08 | Claude Code in 16 Hours: MCP—When to Connect Claude Code to External Systems
Understand MCP server forms, scope, and call approval so external tools and services can be connected safely.
22 · MCP: Connecting Claude to the outside world
Let’s talk about a pitfall first - when I installed the first MCP server, I struggled with the terminal errors for almost an hour.
At that time, I wanted to connect a server that connects to the database, so I copied a command from the README of a certain warehouse. It probably looked like this: claude mcp add db -- npx server --transport stdio. Knock on it, but it won’t connect. I first suspected that it was the network, and then I suspected that the package was not installed properly. I deleted and reinstalled it several times. npx downloaded the package repeatedly, and the progress bar ran back and forth - just couldn’t connect.
Later, I looked through the official documentation and discovered that the parameters were placed in the wrong position. The official statement is clear: All options (--transport, --env, --scope) must be “before” the server name, and -- (double dash) is followed by the command to start the server. In the above command, --transport stdio comes after -- and is regarded as a parameter passed to the server, so it is naturally not recognized. In addition, stdio is the default transmission, so there is no need to write it at all - the correct way to write it is claude mcp add db -- npx server, which connects in seconds.
I say this pitfall to save you an hour of detours: MCP itself is not difficult, the difficulty is all in the details of “location”, “scope” and “whether approval is required”. Today, we will fill in these pitfalls one by one, and finally let you run through a real server with your own hands.
After reading this article, you will get:
- In one sentence, explain what MCP is and which shortcomings of Claude it makes up for.
- When to use the three server forms (local stdio, remote HTTP, and deprecated SSE), a table explains clearly
- The correct way to write the
claude mcp addcommand, and the differences between the three scopes oflocal/project/user - After adding the server, how does the tool appear in front of Claude? Does it require your approval for the first call (echoing the permissions and security of the previous article)
- A practical example that can be followed and gives the expected output: connect to the official document server and verify it in 5 minutes
01 First understand: What shortcomings has MCP made up for?
Let me give the conclusion first: Claude Code is an assistant that “can only work locally” by default, and MCP is the opening for it to unifiedly connect to various external services.
Think back to what Claude was doing in the previous twenty-one chapters - reading your files, changing your code, and running your commands. It’s all a local thing. No matter how smart it is, it can’t touch the work order in your company’s Jira, can’t connect to the data in your production library, and can’t see the designer’s draft on Figma. It cannot reach this information, so you can only copy and paste it yourself.
**Analogy: A docking station with a bunch of interfaces. ** Your laptop is becoming thinner and thinner, and there may only be one or two Type-C ports left on the body, and HDMI, network cables, USB flash drives, and card readers cannot be plugged in. what to do? Connect a docking station - Connect it with one cable, HDMI, network cable, USB, and power supply are all connected. MCP is this extension for Claude: one after another, a bunch of external service tools are placed in front of it.
The official definition is:
Claude Code can connect to hundreds of external tools and data sources through the Model Context Protocol (MCP), an open source standard for AI tool integration. The MCP server provides Claude Code with access to your tools, databases, and APIs.
Here is a keyword: Open source standards. MCP (Model Context Protocol, a set of open specifications that stipulates “how AI adjusts external tools”) is not a private protocol that Anthropic plays behind closed doors, but a set of open standards. The advantage is “once connected, can be used everywhere” - the MCP server you write for a certain database can be used by Claude Code, and other clients that support MCP can also be used.
When should you remember it? The official judgment is particularly simple:
Connect to a server when you find yourself copying data from another tool (such as an issue tracker or monitoring dashboard) into chat.
Let’s take a few scenarios that you are likely to encounter and experience what you can do after connecting:
- “Implement the functions described in JIRA work order ENG-4521, and then open a PR on GitHub” - It reads the work order by itself, without you having to relay it.
- “Based on our PostgreSQL database, find out the 10 user mailboxes that have used new features this month” - It checks the database directly, without you needing to export CSV and then paste it in
- “Update the email template according to the new design on Figma” - It will read the design draft without you taking screenshots to describe it.
💡 To summarize in one sentence: Claude will only touch local files and commands by default, and cannot reach your database, work orders, and design drafts; MCP is the unified external interface, and a bunch of external service tools are placed in front of it at one time.
02 Three server forms: running locally or connected to the cloud
There is more than one type of MCP server. Only by understanding their differences can you know how to modify the copied commands. **The core question is: Is this server running on your own machine, or is it hosted on a certain URL? **
**Analogy: Some of the devices plugged into the docking station are on the table, and some are on the other side of the wall. ** U disks and card readers are local devices plugged into the docking station and right at your fingertips; the other end of the network cable is connected to the server in the computer room, which is far away. MCP servers are also divided into two categories - one that runs on your machine as a local process, and one that is remotely hosted and you connect to it.
The official provides several transmission methods (transport, that is, “how to communicate” between Claude Code and the server). There are only two that are used daily, plus one that has been eliminated:
| Form | Where to run | How to add | Suitable |
|---|---|---|---|
| stdio (local process) | Start as a child process on your own machine | claude mcp add <name> -- <command> | A tool to directly read local files, control local browsers, and connect to local database sockets |
| HTTP (remote hosting) | On a certain website | claude mcp add --transport http <name> <url> | Cloud services (Sentry, Notion, GitHub, etc.), official recommendation |
| SSE (remote, deprecated) | On a certain URL | claude mcp add --transport sse <name> <url> | You can only see it in the old configuration, don’t use it if you can use HTTP |
Here are a few points that are most likely to be missed by novices:
**stdio server does not write --transport. ** Because the local process uses the default stdio transmission, there is no need to specify it **. Its essence is the string of commands after -- - those are the instructions of Claude Code “how to run this server”. For example, the official Playwright (a tool that allows Claude to operate the browser) example:
claude mcp add playwright -- npx -y @playwright/mcp@latestnpx -y @playwright/mcp@latest after -- is the startup command, and -y tells npx not to confirm and install directly. stdio server is equivalent to “Claude will help you pull up a small program in the background”, so the prerequisite for it to run is that there is a corresponding environment on your machine (this Playwright requires a newer Node environment, the specific version shall be subject to its documentation).
**HTTP is the first choice for Lianyun services. **Official original words:
HTTP server is the recommended option for connecting to remote MCP servers. This is the most widely supported transport method for cloud services.
Like Sentry, Notion, and GitHub, you don’t need to install anything locally, just give it a URL and it will connect:
claude mcp add --transport http sentry https://mcp.sentry.dev/mcp**You only need to know SSE (Server-Sent Events), don’t use it new. **Officially clearly marked “Deprecated”:
The SSE (Server-Sent Events) transport is deprecated. Please use an HTTP server where available.
SSE is generally only seen when taking over someone else’s old .mcp.json, and new servers will all be HTTP.
💡 In one sentence: use stdio for local tools (
--followed by the startup command, do not write transport), use HTTP (for URLs, officially recommended) for cloud services, SSE has been deprecated, replace it when you see it.
03 How to add a server: command, scope, and details of the pitfalls
Now that we know the form, let’s see how to add it. Two orders to conquer the world, the rest is all details.
Add remote HTTP server——--transport http, give name and URL:
claude mcp add --transport http notion https://mcp.notion.com/mcpAdd local stdio server - do not write transport, -- followed by the startup command:
claude mcp add airtable -- npx -y airtable-mcp-serverThis is the pitfall that was planted at the beginning. The official emphasized it with a Note box, which is worth sticking on your forehead:
All options (
--transport,--env,--scope,--header) must precede the server name. Then--(double dash) separates the server name from the commands and parameters passed to the MCP server.
To put it bluntly, just one sentence: claude mcp add puts all his own switches forward, and the ones behind -- are all for the server. If one position is missing, the order will not be recognized.
Three scopes: In which projects this server can be used
There is an unavoidable choice when adding a server: **Is this server only used for the current project, shared with the entire team, or used for all your projects? ** This is what “scope” is responsible for, specified with --scope.
**Analogy: How to share a printer in the office. ** Some printers are only connected to your computer, and only you can print (local); some are connected to department sharing, and are registered in the department asset list, and can be used by all colleagues in the group (project, shared through git); some are your own portable printer, which can be used in any workstation or conference room (user, cross-project). The three scopes are these three types of “wherever they are placed, who can reach them.”
For the three official scopes, see this table for the differences:
| Scope | In which projects to load | Share with the team | Where to save |
|---|---|---|---|
local (default) | Current project only | No, private only to you | ~/.claude.json (under the project entry) |
project | Current project only | Yes, via version control | .mcp.json in the project root |
user | All your projects | No, private only to you | ~/.claude.json (top-level mcpServers) |
How to choose? Just remember these three sentences:
- Personal experiment, bring credentials and don’t want to enter the repository →
local(default, don’t write--scopeand that’s it) - I want the whole team to use the same set →
project, write it into.mcp.json, submit it to git, teammates can pull it down and have it - You use it every day across projects →
user, add it once and it can be used in all projects
# 跨所有项目都能用(user 作用域)
claude mcp add --scope user --transport http sentry https://mcp.sentry.dev/mcp

# 跟全队共享(project 作用域,写进 .mcp.json)
claude mcp add --scope project --transport http github https://api.githubcopilot.com/mcp/
I have made a habit of using it myself: For things like Sentry and GitHub that I use every day, always add user** - only add it once to the first project, and it will automatically be added when you open a new project later, so you don’t have to repeat the configuration. At first, I tried to save trouble by using the default local, but as a result, I had to add it again when I changed the project. It took me a few times to realize that it was time to add user. Only when “this server is exclusive to this project and must be used by collaborators”, I use project to write .mcp.json.
You can also write .mcp.json directly
You can also handwrite the file in the project scope. It is essentially JSON, and the fields of HTTP and stdio servers are different:
{
  "mcpServers": {
    "claude-code-docs": {
      "type": "http",
      "url": "https://code.claude.com/docs/mcp"
    },
    "playwright": {
      "type": "stdio",
      "command": "npx",
      "args": ["-y", "@playwright/mcp@latest"]
    }
  }
}
HTTP writes url, stdio writes command and args. It is checked into the repository, which is equivalent to leaving a “configuration as code” for the team - when others clone it and start Claude Code, they will read this configuration. Pay attention to the official reminder: After changing .mcp.json, you have to exit and restart the session to take effect, because Claude Code only reads it at startup.
💡 To summarize in one sentence: Use
--transport httpfor HTTP, use--and commands for URLs and stdio, put all switches in front of their names; remember three sentences for scope -localfor personal experiments,userfor cross-projects, andprojectwritten in.mcp.jsonfor whole-team sharing.
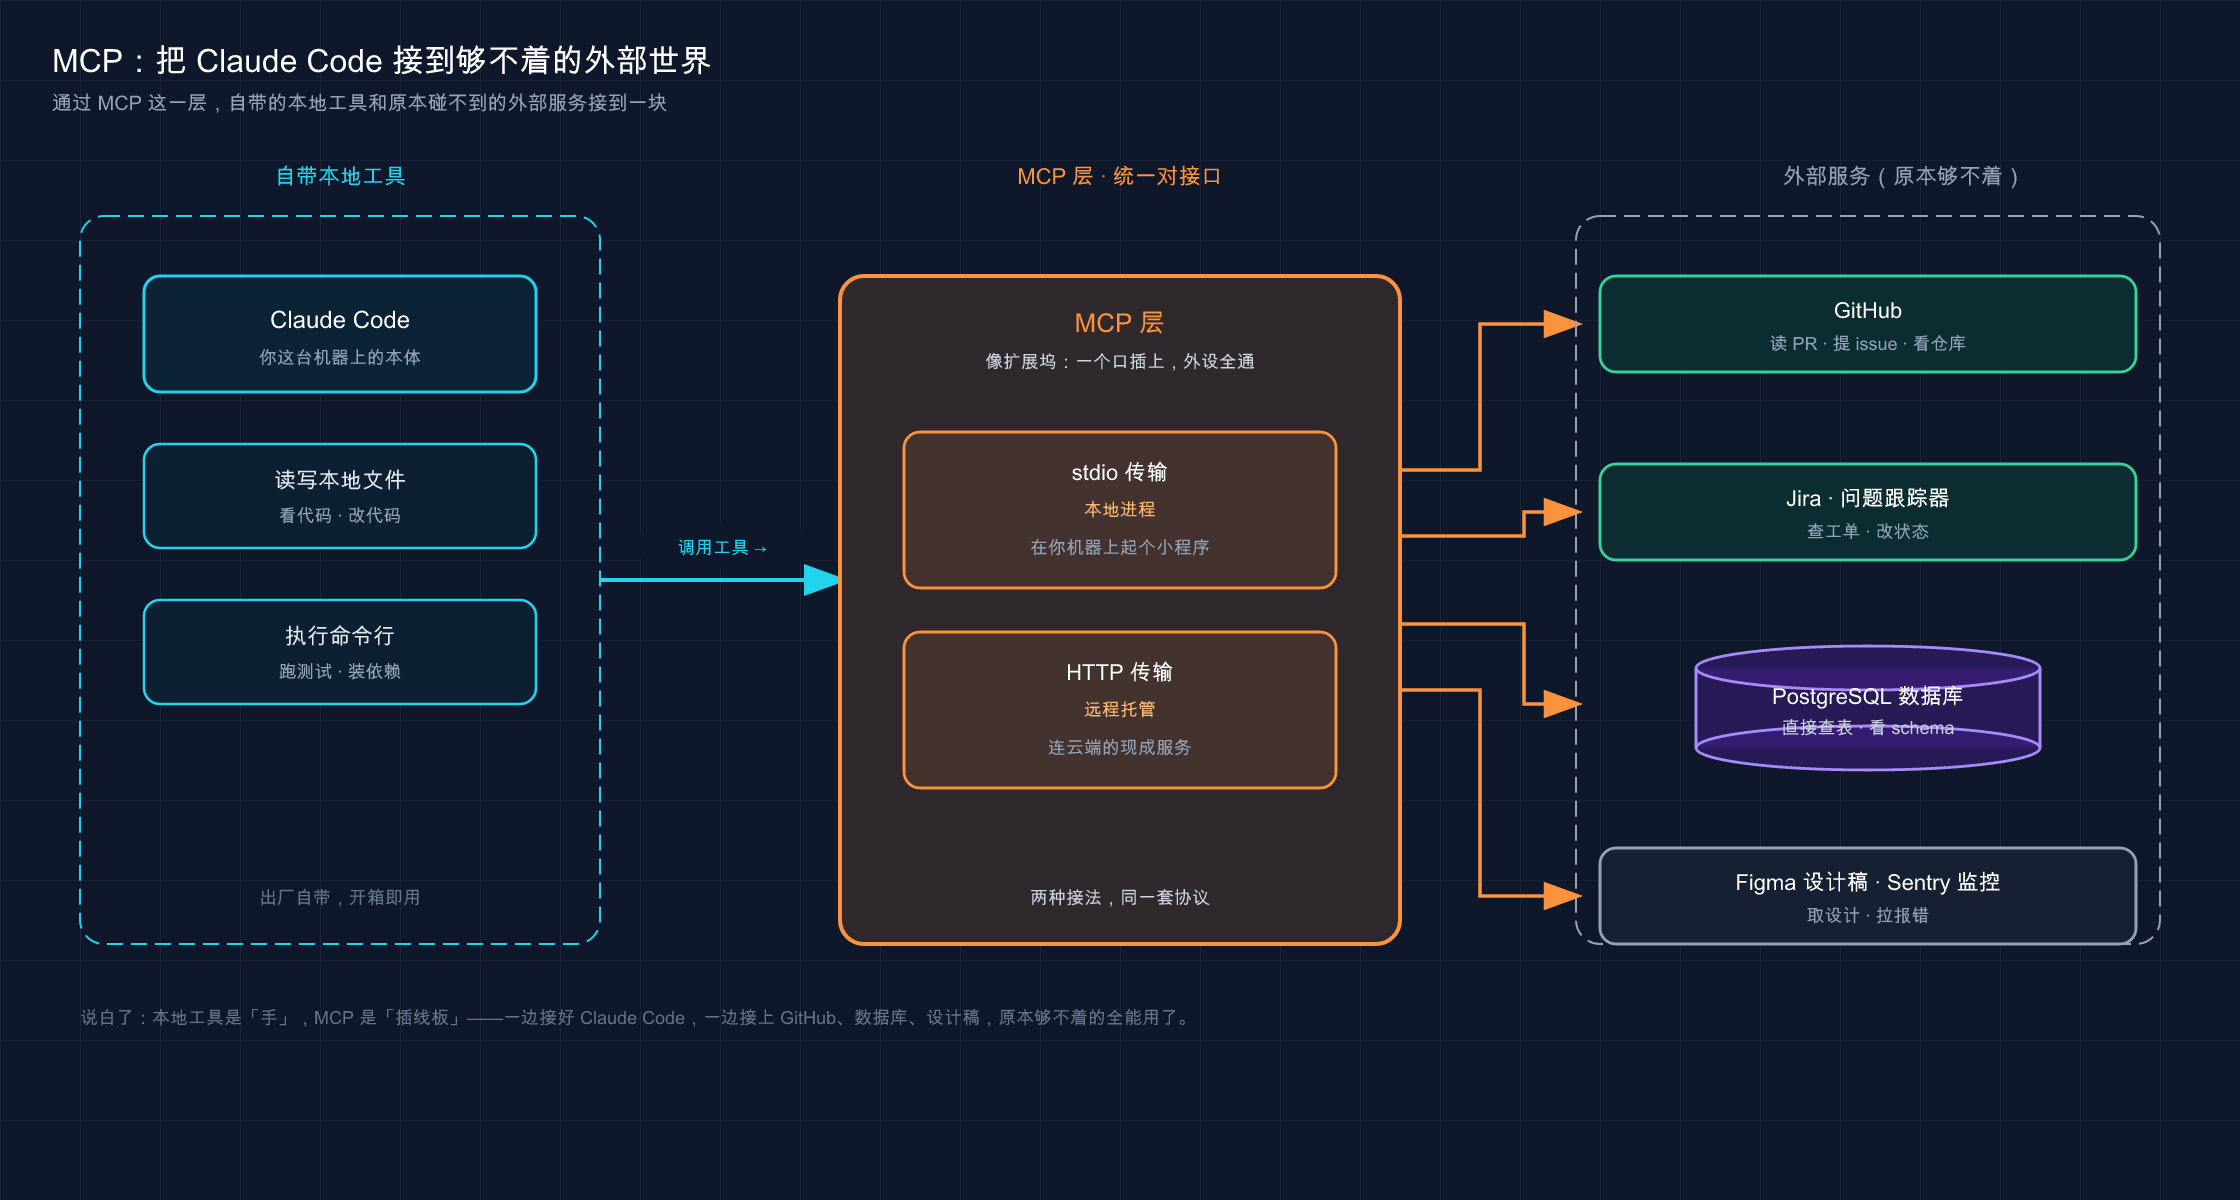
This picture depicts the role of MCP as the “extension dock” in the middle: on the left are the local tools that come with Claude Code (reading and writing files, running commands), and on the right are the external world (GitHub, Jira, PostgreSQL, Figma, Sentry) that are originally out of reach - the MCP layer in the middle uses stdio and HTTP lines to connect them together, allowing external service tools to appear directly in front of Claude.
04 After adding: How does the tool appear and does it require your approval to call it?
The server is added, and what happens next is exactly the same as the permissions mentioned in the previous article.
Let’s first talk about how tools “appear”. Each MCP server comes with a set of tools (such as GitHub server with “read PR” and “open issue”). After adding it, these tools will be registered in front of Claude, and it can adjust them like its own tools. How do you confirm that you are connected? What tools do you use? Two commands:
# 在终端:列出所有配置的 server 和它们的连接状态
claude mcp list
# 在 Claude 会话里:看每个 server 的状态和工具
/mcpclaude mcp list will show you the status tags of each server. You need to know these tags (directly related to “why my server is not working”):
| Status | Meaning |
|---|---|
✓ Connected | Connected and usable |
! Needs authentication | Passed but you need to log in (OAuth or with a token), go to /mcp for authentication |
✗ Failed to connect / Connection error | Failed to connect (the server did not respond, or the command itself failed), check the command / URL |
⏸ Pending approval | The project server from .mcp.json has not been approved by you yet |
That ⏸ Pending approval is the first part “Do you want your approval?”. The official design is very cautious:
For security reasons, Claude Code will prompt for approval before using the project-wide server from the
.mcp.jsonfile.
**Why do we need this step? ** Think about it: you cloned someone else’s repository, and the .mcp.json inside said “Run a local server at startup”. If it runs automatically without your consent, it is equivalent to someone else’s warehouse secretly starting a process on your machine. This approval is to stop this - echoing the main line of security in the previous article, stuff from unfamiliar sources, please stop and wait for your nod. (If you make a mistake with your swipe, claude mcp reset-project-choices can reset it.)
The second approval is when the tool is first called. The official said in the quick start:
The first time Claude calls the server, it will ask for permission to use the new tool. Approve it to continue.
In other words, with the addition of server ≠ Claude can use its tools at will. The first time it really wants to adjust a certain MCP tool, it will stop and ask you - it is the same permission mechanism as it asked you before changing files and running commands in the previous chapter. It won’t move until you approve it.
There is also a thoughtful detail to help you “verify the authenticity”: When Claude calls the MCP tool, the tool call in the output will be marked with the name of the server. This is the basis for you to confirm that “this answer really comes from an external service and is not made up by it.” For example, after connecting to Sentry, you can rest assured when you see sentry marked next to the tool call - you have indeed checked the real error report, and it is not a fake one made by the model.
💡 To summarize in one sentence: After the MCP tool is added, it will be registered in front of Claude, but there are two approval gates - the first time the server of the project
.mcp.jsonis loaded, you need to approve it, and the first time the tool is called, you need to approve it; the output is marked with the server name, which is your credential to confirm that “the answer really comes from outside.”
05 Trust issues with third-party servers: Don’t connect everything to them
This section is the shortest, but cannot be skipped - it directly connects to the safety boundary of the previous article.
Let’s put the official warning here intact. It is a red box Warning in the document:
Before connecting to each server, verify that you trust the server. Servers that fetch external content may put you at risk for prompt injection.
To put it in adult language: MCP server is a code/service written by a third party, and Anthropic will not do a security audit for you. The connectors in the official directory (Anthropic Directory) have undergone basic review, but you have to judge whether the servers outside the directory are trustworthy or not.
**Analogy: Install a third-party dependency package into a production project. ** You wouldn’t casually npm install a package you’ve never heard of and whose maintainer you don’t know, and let it run into your online code - you would first check who is maintaining it, how many people are using it, and what its reputation is. The essence of MCP server is such a “third-party dependency”: Consider the source before installation, especially the kind that will capture external content (web pages, work orders, emails).
Why are servers that capture external content more risky? Because that is the hotbed of prompt injection - the previous article specifically talked about this pit. To put it simply: there may be a malicious command “written for AI” hidden in the web page/work order captured by the server, and Claude may be led astray after reading it. The more “wild” the server is, the greater the risk.
Here are a few rules for connecting to servers that you can use:
| Scene | Accept or not |
|---|---|
| Connectors reviewed in the official directory (Anthropic Directory) | ✅ Choose these first |
| Servers officially produced by big manufacturers (GitHub, Sentry, Notion official) | ✅ Relatively assured |
| Any third-party server with few stars on GitHub | ⚠️ Read the source code first and think clearly before picking up |
| Let a certain server get the write permission of your production library | ❌ Read only if you can, don’t write |
The last one is especially important. In the official example of connecting to the database, the DSN specifically says readonly (read-only account) - If you can use read-only credentials, do not use writable credentials. This is the most practical way to minimize the risk.
💡 In one sentence: MCP server is a third-party code, Anthropic will not audit it for you; verify your trust before connecting, give priority to official directories and official servers of major manufacturers, and be careful about injection prompts when capturing external content servers. Always use read-only accounts for databases.
06 Hands-on: Connect to a real server and run through in 5 minutes
Just watch and practice fake moves. Below I will take you to the official document server - it is a hosted HTTP server, no login required, no configuration required, it is most suitable for practicing. The whole process does not rely on any complex environment you already have.
This server is a remotely hosted HTTP service, and it requires an Internet connection. If access to
code.claude.comfrom China fails, first open “Magic Internet” and try again.
Step 1: Add server (in the terminal, not in the claude session)
claude mcp add --transport http claude-code-docs https://code.claude.com/docs/mcpExpected: Print a confirmation line, similar to Added HTTP MCP server claude-code-docs with URL: https://code.claude.com/docs/mcp to local config. See Added = configuration has been written (note that it says local config, which is the default local scope and only takes effect in the current project).
Step 2: Check connection status
claude mcp listExpected: claude-code-docs appears in the list with ✓ Connected next to it. See this green check = really connected. If ✗ Failed to connect is displayed, it is probably because the network is not connected - follow the prompt above to turn on Magic Internet and try again.
Step 3: Enter the session and ask it to use this server
claudeAfter entering, type (name the server specifically to ensure that it uses MCP instead of using its own network search to answer the same question):
用 claude-code-docs server 查一下 MCP_TIMEOUT 这个环境变量是干什么的Expectation: Claude will stop and ask you if you want to approve when calling this server for the first time (this is what Section 04 says “Approve when the tool is called for the first time”) - approve it. It will then return the description of MCP_TIMEOUT (used to configure the startup timeout of the MCP server), and the tool call will be marked with claude-code-docs next to it in the output. Seeing this mark = the answer is really found from the document server, not from the model memory.
Step 4: Cleanup (optional)
After practicing, I want to dismantle this server:
claude mcp remove claude-code-docsExpected: Print removal confirmation. Run claude mcp list again, claude-code-docs is no longer in the list.
The official reminder is worth remembering: Each connected server will occupy a little context window (its tool name and description must be loaded into each session). As mentioned in the previous article, the workbench will become stupid if it is overcrowded -
removeunused servers in time to free up that little space**.
After completing these four steps, you will have gone through the complete link of “add server → check status → call for approval → tear down”. **When connecting any server in the future, the essence is the same process. It is nothing more than changing the name, changing the URL or command, and adding --scope and authentication as needed. **
💡 One sentence summary: The most reliable way to practice is to connect to the official document server -
addto add,listto see the green check, call it by name in the session and approve it,removeto dismantle it; run through this link by yourself, and it will be more effective than memorizing ten commands.
07 Summary
In this article, we connect Claude to the outside world - from “only working locally” to “connecting to a bunch of external services through one port”, all thanks to the MCP expansion dock**.
Let’s review the core points together:
| What you have to do | What to use | Key points |
|---|---|---|
| Understand what MCP does | An open source docking standard | Claude cannot reach external services by default, and MCP provides unified external connections |
| Connect to local tools | stdio | claude mcp add <name> -- <command>, do not write transport |
| Connect to cloud services | HTTP | --transport http to the URL, official recommendation |
| Decide where to use the server | Scope | Personal local, cross-project user, whole team project (write .mcp.json) |
| Confirm whether it is connected and what tools are available | claude mcp list / /mcp | Check the status of ✓ Connected, ⏸ Pending approval |
| Control how Claude uses tools | Two approval gates | The project server loads the batch for the first time and the tool calls the batch for the first time |
You should now be able to: Understand which shortcomings of Claude MCP makes up for, distinguish how to add stdio and HTTP servers, use --scope to allocate the server to the appropriate range, and use claude mcp list and /mcp to verify the status after adding it. Understand that there are two permission gates after the tool appears in front of Claude, and know how to weigh trust before connecting to a third-party server. **This set of “external capabilities” is the key that allows you to upgrade Claude from a “local code assistant” to one that can directly operate your entire tool chain. **
This interface has filled up all the pitfalls of the first hour of tossing - **Remember “put the switch before the name, -- followed by the command”, and you will save yourself a lot of detours. **
Next article 23 “Subagent” - MCP allows a Claude to do more things, but with more tasks, a Claude will be too busy and the context will become more and more full**. The next article will teach you to change your thinking: instead of letting one Claude do the hard work, hire a team of dedicated underlings with independent contexts to divide the work - the main agent assigns work, and the sub-agents do their own work, and their respective contexts do not contaminate each other. Think about it: If “checking logs”, “writing tests” and “running builds” can be split up among three guys who don’t interfere with each other, wouldn’t it be much easier than having one Claude to switch back and forth?