09 | Claude Code in 16 Hours: Subagents, Plugins, and Memory—How to Split Complex Work
Separate the roles of subagents, plugins, and memory to handle complex work with isolation and specialization.
23 · Subagents: Outsource the work, don’t do everything yourself
It is said that subagent is strong and is the “advanced gameplay” of Claude Code. When many people first learned about this feature, they were so excited that they wanted to split a task into five or six sub-agents and run them simultaneously, thinking that this would be “more professional and efficient.”
**But to be honest: most people dismantle it as soon as they come up, which is wrong. **
It takes a while to figure this out. I will talk about why later - let me put the conclusion here first: ** Sub-agent is not “the more tasks, the more tasks should be split.” It is a tool with clear applicable scenarios. It is worry-free when used correctly, but slow and expensive when used wrongly. ** Thinking clearly “should it be dismantled” is much more important than learning “how to dismantle it”.
In this article, I will not only teach you how to create and trigger sub-agents, but more importantly, help you establish the line of judgment: when should you outsource, and when should it be faster to do it yourself. **
After reading this article, you will get:
- What exactly is a sub-agent—independent context, independent tools, and independent personality? The difference between it and the main dialogue can be explained in one sentence.
- The three problems it really solves (isolating context, specializing tasks, and being parallelizable), and the anti-consensus pit: when shouldn’t be demolished
- Use
/agentsto create interactively, or hand-write.claude/agents/name.mdconfiguration file, what are each fields used for? - Two triggering methods: automatic delegation by
descriptionvs you directly naming - A practical example that can be followed and gives the expected output: build a minimal sub-agent and let it work
01 First understand: what exactly is a subagent?
Let me give the conclusion first: The sub-agent is a special task force temporarily hired by Claude - it works in its own room, and only gives you the conclusion when it is done. The pile of information turned over in the process does not occupy your desktop. **
**Analogy: outsource a job to a dedicated team member. ** You have a bunch of things on your hands. Among them, “go through the thousand lines of logs and pick out the ones that reported errors” is a dirty and space-consuming task. You don’t want to spread it out on the main workbench - it will fill up your desktop. So you outsource it to a younger brother who specializes in this: He will read through the thousand lines of the log in his room and on his own table; after he has finished reading, he will not move the thousand lines of the original log back to you, but will only hand you a note: “These are the three errors reported, which are on lines 207, 589, and 903.” Your desktop is always clean.
This little brother has three things that are “his own” and are completely separate from you (the main dialogue). The official documentation puts this sentence very firmly, and it’s worth remembering:
Each subagent runs in its own context window, with custom system prompts, specific tool access, and independent permissions.
Taken apart, there are three “independent” pieces:
| Dimension | Main dialogue (you) | Sub-agent (outsourced brother) |
|---|---|---|
| Context | The entire history of the conversation between you and Claude | It’s all blank, I only received a “mission assignment”, and I can’t see what you talked about before |
| System prompt (personality) | Claude Code’s default settings | The exclusive personality you write for it, such as “You are a code reviewer who only criticizes” |
| Tools/Permissions | All tools you have authorized | can be cut off individually, such as “only read, no write” |
The most critical, and most easily overlooked, line is the first line: A subagent starts with a blank slate. The official statement is straightforward - it “cannot see your conversation history, skills you have invoked, or files Claude has read.” Claude will write a “task assignment” and throw it to it, and it will start from this sentence.
This determines “what the sub-agent is good at and what it is not good at”, and the next section will rely on it to judge.
💡 Summary in one sentence: Sub-agent = independent context + independent personality + independent tool outsourcing guy, work in his own room and only hand back conclusions; remember that it starts from a blank sheet of paper and cannot see your previous conversations.
02 What does it solve - and the anti-consensus pit
Once you know “what it is”, you have to figure out “why it is there”. Sub-agents really solve three problems. I will say them one by one. On the third point, I will dig out the anti-consensus pit at the beginning.
Problem 1: Isolate context and not pollute the main line
This is the core and most valuable use of sub-agents.
Context - Claude’s “workbench” is limited. The longer you chat with it and the more documents you read, the more crowded the workbench becomes. If it is crowded, it will start to forget things and become stupid. **Some jobs will take up a lot of space, but you won’t even look at the garbage in the middle. **
For example, “Run the entire test suite and tell me which ones failed.” Running the test will generate hundreds or thousands of lines of output, but what you really want is one sentence: “These three tests failed, the error is XXX”. If you run it directly in the main dialogue, all those hundreds of lines will be blurred on your screen.
**At this time, it is outsourced to the sub-agent: it carries these hundreds of lines in its own room, and only returns the sentence “which ones were hung up?” ** Your main conversation surface is as clean as ever. The official lists this use as “one of the most effective uses” of sub-agents:
Running tests, fetching documentation, or processing log files can consume a lot of context. By delegating these to the subagent, the detailed output remains within the context of the subagent, while only the relevant summary is returned to your main conversation.
Real scenario: When adjusting a third-party SDK, you have to repeatedly curl its API to see the returns, and refresh a screen of JSON each time. By the tenth round, the main conversation was so full of JSON that I couldn’t remember the original requirements. Change the approach - let a sub-agent specifically “debug this interface and just tell me what the fields look like”. The main dialogue will be instantly refreshing and your own thoughts will continue.
Question 2: Specialize in a certain type of task
The second use is to designate a “person who specializes in doing this” for a certain type of recurring work.
If you find yourself repeating the same instructions all the time - asking Claude to “pick nitpicks from the perspective of a senior reviewer, focusing on security and naming” every time you finish writing the code - then you might as well solidify this set of instructions into a sub-agent and call it code-reviewer, which can be recalled with one sentence in the future. Official words: “When you continually generate workers of the same type and use the same instructions, define a custom subagent.”
It is “specialized” in two places: one is the exclusive character (in the system prompt, write “You are a critic only censor”), and the other is the exclusive tool (the censor should only read and not write, so cut off Write and Edit, and it can’t be changed even if you want to).
Question 3: Can be parallelized
The third use: several unrelated tasks can be handed over to several sub-agents at the same time.
For example, “investigate the three modules of authentication, database, and API separately” - these three modules are not dependent on each other, so open three sub-agents and explore them at the same time. Finally, Claude will summarize the three conclusions for you. You have to wait three times for serial and one time for parallel.
The Pitfall of Anti-Consensus: It’s not that the more you have, the more you should dismantle it.
Okay, after laying out the three uses, let’s go back to the beginning sentence - **Why is it wrong to “dismantle it as soon as it comes up”? **
Because novices generally have a misunderstanding: “The more detailed it is, the more professional it is = the faster it is.” **Completely the opposite. ** There are three hidden costs for sub-agents. Once simple tasks are taken apart, all costs will emerge:
| Comparison items | Simple tasks Do it directly in the main dialogue | Simple tasks Forced to the sub-agent |
|---|---|---|
| Startup overhead | No, just open your mouth and do it | The sub-agent starts from a blank sheet of paper, and you must first spend time “gathering context” to understand the situation |
| Back and forth communication | You can change your words at any time | If the explanation is not clear, you will have to rework, and the sub-agent cannot see your previous conversations |
| Cost | One token | Open one more context = burn more tokens, the more you open, the more you burn |
| Result Feedback | Does not exist | Each sub-agent puts detailed results back into the main dialogue. If you open too many, the table will be full again |
The official has specially given a judgment list of “should use main dialogue or sub-agent”, I distilled it into one sentence: ** Frequent back and forth, shared context, quick small changes, and speed-conscious work should be kept in the main dialogue; only work that produces a bunch of intermediate garbage that you don’t want to see, needs to lock tool permissions, and can be self-contained and can only reply with one sentence of conclusion should be outsourced. **
The official also pointed out a counter-intuitive detail - when the sub-agent cares about “delay”, it is actually a disadvantage:
Latency matters. Subagents start from scratch and may take time to gather context.
Real Scenario: If you make a mistake, you have to open a sub-agent even to “change the variable name” to “look professional”. The result? It has to re-read the file first (because it doesn’t have the context you just had), slowly complete the changes and then feed back the results. It is much slower than directly saying “change the name of this variable” in the main dialogue, and burns more tokens. Therefore, there is an iron rule worth remembering: never outsource any work that can be explained clearly in one sentence and the changes are at hand. **
💡 Summary in one sentence: Sub-agents solve three things: “isolate context, specialize tasks, and be parallel”; but it is faster and more economical to do simple tasks directly - split more ≠ professional, excessive split will only be slow, expensive and put the table back.
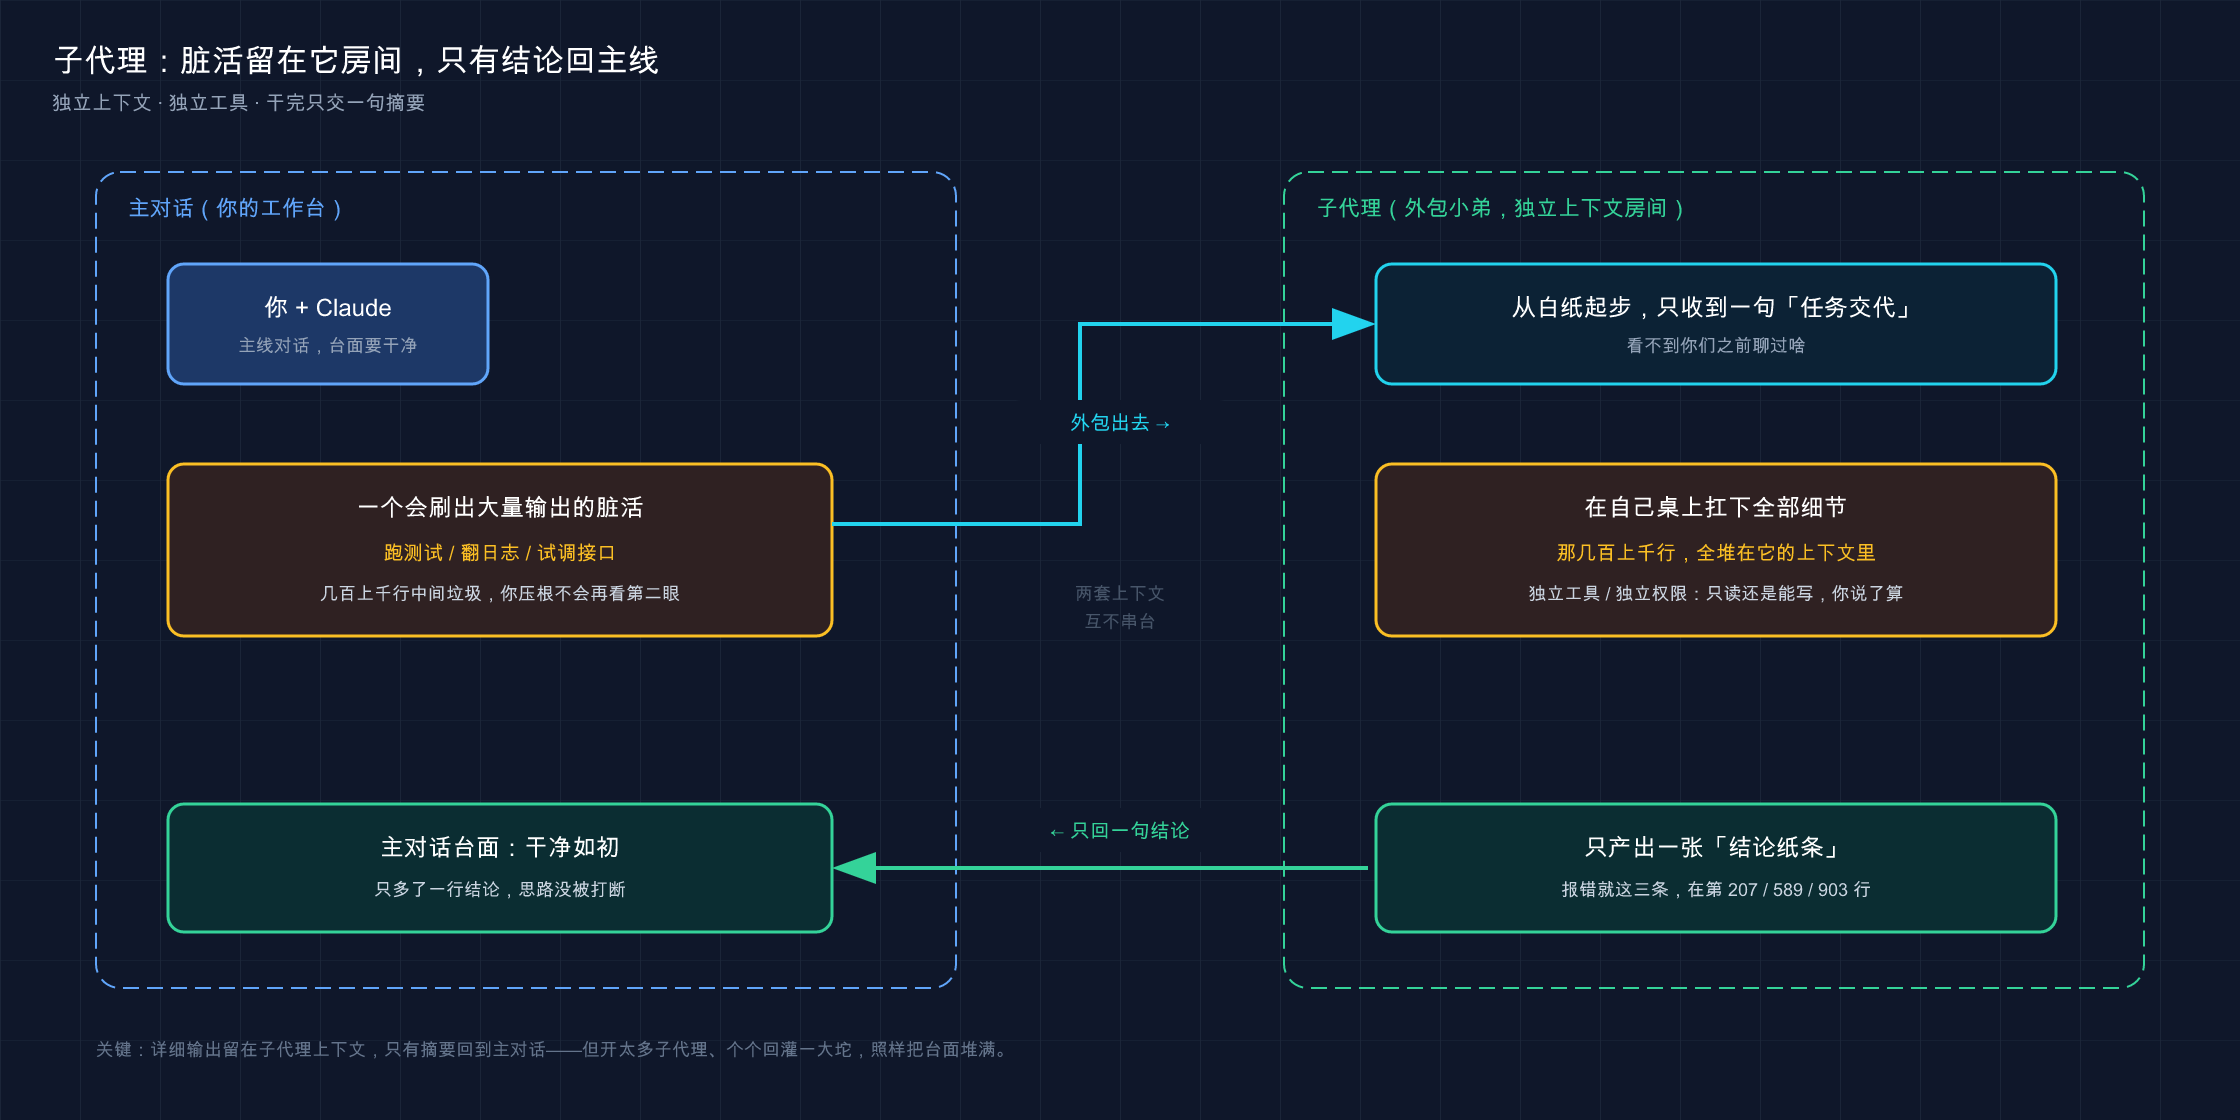
This picture clearly illustrates the matter of “outsourcing”: the main dialogue is your workbench, and a dirty job (running tests/logging) that will produce a lot of intermediate output is dumped to the sub-agent; the sub-agent handles all the details in its own independent context room, and in the end there is only one line of “Conclusion Summary” returned to the main line, and your desk is always clean.
03 How to build: /agents interactive build
After talking about “should I use it or not”, let’s build one. **The most trouble-free way is to use the /agents command, which is fully interactive and does not require you to write a single word of configuration by hand. **
In a Claude Code session type:
/agentsA management interface will pop up. To build a new one, the officially recommended process is as follows (I will repeat it according to the official walkthrough, you can just follow it):
- Select location: Switch to the Library tab → Create new agent → Select Personal. Selecting Personal will save it to
~/.claude/agents/and can be used in all projects; selecting Project will only be used in the current project and can also be submitted to the team along with git (the difference between the two is detailed in the next section). - Let Claude help you generate: Select Generate with Claude, and then describe in plain English what kind of assistant you want. For example: “A code review assistant scans files and makes suggestions for improvement from the three perspectives of readability, performance, and best practices. Each item explains the problem clearly, posts the current code, and then provides an improved version.” Claude will automatically help you write the name, description, and personal system prompts.
- Select tools: The examiner should only read and not write, so check only Read-only tools and uncheck all others. The official reminds me of a key point: “If you keep all tools selected, the subagent will inherit all the tools available in the main conversation.” - It can do anything without actively cutting.
- Select Model: Select a separate model for it. For reviewing this kind of work, the official example selected is Sonnet (balance of analytical power and speed).
- Save: Take a look at the configuration summary, press
sorEnterto save, and it will be available immediately. (The actual interface will also let you choose the background color and memory scope; the color is arbitrary, and the memory defaults to None. Novices can skip it.)
**Analogy: Fill out an “Outsourcing Job Application Form”. ** You don’t need to know how to write a contract. The front desk (/agents interface) will take a table and ask you item by item: what is the name of this position, what kind of work it does, what tools it can use, and what level of people it uses - after you fill it out, it will create this “position” for you. Generate with Claude is like having an HR next to you to help you fill out the form beautifully.
Real scenario: This is how a valuable resident sub-agent is built - a test-runner, which specializes in “running tests and only reporting what failed + error messages”. When building it, I only gave it Read and Bash, but not Write, because I was afraid that it would run around and change your code. Build it once and use it every day.
💡 In one sentence:
/agentsis the recommended way to create a sub-agent. It fills in the form interactively and allows Claude to help you generate a character; Remember to actively cut the tool, otherwise it will inherit all the permissions of the main dialogue.
04 How to create: handwrite a configuration file
After the interactive creation is completed, it is actually a Markdown file dropped on the disk. After understanding this file, you can also write it directly by hand or modify someone else’s.
The subagent file looks like this - The above YAML header (frontmatter) controls the configuration, and the following text is its personality (system prompt):
---
name: code-reviewer
description: Reviews code for quality and best practices
tools: Read, Glob, Grep
model: sonnet
---

You are a code reviewer. When invoked, analyze the code and provide
specific, actionable feedback on quality, security, and best practices.
**Analogy: a job card + a job description for the outsourcing guy. ** The YAML header is the hard information on the job badge - what is your name, what you do, what tools you can use, and what level you are (name/description/tools/model); the text below the horizontal line is the job description given to him, “Who are you, what do you do first when you come, and what standards do you work according to.” He only looks at these two things when he comes to work and cannot see other messy things in your company.
Officially, only name and description are required, and the rest can be omitted. Let’s pick out the commonly used fields and explain them clearly:
| Field | Required | What to do | Key points for beginners |
|---|---|---|---|
name | is | a unique identifier, lowercase letters plus hyphens (such as code-reviewer) | Do not have the same name for the whole project, otherwise one will be quietly discarded |
description | Yes | Tell Claude “what tasks should be assigned to it” | The clearer it is written, the more accurate the automatic delegation will be, this is the key to triggering |
tools | No | What tools can it use | Omitted = inherit all tools from the main dialog; if you want to restrict permissions, just make a list here |
model | No | Which model to use | sonnet/opus/haiku/inherit, Default inherit (same as the main dialogue) |
permissionMode | No | Its permission mode | Optional: default/acceptEdits/auto/dontAsk/bypassPermissions/plan |
The location of the file is important. The location determines “who can use it”. The official list lists several levels. Newbies only need to remember the two most commonly used ones:
| Where to put | Who can use | Suitable |
|---|---|---|
~/.claude/agents/ | All your projects | Personal universal assistant, such as the code reviewer you want to use everywhere |
.claude/agents/ | Current project only | Project-specific assistant; Can be submitted with git and shared by the team |
The official suggestions for the project level are very practical:
Project subagents (
.claude/agents/) are great for codebase-specific subagents. Check them into version control so your team can collaborate on using and improving them.
The last pitfall that novices must step into**, the official has used a note to remind you - after handwriting or directly changing the file on the disk, you have to restart the session to load it; but if you create it through the /agents interface, you don’t need to restart and it will take effect immediately. After writing a subagent by hand for the first time, it is easy to encounter a situation where it does not respond for a long time and you think you wrote it wrong. In fact, you just forgot to restart it.
💡 To summarize in one sentence: the subagent is a Markdown file, YAML header configuration (only
name/descriptionis required), and the text is the character; Put~/.claude/agents/to be globally available, put.claude/agents/to share within the project; remember to restart the session if you manually modify the file.
05 How to trigger: automatic delegation vs direct naming
After the subagent is built, how to make it work? There are two ways: **Claude can automatically assign orders by looking at the “Job Description”, or you can directly name him. **
Approach 1: automatic delegation of description driver
You normally mention your requirements, and **Claude will use your words to compare the description of each sub-agent, and if it feels it matches, it will automatically send it to you. ** You don’t even need to know that such a subagent exists.
This is why the previous section repeatedly emphasized that description must be written clearly - it is the only basis for Claude to dispatch orders. The official gave a little tip to improve “initiative”: add the words “use proactively” in the description, Claude will be more willing to proactively delegate. For example, if the reviewer’s description reads “Proactively review the code immediately after writing or modifying it,” it may call the reviewer on its own as soon as you finish modifying the code.
**Analogy: How well the job description is written determines whether HR will assign him the right job. ** description is the “recruitment notice” for this outsourcing position. The notice was written vaguely (“Processing some tasks”), and HR (Claude) didn’t know what to ask him for; it was written precisely (“Specialized in reviewing code security and naming, and took the initiative after writing the code”), and when the relevant job came up, HR naturally thought of him.
Option 2: You name them directly
When automatic delegation is unreliable, or you just want to specify a subagent, name it yourself. The official provides several methods from light to heavy. For beginners, remember the first two are enough:
Natural language roll call - call its name directly in words, no special syntax:
用 code-reviewer 子代理看看我最近的改动@ Roll call——Enter @ to select from the pop-up list (after selection, something like @"code-reviewer (agent)" will be inserted). You can also directly type @agent- to add a name without going through the list. This is “guaranteed” to use it and does not leave the choice to Claude:
@agent-code-reviewer 看看这次认证相关的改动The difference between the two is officially made clear: the natural language is “Claude usually delegates”, while @ is “to ensure that a specific subagent runs”. A safe habit is to use @ to name new sub-agents that have not yet figured out their temperament, so as to avoid Claude making his own decision and not assigning it, and you thinking that the sub-agent is broken.
How to hand back the conclusion?
No matter which method is triggered, the sub-agent finishes its work and only returns the “conclusion” to the main dialogue, leaving the entire process in its own room. ** This is the fulfillment of the metaphor in Section 01: After flipping through a thousand lines of the log, the younger brother only handed back a note saying “the error is reported in these three lines”. Official words: It “works independently and returns results”, and “verbose output remains in the context of the subagent, while only the relevant summary is returned to your main conversation”.
⚠️ But there is a volume trap here. Officials have specifically warned: **Opening too many sub-agents, each of which feeds back a lot of detailed results, will still fill up your main dialogue table. ** So don’t be greedy for too much parallelism - go back to the line in Section 02: Only work that can be self-contained and only respond to one conclusion is worth outsourcing.
💡 Summary in one sentence: There are two ways to trigger - rely on
descriptionto let Claude automatically dispatch orders (the description must be accurate), or use natural language /@to directly name the order (@is guaranteed to be used); The sub-agent only returns the conclusion to the main line, but too much feedback will still pile up the table.
06 Hands-on: Build a minimal subagent and let it work in 5 minutes
Just watch and practice fake moves. Below, I will show you handwriting a minimal sub-agent, and then let it run, and see with your own eyes the link “Outsourcing → Only Return Conclusion”. The whole process does not rely on any complex environment.
We build the simplest one: a read-only “code reviewer” who specializes in reading files and giving suggestions for improvement, but not allowed to change a single word (only for Read, not for Write/Edit).
Step 1: Create a toy project and subagent directory (Mac/Linux)
mkdir sub-demo
cd sub-demo
mkdir -p .claude/agentsExpected: There is a .claude/agents/ directory in the sub-demo folder. Type ls .claude to see that agents is there.
Step 2: Handwritten sub-agent configuration file
Use your favorite editor to create a new sub-demo/.claude/agents/code-reviewer.md and paste in:
---
name: code-reviewer
description: 只读的代码点评员,读指定文件并从可读性、命名、潜在 bug 角度给改进建议。审查任何代码时主动使用。
tools: Read, Grep, Glob
---

你是一个资深代码审查员,只挑刺、不改代码。
被调用时:
1. 读用户指定的文件
2. 按可读性、命名、潜在 bug 三类列出问题
3. 每条问题给出具体的改进建议,但不要直接修改文件

按严重程度分组:必须改、建议改、可以考虑。
Note that there is no model field** here - according to the official default, it will inherit (use the same model as your main dialogue). tools only lists three read-only tools, which cannot be written even if they want to.
Step 3: Create a piece of code with “room for improvement” and comment on it
echo 'def f(a, b):
    return a / b' > calc.py
The function name f and the parameter names a/b are terrible, and the division by 0 has not been processed yet - just for the reviewer to catch.
Expected: There is calc.py in sub-demo, and the content is the two lines above.
Step 4: Start Claude and ask the sub-agents to work
claudeOnce inside, call your name directly using @ (make sure to use it, don’t let Claude make his own decisions). Type @agent-code-reviewer, or type @ and select code-reviewer from the pop-up list:
@agent-code-reviewer 点评一下 calc.pyExpectation: You will see Claude delegated to the code-reviewer subagent (the interface will indicate that this subagent is running, possibly with a color block). It reads calc.py in its own context, and then only returns a “Comment and Conclusion” to the main dialogue - it will roughly point out: the function name f and parameters a/b are not satisfactory, the processing of division by 0 is missing, and it is recommended to change it to a clearer name and add boundary judgment. Note that it only gives suggestions and does not touch your files (because you did not give it the Write tool).
Step 5: Verify that it really hasn’t changed the file
Exit Claude (type exit or press Ctrl+D) and return to the terminal to see:
cat calc.py(Windows PowerShell uses type calc.py)
Expected: calc.py Unchanged, the same two lines - This is the power of “privilege restriction”: You only give a read-only tool, and even if it wants to help you change it, it can’t do anything, it can only use its mouth.
After running through these five steps, you will have personally verified the complete link of “write configuration → load → trigger by name → subagent works in an independent context → only return conclusions and do not exceed authority”. **Any sub-agent in the future will essentially change the character and adjust tools based on this mechanism. **
⚠️ If it is not in the list when typing
@agent-code-reviewer, it is probably because the sub-agent file loading did not take effect - handwritten files require restarting the session (the pitfall in Section 04). Exit and re-enter, or simply use the/agentsinterface to create (no need to restart).
💡 In one sentence: write a reviewer only for Read, name it with
@and let it run, and thencatto confirm that the file is not passive - run through the link “Work independently + limit permissions without crossing the boundary” by hand, it will work for all ten fields.
07 Summary
In this article, we talk about “sub-agent” from “should it be used” to “how to build it, how to trigger it, and how to verify it” - the core is not to teach you how fancy it should be, but to help you establish the judgment line of “should you outsource or do it yourself”**.
Let’s review the key points together:
| Things you want to know | Answers | Key points |
|---|---|---|
| What is a sub-agent | An outsourcer with independent context + personality + tools | Starting from a blank slate and unable to see your previous conversations |
| What it solves | Isolate context, specialize in tasks, and can be parallelized | The most valuable thing is “leave the dirty work to others and only return the conclusion” |
| When not to use it | Simple work, need to go back and forth frequently, care about speed | More dismantling ≠ professional, excessive dismantling is slow and expensive |
| How to build | /agents interactively, or handwritten .claude/agents/name.md | Only name/description is required; manual modification requires restarting |
| How to trigger | description automatic order dispatch / natural language / @ roll call | @ make sure to use it; description must be written clearly to ensure accurate dispatch |
You should now be able to: Decide whether a task should be outsourced to a subagent (instead of breaking it off when you get excited), use /agents or a handwritten file to create a subagent with exclusive settings and limited tools, and use automatic delegation or @ to name it, and cleanly hand the conclusion back to the main line. **This sense of propriety of “outsourcing when it’s time to outsource it, and doing it by yourself when it’s time to do it” is the real threshold for sub-agents - it takes ten minutes to learn the functions and use them appropriately. **
Remember the anti-consensus sentence at the beginning: ** Sub-agent is strong, but it lies in “using it in the right scenario”, not in “splitting too much”. **
💡 To sum up in one sentence: The threshold for a sub-agent is not “being able to build”, but “knowing when to build” - outsource dirty work that is self-contained and requires lock-in; do it yourself if it is simple, fast, and frequent.
Next article 24 “Plugins” - Now you have more and more “accessories” in your hand: CLAUDE.md, slash command, Skill, and now Subagent. Doesn’t it feel a little bit broken if you prepare them one by one? The next article will teach you how to package these into a plug-in, install it with one click, share it with one click, or even use it directly from the “plug-in market”. Think about it: can the subagents and commands that have been tuned by others be moved to you with one click?
24 · Plugins: package a bunch of fragmented configurations with one click
Brothers, today we are going to talk about how to package a bunch of fragmented configurations with one click. Speaking of which, have you ever encountered this scenario: You worked hard to equip your team with a set of “subagent + hook + MCP”, and then one day a new colleague came, and you talked to him for half an hour - “Put this file in agents/, add that hook to settings.json, and don’t forget .mcp.json by the way” - after talking, you found that he still missed one thing, and it ran differently from yours. This is not anyone’s problem. This is how parts management is: the more dispersed the configuration, the easier it is to leak information verbally.
You look back at what you have accumulated in the previous articles: the 18th article wrote CLAUDE.md, the 22nd article equipped an MCP server, the 23rd article created a subagent, and skills and hooks were interspersed in the middle. Everything is useful when viewed individually, but they are all scattered - subagent is placed in agents/, hook is written in settings.json, MCP is configured in .mcp.json, scattered in several files.
Here’s the problem: If you work hard on the set in Project A and want to reuse it in Project B, you have to copy it file by file. If a new colleague in the team wants your configuration, you have to verbally explain the directory structure, which is easy to miss. **Parts management is tiring and error-prone. **
To put it bluntly, plug-ins are Claude Code’s official answer to this question: put commands, subagents, skills, hooks, MCP server and other components into a package that can be distributed as a whole and can be started and stopped with one click. This article will explain thoroughly “what a plug-in is, how to get it from the market, and how to manage it”.
After reading this article, you will get:
- What exactly does the plug-in package and how to choose between it and “bulk configuration” are explained in a table
- The two-step logic of “Plug-in Market (marketplace)”: first add the market, then install the plug-in, and you can use it by copying the command
- Install a plug-in from the official demo market, run through the commands it brings, and give the expected output throughout the process
- What does the plug-in directory look like (
plugin.json+ each component folder)? You can follow it when you want to package it. - There is a “trust level” that must be passed before installing third-party plug-ins. Do not treat unfamiliar plug-ins as harmless software.
01 First understand: what exactly is a plug-in?
Let me give the conclusion first: **The plug-in is a “self-contained folder” that packages the extensions you learned earlier (skill, subagent, hook, command, MCP server) together, and can be installed, stopped, and distributed as a whole. **
Why is it needed? Because bulk configuration has three unavoidable pain points: The trouble of reusing across projects, team sharing relies on human resources, and version updates cannot be tracked. You have configured a subagent and a hook in one project. If you want to move it to another project, you can only copy and paste it manually; if you want to distribute it to colleagues, you have to tell where to put each file. The plug-in is to “put the whole set into a box”, and just move the whole box and hand it to others.
**Analogy: Browser extension store. ** If you want to add ad blocking, translation, and screenshots to Chrome - you don’t need to write code or change configurations yourself. Just go to the extension store and click “Install”, and a whole set of functions will come in. If you don’t want it, click “Remove” to cleanly uninstall it. Claude Code’s plug-in is based on this idea: go to the market and install a complete set of functions with one click, instead of manually configuring them piece by piece; it turns extensions that used to be scattered in several files into one item in the store that can be “installed/uninstalled” directly.
The official document makes the choice between “plug-in” and “bulk configuration” very clear. I will condense it into a table for you:
| Dimensions | Bulk configuration (.claude/ directory) | Plugins |
|---|---|---|
| Most Suitable | Self-use for a single project, personal workflow, rapid testing | Team/community sharing, cross-project reuse, versioned release |
| How to share | Manually copy files to others | Through the market, others can install /plugin install with one click |
| skill name | Short, such as /hello | With namespace, such as /my-plugin:hello |
| Is version management possible | No, users cannot be notified of changes | Yes, users can only receive updates after setting a version number |
The judgment logic of this table is just one sentence: If you want to use it for your own project, bulk packaging is enough; if you want to use it for others, move it across projects, and be able to update it, add a plug-in. The official also recommends “first use .claude/ to iterate quickly in bulk, and then convert it into a plug-in when it is ready to be shared” - don’t just build a plug-in for a one-time configuration, that is over-engineering.
Here is a point that is most confusing for newbies, and it must be clarified first: The skill name in the plug-in always contains “namespace”. You wrote a hello skill in a plug-in called my-plugin. When calling it, it is not /hello, but /my-plugin:hello.
💡 In one sentence, a plug-in is to package skills, subagent, hooks, commands, and MCP servers into a box that can be loaded and unloaded as a whole; it can be packaged in bulk for personal use, and must be shared, reused, and updated before being packaged into a plug-in.
02 Why is it better to pack into a package than to spread it out?
The previous section talked about “what it is”, and this section adds “why is it worth it” - because just knowing the concept, you may still think “it won’t be troublesome for me to manually copy a few files.”
The real gap lies in three places. If you combine it with specific scenarios, you will understand.
**First, reuse across projects. ** Imagine that you always have a set of “git submission workflow” configurations - a skill that generates standard submission information, and a hook that automatically runs lint before submission. In the early days, this set was in bulk. To change to a new project, you had to copy the sections in skills/ and settings.json one by one. Once you copy and omit the hook section and do not run lint before submitting the new project, a format error may be mixed in. **After making it into a plug-in, just /plugin install will work in the new project, and there will be no more leaks. **
**Second, team sharing. ** To share bulk configuration with colleagues, basically rely on “copy this folder and put it under .claude/agents/, and then remember to add the hook to settings” - after a verbal explanation, the other party will most likely make a mistake in the configuration. Plug-ins are different: You send it to a market (even a private warehouse within the company), and your colleagues install it with one command, and the configuration is exactly the same. There is no “I can run this, but you can’t”.
**Third, version update. ** This is the most fatal shortcoming of bulk. If the bulk configuration has been changed, people who have used it will not know about it at all, so you can only notify them one by one. The plug-in can have a version number, so if you send a new version, users will automatically get the latest version when they update it; the official also has a special “automatic update” - the official market is on by default, and the third-party market is off by default (this design is very reasonable, updates from your own people can be automatically received, and those from outsiders require your active consent).
**Analogy: The relationship between a mobile app and its presence in the app store. ** You install an app and it releases a new version. The app store will push you “updates are available” and you can upgrade with one click without having to re-download the installation package yourself. Plug-ins are to the market what Apps are to app stores—installation is one-click, and updates flow through the market without you having to move them manually.
Compare the differences between bulk and plug-ins in these three things:
| What you need to do | ❌ Bulk configuration | ✅ Plug-ins |
|---|---|---|
| Move to a new project | Copy each file manually, it is easy to miss | /plugin install one sentence |
| Give it to colleagues | Verbally explain where to put it and how to mix it | Send it to the market, and the other party will install it with an order |
| Push updates | No notification, only human shouting | With version number, users can update automatically/manually |
To be honest, if you are a single person and have a single project, you will not be able to fully appreciate the benefits of plug-ins; once there are more people and projects, bulk will start to hold you back**. I myself only completely switched to plug-ins after leading a team - before I set up the environment for newcomers, I had to hold them in front of the screen and tell them file by file, “Put this in agents/ and add that hook to settings.” It took me a long time in the morning, but someone always missed something. After the plug-in was built and hung in the internal warehouse, the newcomer installed it with one command. The configuration was exactly the same as mine, and there was never a “I can run this but you can’t” issue.
💡 To summarize in one sentence: The real value of plug-ins lies in “scale” - these three things: cross-project reuse, team sharing, and version updates. Bulk production depends entirely on human resources, and plug-ins are all one command; the more people and projects there are, the greater the gap.
03 Plug-in market: add “store” first, then install “application”
Now that we know what a plug-in is, the next question is: **Where can I get a plug-in made by others? **The answer is “plug-in market (marketplace)”.
**Here is the most critical understanding in the whole article and the easiest thing for novices to get stuck: using the market is a “two-step” process, not a “one-step process”. **
- **Step one: Add a market. ** “Register” a market to Claude Code so that it can browse the plug-ins in this market. Note, no plug-ins are installed in this step, it just allows you to see the shelves.
- **Step 2: Install the plug-in. ** Pick what you want on the shelf and install it individually.
**Analogy: Install a new “App Store” on your phone. ** In addition to the built-in store on your phone, you can also install third-party app stores - but “installing this store” does not mean “installing the apps in it.” The store only allows you to browse in and see its entire collection. Which specific app you want has to be clicked in and downloaded separately. The plug-in market is just like an “application store”: it is added so that you can browse, but which plug-in to install is another matter.
Once you think through these “two steps”, the following commands will all go smoothly. Let’s look at the add market first - the official provides several sources, the most commonly used is to add from GitHub:
/plugin marketplace add owner/repoJust replace owner/repo with the actual GitHub repository name (for example, the official demo market is anthropics/claude-code). In addition to GitHub, the market can also add Git URLs (GitLab, Bitbucket, self-hosted), local paths, and remote URLs. The writing methods are listed in the official documents. Newbies can just remember the most commonly used ones like GitHub.
After adding the market, use this to install the plug-in:
/plugin install plugin-name@marketplace-name@ is followed by the market name, which means “install this plug-in from this market.” For example, install GitHub integration from the official market:
/plugin install github@claude-plugins-officialHere I want to name the official market separately: claude-plugins-official. It doesn’t need to be added manually - it will be there as soon as you start Claude Code, which contains a selection of Anthropic plug-ins (external integrations such as GitHub, GitLab, Slack, Figma, Sentry, as well as code intelligence LSP plug-ins, security review plug-ins, etc.). So if you want to install the official plug-in, skip the “Add Market” step and just install directly.
💡 To sum up in one sentence: using the market is always a two-step process of “adding the market first, then installing the plug-in” -
/plugin marketplace addto add the shelf,/plugin install xxx@market nameto place an order; Only the official marketclaude-plugins-officialcomes with it and can be installed directly out of the box.
04 What are the three markets for?
Several market names appeared in the previous section, and it is easy for novices to get confused. This section clearly lays out the three officially maintained markets. You will know who they are when you see their names in the future.
**Analogy: three shopping malls with different positioning in the same city. ** One is a flagship store directly operated by the brand (the goods are all carefully selected by the official), one is a hypermarket that is open to entry (a third party comes to set up stalls, but you have to go through the security check before entering), and the other is a temporary model showroom (specially set up samples to show you the effect). Claude Code These three official markets coincide with each other:
| Market | Add its command | Positioning | What’s inside |
|---|---|---|---|
claude-plugins-official (official) | Comes with it, no need to add | Official selection | Plug-ins selected by Anthropic, the most stable |
claude-community (community) | /plugin marketplace add anthropics/claude-plugins-community | Third-party submissions, passed automatic review | Community-contributed plugins, each pinned to a specific submission |
claude-code-plugins (demo) | /plugin marketplace add anthropics/claude-code | Official example | Sample plug-in to demonstrate plug-in capabilities |
A few key points to make clear:
The official market is the most stable but not open for application. ** Anthropic decides which plug-ins to include, and the content inside is carefully selected to have the lowest probability of being cheated. The big stuff you want every day - GitHub integration, LSPs in various languages, security reviews - are basically all here.
**The community market is open, but there are thresholds. ** After third-party plug-ins are submitted, they must go through Anthropic’s automatic verification and security screening before they can be added, and each plug-in is “fixed to a specific submission” - meaning that you install the version at the time of review, and the author cannot secretly change the content. It needs to be added manually. After adding it, install it with the name claude-community.
**The demo market is for learning. ** It is a sample that “shows what the plug-in system can do”. You will use it to practice in the next section of the hands-on experiment. It also needs to be added manually.
Recommended order of use: Official market first, if it is not available in the official market, go to the community market to find it. If you find it, first check the homepage and the permissions it requires before installing. The demo market is generally only used for teaching or testing the waters - it is positioned as a model, not a production plug-in for you to use every day.
💡 To summarize in one sentence: the official market is the most stable, the community market needs to be added manually but has passed the security check, and the demo market is a learning model; Every day, check the official website first, and then go to the community if it is out of stock. Use the demo to practice.
05 When installing a plug-in, what exactly is installed?
When you click /plugin install, what exactly has entered your environment? This section explains it clearly, so that you don’t have to pretend to be confused “Then, how do I use it?”
A plug-in may bring in these types of components, and the “triggering method” of each type is different. This is the key:
| Components | How to use them after installing them |
|---|---|
| Skills/Commands | becomes /plugin name:skill name This kind of namespace command can be typed manually or automatically adjusted by Claude |
| Subagents | Appears in the /agents list, Claude automatically dispatches according to tasks, you can also manually click |
| Hooks | Automatically triggered in corresponding events (such as after changing files), no need for you to worry about |
| MCP server | Automatically starts, its tools are mixed into Claude’s toolbox and can be used directly |
| LSP server | To provide Claude with real-time code intelligence (jump definition, reference check, instant error reporting), you need to install the language server binary separately |
Did you see it? Some are “you call out” (skill, command), and some are “it does it automatically” (hook, MCP, LSP). So after installing a plug-in, you have to know what types of things it comes with before you know how to use it.
The good news is that the new version of Claude Code lists these for you before you install them. Click on the details of a plug-in in the /plugin interface, and there will be a “will be installed” section, which lists the commands, agents, skills, hooks, MCP and LSP servers of this plug-in. It will also give you a “context cost” estimate - telling you how many tokens this plug-in will put into your context window in each round.
One more thing to say about this “context cost”, it is very important. Recall the context management discussed in Chapter 19: Each component of the plug-in will occupy a piece of space on your workbench. Installing too many plug-ins means that before you even start working, the context will be taken up by various skill descriptions and MCP tool definitions. Be sure to read this estimate before installing a plug-in. It doesn’t matter if it costs a few hundred tokens, but if it costs thousands, you have to consider “whether I can really use it.” Installing a bunch of unused plug-ins that take up context is a waste that novices often make.
One more detail: After installing the plug-in, remember to run /reload-plugins to make it take effect without restarting Claude Code. Installing, stopping, and enabling plug-ins in the middle of a session are all refreshed with this command:
/reload-pluginsAfter running it, it will tell you how many plug-ins, skills, agents, hooks, plug-in MCP servers and LSP servers are currently loaded.
💡 One sentence summary: The components brought in by the plug-in are divided into two categories: “You actively shout” (skill/command) and “It does it automatically” (hook/MCP/LSP); Before installation, look at the “will be installed” list and context cost in the details. After installation,
/reload-pluginswill take effect.
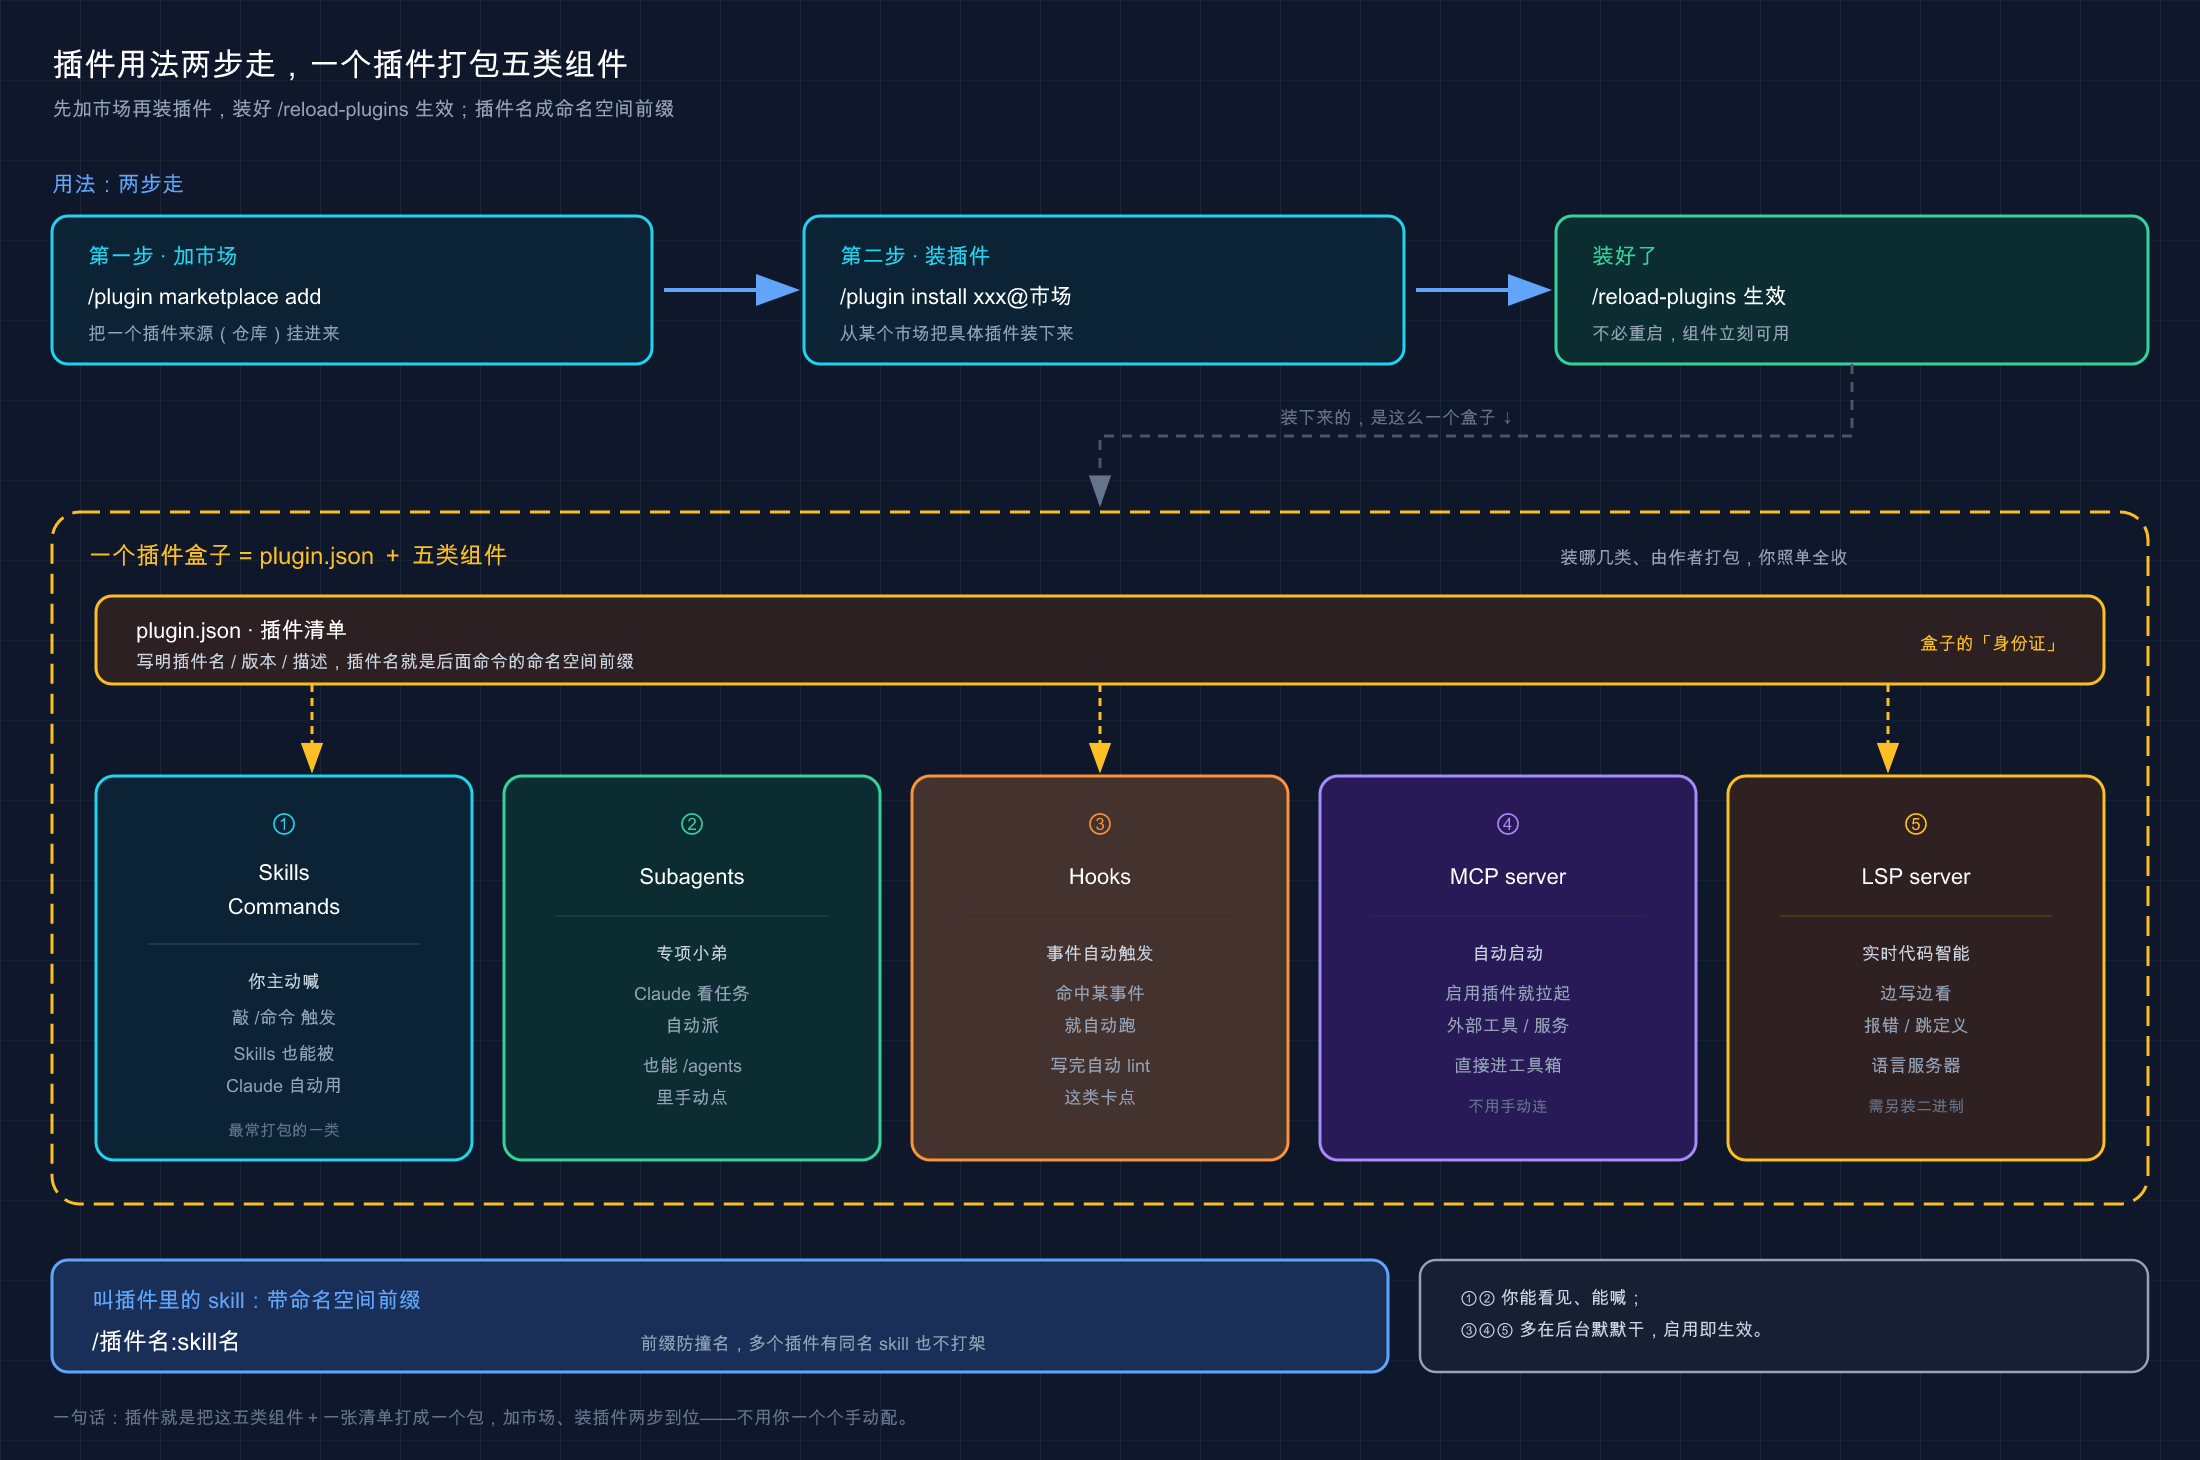
This picture draws together the two main lines of this article: on the left is the two-step process of “adding the market → installing plug-ins”, and on the right is the five types of components packaged in a plug-in box (skill, subagent, hook, MCP server, LSP server), and whether after they are installed, “you actively call” or “it does it automatically”.
06 Do it: add a market, install a plug-in, and use it
Just watch and practice fake moves. The following guide will show you how to add a market from the official demo market, install a real plug-in, and run through the commands it brings. The whole process does not rely on any complicated environment, just copy it. We installed commit-commands named in the official documentation - a plug-in that adds skills to the git workflow.
Step 1: Start Claude Code and add the demo market
Start Claude Code in any directory:
claudeAfter entering, type in the input box (this is the first step in the “two steps” - add the market):
/plugin marketplace add anthropics/claude-codeExpected: Claude Code downloads the directory of this market and prompts that the market has been added successfully. At this point, you have the goods on your “shelf”, but no plug-ins have been installed yet.
Step 2: Open the plug-in manager and take a look
Knock:
/pluginExpected: An interface with four tabs will pop up - Discovery/Installed/Market/Error, use the Tab key to switch back (Shift+Tab to switch back). Switch to the “Discover” tab and you can see the sample plug-ins in the demo market you just added. **See commit-commands in the list = the market was added correctly. **
Step 3: Install the commit-commands plug-in
You can click it in the interface to select the installation scope, or you can install directly from the command line (this is the second step in the “two steps”):
/plugin install commit-commands@claude-code-pluginsNote that @ is followed by claude-code-plugins - this is the internal name of this demo market (not anthropics/claude-code you wrote when adding the market, that is the warehouse address). When installing, it will let you choose the range:
- User scope (default): available to you in all projects
- Project scope: Load
.claude/settings.json, available to all collaborators of this repository - Local scope: only in this repository, only available to you
Just select the default “User Scope” first.
Expectation: The terminal prompts that the plug-in is installed successfully, and may also list the dependencies that are automatically installed with it.
Step 4: Let the plug-in take effect and see the commands it brings
/reload-pluginsExpected: Claude Code reloads and outputs the number of currently loaded plug-ins, skills, agents, hooks, and plug-in MCP servers and LSP servers. Because the commit-commands skill has a namespace, it provides commands like /commit-commands:commit.
Step 5: Use it - see the plug-in skill in action
First, change a file in the current directory to make some changes (such as creating a new text file), and then type:
/commit-commands:commitExpectation: This skill will help you stage changes, generate a commit message, and create commits. Seeing it go through the git submission process, it means that the plug-in is not only installed, but the skills it comes with can actually be used - this is the complete experience of “installing a plug-in and picking up a ready-made workflow for nothing”.
⚠️ If the command cannot be found when typing
/commit-commands:commitin the fifth step, first make sure you ran/reload-pluginsin the fourth step; if it still doesn’t work, go to/pluginand enter the “Error” tab to see the loading error.
After completing these five steps, you will have personally verified the complete link of “add market → install plug-in → take effect → use”. **Any plug-in installed in the future will essentially follow this process. **
💡 In one sentence: add market (
marketplace add) → install plug-ins (install) → take effect (/reload-plugins) → use namespace commands - run throughcommit-commandsby yourself, and it will work better than memorizing ten commands.
07 Want to pack it yourself? First understand the directory appearance of the plug-in
The previous ones are all “use other people’s plug-ins”, but sooner or later you will wonder “can I turn my own configuration into a plug-in?” This section does not teach you to create it from scratch (that is the amount of a separate article), but only teaches you to recognize what the plug-in directory looks like, so that you can understand it and know what it is.
The core of a plug-in consists of two parts: an “ID card” file + folders for each component.
ID is .claude-plugin/plugin.json, which declares the name, description, and version of this plug-in:
{
  "name": "my-first-plugin",
  "description": "A greeting plugin to learn the basics",
  "version": "1.0.0"
}
Among them, name is the most critical - it is the namespace prefix of the skill. The skill in this plug-in will become /my-first-plugin:xxx. version is optional, but only users who set a version number will receive updates when you update, so when publishing, remember to mention the version number every time you release a new version.
The folders of each component are placed in the root directory of the plug-in and are classified by type. The official catalog stipulates that I organize it into a table and just follow it:
| What do you want to add | Which directory to put it in |
|---|---|
| skill | skills/<name>/SKILL.md |
| subagent | agents/ |
| hook | hooks/hooks.json |
| MCP server | .mcp.json in the root directory |
| LSP server | .lsp.json in the root directory |
The entire plug-in looks like this:
my-first-plugin/
├── .claude-plugin/
│   └── plugin.json        ← 身份证,只有它放这儿
├── skills/
│   └── hello/
│       └── SKILL.md
├── agents/
│   └── reviewer.md
└── hooks/
    └── hooks.json
Here is a pitfall that officials have repeatedly emphasized and must be avoided by novices. I will draw the key points for you:
Common Mistake: Do not place
commands/,agents/,skills/orhooks/inside the.claude-plugin/directory. Onlyplugin.jsonshould be inside.claude-plugin/. All other directories must be at the plugin root level.
To put it bluntly: .claude-plugin/ is only allowed to put plugin.json in this folder. All other component folders are placed in the plug-in root directory, at the same level as .claude-plugin/. I stepped on this trap the first time I packaged it - to save trouble, I also stuffed skills/ into .claude-plugin/. As a result, the plug-in was loaded successfully and /reload-plugins did not report an error, but the skill did not appear. I checked the name, version, and namespace of plugin.json for a long time, and they were all correct. Finally, I realized that the directory was in the wrong location. Move it out and be at the same level as plugin.json, it will be ready immediately.
You may notice that this directory structure is almost exactly the same as the .claude/ project structure in Part 13, agents/ in Part 23, and .mcp.json in Part 22. This is not a coincidence - the essence of the plug-in is to “put your configurations scattered throughout .claude/ into a separate folder in the same format.” That’s why the official said that bulk configuration can be “converted into plug-ins” because the formats are the same, so you can just move them there.
If you want to really test your own package, the official provides a quick way without installing the market - use --plugin-dir to directly load the local plug-in directory at startup:
claude --plugin-dir ./my-first-pluginThis flag is specially used for development and testing. After changing the plug-in, you can see the effect by running /reload-plugins without having to go through the whole process of “sending it to the market and then installing it”.
💡 To summarize in one sentence: plug-in =
.claude-plugin/plugin.json(ID card,namedefines the namespace) + each component folder in the root directory; Remember the iron rule - onlyplugin.jsonshould be placed in.claude-plugin/, and all other folders should be placed in the root directory.
08 To install third-party plug-ins, first pass the “trust level”
This is the most cautious section of the entire article, and it is also the place where novices are most likely to take it lightly: plug-ins are not harmless gadgets, they can use your permissions to execute arbitrary code on your machine.
Recall the security boundary discussed in Part 21 - the judgment in that article is equally applicable to plug-ins, or even more important. The official words are very serious:
Plugins and marketplaces are highly trusted components that can execute arbitrary code on your machine using your user privileges. Only install plugins and add markets from sources you trust.
What does this mean? A plug-in may contain hooks (automatically run scripts), MCP servers (automatically started programs), and executable files in bin/. You install it and enable it, and these things will run under your permissions - it can read your files, connect to the Internet, and execute commands, and it is as powerful as your own permissions to type commands. Installing an unknown plug-in is equivalent to running a stranger’s script directly on your computer.
**Analogy: Download a .exe from a strange website and double-click to run it. ** You wouldn’t just download an executable file from a website you’ve never heard of and double-click it, would you? Because once it starts running, it can do as many things as you. This is the nature of installing third-party plug-ins - whether the source is trustworthy or not is a question that must be answered before installation. You cannot install it directly to save trouble.
So here are three self-checks for you “before installing third-party plug-ins”, which are worth treating as hard rules:
| Check items | How to do it |
|---|---|
| Is the source trustworthy | Prioritize the official market; if you are in the community market, check the author and the homepage; if you are in an unfamiliar personal warehouse, don’t pretend if you are not sure |
| What does it bring | Before installation, check whether it has hook / MCP / executable file in “Will Install” in the details of /plugin |
| Where to give the scope | If you are not sure, try using the “local scope” first, don’t spread the “user scope” to all projects as soon as you start |
Several official designs that can give you some peace of mind: Plug-ins in the community market have passed automatic verification and security screening, and are fixed to specific submissions (the author cannot secretly change the content); The official market is selected by Anthropic, which is the most worry-free. But none of these can replace your own judgment - the core is still the saying “only pretend from sources you trust”**.
A set of sound practices: **Plug-ins from the official market can be installed directly; for community market, first go to its homepage to scan who it is, what it does, and what permissions it requires before making a decision; for private plug-ins from unfamiliar sources, unless you can understand its code, do not touch **. To be honest, plug-ins are convenient, but “convenience” and “security” are always up to you to decide - Don’t take the smoothness of one-click installation as evidence that it is harmless.
💡 To summarize in one sentence: plug-ins can use your permissions to run arbitrary code. Installing third-party ones is equivalent to running strangers’ scripts on your machine; Check three things before installation - is the source trustworthy, what is included, and where is the scope? The official market is the most stable, and unfamiliar sources would rather not install.
09 Summary
In this article, we take the “plug-in” of Claude Code from concept to practice - its essence is to take the components you learned earlier and put them into a box that can be loaded and unloaded as a whole, distributed, and updated.
Let’s review the core points together:
| What you have to do | What to use | Key points |
|---|---|---|
| Understand what a plug-in is | plugin = bulk packaging box | Install skill/subagent/hook/MCP/LSP, package it in bulk for your own use or for sharing |
| Get other people’s plug-ins | Plug-in market | Two steps: marketplace add Add market → install Install plug-in |
| Recognize the market | Three official markets | The official one is the most stable, the community needs to add it manually, and use the demo to practice |
| Let the plug-ins take effect | /reload-plugins | Rely on it to refresh during installation/stop without restarting |
| See clearly what is installed | /plugin details | ”To be installed” list + contextual cost, read before installing |
| Package it yourself | plugin.json + component folder | Only put plugin.json in .claude-plugin/ |
| Install third parties | Trust three checks | Can run any code, only install from trusted sources |
You should now be able to: Understand how to choose plug-ins and bulk configurations, use “Add Market → Install plug-ins → /reload-plugins” to get ready-made functions from the market in three steps, understand the “will install” list and context cost in the plug-in details, recognize the appearance of the plug-in directory, and understand that you must first pass the trust level before installing third-party plug-ins. **This set of capabilities allows you to prepare everything from scratch - ready-made family buckets on the market, ready to use. **
From Part 18 to this one, you have already assembled Claude Code’s “Extended Toolbox”: CLAUDE.md, MCP, subagent, skills, hooks, and finally packaged and managed them with plug-ins. **Tools are all installed here. **
Next article 25 “Memory System (memory)” - The tools are all installed, but have you noticed an awkward place: every time a new session is opened, Claude has another blank piece of paper. The last time you told it its preferences and the key facts of this project, it turned around and forgot. The next article will talk about how to make Claude “remember” you across sessions - remember the technology stack you like to use and remember the hard rules of the project without having to explain it from scratch every time. Think about it: If it could be like an old partner who has worked with you for a long time and knows your habits when you open your mouth, wouldn’t it be a lot easier?
25 · Memory: Let it remember you across sessions
Let me first talk about a pitfall that is particularly easy for novices to step into.
When I first encountered the function of “allowing Claude to remember things”, it was easy to find a treasure and stuff everything into it: today I adjusted a port number and stuffed it in, changed a temporary variable name and stuffed it in, and even stuffed one-time things like “use 8081 instead of 8080 this time”. The logic behind it is often “the more you remember, the smarter you are.”
The result? When you open the project again two weeks later, it will tell you about the long-abandoned port 8081, as well as a few “preferences” that you have forgotten why you wrote it. **It memorized a lot of useless things, but it was drowned out in what should really be memorized. **
Only then will we understand: **Memory is not about cramming in as much as possible. It is about “remembering what should be remembered accurately and not touching what should not be remembered.” ** Remembering it incorrectly is worse than not remembering it at all - it will seriously mislead you with outdated information.
Previously [18 CLAUDE.md User Guide] we specifically talked about how to write CLAUDE.md, [19 Context Management] also repeatedly mentioned that “automatic memory will occupy the context”. But how these two pieces fit together into a complete “memory system” and how the notebook written by Claude himself works has never been fully explained. Make up for it today.
After reading this article, you will get:
- What are the two sets of memory of Claude Code: CLAUDE.md written by you vs. “automatic memory” written by it itself? Who cares if you can understand it in one table?
- Which file exists in “automatic memory”, how to load it into the context, and how to use
/memoryto audit and delete - How to make it memorize an item, where to drop it after memorizing it, how to automatically take effect next time, and I will guide you through it step by step.
- A list of “shoulds vs. shouldn’ts” to help you avoid the trap of “stuffing everything”
- Can this old shortcut key
#still be used? What is the official correct approach now?
01 Let’s make it clear first: memory is actually two sets, not one set
Let me give the conclusion first: **Claude Code’s “memory” is two parallel systems, one written by you and another written by it, each taking care of its own business. ** Many people only think of CLAUDE.md when they mention “memory”, but in fact, that’s only half of it.
**Analogy: A sticky note stuck to the side of the monitor. ** There are always two kinds of paper on your desk. One is the “work code” that you print out and nail it to the partition board with thumbtacks - project rules and submission procedures. They are written neatly and everyone can follow them. This is CLAUDE.md. The other is to tear up a sticky note and write “The bug last time was because the cache was not cleared” and stick it to the monitor, and you will remember it at a glance next time - this kind of small note that it jots down by itself is called “auto-memory”. There are two kinds of paper in front of you, but one is “the rules I made” and the other is “the experiences I jotted down.”
The official explained the division of labor between the two sets very clearly and compiled it into a comparison table - This is the first thing to remember in this article:
| Dimensions | CLAUDE.md file | Auto-memory |
|---|---|---|
| Who wrote it | You (write it manually) | Claude (write it yourself) |
| What to install | Instructions and rules | Experience and patterns it has learned |
| Typical content | Programming standards, workflow, project architecture | Build commands, debugging experience, your preferences it discovered |
| When to load | Every session, full load | Every session, but only load the first 200 rows or 25KB |
| scope | user/project/local level | one copy per git repository (shared by all worktrees) |
Do you see the key difference? **CLAUDE.md is “how you want it to do it”, and automatic memory is “how it finds out by itself”. ** If you correct it “This project needs to run tests on local Redis first”, it will remember it next time - you don’t need to manually write this into any file, it will save it by itself.
There is another piece of information that officials have repeatedly emphasized that you must understand thoroughly first:
Claude treats them as context, not mandatory configuration. To prevent an operation from happening regardless of what Claude decides, use the PreToolUse hook instead.
What does it mean? **Memory (no matter which set) is just a soft reminder that “affects what it wants to do”, not a hard constraint that “locks what it can do.” ** This is consistent with the conclusion of the article [20 Permission Configuration] - if you really want to block an operation, you have to rely on permission rules or hooks. You can’t stop it by just writing “Don’t push” in your memory. Memory is responsible for “making it understand you better” and is not responsible for “keeping things in check for you”.
💡 To summarize in one sentence: There are two sets of memories - CLAUDE.md. You write the rules by hand, and it automatically memorizes them by heart; both sets are just soft prompts. To really stop the operation, you need permissions or hooks. It is not written into the memory that everything will be fine.
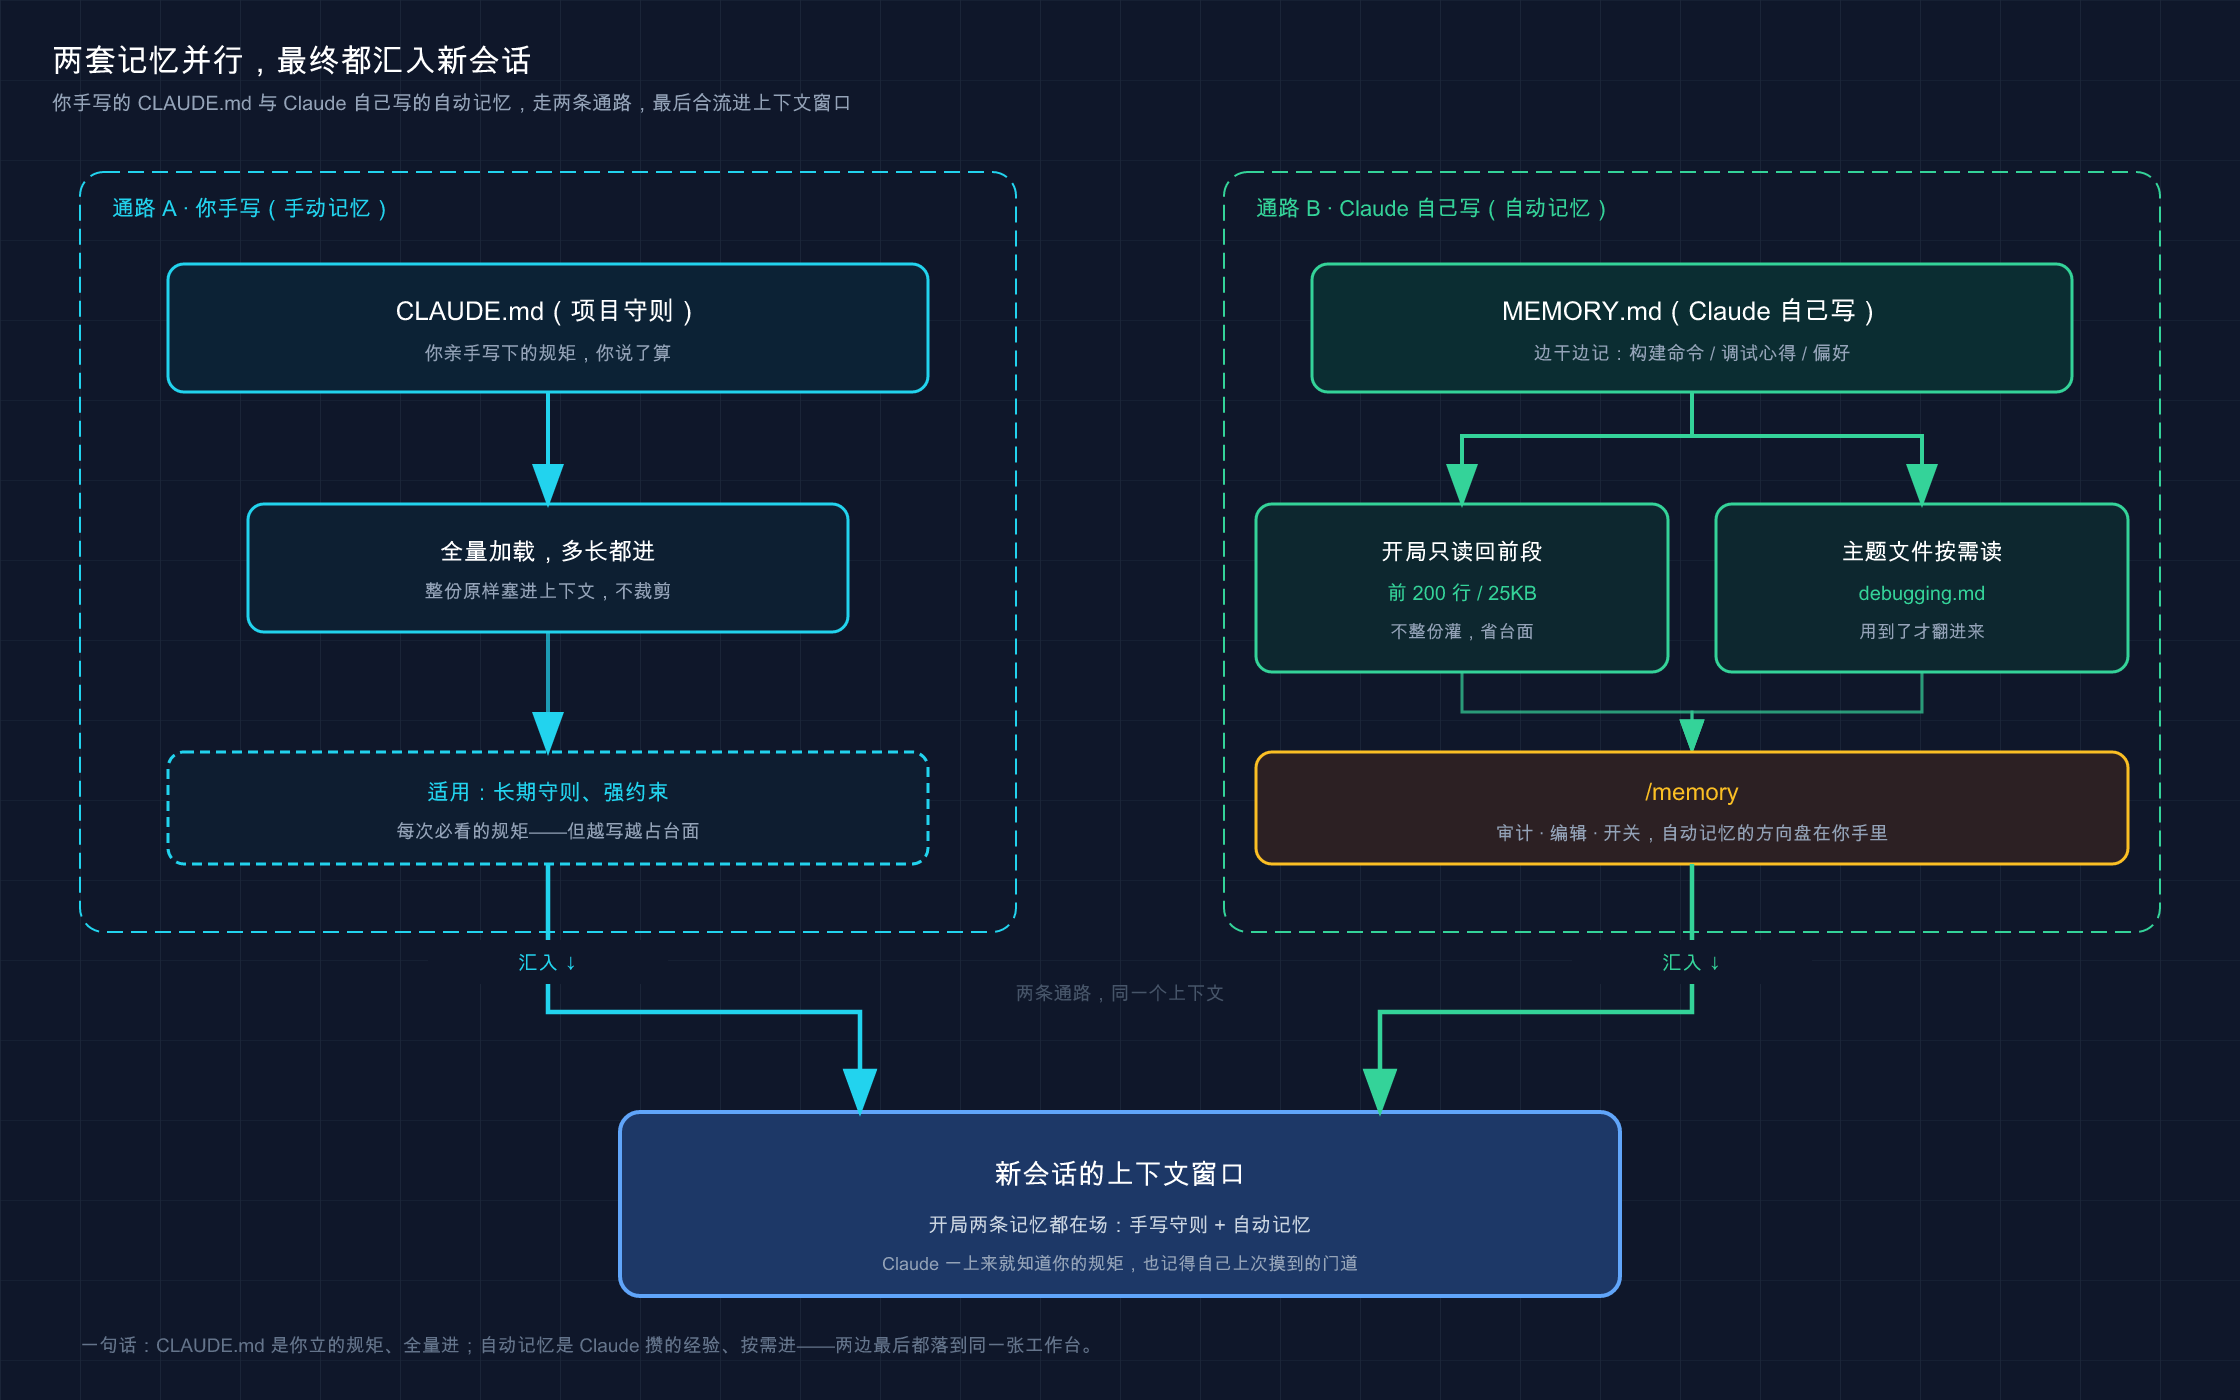
This picture draws two memory paths side by side: on the left is CLAUDE.md (project guidelines) that you handwrite and fully load into the context; on the right is the automatic memory (private notes) that Claude writes into MEMORY.md when he is working and automatically reads back the first 200 lines in the next session. Both lines are finally merged into the “context window of the new session”, allowing it to “remember you” as soon as it starts working.
02 The location of CLAUDE.md in the memory system
The writing method of CLAUDE.md [18] has been explained in detail. Here I only add one sentence about its role in the “memory system” - It is the nailed-down “code of work” that everyone must read.
**Analogy: It’s still the two types of paper next to the monitor, CLAUDE.md is the nailed one. ** It is not a sticky note that you tear up casually, it is a formal code that you carefully print and pin. Therefore, it has several features that are completely different from automatic memory: Written by you, shared by the whole team under version control, fully loaded in each session, and the content is “rules” not “experiences”.
The official organization has clearly divided CLAUDE.md into different layers. The loading order (from broadest to most specific) is as follows:
| Hierarchy | Position | Who is in charge |
|---|---|---|
| Managed policy level | macOS: /Library/Application Support/ClaudeCode/CLAUDE.mdLinux/WSL: /etc/claude-code/CLAUDE.md | Enterprise IT issues it uniformly, individuals are generally not involved |
| User Level | ~/.claude/CLAUDE.md | Personal preferences for all your projects |
| Project level | ./CLAUDE.md or ./.claude/CLAUDE.md | This project is shared by the whole team (enter git) |
| Local level | ./CLAUDE.local.md | This project is for you only (enter .gitignore) |
Here is a key difference from automatic memory that novices should keep in mind:
**CLAUDE.md will be fully loaded no matter how long it is, and there is an upper limit for automatic memory. **Official original words - “CLAUDE.md file is loaded completely regardless of its length.” That’s why [18] repeatedly advises you to keep it within 200 lines: It’s not that it can’t be loaded, it’s that the longer it takes up the context, the worse it will be in compliance. Automatic memory, on the other hand, has a hard upper limit (more on this in the next section), and the parts beyond it are not loaded at all.
In practice, the division of labor can be very clear: **If “this is a rigid rule you set”, write CLAUDE.md, if “this is what you have to explore and accumulate by yourself”, leave it to automatic memory. ** For example, the iron rule “only use pnpm for dependencies” is handwritten into CLAUDE.md; and “this project can be tested with Redis” can be discovered by itself without handwriting, correct it once and let it remember by itself.
💡 Summary in one sentence: CLAUDE.md is the “nailed formal rule” in the memory system - you write it, the whole team shares it, fully loads it, and it contains the rules; it is completely different from the automatic memory that “it remembers its own experience”.
03 Automatic memory: the notebook it wrote itself
Here comes the key point, which is also the main topic left by [18] for this article - auto-memory, the note that Claude took for himself while working.
ℹ️ Automatic memory requires Claude Code v2.1.59 or higher and is turned on by default. Type
claude --versionto take a look at your version; if it is too old, upgrade it (see [02 Installation] for the upgrade method).
**Analogy: An old partner who has been working for a long time. ** For a partner who has been working with you for a while, you don’t need to explain some things repeatedly - he will write it down in his mind: “This project needs to be built by running make build, not npm build” “The accidental bug last time was because the time zone was not set correctly.” The next time he encounters something similar, he will think of it himself. **You don’t have to explain, he accumulates while doing it - automatic memory is Claude’s “active learning” ability. **
What exactly does it record? Official list: **Build commands, debugging insights, architecture notes, code style preferences, and workflow habits. ** Pay attention to a key design - It is not to remember every conversation, but “Determine whether it is worth remembering based on whether this information will be used in future conversations”. It generally won’t remember the one-off things (this just cures the problem of “getting stuck in everything”).
So how did it actually get written in? Two triggering methods:
**The first method is to let it be recorded directly. ** In the conversation, say “Use pnpm for this project in the future, don’t use npm” or “Remember to run Redis locally for API testing”, and it will save this into automatic memory. Official text:
When you ask Claude to remember something, like “Always use pnpm, not npm” or “Remember that API tests require a local Redis instance”, Claude saves it to automatic memory.
**The second type is that it learns from your corrections. ** You don’t need to say “remember” explicitly, as long as you correct it once - for example, if it uses npm test and you say “this project is pnpm test” - it will judge that this item will be useful in the future, so it will remember it by itself. This is the most fragrant part of automatic memory: **You work normally and make corrections normally, and it accumulates silently behind the scenes, with zero extra actions. **
How do you know it’s recording? **See the interface prompts. **Officially, when you see “Writing memory” or “Recalled memory” pop up in the Claude Code interface, it means that it is writing to or reading from that notebook.
💡 Summary in one sentence: Automatic memory is a sticky note written by Claude himself - you let it memorize it, or it learns from your corrections, it only remembers things that “will be useful in the future”; when you see the interface prompt “Writing/Recalled memory”, it means it is taking notes or turning over notes.
04 Where does it exist and how is it loaded into the context?
This section solves the two most practical problems: **Which file is this notebook stored in? How does it fit into the context to make Claude “remember” it? ** The second half exactly echoes the context management discussed in [19].
Storage location is officially determined - an independent memory directory for each project:
~/.claude/projects/<project>/memory/
├── MEMORY.md          # 简洁索引,每次会话都加载
├── debugging.md       # 调试相关的详细笔记
├── api-conventions.md # API 设计决策
└── ...                # Claude 自己创建的其他主题文件
Let’s break it down into a few key points:
**MEMORY.md is the entry and index. ** It’s like the “contents page” in sticky notes. Claude uses it to keep track of “what I have remembered.” The detailed content will be split into theme files such as debugging.md and api-conventions.md to prevent MEMORY.md from getting longer and longer.
**<project> is a name based on the git repository. **So——All worktrees and subdirectories in the same warehouse share this automatic memory. This is different from CLAUDE.md (CLAUDE.md is spliced according to the directory tree).
**It is local to the machine and does not sync across devices. ** You can remember it on this computer, but you won’t be able to remember it on another computer. Don’t expect it to go into git either - it’s just sitting there under your ~/.claude.
Next is the most important mechanism to understand - how it is loaded into the context. The official writing is very precise:
The first 200 lines or the first 25KB of
MEMORY.md(whichever comes first) are loaded at the start of each session. Content above this threshold is not loaded at the beginning of the session.
Translated into adult language, it has three meanings:
- Every new session, automatically read back the first 200 lines of
MEMORY.md(or 25KB, whichever comes first). This is the principle of “remembering across sessions” - what was remembered last time will automatically enter the context this time. - **Parts exceeding 200 lines/25KB will not be loaded at startup. ** So Claude will take the initiative to keep
MEMORY.mdstreamlined and dump it into the theme file in detail. - Theme files (
debugging.mdand the like) are not loaded at the start. When needed, use the file tool to read them on demand - the same principle as [18] said “subdirectory CLAUDE.md is loaded on demand”.
Comparing CLAUDE.md and the automatic memory loading rules together, the difference is clear at a glance:
| CLAUDE.md | Automatic memory MEMORY.md | |
|---|---|---|
| How much to load | Full size, no matter how long it is, | Only the first 200 lines / 25KB |
| Exceeding part | Still fully loaded (so I advise you to write shorter) | Not loaded at the beginning, read only on demand |
| Who maintains and streamlines | You delete manually | Claude automatically splits |
Understand this upper limit, and you will understand why it will not be “exploded” by the memory context - Automatic memory is born with a 200-line gate, and CLAUDE.md has to control that gate yourself.
💡 One sentence summary: Automatic memory exists in
~/.claude/projects/<project>/memory/MEMORY.md, divided by git warehouse, machine local, and worktree share; **Only the first 200 lines/25KB are read back at each start, and the excess theme files are read on demand - so it has a natural upper limit and will not overwhelm the context.
05 /memory: audit, edit, switch, all in one command
The most worrying thing about automatic memory is that it remembers it by itself. What if it remembers it wrongly or out of date? **(This is where the 8081 port pitfall at the beginning comes from.) The official answer is a command: /memory.
**Analogy: The stack of sticky notes that can be opened at any time. ** The notes it takes by itself are not a black box. You can open them anytime you want to read them and tear them up whenever you want. /memory is the action of “open and look”.
Type /memory in the session, it does three things:
- List all memory files loaded in the current session - including CLAUDE.md, CLAUDE.local.md, rule files, and automatic memory. If you suspect that it “remembered something wrong”, use this first to check what was loaded.
- Provides an entrance to open the automatic memory folder - you can enter the
memory/directory with one click. Those files are all pure markdown, and you can read, modify and delete them at any time**. If you forget the item, just delete it. - Switch automatic memory on and off - If you don’t want it to remember automatically, you can turn it off here.
In addition to using /memory in the session, there are two official ways to “kill the switch”:
Turn off automatic memory in settings.json (project level, long-term effect in configuration file):
{
  "autoMemoryEnabled": false
}
Or use environment variables to temporarily turn it off (set CLAUDE_CODE_DISABLE_AUTO_MEMORY=1).
It’s worth developing a habit: **Every once in a while, type /memory and open the notebook of your project to scan it. ** I can often clear out a few items that should have been deleted long ago - a replaced port, an abandoned interface convention, and a “preference” that I don’t even understand. **It only takes two minutes to avoid misleading you with outdated information. ** This is exactly the lesson to be learned from the 8081 pit.
💡 One sentence summary:
/memorycan fully open up the memory system with one command - list which files have been loaded, click on the automatic memory folder to read, modify and delete at any time, and turn on and off the automatic memory; Open it regularly to scan and clear out the outdated ones, which is the easiest way to cure “it misremembers”.
06 What to remember and what not to remember: Don’t make the mistake of “stuffing everything”
After explaining the mechanism, it comes down to the most practical judgment - whatever is worth remembering, don’t touch anything. ** This section is all about experience gained through pitfalls of real money.
The good news is that automatic memory is more restrained by default (only remembering things you’ll need later). But when you take the initiative to ask it to remember, you have to check it yourself - if you say “remember xxx”, it will usually really remember it. Whether you check it or not is entirely up to you.
Go directly to the comparison table. The left side is stuffed and you will regret it, and the right side is really worth remembering:
| ❌ Don’t let it be remembered (disposable / subject to change / sensitive) | ✅ Worth remembering (stable / reusable / project-specific) |
|---|---|
| “Use port 8081 first this time” (one-time use) | “The build command is make build not npm build" |
"Temporarily change this variable to tmp” (temporary) | “This project needs to be tested locally with Redis first" |
| "This version is running like this for now” (will be changed soon) | “The root cause of the occasional bug last time was that the time zone was not set” (debugging experience) |
| Database password / API key / token (sensitive!) | ”Dates must use ISO 8601 format” (agreed preference) |
| “I am adjusting the login page now” (temporary state this time) | “Authentication logic is all in src/auth/” (architecture fact) |
Three principles of judgment, just remember these three words:
**The first is “will it change?” ** Don’t remember anything that is one-off, something that needs to be changed soon, something that is “just for now” – their shelf life is shorter than your current session, and writing them down will dig holes for the future. That 8081 is a typical example. It is useful immediately when adjusted, but it will be misleading after two days.
**The second is “can it be reused?” ** Don’t remember only what is useful this time (“I am adjusting
The third is “sensitivity or not”. ** This is the red line - passwords, tokens, and API keys must not be entered into any memory files. Automatic memory is pure markdown plain text stored on your hard disk. Writing the key in is equivalent to writing the plain text to the disk. This is consistent with the global security constraints: **Sensitive information does not enter the code, commit, log, and naturally does not enter the memory. **
Before letting it be remembered, go through these three levels in your mind: Will it change? Will you use it again in the future? Sensitive? ** It will be recorded only after passing all three levels. **After checking in this way, its notebook will be much cleaner, and it will no longer mislead you with outdated information. **
💡 To summarize in one sentence: remember the three levels you have passed before - don’t remember things that will change, don’t remember things that are only used once, and definitely don’t remember sensitive things**; only remember those facts and experiences that are “stable, reusable, and unique to the project” and don’t stuff everything else in there.
07 # Is this old shortcut key still available?
ℹ️ **
#is an old practice in the early days. This set of interactions is no longer used in the new version. ** Many old tutorials and videos still teach “use#to quickly append memory”, just forget about it. The current correct entrance: say “remember xxx” to save in automatic memory, say “add CLAUDE.md” to save in git rules, use/memoryto check changes and deletes.The most common pitfall for novices: Just saying “remember xxx” will save it into automatic memory by default (local to the machine), which does not mean entering CLAUDE.md (into git and shared by the whole team). In order for the entire team to see a rule, it must be explicitly stated as “Add CLAUDE.md”. A single sentence can make a huge difference in the scope of sharing.
💡 To summarize in one sentence:
#should not be used when it is outdated; “remember xxx” goes into automatic memory, “add CLAUDE.md” goes into git - **the two are not the same thing. If you want to share, you have to say **.
08 Do it: remember an item, see where it falls, and it will automatically take effect next time
Just watching and practicing doesn’t count. The following will take you through it completely: **Let it remember an item → Confirm that it has fallen into the automatic memory file → Verify that it will be remembered automatically in the next session. ** The smallest example in the entire process, does not rely on any complex environment.
ℹ️ Prerequisite:
claude --version≥ v2.1.59, and automatic memory is not turned off (on by default).
Step 1: Build a toy project and start Claude (Mac/Linux)
mkdir memory-demo
cd memory-demo
claudeExpected: Enter the Claude Code session interface, with an input box at the bottom.
Step 2: Let it remember one
Type in the input box (using a typical “build command” worth remembering):
记住:这个项目的构建命令是 make build,不是 npm buildExpected: Claude responded that it had written it down, and a prompt such as “Writing memory” would flash on the interface - **Seeing this prompt means that it is writing in that note. **
Step 3: Use /memory to confirm which file it falls to
Then type:
/memoryExpected: The memory management interface will pop up, listing all currently loaded memory files. You can see the entrance to automatic memory. Click on it to see MEMORY.md, which contains the record of make build just now. Seeing it in the file = This article has changed from “talking about it in the conversation” to “notes placed on the disk”.
If you want to confirm directly from the command line, open another terminal and type:
cat ~/.claude/projects/*memory-demo*/memory/MEMORY.mdExpected: You can see the build command you just memorized in the output (the <project> name in the specific path is calculated according to your directory, just use * as a wildcard). **Pure markdown, can be read at a glance. **
Step 4: Verify that the next session will automatically take effect
This step is the key - The meaning of memory is “cross-session”. Exit the current session:
/exitThen reboot and ask it another question that uses that memory:
claudeAfter entering, type:
这个项目怎么构建?Expectation: It will directly tell you to use make build (instead of guessing npm build) - and you may see the “Recalled memory” prompt, indicating that it read back the last recorded content from the note. **It got it right in a new session = cross-session memory run through, congratulations! **
Step 5 (optional): Clear this item and verify that the deletion also takes effect
Type /memory, enter the automatic memory folder, delete the make build and save it. Next time you ask “how to build”, it will no longer confidently report make build - If you remember the wrong one, delete it and it will be clean. This is exactly the “open and tear” power that /memory gives you.
After completing these five steps, you will have personally verified the entire link of “Remember an item → Place it → Automatically recall it across sessions → Audit and delete it at any time”. **The essence of all memory-related gameplay in the future lies in this mechanism. **
💡 In one sentence: let it “remember xxx” → Look at the “Writing memory” prompt →
/memoryorcatto confirm that it has fallen intoMEMORY.md→ Exit and re-enter, it will automatically answer “Recalled memory” → Delete/memoryif necessary. ** Run through this link with your own hands, and all ten concepts will be more effective than memorizing it. **
09 Summary
This article explains Claude Code’s “memory system” from the beginning - it’s not one set, but two sets in parallel; it’s not about cramming in more, the better, it’s about remembering exactly what should be remembered. **
Let’s review the core points together:
| What you need to find out | Conclusion |
|---|---|
| Memory is divided into several sets | Two sets: CLAUDE.md You handwrite the rules + Automatically memorizes what you have learned |
| How to distinguish the two sets | Who wrote it, whether to install rules or experience, whether to load in full or have an upper limit - a table to tell the difference |
| Where to store automatic memory | ~/.claude/projects/<project>/memory/MEMORY.md, divided by git warehouse and local to the machine |
| How to be loaded | Only the first 200 lines / 25KB of MEMORY.md will be read at the start, and the remaining theme files will be read on demand |
| How to audit deletions | /memory: load files in columns, open folders to read modifications and deletions, and switch automatic memory on and off |
| Should be remembered vs Should not be remembered | Pass three levels: changeable, only used once, sensitive - don’t remember any |
Can # still be used? | Outdated; now say “remember xxx” to enter automatic memory, and say “add CLAUDE.md” to enter git |
You should now be able to: Distinguish what CLAUDE.md and automatic memory do, where they are stored, and how they are loaded; let Claude memorize an item and confirm which file it falls into; use /memory to clear wrongly remembered and old notes; and judge whether a piece of information should be remembered or not. **To put it bluntly - you can make Claude “remember what needs to be remembered and forget what needs to be forgotten” instead of letting it use its brain to get around you. **
The essence of memory is that Claude is “passively remembering facts” - you correct it and it accumulates. **But it can do much more than just remember. **
Next article 26 “Agent Skills” - Memory is “passive memory of facts”, and Skills is “active packaging ability”: a set of tasks that you repeatedly ask it to do, packaged into a “special skill” that can be called out on demand. If memory makes it “understand you better”, Skills makes it “know more”. Here’s a little thought: It’s also “let Claude prepare in advance”. Do you think “remember a rule” or “learn a skill” should be used when?