10 | Claude Code in 16 Hours: Agent Skills—Turn Repeated Work into Reusable Capability
Distinguish Skills, slash commands, and subagents, then use progressive disclosure to make repeatable work reusable.
26 · Agent Skills: Equip Claude with special skills that are always on call.
“Isn’t Skill just a slash command with a different name? I type /deploy and it will be deployed. What is the difference from the previous .claude/commands/deploy.md?”
“The difference is huge. For the slash command, you have to actively shout it before it moves; for skill, you don’t have to shout it - Claude called it out as soon as he saw that you were suitable for the job. And it usually only takes up the space of one of your sentences, and the full text will not be expanded until it is used.”
”…Turn it out by yourself? That would be messy. How would I know when it will move?”
This is a very common misunderstanding. This is what I thought when I first started using it - insert the existing commit.md command into .claude/skills/, and it will run exactly the same as before. I also wondered, “Isn’t this just a different folder?” Only later did I realize that the problem was stuck in: Treat Skill as a vest for the slash command. In fact, the official has already incorporated custom commands into the Skills system - your .claude/commands/ files can still be used, but Skills have three more things: they can bring supporting files, they can be automatically triggered by Claude on demand, and they usually occupy almost no context.
Official original words: “Custom commands have been merged into skills. Files in
.claude/commands/deploy.mdand skills in.claude/skills/deploy/SKILL.mdwill create/deployand work in the same way.”
In this article, I will explain to you exactly what Skill is, why it can be “triggered by oneself” without breaking the context, where it comes from, and how it is triggered.
After reading this article, you will get:
- What exactly is Skill? How can a
SKILL.mdplus supporting resources become a skill of Claude? - How it “loads on demand” (progressive disclosure): Why it usually only takes up one sentence and expands it only when it is used? The secret of saving context is all here
- The positioning differences between Skill, slash command and Subagent can be clarified in a table (the complete decision will be left to Part 30)
- Where the skill comes from (built-in, plug-in, written by yourself), and which directory it is placed in determines who can use it
- How to trigger (automatic matching based on description, no need to memorize commands), how to check what is currently available
01 First understand: what exactly is Skill?
Let me give the conclusion first: A Skill is essentially a description file called SKILL.md, plus several optional supporting files, packaged into a “specialized skill” and given to Claude.
**Analogy: Shortcut commands on mobile phones. ** You program a “Go Home Mode” in the “Shortcut Commands” on your iPhone - turn on the lights, adjust the air conditioner, and play music. After programming, you don’t need to manually operate step by step. Just say “Go Home Mode” and it will automatically run in the order you arranged. Skill does the same thing: you write a fixed process (such as “summarize uncommitted changes and mark risks”) into SKILL.md, and then this process becomes an action that Claude can adjust at will, so you don’t have to type the steps again every time.
What does SKILL.md look like? As for the two parts, the official document makes it very clear (this example exists in ~/.claude/skills/summarize-changes/SKILL.md, and the directory name summarize-changes is the command name you enter in the future):
---
description: 总结未提交的改动并标出风险。当用户问改了啥、想要提交信息、或让我审查 diff 时使用。
---

## 当前改动

!`git diff HEAD`

## 说明

把上面的改动用两三个要点概括,再列出你注意到的风险,比如缺失的错误处理、写死的值、需要更新的测试。如果 diff 是空的,就说没有未提交的改动。
The part framed by --- above is called YAML frontmatter (pre-metadata, written in the configuration area between the two --- at the beginning of the file), which tells Claude what this Skill does and when to use it; the markdown text below is the instructions that Claude must follow when actually calling it.
Pay attention to the line in the middle !`git diff HEAD` - this is a wonderful design, called dynamic context injection: Claude Code will run this command first and replace its output to this line, and then Claude will see the Skill content. So what Claude gets is not “run a diff”, but the filled-in, real changes you make at this moment. This is preprocessing and is not performed by Claude himself.
A Skill is not just a file SKILL.md, it is a directory. The official standard appearance is as follows:
my-skill/
├── SKILL.md           # 主说明(必需)
├── template.md        # 让 Claude 填的模板
├── examples/
│   └── sample.md      # 给它看的示例输出
└── scripts/
    └── validate.sh    # 它可以执行的脚本
Only SKILL.md is required, the rest are optional. This is where Skill is better than the old slash command: It can bring templates, examples, and scripts - the script can be in any language, Claude is responsible for the arrangement, and the script does the heavy lifting.
Three real-life scenarios, you can immediately think of what Skill can do:
- Every time you ask Claude to submit code, you must tell him to “run the test first, then write the Chinese commit, and prefix it with feat” - write this into a
commitSkill, and then you can do it in one sentence. - The team agreed on a set of API writing methods (RESTful naming, unified error format, mandatory verification) - written as an
api-conventionsSkill, whoever writes the interface will automatically follow this set. - You want to generate a visual structure diagram of the code base - the official
codebase-visualizerSkill is bundled with a Python script, and after running it, the interactive tree diagram will be opened directly in the browser.
💡 To summarize in one sentence: Skill is “
SKILL.md(when to use + how to do it) + optional supporting files” packaged into one package - write it once, and then Claude can adjust it at will, and can also bundle templates and scripts.
02 Mingmen: Progressive disclosure, context-saving secrets
This is the most important section of the entire article to understand. **Why can Skill be packed in so much but barely occupy your context? ** The answer is one word: progressive disclosure (progressive disclosure, which means “gradually unfolding on demand”, not loading the full text when it is not relevant).
Let’s first talk about why this is important. As mentioned before 19 Context Management, Claude’s “workbench” is so big, and every word that is put into it consumes the budget and takes away the room for thinking. If the full text of each Skill is piled into it as soon as the session starts, half of your workbench will be useless if you install ten Skills.
**Analogy: restaurant menu and chef. ** When you sit down, the waiter will first hand you a menu - each dish has a line of dish name and an introduction, and you will know what is there at a glance. You ordered “Kung Pao Chicken” and the kitchen’s detailed recipe filled with steps was taken out and followed. For dishes you haven’t ordered, the recipes are kept in the drawer and don’t take up an inch of space on your table. Skill works like this:
- Normally: Claude can only see the
description(the name of the dish on the menu) of each Skill. - Relevant: The thing you asked matches a certain description, and the complete text of that Skill is loaded in (turn out the corresponding recipe).
The official stated this rule very straightforwardly:
In a regular session, the skill description is loaded into the context so that Claude knows what is available, but the full skill content is only loaded on call.
So you can feel free to write long references and detailed checklists into the Skill text - it costs almost nothing until you use it. This is the reason why the official recommendation is to “make the content into a Skill instead of stuffing it all into CLAUDE.md”: CLAUDE.md is resident throughout the session as soon as the session is started, and the Skill body is only used when it is used.
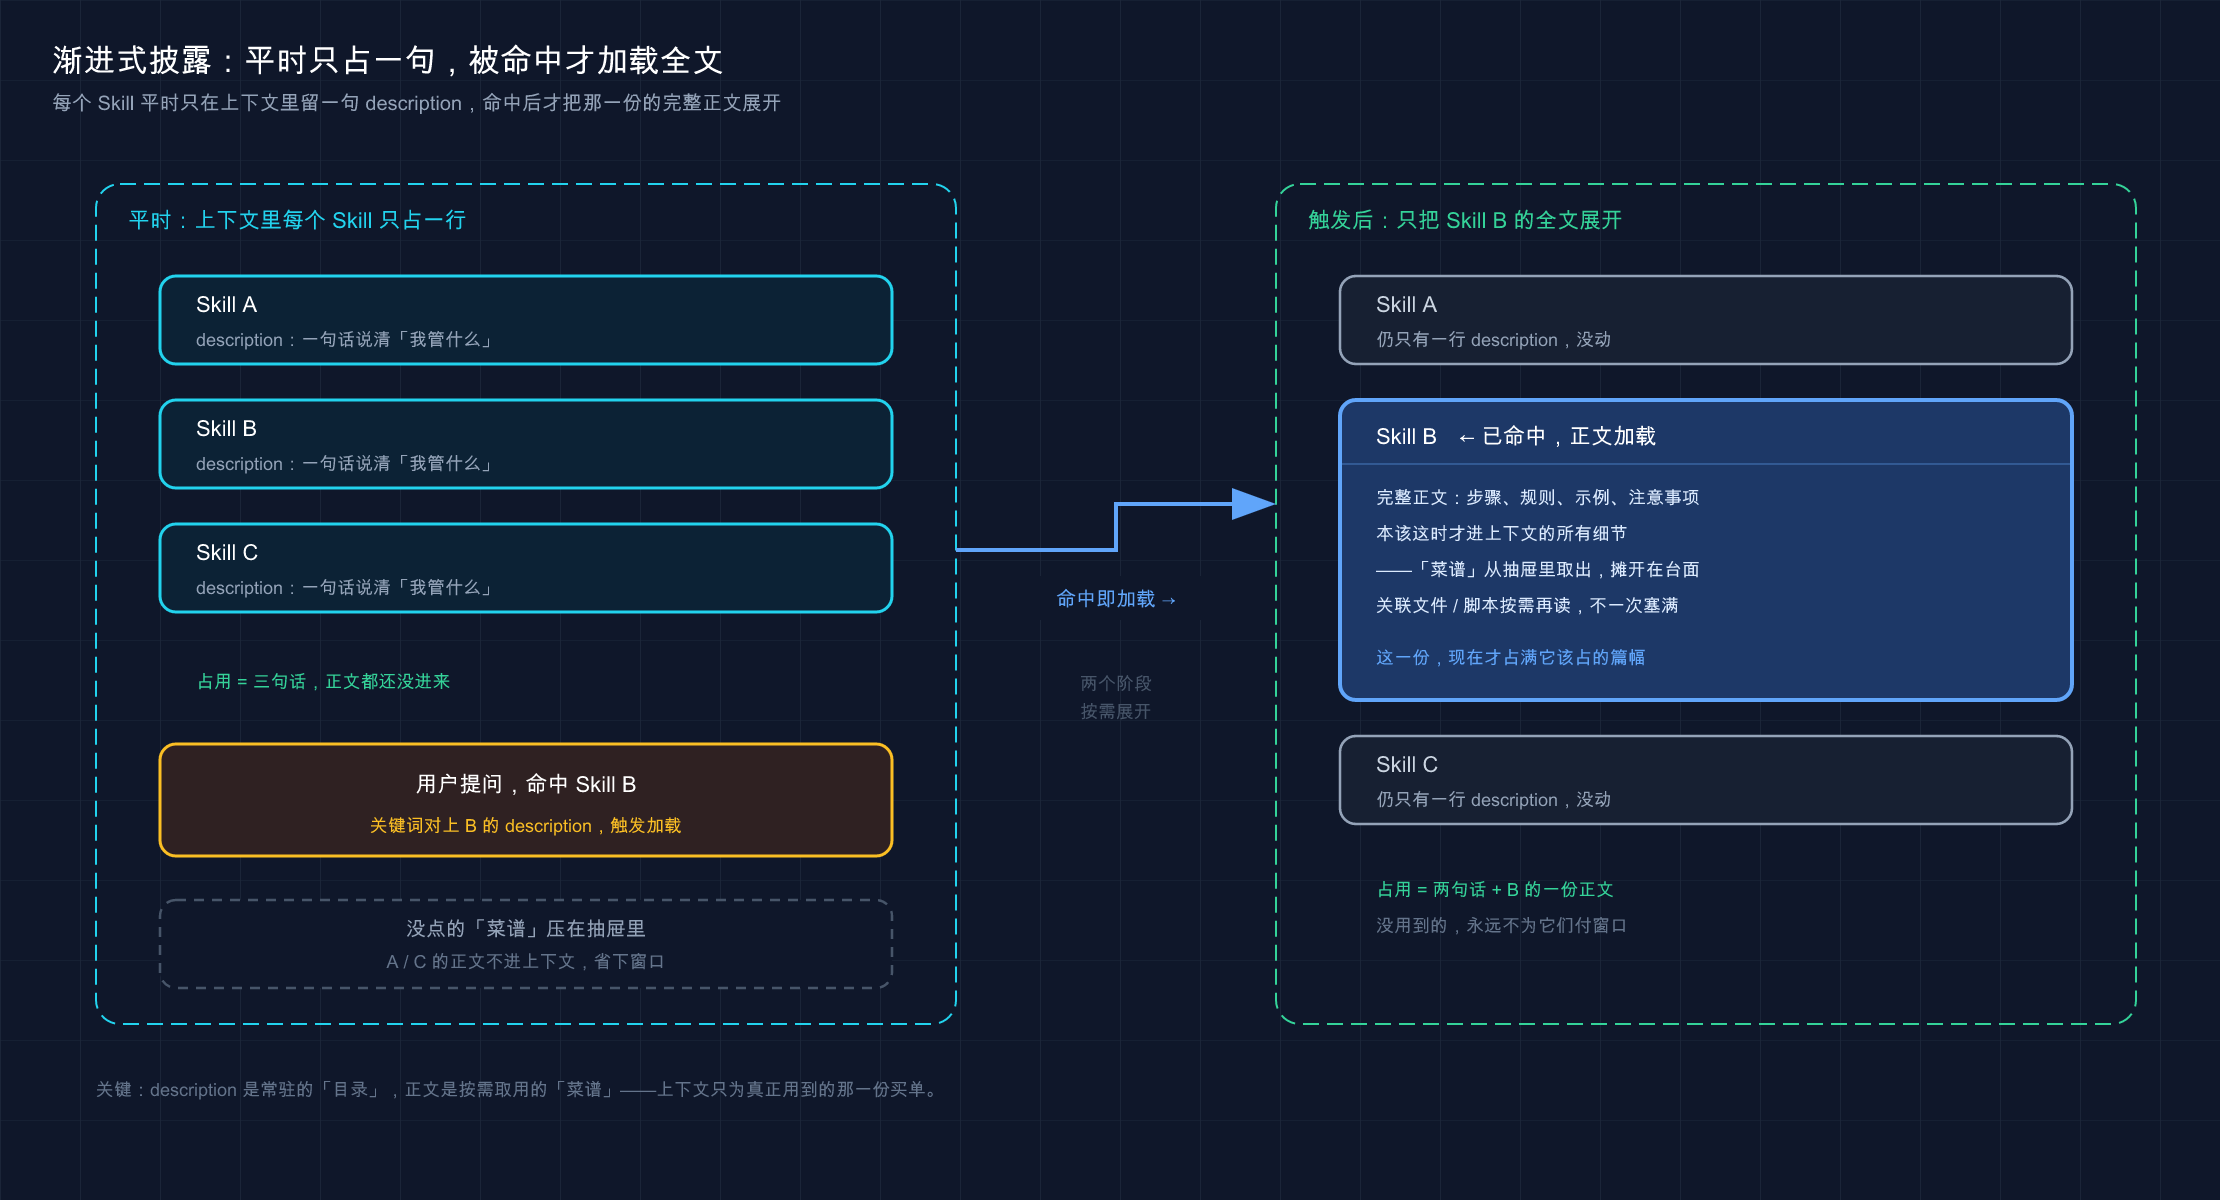
This picture clearly illustrates the two stages of “progressive disclosure”: on the left is the normal conversation - the three Skills each occupy only one description in the context, and the workbench is still empty; on the right is after a description is hit by your question, only the complete text of that Skill is loaded, and the other two are still just one line. You can see where the “province” is at a glance.
But there’s a price you need to know, otherwise you’ll be in trouble: once a Skill is loaded, its text will persist for the entire session - Claude won’t re-read it in every subsequent round. Official words:
When you or Claude invoke a skill, the contents of the rendered SKILL.md enter the conversation as a single message and remain there for the rest of the session.
This means two things: first, each line in the Skill text is a repeated token cost, don’t overdo it. The official recommendation is to control SKILL.md within 500 lines, and split long references into separate files and load them on demand; second, write “permanent instructions” instead of “one-time steps” - because it is present throughout the whole process, it should be written as “guidance applicable to the entire task” rather than “the first step to do X” that expires after use.
Here is a related little trick that I have actually encountered myself: I wrote a Skill and followed it in the first few rounds. After the conversation, I felt that “it seemed to have forgotten this set of instructions.” My first reaction was that it failed to load, and I restarted Claude repeatedly to try to read it again. Only after reading the official version did I understand - the content is usually still there, but the model has turned to choose other tools**. The solution is to write the description and instructions more clearly, and let it continue to be biased towards this Skill instead of doubting the loading mechanism.
💡 One sentence summary: Progressive disclosure = Usually only one description is revealed, and the full text is expanded when it is used, so no matter how many skills are installed, it will not support the context; But it will stay throughout the entire process after expansion, and the text must be streamlined and written as a permanent description.
03 Skill, slash command, Subagent: What’s the difference?
The core of the debate at the beginning is this section. Many people mix these three together, but in fact the positioning is completely different. Here I will break down the most confusing points first, and leave the complete “Which one to choose” decision-making table to Part 30**. This section only focuses on “making it clear”.
First, align the three nouns:
- slash command: An operation automatically triggered by you entering
/xxx. - Skill: Packed with skills, you can take the initiative to shout, and Claude can also automatically adjust on demand.
- Subagent (subagent): a independent context sub-assistant. The main dialogue delegates tasks to it, and it completes the work in its own little world and then brings back the results (discussed in detail previously 23 Subagent).
Here is a key understanding, specifically to break the misunderstanding at the beginning: The slash command and Skill are not antagonistic. The slash command is actually a method of calling Skill. Officially, custom commands have been incorporated into Skills - if you create a commit Skill, it can naturally be adjusted using /commit. The real difference is not in “what it is called”, but in who can initiate it and whether it occupies the context:
| Dimensions | slash command (old .claude/commands/) | Skill | Subagent |
|---|---|---|---|
| Who can initiate | Only you (hit / to trigger) | You + Claude can (can be triggered automatically) | Main dialogue delegation |
| Which context to run in | In the current conversation | In the current conversation (default) | Independent sub-context |
| Does it usually occupy the context | —— | Only one sentence of description | Doesn’t occupy (on demand) |
| Can I bring supporting files | No | Yes (template/script/example) | See its own definition |
| Best for | Fixed operations where you want to manually control the timing | Let Claude use special abilities when he needs to | Run independent, heavy subtasks in isolation |
After understanding this table, the argument at the beginning is resolved: The understanding of the “slash command” is the manual trigger file of Skill; it does not realize that the same Skill can also allow Claude to trigger automatically.
Will “automatic triggering” cause chaos? No, because you have precise control over who has the right to call it. The official provides two frontmatter switches:
disable-model-invocation: true: Only you can adjust it. Use it for tasks that have side effects and you want to catch the opportunity yourself - such as/deploy,/commit, and sending Slack messages. You definitely don’t want Claude to deploy it on his own “seeing that your code seems to be written”.user-invocable: false: Only Claude can invoke. It is used for “background knowledge” skills - such aslegacy-system-contextthat explains how the old system runs. Claude only needs to know it when he needs to use it, but/legacy-system-contextis not a meaningful command for you.
Therefore, “chaos” is controllable: If you are afraid that it will do anything randomly, add disable-model-invocation: true to lock it into pure manual operation; this is exactly the trick that should be used in the above misunderstanding.
💡 To summarize in one sentence: the slash command is the manual trigger file of the Skill, and the Subagent is the sub-assistant of an independent context - the three have different positioning; if you are afraid that the Skill will automatically mess up, use
disable-model-invocation: trueto lock it so that you can only shout**.
04 Where does Skill come from: built-in, plug-in, written by yourself
Now that you know what it is, where does Skill come from? Three sources, from near to far.
**Source 1: Built-in (bundled) Skill – right out of the box, present in every session. ** Claude Code comes with a batch of bundled skills, so you don’t need to install them. The official list includes /code-review (code review), /debug (debugging), /batch (batch processing), /loop (loop running), /claude-api (Claude API reference), etc. There are also three supporting tools for “run and verify”: /run (start and drive your application to see if the changes are effective), /verify (build and run to confirm that the changes work as expected), /run-skill-generator (teach the first two how to build and start your project). You can see these in the menu by pressing /.
Note: Bundling Skills is not the same thing as built-in commands like
/helpand/compact. Built-in commands directly execute fixed logic; bundled skills are prompt-based - give Claude a detailed instruction and let him use his own tools to complete the arrangement. The calling method is the same, just type/and add the name.
**Source 2: Plug-in included - install the plug-in and Skill will follow. ** As mentioned before 24 plug-ins, plug-ins can package a bunch of extensions. Skill is one of the things that a plug-in can bring: create a skills/ directory in the plug-in, and these Skills will be available where the plug-in is enabled. The plug-in Skill uses the namespace of plugin name:skill name (such as /my-plugin:review), so it will never conflict with the name of your own Skill.
**Source 3: Write it yourself – this is Skill’s home turf. ** You write the set of instructions, checklists, and multi-step processes you have pasted repeatedly into a SKILL.md, and it becomes your exclusive skill. The official judgment criteria are very practical:
Create a skill when you keep pasting the same instructions, checklists, or multi-step procedures into chat, or when part of CLAUDE.md has evolved into procedures rather than facts.
This sentence breaks down the division of labor between Skill and CLAUDE.md, and it follows the previous article: CLAUDE.md installs “facts” (what technology stack is used for this project, what are the agreements), and Skill installs “programs” (how to do this in several steps). You find yourself writing “Step 1…Step 2…” in CLAUDE.md, that part should be moved to Skill.
The table below will help you get the right seat:
| Your situation | ❌ Stop doing this | ✅ It’s time to get Skill |
|---|---|---|
| Follow the same process every time you submit | Manually type out the steps every time | Write a commit Skill in one sentence |
| The team has a fixed API writing method | Insert it into CLAUDE.md to occupy the entire context | Write it as Skill and load it only when used |
| Want some kind of visual report | Describe what picture you want every time | Bundle a Skill to generate scripts |
💡 Summary in one sentence: Skill comes from three sources - built-in bundles (out-of-the-box), plug-ins included (you can install them with you), and write it yourself (home game); The only thing you need to judge whether you should write it yourself is: Are you sticking to the same set of steps over and over again.
05 Where to put it determines who can use it + how to trigger and check
The last section comes down to the three most practical things: where to put the Skill you wrote, how to trigger it, and how to see what you have on hand now.
Which directory to put it in determines who can use it
This is the official location list, misplaced = people who should use it cannot use it, just copy it:
| Scope | Where to put | Who can use |
|---|---|---|
| Personal | ~/.claude/skills/<skill-name>/SKILL.md | All your projects |
| Project | .claude/skills/<skill-name>/SKILL.md | Only this project |
| Plugin | <plugin>/skills/<skill-name>/SKILL.md | Where to enable the plugin |
| Enterprise | See Hosting Settings | Everyone in Organization |
The logic is very intuitive: If you only use it and are common across projects (such as your personal commit habits), put it in the personal level ~/.claude/skills/; If it is exclusive to this project and want the team to use it (such as the deployment process of this project), put it in the project level .claude/skills/ and submit it to the repository.
Who wins when they have the same name? The official priority is Enterprise > Personal > Project (because the plug-in has a namespace, it does not participate in the name grab). There is another security tip worth focusing on: After a project-level Skill is submitted to the warehouse, others must first go through the “Workspace Trust” dialog box to pull it - because the allowed-tools in the Skill can authorize a batch of tools for itself, Check what is written in the Skill in the project before trusting the warehouse, don’t let an unknown Skill secretly open the permissions.
How to trigger: automatic matching based on description, no need to memorize commands
This is the most comfortable thing about Skill: You don’t need to remember /whatso, just speak normal human language. Claude will compare what you say with the description of each Skill, and if it matches, it will automatically call up that Skill.
Take the summarize-changes Skill in Section 01 as an example. Its description says “Use when the user asks what has been changed…”, so it can be triggered in two ways:
我改了什么?/summarize-changesThe first is to let Claude automatically adjust (you didn’t mention the skill name at all, it matched it by itself); the second is to call the name directly. The first method is recommended for daily use - just state the need and leave it to it to trigger it. This in turn tells you how important description is when writing Skills: the description must contain “keywords that users will naturally say” for it to be an accurate match. The first step in the official troubleshooting of “Skill not triggered” is to check this:
Check if the description contains keywords that users would naturally say.
How to check: Which Skills are currently available?
I have installed a bunch of them and built them in, how do I know what I have on hand now? The most direct way to ask it is:
现在有哪些 Skill 可用?It will list all currently available Skills for you. This is also one of the official standard actions for troubleshooting Skill problems - confirm first whether it is in the list, and then talk about triggering. In addition, if you press / to bring up the command menu, you can also see those that can be adjusted manually. /doctor can help you check “whether the Skill description has been truncated due to too many installed skills” (if there are too many Skills installed to a certain extent, the description will be compressed to save character budget, and the matching keywords may be cut off).
💡 In one sentence: put
~/.claude/skills/at the personal level and.claude/skills/at the project level. When they have the same name, the priority is: Enterprise > Personal > Project; triggering depends on automatic matching of description, no need to memorize commands; **You can check what skills are available right now with just one sentenceWhat skills are available?.
06 Hands-on: Understand “automatic triggering” and “progressive disclosure” in 5 minutes
You can’t remember it just by watching it. The following set of minimal operations, without writing any complicated scripts, allows you to see two things with your own eyes: How Skill is automatically triggered by a sentence, and how it usually only occupies one line. The whole process can be run in an empty directory.
Step 1: Create a personal Skill directory (Mac/Linux)
mkdir -p ~/.claude/skills/explain-selfWindows users: Create a new explain-self folder under C:\Users\your username\.claude\skills\.
Expected: There is an additional explain-self empty directory under ~/.claude/skills/.
Step 2: Write the simplest SKILL.md
Using your favorite editor, save the following content to ~/.claude/skills/explain-self/SKILL.md:
---
description: 用大白话解释一段代码或一个报错。当用户说「这段代码啥意思」「这个报错咋回事」「帮我读读这个」时使用。
---

## 说明

把用户给的代码或报错,用初学者能懂的大白话讲清楚:
1. 这东西整体在干啥(一句话)
2. 逐行 / 逐段拆开说
3. 如果是报错,指出最可能的原因和怎么改

不要堆术语,能用生活类比就用。
Note that its description specifically says “What does this code mean?” “What’s going on with this error?” These are the things you really know how to say - these are automatically triggered hooks.
Expected: There is a SKILL.md in the explain-self directory.
Step 3: Start Claude and confirm it recognizes the Skill
claudeAfter entering, type:
现在有哪些 Skill 可用?Expected: In the returned list of available Skills, you can see explain-self, next to the description you wrote. **See it in the list = Skill has been loaded correctly. (This step also confirms progressive disclosure: at this moment, there is only one description in the context, and the description lines of the main text have not been loaded yet.)
Step 4: Don’t call out the name, use “human words” to trigger it
Deliberately not type /explain-self, but say something that matches description:
这段代码啥意思:print(sum([1,2,3]) / len([1,2,3]))Expectation: Claude will automatically call the explain-self Skill (you can see the prompt that the Skill is triggered in its response), and then follow the three steps you wrote - first say the whole thing in one sentence (calculate the average of these three numbers), and then break it down into sections with fewer terms. **It calls up the corresponding function without waiting for you to shout the command. This is automatic triggering. **
Step 5: Call the name directly
Try manual transmission again and type directly:
/explain-self 这个报错咋回事:ZeroDivisionError: division by zeroExpectation: This Skill is also triggered, and the effect is the same as the fourth step - the only difference is that this time you actively shout. The two roads lead to the same ability, which just confirms the statement in Section 03 that “you + Claude can initiate it.”
After passing these five steps, you will have verified the two core things of Skill - “automatic triggering of description matching” and “usually only one sentence of description” - with your own hands.
💡 To summarize in one sentence: Create
~/.claude/skills/explain-self/SKILL.md, useWhat skills are available?to confirm loading, and then use “human words” and/nameto trigger once each - Seeing with my own eyes that automatic triggering and manual triggering lead to the same skill, it is more practical than memorizing ten documents.
07 Summary
This article walks through Agent Skills from “what it is” to “how to use it” - it makes Claude no longer a blank piece of paper, but comes to work with a set of specialized skills that can be deployed on demand.
The core points are reviewed in series:
| Things you want to know | Answers | Key points |
|---|---|---|
| What is Skill | SKILL.md + optional supporting files packed into one package | The frontmatter tells when to use it, and the main text tells how to do it |
| Why not support the context | Progressive disclosure | Usually only reveal a description, and then expand the full text when used |
| What is the difference between slash / Subagent | Different positioning | slash is a manual file, Subagent is an independent context (see article 30 for the decision table) |
| Where does the Skill come from | Built-in / Plug-in / Write it yourself | Pasting the same set of steps over and over again = It’s time to write it yourself |
| Where to put it, how to trigger it, how to check it | Directory determines the scope | Automatic matching of description; What Skills are available now? Check |
You should now be able to: Explain clearly what a Skill consists of and how it relies on the principle of “progressive disclosure” to save context; distinguish the respective positioning of the Skill, slash command, and Subagent; know the three sources of the Skill, and which directory it is placed in to determine who can use it; and understand that triggering it relies on automatic matching of the description without having to memorize commands. **This ability to “call up specialized abilities on demand” is a key step in training Claude from a “general assistant” to an “expert who understands your job.” **
The next article 27 “Skills usage examples” - This article is all about concepts and mechanisms, the next article is real: Take you to install a truly useful Skill from scratch, trigger it with your own hands, and watch it finish the job. Think about it, what do you do in your daily life that you repeatedly tell Claude to follow the same process? In the next article, we will take a look at this kind of work and turn it into a skill that can be adjusted in one sentence.
27 · Skills usage examples: install one, shout, and watch it work
For example, you need to prepare a code base structure diagram to report to your boss. Normally, we would have to sort out the nodes, draw a Mermaid sketch, adjust the color, and export the PNG in our minds first, and it would take a long time to complete the set. At this time, just type “Draw me an architecture diagram of this project” into Claude Code - Claude will do it by himself.
It does not ask you for any parameters, it loads a skill called baoyu-diagram, layouts it according to the hard-coded dark design system, generates SVG, and converts it to @2x PNG. In less than five minutes, the picture is in docs/assets/**.
Only at this moment do you truly understand the value of skill: It is not “to make Claude smarter”, but “to let Claude do something according to the same set of reliable procedures every time”. Half a day was reduced to five minutes, and the only difference was the written process.
You already know what skill is from the previous article. This article only does one thing: take you through the experience of “turning half a day into five minutes” by running it yourself.
After reading this article, you will get:
- Find out what skills are available in the current session in one sentence, no more guessing
- Understand what a real
SKILL.mdlooks like, and know how thedescriptionline determines whether it is triggered or not. - Use “natural language trigger” and “
/to call him by name” to run the complete process of a skill, and each step has expected output. - Three-step checklist when the skill cannot be called (the statement is too vague/the description does not match/it is not enabled at all)
- The specific method of submitting a skill to the project and having the whole team work according to the same process
01 Don’t rush to use it yet: take a look at what skills you have
The first step is not to “use skills”, but to figure out which skills you currently have that can be used.
The most common mistake that novices make is to yell based on their impression - “I remember there is a skill for drawing, right?” Then shout to Claude for a long time and there is no response, thinking that the skill is broken, but in fact it is not installed at all. Find out your family background first, that’s better than anything else.
**Analogy: Before cooking according to the recipe, first look through the dishes in your cookbook. ** You don’t look at the kitchen and daydream, “Let’s make braised pork today.” You have to first make sure that the recipe has a “braised pork” page and that the ingredients and steps are all present. Skill is Claude’s recipe, and each SKILL.md is a written dish - flip the directory first, confirm that the dish is in the book, and then start it.
The way to check is very simple, just ask it in vernacular in the Claude Code session:
有哪些可用的 skill?The official document uses the English question What skills are available?, which is also recognized in Chinese. Expected: Claude will list the skills available in the current session, each with a name and a one-sentence introduction. When I run this tutorial project, there is a drawing in the list:
baoyu-diagram — 生成专业的暗色主题 SVG 图(架构图 / 流程图 / 时序图 / 思维导图……)💡 In one sentence: Before using a skill, ask in the conversation “What skills are available?” Confirm that the dish you want is on the list before firing, don’t yell at skills that don’t exist.
There are two other little tricks for checking family background, please note them down:
/skills menu - Type /skills in the input box and press Enter. A visual menu will pop up listing all skills. You can also switch the enabled status of each skill here (highlight it and press Space to cycle through and Enter to save). More intuitive than a plain text list.
/doctor Physical Examination - This is more advanced: If you have installed a lot of skills, Claude may not be able to install them due to the “description budget” and has cut off the description of some skills, causing it to “not see all the skills”. /doctor can tell you whether the budget is overflowing and which skills are affected. Novices generally don’t need it, but if you find that a certain skill is not triggered for no reason, run /doctor first and take a look.
02 Take apart a real skill: What does SKILL.md look like?
It’s not enough to just know “there is this skill”, you have to understand what it looks like inside so that you can understand why it is triggered and what it can do.
Fortunately, there is a real skill in this tutorial project. Let’s not look at the toy examples in the official documentation, but just look at the baoyu-diagram that is actually used and relied on to create pictures every day.
Its location in the project is:
.claude/skills/baoyu-diagram/
├── SKILL.md              # 主说明(必需)
├── references/           # 各类图的详细排版规范(按需加载)
│   ├── architecture.md
│   ├── flowchart.md
│   └── sequence.md
└── scripts/
    └── main.ts           # SVG 转 PNG 的脚本(被执行,不进上下文)
Do you see the way through? A skill is a folder, SKILL.md is the entrance, and reference documents and scripts can be hung next to it. SKILL.md is required, the rest are optional “materials” - refer to the documentation to keep the main description concise (load which type of diagram is used), the script is a tool for Claude to run.
Open its SKILL.md, and the top block surrounded by --- is the life gate, called frontmatter (pre-metadata, the configuration written at the top of the file):
---
name: baoyu-diagram
description: Create professional, dark-themed SVG diagrams of any type — architecture diagrams, flowcharts, sequence diagrams... Also trigger when the user says "画个图" "画一个架构图" "diagram" "flowchart"...
version: 1.117.3
---
--- The large section of markdown below is the “recipe text” that Claude really wants to follow (design system, color matching, typesetting rules, and PNG conversion commands).
Here is a key point that was mentioned in the previous article, but you should see it with your own eyes now: The description line is the core basis for Claude to judge “should this skill be used this time” (there is also an optional when_to_use field in the frontmatter that can supplement the trigger conditions, and the two together are truncated to 1536 characters).
Have you noticed - this description is filled with a bunch of Chinese trigger words: “Draw a diagram”, “Draw an architecture diagram”, as well as English diagram and flowchart. This is not written casually. The author deliberately put everything the user might say into it, so that Claude would react “It’s my turn” when he hears these words.
**Analogy: The line in the recipe header reads “Suitable for: family banquets, entertaining guests, and serving meals.” ** When you are looking for “Hospitality Dishes” in the menu, and you glance at the line in the header, you will know that this is the right dish. description is the header tag of the skill - Claude will use your words to compare the description of each skill, and whose tag matches the most, open that page.
So remember this causal chain, and all subsequent troubleshooting will depend on it:
What you said → Claude compared the description of each skill → they matched → load the text of the SKILL.md → follow the steps inside.
The closer the description is to what you actually said, the more accurate the trigger will be. This is why the next section to investigate “Can’t Shout” is the first thing to check.
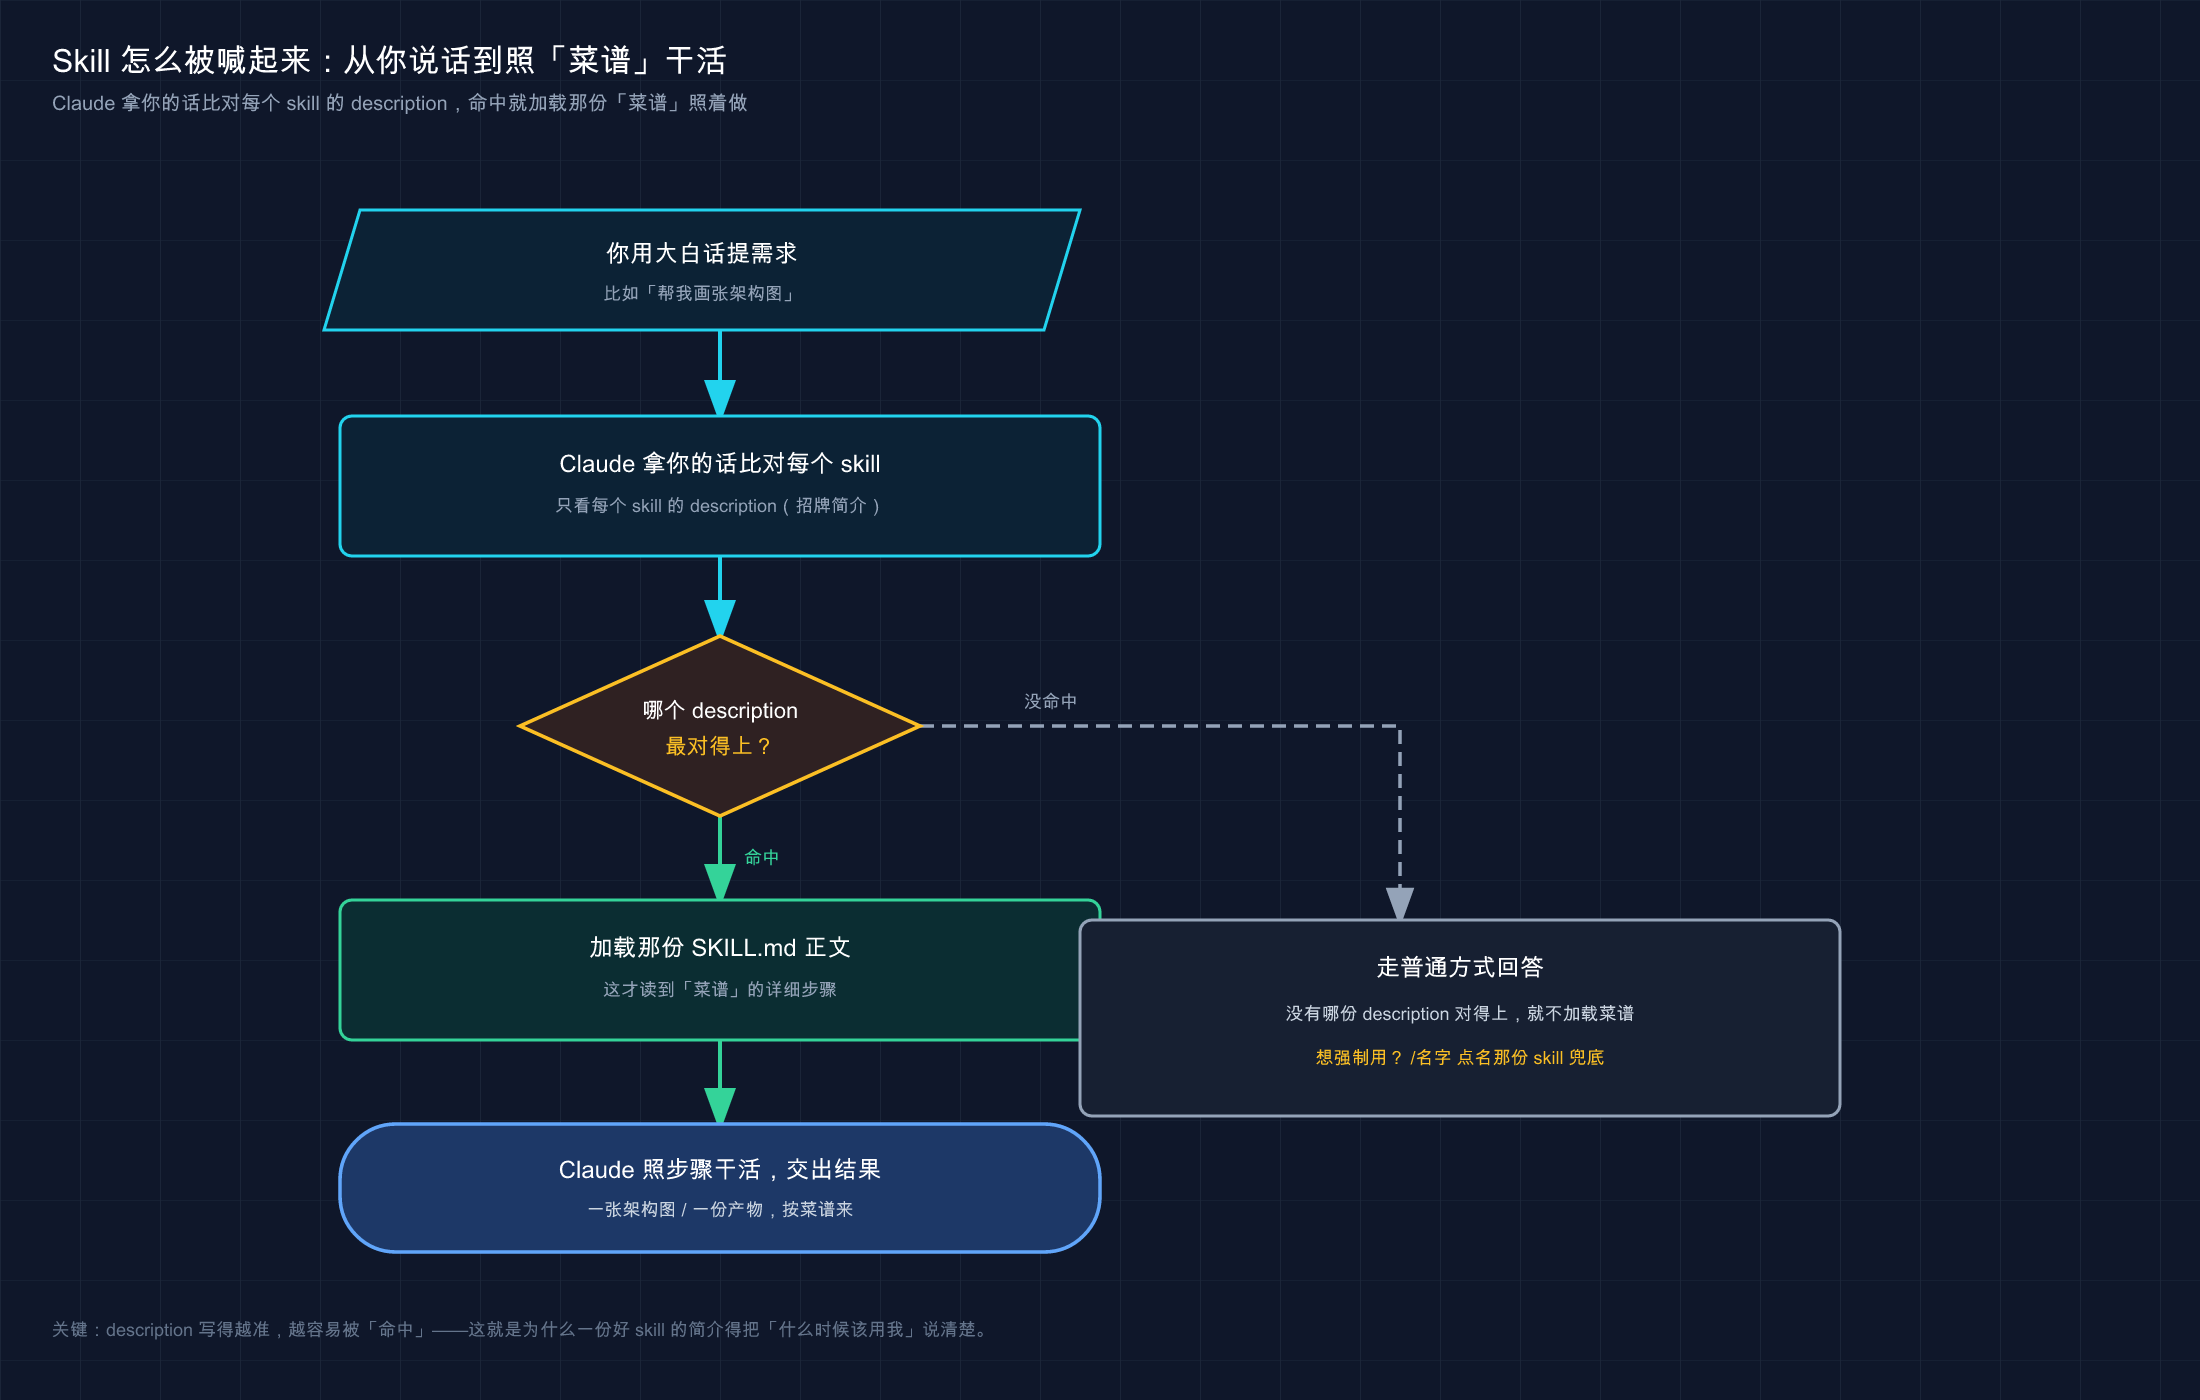
This picture breaks down “How to turn a sentence into a skill to work” into four steps: you speak → Claude compares it with the description of each skill → loads the corresponding SKILL.md text after hitting it → produces the result according to the hard-coded steps. Once you understand this chain, you will know where to start troubleshooting.
💡 In one sentence summary: A skill is a folder with
SKILL.md, and thedescriptionat the top is the triggering gate - Claude compares it with your words, and only opens this page of recipes when it matches.
03 Run through the first one: shout in natural language and see it come alive
The family assets are cleared, the structure is understood, and everything is in order. This section uses baoyu-diagram to go through the most common usage of **: shout in vernacular and let Claude decide whether he should go to **.
This is the most exciting thing about skills - you don’t have to remember any commands, Claude chooses which skill to use.
The first step is to start Claude Code in the root directory of the tutorial project:
claudeExpected: Enter the session and an input box appears at the bottom.
The second step is to state the requirements directly in vernacular - note that the name baoyu-diagram is not mentioned here**:
帮我画一张图,说明 Claude 的「想→做→看」代理循环Expectation: As soon as Claude heard “draw a picture”, he compared the description of each skill and hit the diagram/“draw a picture” in the baoyu-diagram line, so he automatically loaded it, and then worked according to the text of the recipe: read the corresponding reference document (for the flow chart, read references/flowchart.md), typeset according to the dark design system, and generate a .svg, and then run the script to convert it to @2x.png.
After you finish it, it will tell you where the output is, which roughly looks like this:
已生成图表:
  docs/claude-code/assets/27-agent-loop.svg
  docs/claude-code/assets/27-agent-loop@2x.png
**See these two files = the skill is triggered successfully and the work is completed. ** You didn’t touch any parameters in the whole process, it all relied on simple words.
This is the biggest difference between skill and “normal conversation”. Take a comparison and the difference is clear at a glance:
| ❌ No skill | ✅ Yes skill | |
|---|---|---|
| What you want to say | Detailed description of color matching, font size, layout, how to convert to PNG… | One sentence “Help me draw a picture” |
| Stability of output | Dark color this time, bright color then, the style will change every time | Use the same design system every time, stable and consistent |
| What you need to remember | A bunch of parameters and steps | No need to remember anything |
To put it bluntly, skill has written down “the cumbersome process that needs to be explained every time” in one go. You just say what you want, “how to make it professionally” is the recipe’s business.
Don’t want to wait for it to guess? Directly call your name
Sometimes you are very sure that you need to use a certain skill, and you are too lazy to let it guess. It is fastest to just call the skill with /**:
/baoyu-diagram 画一张用户登录的时序图Expectation: Skip the “matching description” step, load baoyu-diagram directly and execute it, passing the string of words after / as a parameter (here you tell it what picture to draw).
When should you use the two methods? Generally speaking:
- Explore, not sure what to use → Use vernacular and let Claude choose (maybe it’s more accurate than you think).
- Know exactly which one you want and want it to be executed immediately →
/roll call, especially for skills that “have side effects and cannot be triggered randomly” (such as deployment and submission). Officials recommend that you just let you manually/adjust them, and don’t let Claude make his own decisions.
💡 To sum up in one sentence: There are two ways to run a skill - ** Let Claude choose the vernacular,
/namedirectly call**; the former is suitable for exploration, and the latter is suitable for “I want it and do it immediately”.
04 No response after shouting? Three steps to check and get your seat right
If you really get started, you will encounter it sooner or later: ** shouted, Claude didn’t use skill, and he did it in the normal way. Don’t panic yet, and don’t think that the skill is broken - 90% of the time it is one of the following three situations. These are the official troubleshooting items, sorted by “most common” below.
**Analogy: If you follow a recipe and the dish fails, there are only three reasons - the name of the dish you mentioned does not match the header of the recipe page, the recipe is not included in this book at all, or your words are too vague and the chef does not understand. ** By arranging them one by one, you can always find out which ring it is.
**Step one: First suspect “you are too vague” (the most common). **
Many times it’s not the skill’s fault, it’s that your sentence is too far away from description. For example, the description of baoyu-diagram says “drawing/diagram/architecture diagram”. If you say “give me the whole visualization thing”, Claude may not match it with “drawing”.
Solution: Move your words closer to description and say it again in a more straightforward way:
帮我画一张架构图With clear verbs such as “draw” and “picture”, the hit rate will immediately increase. This is the fastest trick, try it first.
**Step 2: Confirm “whether this skill is registered or not.” **
Go back to the trick in Section 01 and ask:
有哪些可用的 skill?Expectation: If the skill you want is not in the list at all, then the problem is clear - it is not installed at all, or it has not been loaded (for example, the project-level skill has not passed trust, or your startup directory is wrong). Don’t waste time on “how to trigger” this kind of thing, install/load it first (Section 05 talks about how to make it effective at the project level).
**Step 3: Confirm the registration, or it is not triggered - just call / to find out. **
If the second step confirms that it is in the list and the first step changes the wording and it still doesn’t work, Don’t fight with it, just manually adjust it with /name:
/baoyu-diagram 画一张架构图As long as it is in the register, the / roll call will definitely be able to be adjusted (/ is “I want you to be called by name”, bypassing the “Claude makes his own judgment” link). This step not only provides you with the basics, but also helps you to locate the problem: / can be adjusted = there is nothing wrong with the skill itself, it is purely automatic triggering that does not match, then you can go back and optimize description.
Organize these three steps into a checklist and follow them when you can’t stop:
| Phenomenon | What to check first | How to solve |
|---|---|---|
| No response after shouting, Claude did it in the normal way | What you said is not far from description | Let’s repeat it in a more straightforward way (with a clear verb) |
| Changing the wording still doesn’t work | Is the skill in the “Available List” | Ask “What skills are available?”; If not, install/load first |
| Confirm the registration, or not trigger automatically | Is the match simply missed | /name Manually name the details, and optimize afterwards description |
⚠️ On the other hand, there is also the problem of “triggering too frequently” - a certain skill pops up on its own at every turn. The official solution is: Make its
descriptionmore specific (don’t use too broad words), or adddisable-model-invocation: trueto it, directly prohibiting Claude from automatically triggering, and only allowing you to manually/adjust it. This modification method belongs to “creating/modifying skills”, which will be discussed in the next article.
💡 Summary in one sentence: If you can’t cry, follow the three-step process - First suspect that the statement is too vague (change to a straightforward statement), then check whether the person is on the list, and finally
/name the person; these three tricks cover almost all “non-triggers” you will encounter.
05 Make it available to the whole team: Submit the skill to the project
At this point you already know how to use skill. But there is a problem: the skill installed in ~/.claude/skills/ above is only available on your own computer, not when colleagues pull the code.
If you want the entire team to work according to the same process, you have to put it somewhere else - project-level skills.
**Analogy: Don’t just post the recipe for this dish in your own kitchen, print it into the “company recipe book” distributed with the project. ** Anyone who gets this booklet (clone it in the warehouse) can open it and cook the same dish. Personal skills are your private recipes, while project-level skills are public recipes that are sent out together with the code and everyone has a copy.
The only difference is: where to put it and whether to submit it to Git. Look at this comparison:
| Personal skill | Project-level skill | |
|---|---|---|
| Where to put | ~/.claude/skills/<name>/SKILL.md | .claude/skills/<name>/SKILL.md in the project |
| Who can use | All your projects, but only your machine | Everyone who has cloned this repository |
| Whether to enter Git | Not to enter (in your home directory) | Enter, submit together with the code |
| Typical uses | Your personal process | Unified team specifications (deployment, submission format, drawing style) |
How to implement it specifically, there are three steps:
Step one: Put the skill into the project’s .claude/skills/ (instead of the main directory):
你的项目/
└── .claude/
    └── skills/
        └── team-commit/
            └── SKILL.md
**Step 2: Submit to version control. ** Just like submitting normal code:
git add .claude/skills/
git commit -m "feat: 加一个团队统一的 commit skill"
Step 3: Colleagues can use it after pulling it down - This is the best part about the project level: After others clone the repository and git pull, this skill will automatically be in their session, no need to install it manually. From now on, the entire team “draws in the same style” and “submits all go through the same set of checks.”
Here is an official and clear security detail, be sure to remember: for skills checked in other people’s projects, when you open the project for the first time, a “Workspace Trust” dialog box will pop up for you to confirm. Why this one? Because a skill can grant itself tool permissions (such as automatically running commands), before trusting a warehouse, first take a look at what is written in its skill, and don’t close your eyes and agree. Official words:
Review project skills before trusting the repository, as skills can grant themselves broad tool access.
This is what you should do when pulling in external projects. For example, if you clone an open source warehouse and take a look at the SKILL.md under .claude/skills/ before trusting it, you may find that a certain skill in it has released a bunch of Bash permissions in allowed-tools - it is not necessarily malicious, but it is better to see it clearly before trusting it. This glance is worth spending.
💡 In one sentence: If you want the whole team to use the same skill, put it into the project’s
.claude/skills/and submit it to Git. Others will automatically clone it; but before trusting other people’s project skills, take a look at what permissions it has applied for.
06 Do it yourself: Assemble a personal skill from scratch and shout it with your own hands
The ready-made baoyu-diagram was used previously. This section will take you to create the simplest skill from scratch and trigger it - not to make it too complicated, but to see with your own eyes the complete link of “write a file → it appears in the list → shout it in one sentence”. The whole process does not rely on any complex environment.
Let’s make it super simple: let Claude help you explain a piece of code in a “café chat style”.
Step 1: Create a skill directory (personal level, put it in the main directory, and it can be used in all your projects). Mac/Linux:
mkdir -p ~/.claude/skills/explain-casualWindows(PowerShell):
mkdir $HOME\.claude\skills\explain-casualExpected: There is an additional explain-casual folder under ~/.claude/skills/.
**Step 2: Write SKILL.md. ** Use your favorite editor and paste in ~/.claude/skills/explain-casual/SKILL.md:
---
description: 用轻松的咖啡馆聊天风格解释一段代码。当用户说「用大白话讲讲这段代码」「这段代码在干嘛」「讲讲这个函数」时使用。
---

## 任务

用最口语、最轻松的方式解释用户给的代码,像跟朋友在咖啡馆闲聊,不要学术腔。要求:

1. 先一句话说清这段代码整体在干嘛。
2. 再挑出关键的几行,逐个用大白话讲。
3. 最后提一句:有没有看着别扭、可能埋坑的地方。
Emphasis added: That line of description is deliberately filled with words that users may say - “Tell me about this code in vernacular”, “What does this code do”, “Tell me about this function”. This is the “header tag” mentioned in Section 02. The closer the stuff is to the true statement, the more accurate the trigger will be.
Step 3: Confirm it’s on the list. ** There is an official detail to note here: ** “Top-level skill directories” that do not exist when the session is started require a restart to be monitored. We just created the explain-casual directory, so just to be on the safe side open a new session:
claudeAfter entering, I asked:
有哪些可用的 skill?Expectation: explain-casual** appears in the list, with the Chinese description you wrote. **See it = skill installed and loaded. **
**Step 4: Call it in vernacular (don’t mention the name). ** Paste a piece of code in the session and let it speak, for example:
用大白话讲讲这段代码:
def average(numbers):
return sum(numbers) / len(numbers)Expectation: Claude matches your sentence “Explain this code in vernacular” with the description of explain-casual, automatically load this skill, and then follow the three steps: first say that it is an average value; then talk about the line sum(numbers) / len(numbers); and finally remind you that passing an empty list will cause a crash if it is divided by 0** (this is exactly the 1st step) The “Place of Burial” step in the mission is in effect). The whole tone is a relaxed cafe style, not a dry document tone.
**Step 5: Compare the “roll call”. ** Try again / Direct call:
/explain-casual def average(numbers): return sum(numbers) / len(numbers)Expected: The same effect, but this time it is triggered by your roll call - skipping the “Claude’s own judgment” link, and the code after / is passed in as a parameter.
After completing these five steps, you will have touched the complete life cycle of the skill with your own hands**: write SKILL.md → it will appear in the available list → it can be shouted in vernacular → / can also be named. **Anyone else’s skill used in the future will essentially be the same mechanism, except that the recipe content will be more complicated. **
⚠️ If you don’t see
explain-casualin the list of the third step: it is likely that the session has not been restarted (the new top-level directory must be restarted to be monitored), exitclaudeand re-enter. If it doesn’t work after re-entering, check that the file path and file name are exactly calledSKILL.md(all caps).
💡 To sum up in one sentence: Create the simplest skill by yourself and run it - create a directory, write
SKILL.md(description is filled with real explanations), restart and confirm to enter the list, shout in vernacular**; if this link is open, you will be able to use other people’s skills.
07 Summary
This article is hands-on throughout the process, turning “being able to use other people’s skills” from concept to muscle memory. Let’s review the core actions together:
| What you have to do | How to do it | Key points |
|---|---|---|
| Check what skills are available | Ask “What skills are available?” / /skills menu | Make sure it is registered before using it |
| Understand a skill | Read its SKILL.md | The top description is the trigger of life |
| Trigger a skill | Shout in vernacular / /name roll call | Use the former to explore, and use the latter if you want it to do it immediately |
| Don’t call for investigation | Let’s put it bluntly → Check if it’s on the books → / Tell the truth | 90% of the time it’s “the statement is too vague” |
| Let the whole team use it | Put it into the project .claude/skills/ and submit it to Git | Before trusting other people’s project skills, check what permissions it has applied for |
You should now be able to: Find out which skills you have in any session, understand the structure of a real SKILL.md and why it is triggered, run a skill in two ways, locate the problem in three steps when it cannot be called, and submit a skill to the project for team sharing. This ability to “use other people’s skills” is your ticket to the entire skill ecosystem for free in the future - There are a large number of ready-made skills in the community, install them and shout out, and the professional processes written by others will be used for you.
This is how the “half a day becomes five minutes” architecture diagram at the beginning came about. You now have the same key.
Next article 28 “Skill-creator: Create your own skill” - Now that you can use other people’s recipes, the next step is naturally to write your own recipes. Is there any process where you have to give Claude a long list of instructions every time? (There is often more than one such process.) The next article will teach you how to use the official skill-creator to solidify this “tedious process of repeated pasting” into your own skill at once, changing from a “recipe user” to a “recipe writer”.
28 · skill-creator usage: use a skill to create your own skill
They all say that SKILL.md is just a markdown file. You can just write it by hand. Do you need to hire a tool?
To be honest, this is only half true. The file is indeed simple, but “creating a skill that can be triggered accurately” is not simple at all - and 90% of the mistakes in handwriting fall into the same place: description is written crookedly, and as a result, the skill can never be called.
This is how I translated my first handwritten skill. At that time, I wanted to make a skill that “generates commit messages that conform to team specifications.” After the directory was created and the text was clearly written, I casually filled in the sentence “Commit message helper” in description. The result? Every time I ask Claude to submit, he ignores my skill at all and writes a version according to common habits. I insisted that it was not installed properly, and spent a long time trying /doctor, restarting, and reinstalling, all to no avail. Later I figured it out - The problem is not “whether it is installed or not”, but “there are no words that users would say in the description”. This kind of pitfall is completely invisible when you write by hand, so something has to force you to do it right.
skill-creator is that thing.
After reading this article, you will get:
- Why writing
SKILL.mdby hand looks easy but is actually the easiest to get into trouble? What exactly didskill-creatorhelp you do right? - The complete skill creation process of
skill-creator: scaffolding → guide to writename/description/ text → organizescriptsandreferences→ package - The most valuable section of the whole article: How to write
descriptionso that it can be accurately triggered (including trigger scene keywords, and it must be more “active”) - In which directory should personal skills and project skills be located, and who can use them?
- A hands-on practice that you can follow and run: use
skill-creatorto create a minimum skill and verify with your own hands that it is actually triggered
01 Anti-Consensus: Handwriting SKILL.md is not difficult, the difficult thing is “making it scream”
Let’s start with the foundation of the previous article. You already know from Chapter 27: A skill is a directory, the core is the SKILL.md inside, with a YAML at the top writing name and description, and below is the text for Claude to read. Original words from the official document:
Each skill requires a
SKILL.mdfile, which contains two parts: the YAML frontmatter (between the---tags) that tells Claude when to use the skill, and the markdown content containing the instructions that Claude follows when calling the skill.
Doesn’t it look very simple? Create a folder, write a file, and do it all. Therefore, the first reaction of novices is: Handwriting is enough, what tools do you need.
This is the anti-consensus point: handwriting itself is indeed not difficult. The most difficult thing is that the skill written by hand “cannot be called” - you thought it would automatically appear when it should appear, but it turns out that it has been sleeping in the corner**.
**Analogy: Fill out a form in the “Tool Making Wizard”. ** Have you ever seen that kind of wizard when installing new software - it doesn’t let you fill in a blank configuration file, but asks you page by page, “What is this tool called?” “Under what circumstances should it be used?” “What does the input look like, and what format is the output required?” You answer a few questions, and it will arrange the directory structure, scaffolding, and the positions of each field for you behind the scenes. skill-creator is this kind of wizard in the skill world: You answer a few questions for it, and it will do things for you that “you never thought of taking care of when writing by hand”.
Specifically, which pitfalls in handwriting have it saved you from? Look at this comparison table - This is the most important thing to remember in this section:
| Easy to overturn links | ❌ Common results of pure handwriting | ✅ skill-creator helps you get it right |
|---|---|---|
description | Written like “Commit helper”, without trigger words, it will never be triggered | Guide you to write clearly “what to do + when to use”, including keywords that users will say |
| Directory structure | Put all scripts and reference documents into SKILL.md, which is long and messy | Help you divide it into scripts/ references/, and keep the text concise |
| Trigger verification | After writing, I don’t know whether it is triggered or not, it all depends on metaphysics | I will give you a test case, run it to see if it can be triggered |
| Improvement | If there is no trigger, I can only stare and don’t know where to change | There is a special description optimization link to adjust the trigger rate |
Did you see it? The cars that were written over by hand are all things that “you can’t see, so you don’t care”. The value of skill-creator is not to help you type (typing is not much faster), but to force you to do these invisible things correctly.
💡 In one sentence: It is not difficult to write
SKILL.mdby hand, but the difficulty lies in making it trigger when it should be triggered;skill-creatoris like a wizard for filling in forms and making tools, taking care of thedescription, directory, verification, and improvements that are “invisible when writing by hand” for you.
02 What is skill-creator and how to invite it to appear?
Let me give the conclusion first: skill-creator itself is a skill, and its specialty is “creative skills”. It sounds like a tongue twister, but the logic is very smooth - since skill is used to expand Claude’s abilities, then the repetitive task of “making a skill” is worth making a skill in itself.
It does not come with Claude Code (unlike the bundled skills of /code-review and /debug), and needs to be installed separately - put the skill directory into ~/.claude/skills/ (personal global) or the project’s .claude/skills/ (only effective for this project). This mechanism has been discussed in Part 27. The toolkit corresponding to “create plug-ins” in the official plug-in market (claude-plugins-official) is called plugin-dev. skill-creator is an independently released skill. The installation method is to directly clone or download the directory to the skills path:
# 把 skill-creator 目录放到个人 skills 目录
cp -r skill-creator ~/.claude/skills/Expectation: After placing it, you can see skill-creator in the /skills list, and the description reads “Create new skills, modify and improve existing skills…”.
After installing it, there are two ways to invite it to appear, exactly the same as “using skill” mentioned in article 27:
**Position 1: Call the name directly (clear instruction). **
/skill-creator**Position 2: Say in plain English what you want to do (let it trigger automatically). ** This is also the more commonly used one - because the description of skill-creator is very “complete”. If you say “I want to make a skill to do XX”, it will catch it:
我想做一个 skill,每次帮我把 git 改动总结成一条规范的 commit messageRegardless of the posture, it will not just throw a file at you, but will start asking you questions like a wizard. In the official description of skill-creator, the first step is called “Capture Intent”. It will ask you the following things:
- What does this skill allow Claude to do?
- When should it trigger? (Which words will users use/in what scenarios)
- What is the expected output format?
- Do you want to build test cases to verify that it works properly?
Pay attention to question 2 - “When will it be triggered?” it will ask you specifically. This is the biggest difference between it and handwriting: when writing by hand, no one forces you to answer this question, you just write a description and pass; skill-creator treats it as a top priority, because it knows that this question and answer is not good, and the skill created is a waste**.
**Analogy: The wedding planner will ask you thoroughly before accepting an order. ** A reliable planner will not throw away the plan right away. He will first ask “What is the budget?” “How many people will be invited?” “Do you want Chinese style or outdoors?” “Are there any taboos?” After asking these questions thoroughly, the plan will be tailored to your needs instead of just using a template. The “Capture Intent” of skill-creator is the process of “asking for needs” - First ask clearly what you want, and then start to accumulate skills.
💡 To sum up in one sentence:
skill-creatoris a “skill for making skills”. It can be installed from the official plug-in market (requires magic Internet access); it can be summoned by shouting/skill-creatoror by speaking in plain language. The first thing it does when it appears is to ask you questions, especially “When should this skill be triggered?“.
03 It completes the complete process for you
skill-creator does not just help you generate a file and then give up, it will accompany you through the entire skill creation pipeline**. Take it apart and look at its process, and you’ll know what it’s doing for you at every step.
The official skill-creator summarizes the whole process into a cycle, and I will translate it into vernacular for you:
- Think clearly about what you want to do: Let me first explain to you what this skill does and how to do it (this is the “Capture Intent” in the previous section).
- Write the first draft: Based on your answers, fill in the
name,descriptionand text to generateSKILL.md. - Build test cases: Write 2-3 “things real users would say” as a test prompt, asking you “Do these tests look good? Do you want to add them?”
- Run it + evaluate: Take these prompts and actually run them to see if the results are good or not - not only “whether the output is correct” but also “whether the triggers are triggered.”
- Change based on feedback: Go back and change the skill based on your evaluation and test results. After the changes are completed, run another round until you are satisfied.
- (Optional) Optimize description: There is a special link to optimize
descriptionto increase the trigger accuracy rate. - Packaging: Finally, package the entire skill directory into a
.skillfile to facilitate your distribution or installation.
Do you see the doorway to this assembly line? When writing by hand, you only did step 2 (write a file), and skipped the next 3-7 - so whether your skill is triggered or not depends on luck, and if it is not triggered, you don’t know how to change it. The value of skill-creator is that it treats the steps after 2 as a required course, especially the cycle of “run the test to see the trigger” and “change according to the feedback”.
Interspersed here is a directory structure that helps you get it right. The directory example given in the “Adding Support Files” section of the official documentation is as follows:
my-skill/
├── SKILL.md           # 主要说明(必需)
├── reference.md       # 详细参考文档,按需加载
├── examples.md        # 示例输出,按需加载
└── scripts/
    └── helper.py      # Claude 可以执行的脚本
Key understanding: SKILL.md should be short and put heavy things outward. The official words are very clear:
Keep
SKILL.mdunder 500 lines. Move detailed references to separate files.
Why is it so divided? Because once the skill is triggered, the content of SKILL.md will enter the context in its entirety and remain there throughout the session - each line is a repeated token cost. The scripts in scripts/ are “executed but not loaded”, and the documents in references/ are “read only when needed”. The most common mistake when writing by hand is to paste a 300-line API document directly into SKILL.md, which takes up context and is confusing. skill-creator will guide you to put these categories in the right places - just keep “what to do and where to find” for the main text, move important information into references/, and move executable tasks into scripts/.
Analogy: Writing the contents page and appendices of a book. ** You will not pile all the content on the table of contents page. The table of contents page only says “What is the chapter and what page is it on?” The details are in the main text and appendices. SKILL.md is the content page - it tells Claude “what materials are there and when to turn to which copy”, and the materials themselves are placed in references/ and scripts/.
💡 In one sentence summary:
skill-creatoraccompanies you through a whole assembly line of “think clearly → write the first draft → run tests to see triggers → change according to feedback → optimize description → package”; Handwriting often only takes the second step, it completes the following steps, and will also guide you to divide heavy information intoreferences/andscripts/, keepingSKILL.mdstreamlined.
04 The most valuable section of the whole article: description How to write it so that it is impressive
If you only remember one thing in this article, remember this: description is the “master switch” that determines whether a skill is triggered or not.
Why is it? Because what Claude sees in each conversation is not the full text of your skill - it first sees only a list of “skill names + description”, and then based on this description, it determines “should this skill be called out this time?” Whether the description is written correctly or not directly determines whether it will be remembered. In the official troubleshooting of “Skill not triggered”, the first one is aimed at it:
Check if the description contains keywords that users would naturally say.
This is the root cause of my overturned commit skill at the beginning. It says “Commit message helper” - There is not a single “word that users can say” in this sentence. What usually comes out of my mouth is “submit for me”, “write a commit” and “generate commit information”, but there are none of these words in the description, so Claude naturally can’t match it. Later, I asked skill-creator to change the description to the following, and then shouted “Submit for me”, and it immediately caught it.
Comparing these two writing methods, the difference is clear at a glance:
| ❌ Common handwritten useless descriptions | ✅ Good descriptions guided by skill-creator |
|---|---|
Commit message helper | Summarize the temporary changes into a commit message that conforms to team specifications. Use it when the user says "Help me commit", "Write a commit", "Generate commit information" or let you review changes and prepare for submission. |
| Only said “what it is” | It said both “what to do” and “when to use it and what users will say” |
| If the trigger word is missing, it will never trigger | If it contains a real trigger word, it will appear on time when it is time to appear |
Distilled into a formula: Good description = what to do + when to use it (including the original words that users will say). “What to do” lets Claude know what this tool is for, and “when to use it” are the real trigger hooks - and this part should be written as vernacular as possible that will pop out of the user’s mouth, not the terms in your head.
There is another counter-intuitive point that can be learned from skill-creator: The description should be a little more “active”, or even a little “rushing”. Because currently Claude has a tendency called “undertrigger (use it but not use it)” - it often doesn’t bother to call out the skill when it can obviously help. The internal instructions of skill-creator specifically warn against this:
Claude currently has a tendency to be reluctant to trigger skills - not using the skill when it could be useful. To combat this, make the skill description a little more “active”.
What is “active”? To give you an example: instead of dryly writing “Build a dashboard to display internal data”, it would be better to write ”…As long as the user mentions dashboards, data visualization, internal indicators, or wants to display any company data, even if it does not explicitly say that it wants a “dashboard”, this skill should be used.” Explicitly write the scenario of “even if the user doesn’t say it, you should appear” - this move can significantly increase the probability of it being called.
**Analogy: writing copy for the sign at the entrance of the store. ** The signboard only says “Zhang Ji”, so passers-by don’t know what you sell and won’t come in; if it says “Zhang Ji Beef Noodles · Additional noodles are free · Spicy or not spicy”, it puts all the words that customers may search for, and more people come into the store immediately. description is the signboard of your skill - the signboard must have words that customers will say, and you must take the initiative to greet them.
💡 To summarize in one sentence:
descriptionis the master switch, and the formula is “what to do + when to use it (including the original keywords that users will say)”, and it should be written in a slightly proactive manner, and the scene of “it should appear even if it is not stated clearly” is put in - After this sentence is written, the skill can be called effective; if it is written crookedly, no matter how beautiful the text is, it will be in vain.
05 Which directory falls in: personal skill vs project skill
Once the skill is created, where can it be stored? The location of the save directly determines who can use it. skill-creator will ask you this, but you have to know it yourself.
The official position list selects the two most commonly used gears by noobs:
| Location | Path | Who can use |
|---|---|---|
| Personal | ~/.claude/skills/<skill-name>/SKILL.md | All items on your computer |
| Project | .claude/skills/<skill-name>/SKILL.md | Only this project |
How to choose? Just one criterion: **Is this skill “your personal habit” or “the rules of this project”? **
- You want to use it wherever you go - such as “Write commit in the style I like” “Translate the selected text into Chinese” - put it in your personal directory (
~/.claude/skills/), settle in one place, and be common to all projects. - tied to specific projects - such as “generate interfaces according to the API specifications of this warehouse” and “run the deployment process unique to this project” - put the project directory (
.claude/skills/), and submit it to Git, so that everyone in the team will automatically have this skill after cloning.
**Analogy: Tool bag vs construction site tool room. ** Your usual Swiss Army knife is carried in your pocket wherever you go (personal skill); but the large equipment dedicated to a certain construction site is locked in the tool room of that construction site and cannot be used or taken away to another construction site (project skill). The basis for judgment is “whether this tool follows people or follows the place”.
A simple and easy-to-remember method: General habit classes must be entered into ~/.claude/skills/, and project-specific classes must be entered into their respective .claude/skills/ and submitted to Git. Skills such as translation skills and commit skills will stay in your personal directory all year round and follow you through all projects; and the skills “dedicated to this project” in each team project will be submitted to the warehouse - In this way, after the new person clones, even the skills are in place, and there is no need to verbally explain “remember to install those skills”.
There is another advantage that the official points out: the project skill will be found from your starting directory all the way to the parent directory, so if you start Claude in a subdirectory, the project skill defined in the root directory can still be found. Each sub-package in the monorepo can also have its own skills, so they don’t fight with each other.
💡 To summarize in one sentence: Put your personal skill in
~/.claude/skills/and follow you through all projects; put your project skill in.claude/skills/and submit it to Git, which will only take effect in this project and be shared by the team; The judgment is just one sentence - whether this tool follows people or follows the project.
06 Hands-on: Use skill-creator to create a minimum skill and verify the trigger
Just watch and practice fake moves. Below, I will show you how to use skill-creator to actually create a minimal skill. The most important thing is to verify with your own hands that it is indeed triggered** - this step is the most easily skipped and most likely to overturn by handwriters. The entire process does not rely on any complex projects.
The target skill we created is very small: Let Claude summarize the uncommitted changes in the current git repository into a few key points.
Step 1: Make sure skill-creator is in place
After starting Claude Code, type:
/skillsExpected: skill-creator can be seen in the list. If you can’t see it, go back to Section 02 and copy the skill-creator directory into the skills path to install it (remember to turn on the magic Internet).
Step 2: Use vernacular to get it started
State clearly what you want in the input box (I also mentioned “when to trigger” to save it from asking further questions):
用 skill-creator 帮我做一个 skill。
功能:把当前 git 仓库里未提交的改动总结成 2-3 条要点。
触发场景:当我问「我改了啥」「总结一下我的改动」「我这次动了哪些东西」的时候。
名字就叫 summarize-changes。Expectation: skill-creator is awakened and begins to confirm its intentions with you - it may ask you about the output format and whether you want to build a test case. Just follow the answers it asks, and focus on whether the trigger words “what I changed” and “summary of the changes” are written in the description it generates (this is the lifeblood of Section 04).
Step 3: Let it drop the file into the personal directory
Make sure it writes the skill to ~/.claude/skills/summarize-changes/ (personal directory, available to all projects). The SKILL.md it generates probably looks like this - you should focus on checking the frontmatter:
---
name: summarize-changes
description: 把当前 git 仓库里未提交的改动总结成几条要点。当用户问「我改了啥」「总结一下我的改动」「我这次动了哪些东西」,或想快速了解工作树现状时使用。
---

## 当前改动

!`git diff HEAD`

## 你的任务

把上面的改动用 2-3 条要点总结清楚。如果 diff 为空,就说一句「当前没有未提交的改动」。
That line
!`git diff HEAD`is the official way of writing “dynamic context injection”: Claude Code will run away this command first, replace this line with the real diff, and then let Claude see the skill content. So what it gets is the actual changes to your working tree, not just guessing. This grammar was mentioned in Article 27, and it is used here.
Step 4: Make some changes so that the skill has something to summarize
Find any git project (if there is no git init, just leave it empty) and change any file. For example:
cd ~/some-git-project
echo "// test change" >> README.mdExpected: git status can see that README.md has been modified and is in an uncommitted state.
Step 5 (the most critical): Verify that it is really “triggered”
This step is divided into two verifications. Official documents clearly give these two paths:
Verification A - automatic trigger: Ask in vernacular in Claude Code (note, don’t mention the name of the skill, just use natural language and see if it can remember it by itself):
我改了啥?Expectation: If the description is written correctly, Claude will automatically call up summarize-changes and spit out several changes (such as “A new line of comments is added at the end of README.md”). It can catch it by itself = the trigger is successful, your description is turned off.
Verification B——Direct call: In case the automatic is not triggered, hard-click the name again:
/summarize-changesExpectation: It will definitely run this time, and the key points of changes will also be revealed.
How to judge success or failure:
| Phenomenon | Explanation | What to do |
|---|---|---|
| Verify that both A and B have the key points | Trigger perfection | Call it a day |
| A does not trigger, B can run | description keywords are not enough, the text is correct | Let skill-creator optimize the description and fill in the trigger words |
| Neither A nor B has the key points | The file is not created correctly / there is a problem with the text | Check the path and SKILL.md text |
Focus on the middle line - A does not trigger but B can run, which just proves the core argument of this article: The skill itself is not a problem, the problem is “whether it can be called or not”, and the inability to call is almost always the fault of description. This is exactly the trap that the handwriting party has stepped on countless times but never realized. At this time, let skill-creator go through the “Description Optimization” to save it.
After running through these five steps, you will have personally tested the complete link of “scaffolding → writing the correct description → falling into the correct directory → making changes → verifying automatic triggering/direct calling”. **The essence of any skill created in the future is to change the content based on this process. **
💡 To sum up in one sentence: Pay attention to two things when you start - whether there are real trigger words in the generated
description, and ask in vernacular whether it will appear automatically**; if it does not trigger automatically but/namecan run, it is the fault ofdescription, letskill-creatoroptimize the description and fill in the keywords.
07 A bonus: package it into .skill and distribute it to others
Once the skill is created and tested for triggering, if you want to send it to colleagues or teams, skill-creator can also help you package it into a .skill file - the other party can install it after getting a file, without you having to teach him how to create a directory.
It runs a packaging script behind it. You don’t need to remember the command, just let skill-creator package it for you**:
帮我把这个 skill 打包成 .skill 文件Expected: It will run the packaging script, compress the entire summarize-changes/ directory (including SKILL.md and all scripts/, references/) into a summarize-changes.skill file, and tell you the file path.
The significance of this step is distribution: the previous article 27 taught you to “install other people’s skills.” In this article, the skills you create, after being packaged, are exactly what others want to install** - one after the other, the loop is closed. This is how skills are usually passed around within a team: someone builds a useful one, packages it and puts it in the group, and others download it and install it. This is much more reliable than verbally saying, “You can build it based on my directory.”
💡 One sentence summary: The created skills are packaged into
.skillfiles byskill-creator, and one file can be distributed; this just follows the 27th article “Installing other people’s skills” - what you create is installed by others.
08 Summary
In this article, we go from “Why don’t just write it by hand” to “Create a skill that can be triggered by hand” - the core is one sentence: the difficulty of creating a skill is not to write the file, but to make it activated, and skill-creator specializes in this**.
Let’s review the key points together:
| What you have to do | What to use | Key points |
|---|---|---|
| Tools for installing skills | Clone/copy directory to skills path | cp -r skill-creator ~/.claude/skills/ (independently released skill, not built into the market) |
| Arouse it to create | /skill-creator or speak the requirements in plain language | It will ask you “what to do and when to trigger” |
| Make the skill callable | Write a good description | What to do + when to use it (including the user’s original words), slightly proactive |
| Choose storage location | Personal vs project directory | Follow people and put ~/.claude/, follow the project and put .claude/ and submit to Git |
| Confirm success or failure | Automatically trigger + /name direct adjustment | Automatically not trigger=description pot |
| Distribute to others | Package into .skill | One file to install, continued from 27 articles |
You should now be able to: Understand why handwriting SKILL.md is easy to read on the trigger, use skill-creator to go through the whole process of “scaffolding → writing the right description → testing the trigger → packaging”, write a “description” that “can be used” by hand, put the skill into the right directory, and verify that it is really triggered. **This set of abilities that are “built right and can be used” is the watershed for you to upgrade from “using other people’s skills” to “building your own tool chain”. **
The commit skill that was overturned at the beginning was later rebuilt using skill-creator, and the first and last sentence of description was changed, and it has never been broken since then**. This is the most valuable thing about this tool - it doesn’t let you type more, it allows you to step on less invisible pits.
💡 To summarize in one sentence: The difficulty in creating a skill lies in triggering it.
skill-creatorcompletes the tasks of “writing the description correctly, running tests, and making changes based on feedback” that are easily skipped when writing by hand - the key to creating a skill is to learn to clearly state the trigger conditions, not just the functions**.
Next article 29 “Agent teams” (experimental, subject to change) - Up to this point, your Claude Code has been a “single soldier”: a conversation, an assistant, you and it one-on-one. But some tasks are too slow for one person to handle - can it be like forming a project team, where multiple agents can divide the work and collaborate, with one managing the architecture, one writing code, and one running tests? The next article will take you from “single soldier” to “team combat”. Think about it: if you could have three Claudes working for you at the same time, what three things would you want them to do first?