11 | Claude Code in 16 Hours: Agent Teams—Choose the Right Capability Before Multi-Agent Collaboration
Distinguish Agent Teams from subagents and choose a collaboration pattern that matches task boundaries.
29 · Agent teams Agent teams: multi-session collaboration
⚠️ Experimental, subject to change: Agent teams is an officially clearly marked experimental feature, turned off by default, and requires Claude Code v2.1.32 or higher. The commands and default values in this article are based on the official documents at the time of writing. However, the interface, shortcut keys, and behaviors may be adjusted later. Check the version with
claude --versionbefore doing so.
“Why are there three Claudes on your screen? They’re all still running.”
“One is modifying the front-end, one is modifying the back-end, and one is dedicated to writing tests. I keep an eye on the division of labor.”
“Isn’t this a mess? How can you keep an eye on three of them by yourself?”
“I don’t need to keep an eye on them. They all do their own thing. If someone gets stuck or wants me to make a decision, they will take the initiative to come to me - I spend most of my time doing other things.”
The person driving a Claude in this conversation is me. When I ran multiple sessions on the same screen for the first time, the reaction of my colleagues next to me was exactly the same - first surprised, and then “can you keep an eye on me?” To put it bluntly, the most surprising point is “how one person can command multiple AIs at the same time”, and this is exactly what this article is going to break down - Agent teams, which allow multiple Claude Code sessions to collaborate like a team, and you are only responsible for dispatching and acceptance.
After reading this article, you will get:
- What exactly are Agent teams and what kind of ceiling does it solve in a single session? Let’s explain it in one sentence.
- What is the difference between it and the subagent learned in the previous wave - a comparison table to distinguish “when to use which one”
- What do the four key components of the team (leader, teammates, shared task list, and mailbox) do?
- How to use the “master control screen” of
claude agents(agent view) to manage multiple sessions, andShift+Downto switch teammates in the team - A practical operation that can be followed and gives the expected output: enable the function → set up a team of three people → watch them work in parallel
01 First understand: Where is the ceiling of single session?
Let me give the conclusion first: Agent teams are designed to break through the two walls of a single Claude Code session: “limited context + serial only”.
In the previous ten articles, we have been tossing around in “one session” - open a Claude, give it instructions, and it will do it step by step. This mode is sufficient for 90% of the work. But there are two situations where it will hit the ceiling:
**First, the context cannot fit in. ** A session has only one context window (context window, which can be understood as its “working memory”). Let it read the front-end, back-end, and test code at the same time and coordinate the changes. The memory will soon be full, and the more it goes on, the more it will “forget things.”
**Second, we can only do one thing after another. ** The essence of a single session is serial - read B after reading A, and only turn to the back end after modifying the front end. Three unrelated tasks can only be done in a queue.
**Analogy: For a big project, you can be a plumber, a bricklayer, and a carpenter all by yourself. ** First, I can’t remember so many parallel things in my mind, and I forget about the progress of the tiler when focusing on the water and electricity; second, I only have one pair of hands, and I can’t lay the tiles on the wiring now, so I can only finish one type of work before changing to the next one. **The smart thing to do at this time is not to shoulder the responsibility yourself, but to be the foreman - recruit a few masters, and contract the plumbing, bricklaying, and carpentry for a period to start working at the same time. You are responsible for dividing the work and checking acceptance. **
Agent teams transform you from a “worker who takes action personally” to a “foreman who commands decisions”. It is applicable to four types of tasks (officially named the “strongest use cases”):
- Research and Review: Several teammates investigate different aspects of a problem at the same time, and then question each other’s findings.
- New Module/New Feature: Each teammate has an exclusive part that does not interfere with each other
- Debugging using competing hypotheses: Several teammates test different theories in parallel, falsify each other, and converge to root causes faster
- Cross-layer changes: Front-end, back-end, and testing span multiple layers. Each layer is assigned a teammate to monitor.
💡 To sum up in one sentence: A single session has two walls: “memory cannot be loaded, and work can only be done serially”; Agent teams allow you to upgrade from a person to a foreman leading a team of people to work in parallel.
02 What is the difference between it and subagent?
This is the easiest pair to mix up, and you must make it clear first - otherwise you will not know which one to use after learning two functions.
The subagent we learned in the last wave (Part 23) is to outsource a special assistant in a conversation: it has an independent context, and only returns the conclusion to the main conversation after it is done. Teammates do not speak to each other, and are not under your direct control. Agent teams are completely different - it is multiple peer-to-peer, complete Claude Code sessions collaborating. Teammates can send messages directly to each other, and you can also bypass the leader and chat directly with a teammate.
**Analogy: A subagent is a temporary worker you send out to run an errand, and an agent team is a team you call together to start work. ** To the temporary worker who is running errands, if you tell him “Go and pick out the errors in these thousand lines of logs”, he will do it by himself and come back with a note after finishing the work. He does not know other temporary workers like you and will only communicate with you, the superior, during the whole process; while workers in a team can discuss with each other “Have your interface been changed so that it can be easily connected with mine?”, you, the foreman, can also walk up to any worker at any time to give a few words alone.
The difference comes down to this table - If you can’t remember anything else, just remember it:
| Dimensions | Subagent | Agent teams |
|---|---|---|
| Context | Independent context, results are passed back to the caller | Independent context, completely independent |
| Who is coordinating | The master agent manages all activities | leader coordinates, but there is shared task list self-coordination |
| Between teammates | No communication, only report results to the main agent | Send messages to each other directly |
| Can you directly control | No, only through the main dialogue | Can you directly talk to any teammate |
| token cost | Lower, the results are summarized back to the main context | Higher, each teammate is an independent Claude instance |
| Best Suitable | Focused tasks that only require results and no discussion | Complex collaboration that requires discussion and mutual questioning |
The most important thing to remember is the official judgment standard:
Use subagents when you need fast, focused staff reporting on results. Agent teams are used when teammates need to share discoveries, challenge each other, and coordinate themselves.
There is a more direct way: Do these “workers” need to communicate with each other? ** If you don’t need (check each one’s own, and summarize after checking), use subagent, which is cheaper; if you need (do it while working, and find fault with each other), then join agent teams.
💡 To sum up in one sentence: Subagent is a temporary errand worker - he works independently and only reports to you; agent teams are a team - teammates talk to each other, and you can directly manage each one; Whether you want to communicate with each other is the watershed in which one you choose.
03 How the team is built: four key components
When an agent team runs, there are only four parts behind it. Only by recognizing them can you understand what is happening on the screen.
**Analogy: A real construction team. ** There is a foreman (leader), several workers (teammates), a task board full of tasks posted on the wall, and workers can also send notes to each other to communicate (mailbox). If these four things are put together, the team can be transferred.
The official architecture table contains these four items:
| Components | Roles |
|---|---|
| Team lead | The main session for creating a team, generating teammates, and coordinating work assignments - the one you open first |
| Teammates | Independent instances of Claude Code working on tasks, each with its own context |
| Task list | A list of shared tasks claimed and completed by teammates, with three statuses: pending / in progress / completed |
| Mailbox | A system for agents to send messages to each other. Messages from teammates will be automatically sent to the leader without you having to poll |
A few operating details that novices should know most:
**Once the leader is determined, it cannot be changed. ** The session that created the team remains the leader for its entire life - you cannot “promote” a teammate to leader, nor can you transfer leadership rights. So the session you open first is the identity of your “foreman”.
**There are two ways for teammates to receive work. ** The leader can explicitly assign “this task to Little A”; teammates can also finish the work at hand and pick an unclaimed and unstuck task from the task board to continue (officially called “self-claim”). In order to prevent two teammates from grabbing the same task at the same time, the system uses a file lock to prevent collisions.
**There can be dependencies between tasks. ** For example, “writing tests” must wait for “implementing functions” to be completed first. Tasks with unfinished dependencies cannot be claimed until the dependencies are completed; once the dependencies are completed, the stuck tasks will be automatically unlocked.
**Teammates do not inherit your conversation history. ** This is the easiest thing for newbies to do - they take it for granted that whatever the leader knows, their teammates will naturally know. As a result, no background is given when generating teammates, and it looks confused. The official statement is very clear: when teammates are generated, the same project context (CLAUDE.md, MCP, skills) as a regular session will be loaded, but the leader’s conversation history will not be inherited. Therefore, when dispatching a job, the background to be explained must be clearly stated in the instructions.
💡 One sentence summary: A team = foreman (leader, cannot be changed) + workers (teammates, each has an independent context) + task board (shared list, can be relied on, self-claimed) + mailbox (send messages to each other); Remember to write down the full background when assigning tasks, teammates will not read your history.
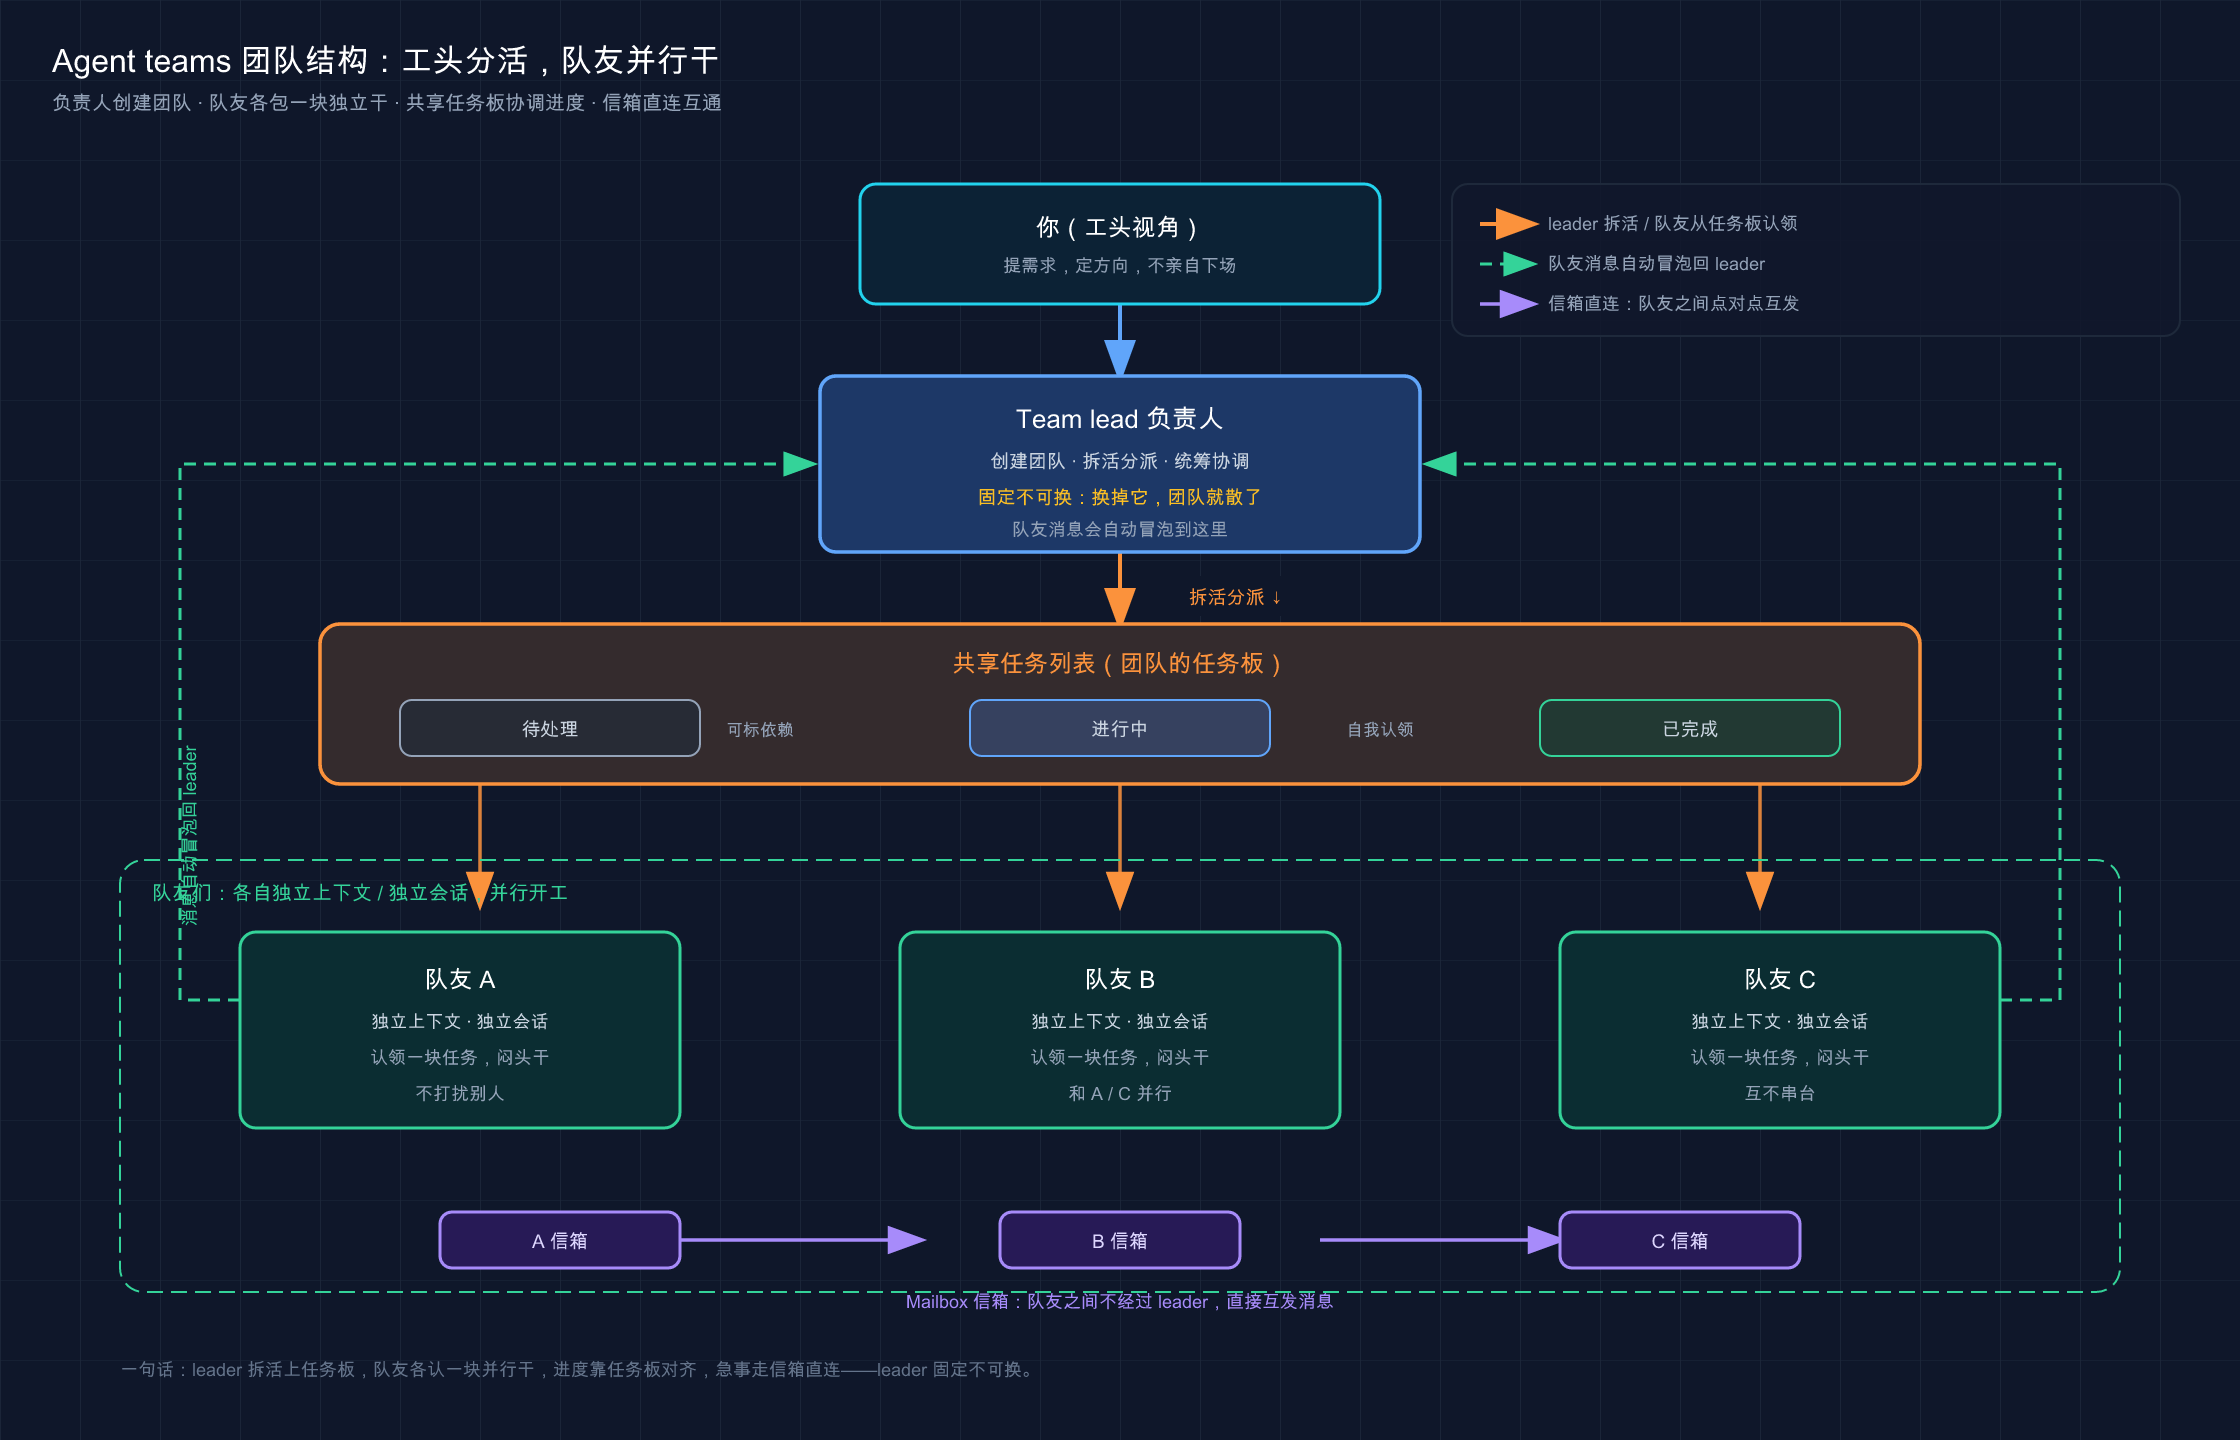
This picture clearly lays out the four parts of an agent team: you are the leader in the middle, and several independent teammates (workers) are generated downwards to each do a piece of work; a shared task board at the bottom allows everyone to claim tasks and automatically handle dependencies; there is also a direct mailbox connection between teammates - whether messages bypass the leader and who claims the work, it is clear at a glance**.
04 Use agent view as a “master control screen” to manage multiple sessions
The team is up, and the question arises: **Several sessions are running at the same time, where should I focus? **
The answer is the agent view - a “master screen” that puts all background sessions on one screen. The command is claude agents.
⚠️ Agent view is a research preview and requires Claude Code v2.1.139 or higher. The interface and shortcut keys may change with the version.
**Analogy: The project progress board on the wall at the construction site. ** You don’t need to go from work station to work station to ask “Where are you doing?”, just look up and glance at the signboard - it is clear at a glance which process is in progress, which one is stuck waiting for your decision, and which one has been inspected and accepted. claude agents is the dashboard of Claude Code: each session occupies one line, and an icon at the beginning of the line tells you its status with color and animation.
Compare the official status and select the most commonly used ones:
| Status | Icon display | Meaning |
|---|---|---|
| Working | Animation | Claude is running a tool or generating a reply |
| Requires input | Yellow | Waiting for you to answer a question or approve a certain permission |
| Completed | Green | Mission completed successfully |
| Failed | Red | The task ended with an error |
On this board, you can do three things for any row, from least to most important:
- Peek: Press
Spaceto open a small panel to see the recent output of this session, or what issue it is stuck on - most of the time this is enough, without actually going in. You can type a reply directly in the Peep panel and pressEnterto send it without going in. - Reply: You can reply by peeking into the panel. If it throws a multiple-choice question, you can choose it by pressing the number keys.
- Attach: Press
Enteror→to dive into the complete dialogue of this session, just like you normally open a Claude. Press←on the empty input box to exit the back-and-forth Kanban board.
There is a particularly convenient design: These background sessions do not require any terminal to be open to run. A separate supervisor process hosts them behind the scenes - you close the agent view, close the shell, or even open a new session, and they continue to work. When you come back and open claude agents, they will still be there.
You can use claude agents as the main entrance instead of claude: when you come in, first put a few independent tasks in the input box at the bottom of the board (press Enter for each prompt to start a new session and run it in parallel), and then do what you need to do, and come back to deal with which rows turn yellow (you are needed) or green (done). **It is much more refreshing than opening seven or eight terminal windows and switching back and forth. **
💡 To sum up in one sentence:
claude agentsis the “master control screen” for managing multiple sessions - one session per line, and the status is known by looking at the color;Spacepeeks,Enterdrills in,←exits; ** sessions run in the background, no need to keep the terminal open to keep an eye on**.
05 Directing teammates in a team: dividing tasks, dividing people, and planning
The previous is the general management method of “multi-session”. Going back to the agent teams themselves, as a leader, how do you specifically direct these teammates? The core is just one sentence: Tell the leader what you want in plain English, and it will handle coordination, work sharing, and delegation for you.
Start a team, you don’t need to remember any commands, just describe the tasks and team structure in natural language. The official example that works well (the three characters are independent of each other and do not need to wait for each other):
I'm designing a CLI tool that helps developers track TODO comments across
their codebase. Create an agent team to explore this from different angles: one
teammate on UX, one on technical architecture, one playing devil's advocate.
Translated into Chinese, you can also directly say: “Help me build an agent team to explore this problem from different angles: one is responsible for UX, one is responsible for technical architecture, and one is dedicated to playing devil’s advocate.” Claude will create a team, generate teammates based on perspective, let them explore individually, and finally make a comprehensive discovery.
**Treat teammates and give personal advice. ** In in-process (in the same terminal) mode, press Shift+Down to cycle among teammates. When you go to a certain teammate, you can type directly to send him a message - to add instructions, follow up with questions, or let him change his mind. Press Enter to enter his session and view details, Escape to interrupt his current round, and Ctrl+T to switch the task list. **Go to the last teammate and then press Shift+Down to circle back to the leader. **
Pay attention to the shortcut keys here and in the previous section: use
↑/↓to switch rows in the master control screen of the background session, and useShift+Downto switch teammates in the agent team, two sets of keys for two scenarios.
**Let teammates come up with a plan before taking action. ** When the work is risky, you can ask your teammates to plan it first in read-only plan mode, and then implement it after you (the leader) approve it:
生成一个架构师队友来重构认证模块。
在他改动任何东西之前,必须先经过计划批准。
After the teammate completes the planning, he will send a “Plan Approval Request” to the leader. After you approve it, he will exit the planning mode and start working. If you call back, he will make changes based on the feedback and resubmit.
**Specify the number and model of teammates. ** You can also specify how many you want and what model to use:
建一个有 4 个队友的团队,并行重构这些模块。
每个队友都用 Sonnet。
Don’t ignore a key point to save money: teammates do not follow the leader’s /model selection by default. If you want to change their models uniformly, you can either specify it in the prompt as above, or go to /config to set the “default teammate model”.
**Close the stall after finishing the work. ** When the work is over, let the leader clean up the team:
清理这个团队⚠️ The official has repeatedly emphasized: The leader must be responsible for cleaning up, and do not let teammates clean up - teammates’ team context may not be parsed correctly, which will cause resources to be in an inconsistent state. Moreover, teammates who are still running must be turned off before cleaning, otherwise the leader will fail to clean up if it detects that there are active teammates.
💡 To summarize in one sentence: start a team, divide tasks, switch teammates (
Shift+Down), need plan approval, close stalls and clean up, all command the leader in vernacular; Remember three things - the teammate model must be specified separately, the background must be given in the command, and only the leader can be used for cleaning.
06 Should you join a team? Don’t tear it apart for the sake of tearing it down.
After learning this, you may be eager to try it out and want to run as a team for everything. **Stop it - this is the continuation of the iron law against consensus when talking about subagent in Chapter 23: It does not mean that the more tasks there are, the more tasks should be demolished. **
Agent teams have real costs and are heavier than subagents:
**First, the token burns more. ** Each teammate is a complete and independent instance of Claude, each with its own context. Several teammates are just a few tokens burning. The official statement is straightforward: for daily tasks, a single session is more cost-effective; only activities such as research, review, and new features that can really benefit from parallelism are worth the extra tokens.
**The second is that coordination itself has overhead. ** The more teammates there are, the more communication, task coordination, and potential conflicts there will be. After a certain point ** adding more people will not speed up the game proportionately ** - three focused teammates can often do better than five scattered teammates.
I compiled a comparison of “whether it’s worth tearing apart” and took a seat according to the numbers:
| Scenario | Should we split into a team or not |
|---|---|
| Front-end / back-end / test three layers are modified in parallel, independent of each other | ✅ It is appropriate to disassemble and include one layer each |
| The root cause of a bug is unknown, and I want to use several competing hypotheses to troubleshoot it in parallel | ✅ Tear it down so that teammates can falsify each other and converge faster |
| Multiple people review a PR in parallel (one person each for security/performance/test coverage) | ✅ Split, each using a set of filters without overlap |
| A series of steps that are dependent on each other (A must be completed before B can be done) | ❌ Don’t split it up, serial live order conversations will be smoother |
| Several teammates want to modify the same file | ❌ Don’t split it, as two people editing the same file will overwrite each other |
| A small task at random | ❌ Don’t split it up, the coordination overhead is more than the time saved |
The official also gave two very practical suggestions for getting started. Novices can avoid pitfalls by following these:
Start with non-coding activities such as “research/review”. ** Reviewing PRs, investigating a library, troubleshooting bugs - these tasks have clear boundaries and do not require writing code. They allow you to appreciate the value of parallel exploration without causing a lot of coordination troubles like writing code in parallel. The first time I used agent teams, I used them to review a PR: three teammates were focusing on security, performance, and test coverage. No one changed the files during the whole process, and naturally there were no conflicts. It was quite refreshing to see the three discoveries popping up one after another. After the experience went smoothly, I dared to push for “parallel code changes”. **Don’t be like what I did later, when I got crazy and asked three teammates to modify three adjacent files in parallel. As a result, the changes conflicted with each other. It was slower to deal with these conflicts than to do it serially in a single session. **
**Team size starts at 3–5. ** This range is useful for all kinds of tasks - there is parallelism, and coordination will not get out of control. If you really want to expand, expand only if “the job can really benefit from more people doing it at the same time.”
💡 To sum up in one sentence: Agent teams burn more tokens and require more coordination than subagents. **Only dismantle them when “you can really benefit from parallelism”; don’t dismantle them if they depend on each other, change the same file, or do random tasks; for novices, the most stable starting point is “research/review without writing code” + “3-5 people”.
07 Hands-on: Enable the function and start a team of three people to run
Just watch and practice fake moves. The following will show you how to enable Agent teams from scratch and start a three-person team to do the simplest task in parallel. The entire process does not rely on any complex projects.
Prerequisite: Take a look at
claude --versionand it must be v2.1.32 or higher; if it is not enough, runclaude updatefirst.
Step 1: Enable experimental features
Agent teams are turned off by default. First turn on the switch in the user-level settings. Edit ~/.claude/settings.json (create a new one if it doesn’t exist) and add the env section:
{
  "env": {
    "CLAUDE_CODE_EXPERIMENTAL_AGENT_TEAMS": "1"
  }
}Expected: There is this env configuration in the file. This is the official way to enable it - set the environment variable CLAUDE_CODE_EXPERIMENTAL_AGENT_TEAMS to 1.
Step 2: Create a toy directory and go in and open Claude (Mac / Linux)
mkdir team-demo
cd team-demo
claude
Windows users: mkdir, cd, then claude.
Expected: The Claude Code welcome screen appears with an input box at the bottom.
Step Three: Start a three-person team in vernacular
Type in the input box (this is “describe the task + team structure” and let the leader form his own team):
帮我建一个 agent team,从三个不同角度调研「个人博客该选静态站还是动态站」:
一个队友只论证「该选静态站」,一个只论证「该选动态站」,
一个唱反调专门挑前两个方案的毛病。让他们各自给出结论。Expectation: Claude will first tell you that it is going to create a team, spawn three teammates (one angle each), and ask you to confirm. It will not create a team without asking - The official statement is that “a team will not be created without your approval.” After confirmation, the three teammates got up one after another, each working in their own context.
Step 4: Use Shift+Down to switch to a teammate to see
After the team starts running, the leader’s terminal will list all teammates and the work they are doing. Press Shift+Down to cycle through a teammate, and you can send him a message directly. For example, cut to the “Naysayer” part and add:
也帮我从「维护成本」这个角度再挑挑毛病Expectation: This message goes directly to that teammate (without being relayed by the leader), and he will include the “maintenance cost” and then pick it out. Switch to the last teammate and press Shift+Down, it will circle back to the leader - when you return to the leader, you can coordinate the overall situation again.
Step 5: Stall closing and cleaning
After the research is completed, return to the leader and let it close its stall:
帮我清理这个团队Expectation: The leader will first confirm that all teammates have stopped, and then delete the shared team resources. If there are still teammates running, the cleanup will fail - At this time, let the leader shut down the teammates first (“let those teammates shut down”) and then clean up. Remember the official rule: **Always go to the leader to clean up, don’t let your teammates do it. **
After completing these five steps, you will have gone through the complete link of “activate → form a team → work in parallel → chat directly with teammates → close the stall”. **The essence of any subsequent use of agent teams is to change tasks and teammate roles on this link. **
💡 One sentence summary: Turn on the
envswitch insettings.json→ Let the leader form a team in plain language →Shift+DownChat directly with teammates → The leader closes and cleans up; ** Run through this link by hand, and all ten shortcut keys will work**.
08 Summary
In this article, we review Claude Code’s “multi-agent collaboration” from the beginning - You have been upgraded from a worker who personally works to a foreman who commands a team.
Let’s review the core points together:
| What you want to do | What to use | Key points |
|---|---|---|
| Break through the single-session memory + serial ceiling | Agent teams | Multiple peer-to-peer sessions run in parallel, you act as the leader |
| Distinguish the difference between subagent and subagent | See “Should we ventilate each other” | Use team to ventilate and question each other, otherwise subagent will save money |
| Manage multiple parallel sessions | claude agents (agent view) | One session per line, see the status by color, Space peek |
| Chat directly with teammates in the team | Shift+Down | Go around and return to the leader; use ↑/↓ to communicate with the Kanban board. Don’t remember the string |
| Determine whether it should be split | A comparison table of “whether it’s worth it” | Don’t split it if you depend on each other, modify the same file, or do small jobs |
You should now be able to: Explain clearly what Agent teams solve, how it differs from subagent, use the master control screen of claude agents to keep an eye on multiple parallel sessions, use vernacular to direct the leader team to divide the work, and understand “when is it worth breaking up, and when should not be broken up just for the sake of breaking up.” **This ability to “be a foreman” is what gives you the confidence to truly parallelize large tasks without burning money and getting out of control. **
But to be honest - it is still experimental after all. The interface and shortcut keys change with the version, but a single session is still enough for 90% of daily tasks. Put it in your toolbox as a “magic tool for speeding up big jobs” and don’t try to tackle small tasks as soon as it comes up.
Next article 30 “How to choose functions: CLAUDE.md vs Skill vs Hook vs MCP vs Subagent” - So far, you have learned a lot of CLAUDE.md, Skill, Hook, MCP, Subagent, Agent teams, and Claude Code moves. But learning too much does not mean using it correctly. The real difficulty is when faced with a specific need, which one should I pay for? ** In the next article, I will give you a decision-making table, putting the “applicable boundaries” of these functions on a piece of paper - after reading this, you will no longer have the difficulty of choosing “what to use” for a requirement.
30 · How to choose functions: CLAUDE.md vs Skill vs Hook vs MCP vs Subagent
Brothers, after learning this, you have already accumulated a bunch of extension points.
CLAUDE.md, Skill, Hook, MCP, Subagent, plus the slash command that can be seen everywhere, five or six nouns, each one can be understood by just reading. **But when it comes to “which one should I use for this need?”, nine times out of ten, it will get stuck. ** For those who have just learned this skill, the most common question that pops up is “Should I use Skill or Subagent for this?” “Can I write this into CLAUDE.md?”
To put it bluntly, this is not a lack of knowledge, but a lack of mapping of “requirements → solutions”. You have read the official introduction to each extension point, but they are organized by “what it is”, not by “what you want to do”. This article is just the opposite - start from your needs and work backwards which one to use.
Let’s put it this way: the first nine articles put five weapons in your hands one by one, but this article teaches you which weapon to draw in battle.
After reading this article, you will get:
- Each of the five expansion points (plus slash command) has a one-sentence positioning of “what to solve, when to choose it, and when not to use it.”
- A “Demand → Recommended Solution” decision-making table to check the solution according to the symptoms
- A decision tree that can be followed. After asking three or four questions, you can determine which one to use.
- Several groups of comparisons that are most confusing (Skill vs Subagent, CLAUDE.md vs Skill, Hook vs permission rules) will be explained thoroughly at once
- Know how to combine these extension points and how to use plugins to package and take away
01 First build a general framework: six extension points are inserted at different locations in the “agent loop”
Before you start picking, build a general framework in your mind. **These extension points are not six parallel options, but six hooks plugged into different parts of Claude’s workflow. **
Recall the “agency cycle” mentioned in Chapter 03 - Claude’s work is a circle of “think → do → see”. These six extension points (CLAUDE.md, Skill, slash command, MCP, Subagent, Hook) are inserted at different positions in this cycle: some are inserted into the background before “thinking”, some are connected to the outside and open clones when “doing”, and some automatically pull the trigger at a fixed moment. The official sentence is very accurate and worth remembering first:
Extended insertion into different parts of the agent loop.
**Analogy: Triage desk in a hospital. ** If you feel unwell and go to the hospital, you won’t rush into a certain department by yourself. You will first go to the triage table and tell the patient your “symptoms” - if you have a headache, go to the neurology department, if you have a stomachache, go to the gastroenterology department, or if you want to take a X-ray, go to the imaging department. The triage table does not treat diseases, it does guide you to the right department based on your symptoms. In this article, I will serve as a triage station for you: you report your “needs” and I will guide you to the right “expansion point.”
When it comes to real scenarios, you often struggle with just a few words: “I want it to abide by a certain rule every time”, “Let it automatically call up a certain expertise when needed”, “Let something happen automatically at a specific time”, “Let it connect to external data or services”. Once the needs are clearly stated, it is not that difficult to pass which subject. In the following sections, we will introduce the “departments” one by one, and finally give you a general list plus a tree.
💡 In one sentence: The six expansion points are not parallel options, but hooks inserted into different links of “think → do → see”; the key to choosing is not “which one is great”, but “which one should be linked to your needs”.
02 Six departments, identify their respective “attending” in one sentence
First, pin down the “indicating scope” of the six expansion points in one sentence. This section is the foundation on which the following decision tables are built. I followed the official function list and assigned the most typical scene to each one.
CLAUDE.md - Rules that make it “remember every time”. ** Backgrounds such as project conventions, build commands, “always use pnpm instead of npm” and “run tests before submitting” are always valid. It loads automatically every session and is visible to Claude as soon as he starts working.
**Skill - a special ability that allows it to be “automatically called upon when needed”. ** Reusable knowledge or processes: an API style guide, a deployment checklist, a debugging routine. Usually only the description text is occupied, and the complete content is called in only when it is used; you can also use /<name> to call it actively.
**slash command - your fixed process of “active one-click triggering”. ** It is actually a usage of Skill (the one triggered by /<name>). The only difference lies in “who initiates it”: Claude can automatically decide whether to use Skill or not, while slash command requires you to call /deploy and actively call it.
**MCP - the interface that “connects it to the outside world”. ** Check your database, send messages to Slack, control the browser - anything that is beyond the reach of Claude’s built-in tools and needs to connect to external services or data, rely on MCP (see Part 22 for details).
**Subagent - Give it an “independent clone” to do the dirty work. ** When you need to read dozens of files and run a large-scale search, but you just want a conclusion and don’t want the intermediate process to fill up the main dialogue, send a Subagent (see Part 23 for details). It does it in an isolated context, and only returns the summary when it’s done.
**Hook - “Automatically pull the trigger” at a fixed time. **Hook is “an action that automatically runs as soon as an event occurs.” Once a certain life cycle event is triggered (such as “every time a file is modified” or “every time a session starts”), it will be executed without fail - running linter, rejecting dangerous commands, and sending notifications. It doesn’t rely on Claude to think, the triggering is guaranteed.
The concept of Hook has not been discussed in detail before. Let’s establish an impression first: It is an “automatic action triggered by an event”. The complete writing method and what events can be monitored will be left to Part 33.
It’s easy to get confused just by talking about it, but if you put a table side by side, it will be immediately clear when you look at it:
| Extension point | One sentence governs | Who will trigger | Whether to occupy the permanent context |
|---|---|---|---|
| CLAUDE.md | Project rules to be followed every time | Automatic, loaded per session | Accounting (full text resident) |
| Skill | Special knowledge/process that can be called up on demand | Claude automatically determines whether ** or ** you /<name> | Low (usually only accounts for the description) |
| slash command | A fixed process triggered by one click | You type /xxx | Low (same as Skill) |
| MCP | Connecting to external services/data | When Claude uses a tool | Low (only the tool name is occupied first) |
| Subagent | Isolated context/parallel dedicated tasks | You or Claude dispatch | Does not occupy the main window (independent context) |
| Hook | Automatically run a fixed action on a specific event | Lifecycle events | Zero (unless it returns output) |
You don’t need to memorize this table, but the two columns “who will trigger it” and “whether it occupies the permanent context” are the watershed for all subsequent decisions** - a decision “should you take the initiative or it automatically”, and a decision “whether it is worth leaving it on all the time”.
💡 In one sentence, the “indications” of the six extension points are different - rules are used to enter CLAUDE.md, expertise is used to make Skills, one-click processes are slash command, external connections rely on MCP, isolation is used for Subagent, and fixed timing is used for automatic running using Hook.
03 Decision table: report requirements and check solutions
The general framework is in place and the attending has a clear understanding of it. Now let’s get to the core of this article - “Requirements → Recommended Plans” decision table. The usage is very simple: find the sentence in the left column that is most similar to the sentence in your mind, the right column is the extension point that should be used, and the last column tells you “why it is, don’t use it as the next door by mistake.”
| Your needs (the words in your heart) | Recommended solutions | Why it is / Don’t use it wrong |
|---|---|---|
| ”Follow our agreement every time” (use pnpm, run test before submitting) | CLAUDE.md | Rules that are always in effect, you want it to be seen in every session |
| ”This API document/style guide can be found when needed” | Skill | Reference materials, do not occupy the context at ordinary times, adjust them after use |
”I want to type /deploy to run the entire deployment process” | slash command (a type of Skill) | A fixed multi-step process that you actively trigger |
| ”Let it check our company database / send Slack” | MCP | To connect to external services and data, built-in tools are out of reach |
| ”Let it read dozens of files and just give me a conclusion” | Subagent | Use context isolation and don’t let the intermediate process fill up the main window |
| ”Check these things at the same time, independent of each other” | Subagent (multiple parallel) | Parallel special tasks, each return to the summary |
| ”Every time you change a file, run ESLint automatically” | Hook (PostToolUse) | Automatic action at a fixed time, no need for it to think |
”rm -rf / command, give me a hard stop” | Hook (PreToolUse)** or permission rules** | To “guarantee” blocking, you cannot rely on prompts |
| ”It always forgets a certain agreement and reminds me twice” | CLAUDE.md | Repeated mistakes are written into the permanent rules, not temporarily corrected in chat |
| ”The same opening prompt, I type it by hand every day” | Skill | Repeated input prompts are saved as a callable Skill |
| ”I want to move this configuration to another project as is” | Plugin (packaging layer) | Take the Skill / Hook / Subagent / MCP bundle together |
I also incorporated the spirit of the official “Build your settings over time” trigger table: Many needs are actually forced by “repetition” - typing the same prompt for the third time, correcting the same mistake for the second time is a signal that it is time to “solidify” it into the corresponding expansion point. Don’t always rely on on-the-spot instructions.
Here is a real pitfall that is easiest to step on. If you want to save trouble, it is easy to put a list of nearly 300 lines of API interfaces directly into CLAUDE.md, thinking “it will be so convenient to remember it all the time.” The result - a large chunk of context is swallowed up as soon as each session starts, and the workbench is already occupied before the real work begins; what’s worse is that Claude often fails to grasp the few core conventions you really emphasize and is overwhelmed by the pile of interface details. Move the interface list into a Skill, and leave only one sentence in CLAUDE.md: “See api-skill for interface specifications”, and the world will become clean instantly. This is what the official says over and over again:
Keep CLAUDE.md under 200 lines. If it’s growing, move the reference to skills.
💡 To summarize in one sentence: If you are not sure about the right time, first translate the requirements into “the words in your heart”, and then use this table to get the right answers; especially remember “always valid → CLAUDE.md, on-demand reference → Skill, external connection → MCP, isolation work → Subagent, fixed timing → Hook”.
04 A decision tree: Ask three or four questions and lock in directly
The table is “Known Requirements Query Solution”, but sometimes you don’t even think clearly about your requirements. At this time, it is more convenient to use the decision tree - go down several alternative questions, and when you reach the leaf, you will find the answer.
I designed the judgment sequence as the tree below. There are four core questions. If you ask them in this order, you will basically not go wrong:
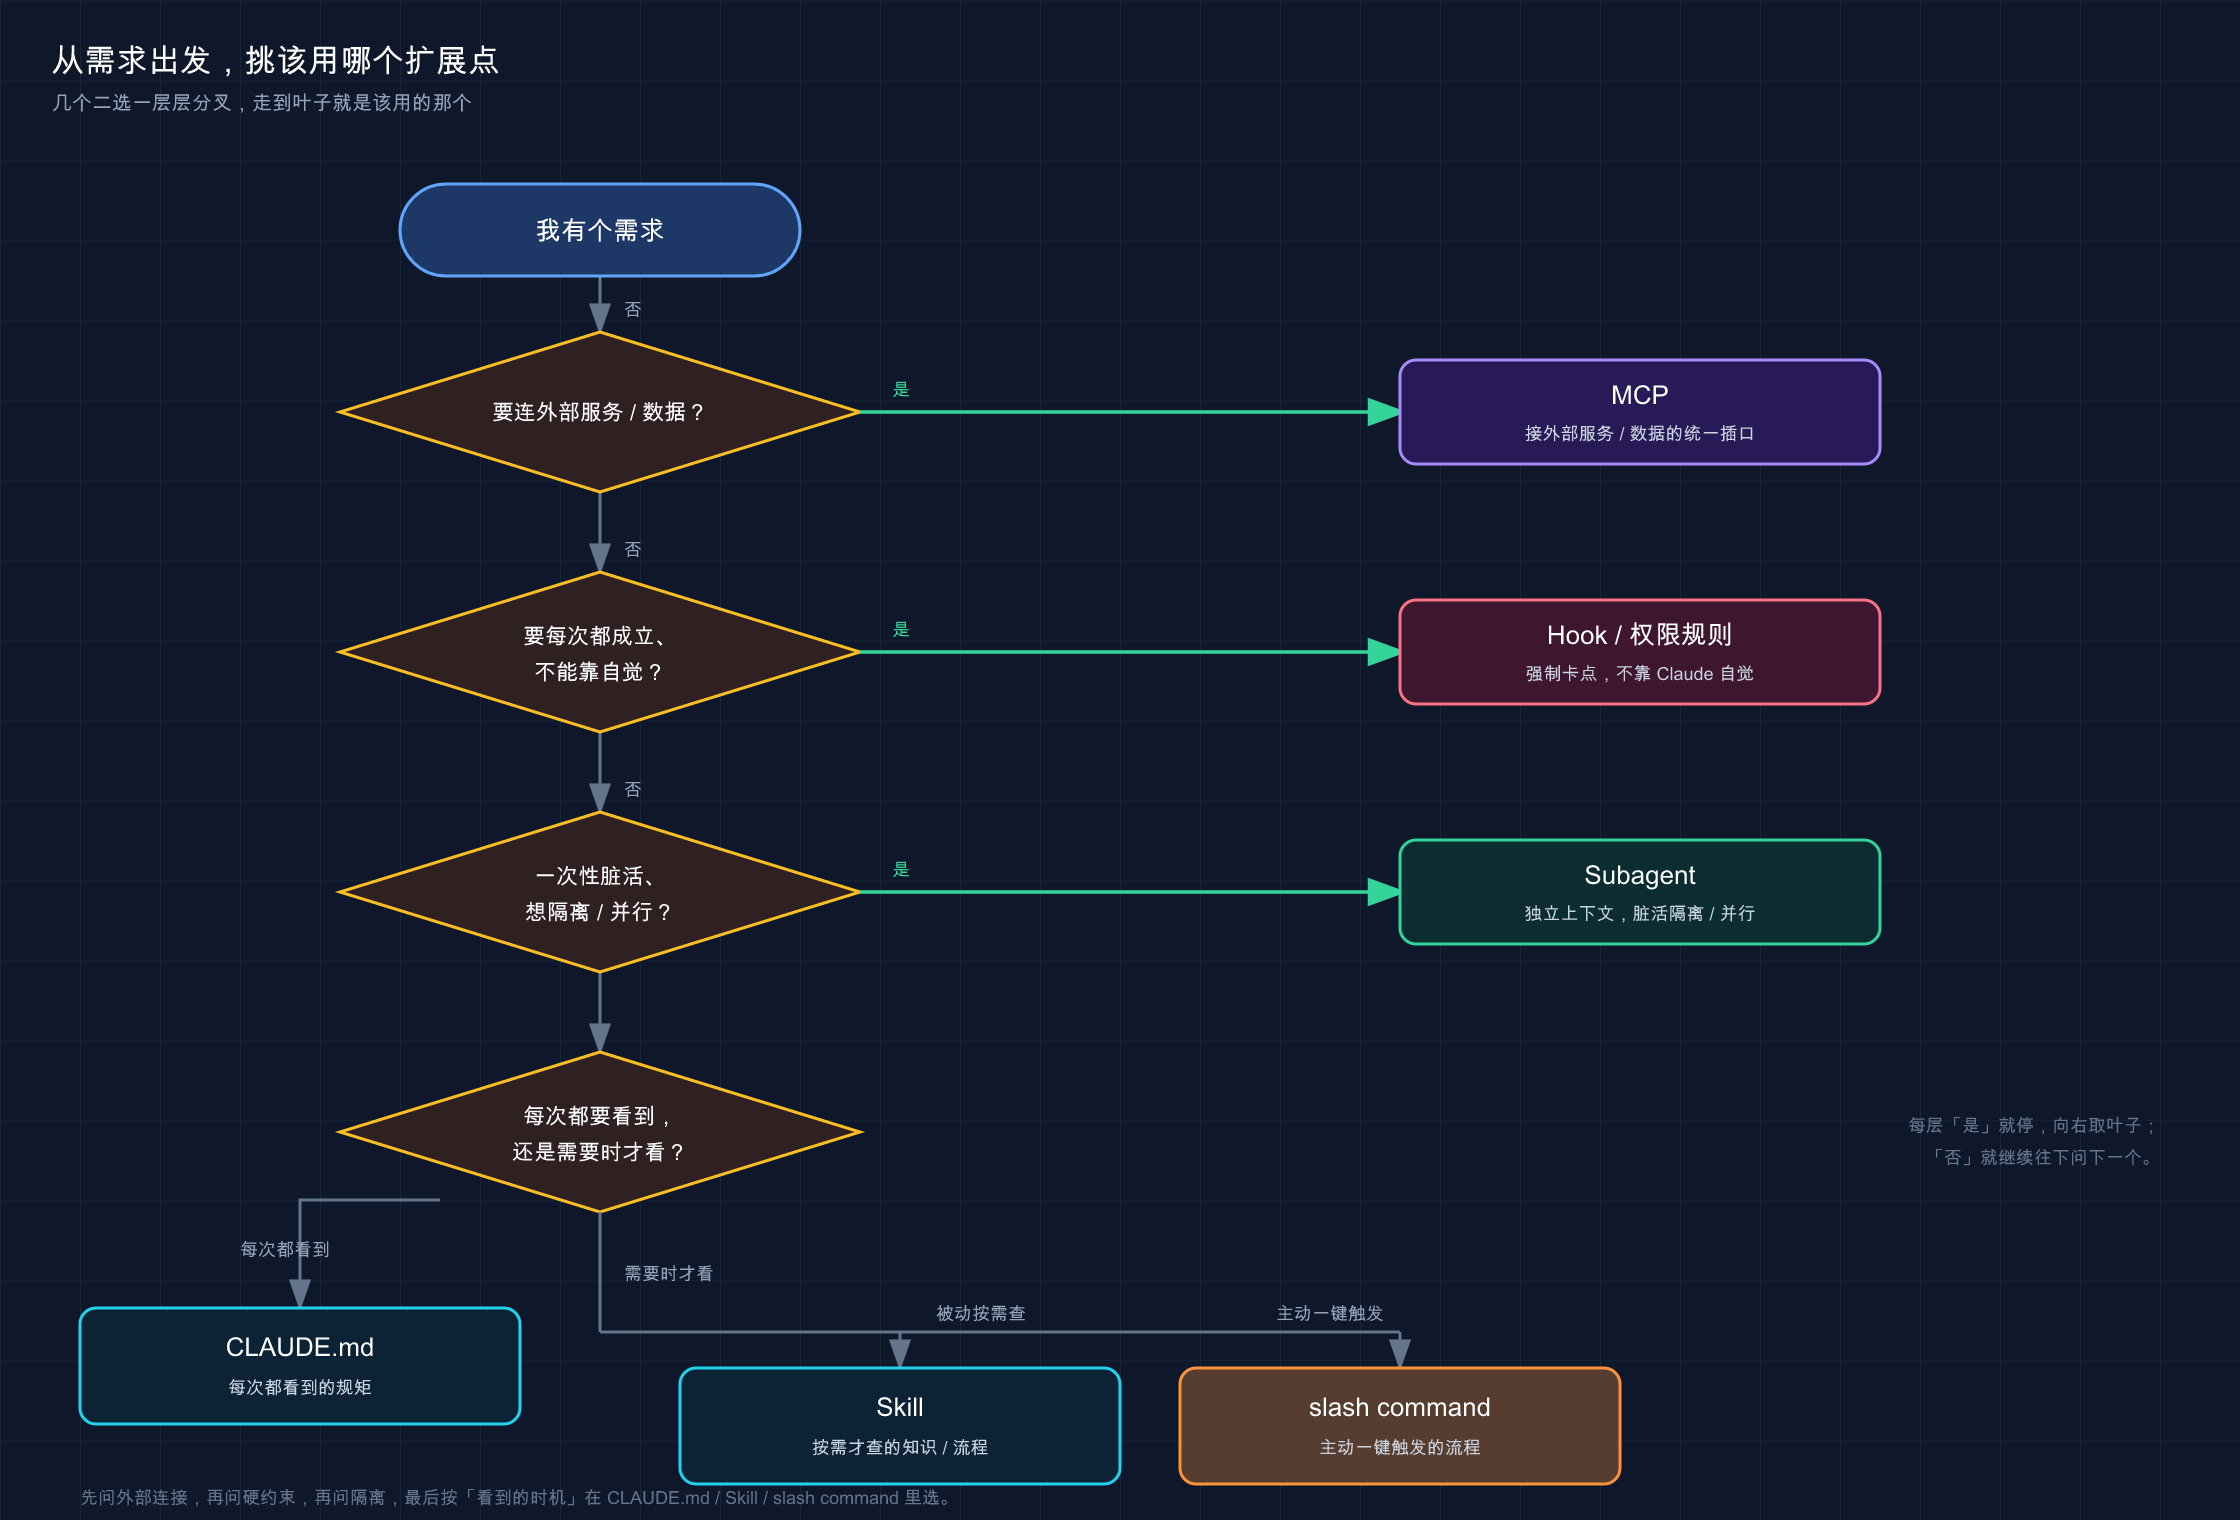
This picture splits “I have a need, which extension point should I use” into a top-down question-and-answer path - first ask “Do I need a hard guarantee/connect to the outside”, and then ask “Should it be automatic or should you take the initiative?” All the way to the end, each leaf node is a clear extension point.
If you walk through this tree in words, you will find that the order of judgment is actually very natural:
**First question: Does this require “connection to external services or data”? ** If you want to - such as check the database, send Slack, control the browser - directly connect to MCP, it’s over. It’s best to recognize this one and filter it out first.
**Second question: Does this matter need to be “established every time and cannot rely on Claude to realize it”? **
To “guarantee” level of enforcement - such as “.env must not be edited”, “rm -rf / must be blocked”, “lint must be run every time a file is modified” - use Hook (or permission rules, see the next section). The key word is “guaranteed”: Hook will always trigger on its event, which is certain; writing to CLAUDE.md is just a “request”, and Claude may comply or miss it.
**Third question: Is this a “one-time dirty job and want to isolate”? ** If you want to read a bunch of files, run a big search, just want the conclusion, don’t want the process to occupy the main dialogue, or want to do several things in parallel - Subagent. It works in an independent context, and only returns the summary after it is done.
What hasn’t been sorted out yet is the choice of “knowledge/rules/processes”. Let me ask the last one:
**Question 4: Should it be “seen every time” or “seen only when needed”? **
- Rules that you need to see every time (agreements, build commands, never do X) → CLAUDE.md.
- Knowledge or processes (API documentation, deployment checklist, debugging routines) that are checked only when needed → Skill.
- Here “you want to actively trigger a multi-step process with one click”, let this Skill bring
/<name>and use it as slash command.
Four questions, ranging from “the most recognizable external connection” to “the most subtle knowledge vs rules”, sifted through the layers, the leaves are the answers. When choosing expansion points, I basically recite these four sentences silently in my mind.
💡 To sum up in one sentence: The order of the decision tree is ”** Connect to the outside? → Hard guarantee? → Isolate? → View every time or on demand? **”. Asking four questions to go straight to the leaves is much easier to use than memorizing a bunch of definitions.
05 The three groups that are easiest to mix up will be explained in one go
Trees alone are not enough. There are always a few couples who look alike, and they are entangled in one choice. I picked out the three groups that novices ask the most and broke them down one by one. If these three groups understand it clearly, they will not fight when using the decision-making table.
Skill vs Subagent
These two are the easiest to mix up, because “both can install a set of processes.” But they don’t address the same thing at all.
**Analogy: manual vs expat. ** Skill is a handbook that can be shared. Whoever needs it can read it. After reading the content, you will enter your current “work notes”; Subagent is to send a person out to carry out the task. After completing it, he will only come back to report the conclusion to you. You have nothing to do with how much information he has read outside.
The core difference is just one word: context.
| Comparison Dimensions | Skill | Subagent |
|---|---|---|
| What is it | Reusable knowledge/process | Isolated workers with independent context |
| Where to go | Load into your main window | Use it to your own window and then return to the main window |
| Is the main conversation affected? | Occupies the main context | Isolated, barely occupies the main window |
| Most suitable for | Reference materials, callable processes | Reading a bunch of files, parallel tasks, special workers |
In one sentence: If you want “I will use the content here”, choose Skill; if you want “The process does not contaminate my place, only give me the conclusion” choose Subagent. The two can also be combined - Subagent can preload specified Skills when it is started, which is equivalent to “expatriates bring their own special manuals.”
CLAUDE.md vs Skill
Both of these are “save instructions”, the difference lies in the loading method.
| Comparative Dimensions | CLAUDE.md | Skill |
|---|---|---|
| When to load | Per session, automatically | On demand (load only when needed) |
| Can workflow be triggered | No | Yes, use /<name> |
| Best for | ”Always do X” rules | Reference materials, callable processes |
The official judgment formula is very simple: If “Claude should always know”, go to CLAUDE.md, if “Claude should always know”, go to Skill. The essence of the “300-line interface stuffing CLAUDE.md” pitfall in Section 03 is that things that should go into Skill are mistakenly put into CLAUDE.md.
Hook vs permission rules
The tangled point in this group is: **To “block a dangerous operation”, should we use Hook or permission rules (deny discussed in Part 20)? **
Let’s talk about the commonalities first: Both of them are “mandatory” hard constraints, and they do not depend on Claude’s self-consciousness - On this point, they are on the same side, which is clearly different from the “request written in CLAUDE.md”. The official sentence breaks the key:
Instructions such as “Never edit
.env” in CLAUDE.md or skills are requests, not guarantees. ThePreToolUsehook that prevents editing is enforced.
The difference lies in “how wide the scope of management is and how complicated the work is”:
- Permission Rules: Declarative, specifically governing “whether this tool/this command is allowed or not”. Write a
Bash(rm -rf *)(that is,"deny": ["Bash(rm -rf *)"]in settings.json) in the deny rule to block it. It is concise and suitable for pure “admission judgment”. - Hook: It can run a script. In addition to “blocking”, it can also do other things** - while blocking, it can record a log, send a notification, and automatically rewrite parameters. Suitable for “block + incidental actions” or complex judgments that cannot be expressed by permission rules.
A useful rule of thumb: For black and white judgments such as “accurate or not”, give priority to using permission rules and do it in one line; only do something (record, notify, rewrite) at the moment of interception before using Hook. There is no conflict between the two, and they are often used together - the authority rules determine the basic base, and Hook makes up for the work of “having to do another job after blocking”.
💡 One sentence summary: Skill enters my context/Subagent isolates and only gives conclusions; CLAUDE.md is viewed every time/Skill is viewed on demand; permission rules govern “accurate or not” black and white judgments/Hook governs “interception + incidental actions” - distinguish the three groups and choose not to fight anymore.
06 Combination is the norm: after doing multiple-choice questions for a long time, remember that they can be stacked
At this point, you may think that picking an extension point is a “single-choice question.” **On the contrary - real projects are almost all combinations. ** Each expansion point does what it is best at, and together they form a complete set of “equipment”.
There are several sets of classic combinations given by the official. I will translate each set with real scenes:
| Combination | How to cooperate | What does it look like on the ground |
|---|---|---|
| Skill + MCP | MCP is responsible for “connecting”, and Skill is responsible for “teaching it to use it well” | MCP connects to the database, and Skill writes down your table structure and common query routines |
| Skill + Subagent | Start Subagent in Skill to work in parallel | A /audit Skill sends three Subagents to check security, check performance, and check style at the same time |
| CLAUDE.md + Skill | CLAUDE.md contains permanent rules, and Skill contains on-demand rules | CLAUDE.md writes “Abide by our API conventions”, and Skill contains the complete style guide |
| Hook + MCP | When an event is triggered, Hook does external things through MCP | After modifying key files, Hook automatically sends a Slack notification via MCP |
If you look at the “Skill + MCP” group, you will understand the beauty of the combination: With MCP alone, Claude can connect to the database, but it does not understand how to design your table and how to check for optimality; with Skill alone, it understands the routines but cannot connect to the database. Stacking two in a stack is “both connected and easy to use.” A common configuration is like this - MCP is connected to the library, and the skill is filled with “which table to check the user’s order and which field the statistical caliber is.” When combined with it, the query written by Claude basically does not need to be reworked.
How can I move that assembled configuration to other projects or share it with colleagues? **The answer is Plugin - it is the layer that “packs it all away”. **
**Analogy: suitcase. ** When you go out, you don’t hold your shirt, razor, and charger in your arms one by one. You put them all into a box and carry them away. Plugin is this box—packing Skill, Hook, Subagent, and MCP server into one installable unit. You need to use the same set for the second project, just install this plugin; the Skill inside also has a namespace (like /my-plugin:review), so multiple plugins can be installed separately without conflicting names. The official said it very directly:
Plugin bundles skills, hooks, subagents and MCP servers into a single installable unit.
The specific method of Plugin was discussed in Part 24. Here you only need to remember its position in the system: the other five are “functions”, and the plugin is the layer that “boxes and distributes functions”**.
💡 One sentence summary: Picking extension points is not a multiple-choice question - real configurations are almost all combinations (Skill+MCP, CLAUDE.md+Skill…); if you want to move the whole set to other places or share it, use Plugin to pack it into a box and take it away.
07 Get started: Make a list of real needs and “triage” them one by one
Just reading the watch is not enough, you have to actually practice “triage”. Here is a list of simulated real requirements - these are all real ideas that will come up in the project. Your task: According to the previous decision tree, assign each section to the right department. **This section does not require typing commands, it is a purely mental exercise, but it is more effective than memorizing ten definitions. **
Step 1: Copy this list into your memo (or just run it in your head)
需求清单(给每条挑一个扩展点):
A. 团队约定「一律用 pnpm,禁止 npm」,希望它每次都遵守
B. 想让它查公司内部的 PostgreSQL 数据库
C. 想敲一个命令就跑完「打 tag → 改 changelog → 推送」整套发版
D. 每次它编辑完任何文件,自动跑一遍 prettier 格式化
E. 让它一次性读完整个 utils 目录,只告诉我哪些函数没人用
F. 一份很长的「内部错误码对照表」,它偶尔需要查
G. 「生产数据库的迁移脚本,绝对不许它执行」,要硬拦死
Step 2: Go through the decision tree yourself first and write the answer after each item
Don’t rush to read on, first use the four questions in Section 04 (External connection? Need a hard guarantee? Need to isolate? Watch every time or watch on demand?) to judge for yourself.
Step 3: Correct the answer
The following are reference answers and reasons for judgment. It doesn’t matter how many items are correct, what’s important is “why” they are correct:
| Requirements | Should be used | Reasons for judgment (which decision tree to take) |
|---|---|---|
| A Always use pnpm | CLAUDE.md | No external connection, no script guarantee, no isolation; it is the “see it every time” rule |
| B Check the internal database | MCP | The first question hits the mark: external services and data need to be connected |
| C One-click release | slash command | A fixed multi-step process that you actively trigger, assign a /release to the Skill |
| D Automatically format after editing | Hook (PostToolUse) | Fixed timing, run every time, no need for it to think |
| E Read the entire directory to seek death code | Subagent | Read a bunch of files and just draw conclusions, isolate the main dialogue and don’t block it |
| F Occasionally check the error code table | Skill | For reference materials that you only need to read, don’t check CLAUDE.md |
| G prohibits execution of migration scripts | Permission rules/Hook | To “guarantee” blocking, you cannot rely on prompts; pure access judgment priority permission rules |
Expectation: If your A and F are not mixed (one enters CLAUDE.md and the other enters Skill), D and G are not mixed (one Hook runs automatically, one permission blocks it), and E you choose Subagent instead of Skill——then your “triage” logic has been established, and you can just follow this process when the real needs arise in the future.
Which one is stuck? Go back to Section 05 and read the corresponding set of comparisons. Most likely, you cannot distinguish which pair. This set of judgments generally requires practice for a while to form muscle memory - the first few times it is easy to force “this Subagent’s activity into a Skill”. After two runs, I found that the main dialogue was overwhelmed by the middle process, and then I remembered “as long as the conclusion is reached, send the clone”.
💡 To summarize in one sentence: Get a list of real needs and go through the decision tree triage item by item, which is a hundred times more useful than memorizing definitions. For the item you are stuck on, go back and read the corresponding “Easily Confused Comparison” and you will basically be clear.
08 Summary
This article is closed to the fourth group - turning the five expansion points (plus slash command) you learned along the way from “what each is” to “which one should be used when the demand arises”.
Putting the core together to review:
| That sentence in your heart | The department that should be admitted | The key point in one sentence |
|---|---|---|
| ”Must be followed every time” | CLAUDE.md | Rules that are always in effect, automatically loaded in each session, controlled within 200 lines |
| ”Automatically call up when needed / I trigger it with one click” | Skill / slash command | On-demand knowledge and processes, usually do not occupy context |
| ”Connecting to external services and data” | MCP | If the built-in tools are out of reach, rely on it to connect to the outside world |
| ”Read a bunch of files and only give me the conclusion” | Subagent | Isolate the context, parallelize the special project, and only return the summary |
| ”Automatically run at specific times, be sure to do so” | Hook | Determined actions triggered by events, guardrail-level compulsory |
| ”Move the whole set / share with others” | Plugin | Package the above into an installable unit |
You should now be able to: Get any request “I want Claude…” and no longer be confused about five or six nouns - silently recite the four questions in your mind (external connection? Hard guarantee required? Isolation required? View every time or on demand?), follow the decision tree to the leaves, and directly lock in which one to use; when encountering Skill vs Subagent, CLAUDE.md vs Skill, Hook vs permission rules, which are easy to confuse, you can also clarify the difference between the two. **After this set of “demand → solution” mapping is established, the parts learned in the previous nine articles can be truly put into use and can be used as needed. **
The entire fourth group (advanced function extensions) is here. **You have touched all five weapons, and you know which one to draw in battle - the rest is to use them smoothly. **
Starting from the next article, we will enter the fifth group “System Configuration and Optimization”. Start from 31 “settings.json: user-level/project-level configuration” - along the way, you have written CLAUDE.md, assigned permissions, and will soon configure Hook. Which file should these configurations be written into? Who should control who at the user level and project level? It’s time to settle down and understand. Think about it: the same configuration, written in your home directory and written in the project, may have exactly the opposite effect** - the secret here will be clarified for you in the next article.