12 | Claude Code in 16 Hours: settings.json, Output Styles, and Hooks
Understand the configuration layers in settings.json, output styles, and the operating boundary of Hooks.
31 · settings.json: user-level/project-level configuration
There is something stupid and easy to do here. Once you step on it, you will never forget it.
When I first started using Claude Code seriously, a common operation was to insert a line of defaultMode: "auto" into the .claude/settings.json of a certain project. I want it to be automatically released as soon as it enters the project, so don’t keep asking. No response after changing. The first reaction was that I wrote the wrong field name. I checked it word for word three times against the official document, and found that not even a single letter was correct. If I still suspect that the JSON format is broken, I run it through the online validator and it is very legal. After struggling for about twenty minutes, I even started to wonder if there was a bug in this version of Claude Code.
Only later did I see this sentence in the corner of the document: When defaultMode is set to "auto", written in the project settings will be directly ignored - this is intentionally blocked by the official to prevent a certain warehouse from secretly turning on the automatic mode for itself (this is also mentioned in Article 20). The configuration syntax of that line is correct and the file is not corrupted. It is simply that the “floor” was written incorrectly. Move it to user-level ~/.claude/settings.json and it will take effect in seconds.
I say this pitfall to make you remember one thing: The pitfall of settings.json is 90% not in “how to write it”, but in “which layer it is written on, which layer is overlaid on which layer”. Today I will break this set of “floor rules” into pieces so that you can have an idea when configuring next time - whether this should be placed in the main directory or in the project, you will know at a glance.
After reading this article, you will get:
- Explain in one sentence what
settings.jsonis and what role it has with CLAUDE.md - The file location, scope of influence, and what should be placed at each of the three levels (user level/project level/local level)
- A priority table of “who gets the upper hand”, plus the most counter-intuitive exception (arrays are merged, not overwritten)
- What are the configuration items you most frequently touch (
model,permissions,env,hooks,statusLine) used for and where to put them? - A practical example that can be followed and gives the expected output: write a configuration → use
/statusto verify that it really takes effect
01 First understand: what is settings.json and what role it has with CLAUDE.md
Let me give the conclusion first: **settings.json is the “behavior switch assembly” of Claude Code - using JSON format to manage tool behaviors such as permissions, environment variables, default models, Hooks, and status bars; it and CLAUDE.md are two sets of things, one manages “how to work” and the other manages “what to remember”. **
Many people confuse the two when they first come up. You have written CLAUDE.md (Part 18), and configured permission rules (Part 20), and then you have to configure Hooks - these things eventually fall into the file settings.json, but it contains completely different content from CLAUDE.md.
**Analogy: The company’s project filing cabinet vs. the switch box at your work station. ** CLAUDE.md is like the “Project Specification” in the filing cabinet - it says “We use pnpm instead of npm” and “Run tests before submitting” and other natural language conventions that are read by people (for Claude). It is read in every session as the background. settings.json is different. It is the switch box on the wall of the workstation - there are clear switches in it: whether this tool is allowed to be used, which model is run by default, and which script is automatically triggered after the file is modified. The filing cabinet is the “rules told to it”, and the switch box is “the machine behavior that determines its death”.
The official stated its positioning very simply:
The
settings.jsonfile is the official mechanism for configuring Claude Code through hierarchical settings.
Note that the two words “official mechanism” and “layered” are exactly the two main lines of this article: it is the formal entrance to configuring Claude Code (not temporarily typing parameters on the command line), and it is stacked in several layers (user level, project level, local level).
If you fall into the real scenario you will encounter, settings.json takes care of these types of things:
- “In this project, commands like
rm -rfare killing me” - writepermissions.deny - “This project can use Sonnet by default, don’t always use Opus to burn credits” - write
model - “Every time it changes the file, it automatically runs the formatting process” - write
hooks - “I want the status bar at the bottom of the terminal to display the current git branch” - write
statusLine
These are not words “said to Claude”, but switches that actually change its operating behavior. This is the fundamental division of labor between settings.json and CLAUDE.md.
💡 To summarize in one sentence: CLAUDE.md is “the natural language rules told to Claude”, and
settings.jsonis the “switch assembly that determines the behavior of the machine” - The former is responsible for what to remember, and the latter is responsible for how to work. Don’t mix the two sets of things.
02 Three levels: home directory, project, or only on your machine
The first thing to understand about settings.json is not what fields there are, but that it has three levels. The same file name is placed in three different locations, and the scope of scope is very different. The root of the pitfall at the beginning is that there is no clear distinction between levels.
**Analogy: Three places to post notifications. ** The same notice “Remember to turn off the air conditioner after get off work” is posted on the door of the company (every project in the company can see it), on the door of this office (only people working on this project can see it, and is registered in the office convention), or on a sticky note next to your own monitor (only you can see it, no one else knows) - the scope is completely different. The three levels of settings.json are these three “posting methods”.
For the officially defined three layers, look at this table (plus the highest managed layer, which is only for enterprise IT and is basically unreachable to us novices, so we will mention it separately in the next section):
| Hierarchy | File location | Who is affected | Enter git | What should be put |
|---|---|---|---|---|
| User | ~/.claude/settings.json | You, across all your projects | No (in your home directory) | Personal preferences: your usual models, themes, tools you want across projects |
| Project level | .claude/settings.json | All collaborators of this repository | Yes (submitted to git share) | Team agreement: permission rules, Hooks, shared MCP |
| Local | .claude/settings.local.json | You, only in this repository | No (automatically gitignored) | Personal overrides, experimental configuration with credentials |
For three levels of trade-offs, just remember these three sentences:
- “I want it for all my projects” → User level (
~/.claude/settings.json). For example, “I’m used to using Sonnet by default” and “My status bar script”. Once configured, it will be there for any project. - “The whole team should have it and follow the warehouse” → Project level (
.claude/settings.json). It was submitted to git, and teammates pulled it down and had the same set of configurations. This is “configuration as code”. - “Just me, exclusive to this project, don’t want to enter the repository” → local level (
.claude/settings.local.json).
There is a particularly thoughtful detail here, which is officially stated: when you create .claude/settings.local.json, Claude Code will automatically add it to git for you and ignore it.
Claude Code will configure git to ignore it when creating
.claude/settings.local.json.
Why is it designed like this? Think about it: the local level is for “private items” - your personal experimental configurations and possibly some credentials. These should not be handed over to the repository to contaminate teammates. The official has welded this line of defense for you, saving you the trouble of using git add. to add your private configuration one day. This also echoes the main line of security discussed in Chapter 21: Sensitive things should not be allowed to enter git from the source.
How to distinguish in actual combat: three-layer distribution of a real project
Just remembering the definitions is not enough. If you look at what is placed on each of these three layers in a real project, you will immediately get a sense of it:
- User level (
~/.claude/settings.json): The set of custom status bar scripts and default model preferences. These have nothing to do with specific projects. They are personal habits of “bringing them wherever you go.” - Project level (
.claude/settings.json): a set ofpermissions.deny(disablecurl, disable reading.env), and a hook that “automatically runs lint before submission”. These are the bottom line and stuck points of the entire team and must be entered into git so that every collaborator can pull them down. - Local level (
.claude/settings.local.json): A few additional commands that are temporarily released by individuals (the team does not need to know), and a hook that is still being tested and is not mature enough to be shared with teammates.
To determine which layer a configuration should be placed in, it is enough to go through a chain of questions in your mind: “I only want this → user level or local level; the whole team needs it → project level”, and then subdivide it further: “Common to all projects, follow me → user level; just for this project, I don’t want to enter git yet → local level”.
A mistake in the opposite direction is very common: to save trouble, you pile all the project-specific permission rules into the user level - but when you switch to another project, those rules all follow, and there are a bunch of inexplicable permissions in unrelated projects. Only then can we understand: “Should this configuration follow me or should it follow the project?”, which is the first judgment of layering. Follow the project and put it into the project honestly.
💡 One sentence summary: three layers in one sentence - ** put user level
~/.claude/settings.jsonacross all projects, put project level.claude/settings.json(into git) for whole team sharing, put local level.claude/settings.local.json(automatic gitignored) for private coverage**; judgment mantra “Follow me vs. follow the project”.
03 Who wins: priority, plus the most counter-intuitive exception
All three layers can write the same field. So here comes the question: **The user level says to use Opus, the project level says to use Sonnet, who do you listen to? ** This is what “priority” has to do, and it is also where settings.json is most likely to confuse people.
First, sort the official priorities from highest to lowest (higher ones suppress lower ones):
| Priority | Hierarchy | Speak human language |
|---|---|---|
| 1 (highest) | Managed (enterprise IT deployment) | The company’s locked-in strategy cannot be changed by anyone |
| 2 | Command line parameters (--settings, etc.) | The board you made temporarily when starting, only this session |
| 3 | Local Level .claude/settings.local.json | Your private overrides in this project |
| 4 | Project level .claude/settings.json | Project settings shared by the team |
| 5 (minimum) | User level ~/.claude/settings.json | Your global default, it will take effect only when no one overrides it |
You can feel this “from high to low” suppression relationship more clearly if you draw it as a picture - The high level is like paper covering the low level, blocking the part where the same field is written below:
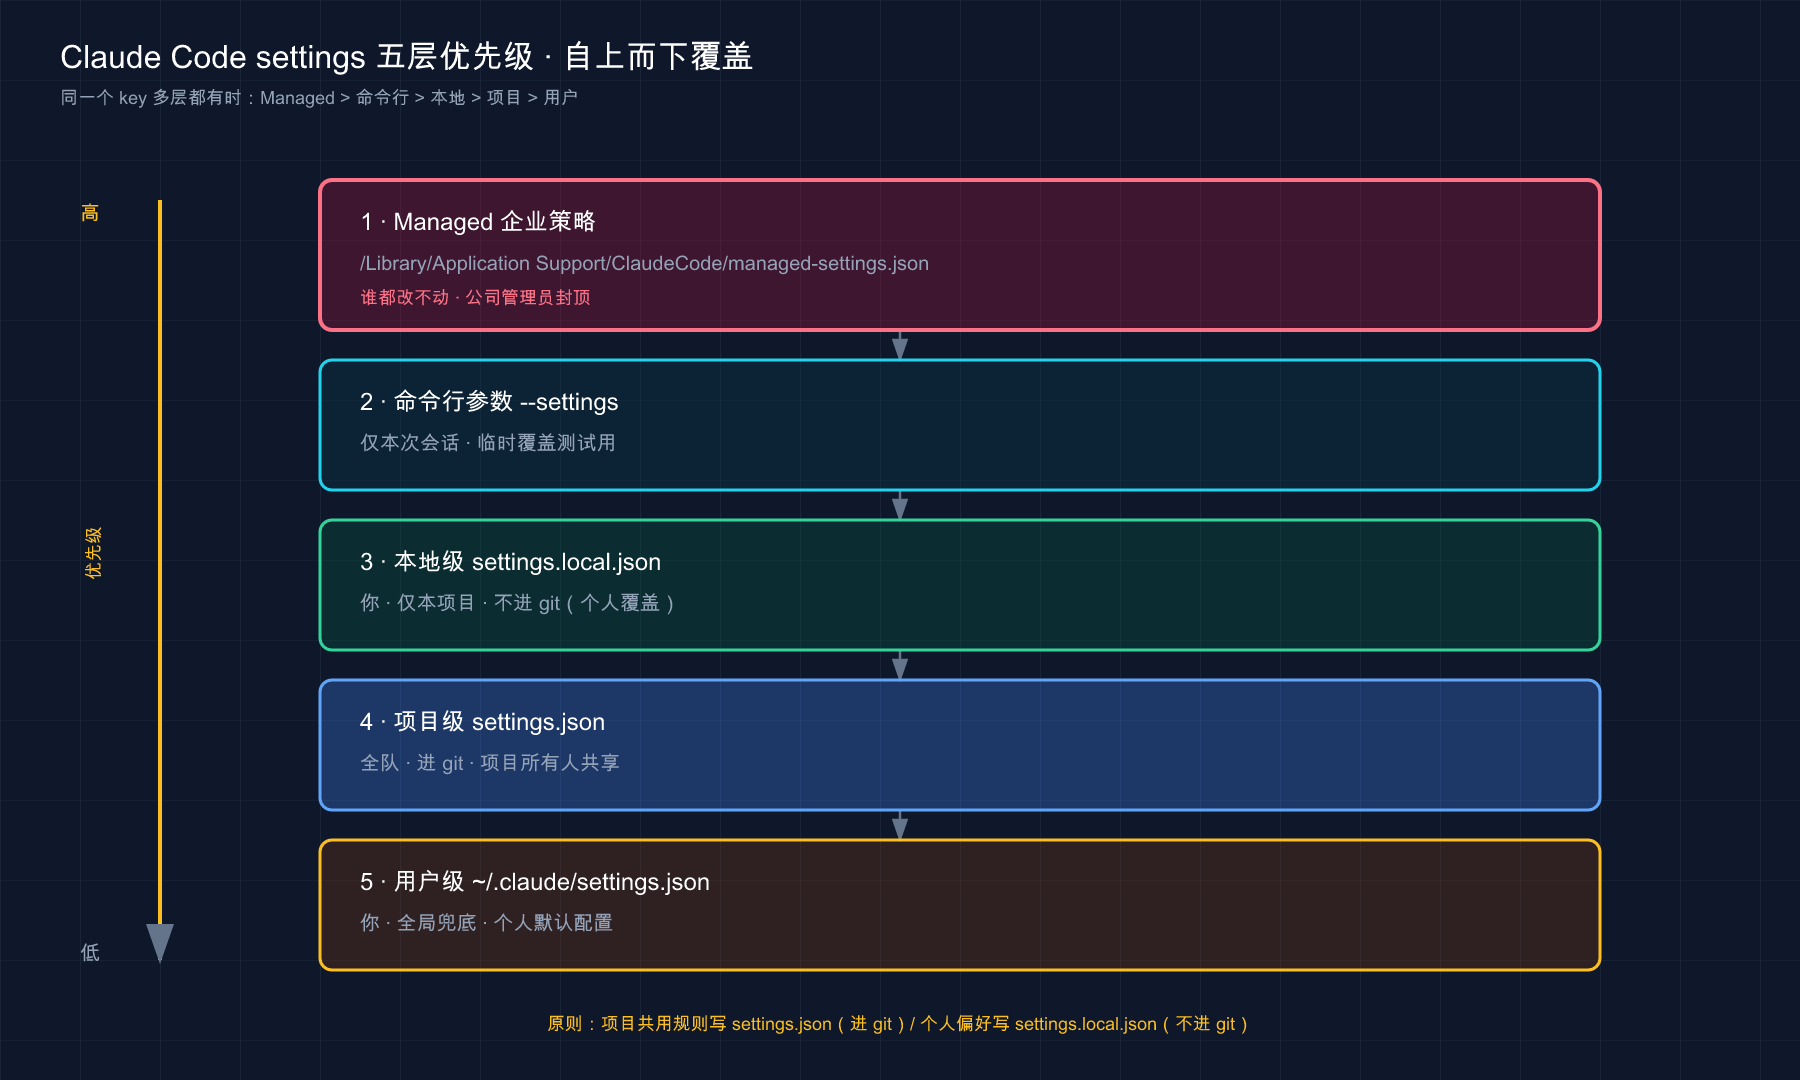
This picture shows the priority from high to low from top to bottom: The upper layer covers the lower layer (only single-value fields). In other words, the ones higher up are more “temporary and specific”, and the ones further down are more “global and comprehensive” - only when all the layers above do not touch a certain field, the user-level default at the bottom will take effect.
Remember this order in one sentence: the more “specific to the present”, the bigger, the more “big picture”, the smaller. The command line parameters (just this time) apply to the local (just this project, just you), the local applies to the project (the whole team), and the project applies to the user (global). The official example is the most intuitive:
For example, if your user settings allow
Bash(npm run *), but the project’s sharing settings deny it, the project settings take precedence and the command is blocked.
In other words - The green light you give yourself in the home directory may be vetoed by the project settings when entering a certain project. This just confirms the suspense buried at the end of the previous article: The same configuration, written in your home directory and written in the project, may have exactly the opposite effect. The pitfall of defaultMode: "auto" at the beginning is essentially due to the failure to fully understand this set of hierarchical semantics.
**Managed layer, Xiaobai can explain it in one sentence. ** It is a policy uniformly issued by enterprise IT through MDM, registry or server. It has the highest priority and cannot be covered by users and projects. It is specially used by the company to enforce security compliance (such as “ban curl in the whole company”). If you use it by yourself or collaborate with a small team, you will basically never touch it - it is enough to know that there is such a “ceiling layer”, and then go to the official server-managed-settings page in a controlled company environment.
The most counter-intuitive exception: arrays are “merged”, not “covered”
The “who wins,” mentioned above, refers to a single value (like model, you write a value and I write a value, and the higher-level one wins). But there is a type of configuration that does not follow this at all, and newcomers will most likely fail - array class configurations (such as permissions.allow / deny) are “merged” across layers, not overwritten.
What does it mean? Read the official words:
**Array settings are merged across scopes. ** When the same array value set appears in multiple scopes, the arrays are ** concatenated and deduplicated ** instead of replaced.
Translated into vernacular: Your permission rules will not be “replaced entirely” by the project settings, but the rules on both sides will be “put together” to take effect.
Give an example and you will understand immediately:
| Scenario | Intuition (wrong) | Actuality (right) |
|---|---|---|
User-level allow: ["Bash(npm run *)"], project-level allow: ["Bash(git diff *)"] | Project-level priority is high, so only git diff is left | Both are valid: npm run * and git diff * are both allowed |
This is two sets of logic with the “high level covering the low level” of single value fields, and they must be recorded separately:
- Single-value fields (such as
model,defaultMode): The high-priority layer ** completely covers ** the lower layer. - Array fields (such as
permissions.allow/ multiple variables indenyandenvare also assembled similarly): Each layer is put together to remove duplicates, and no one will erase anyone.
This point is very easy to trip up: I thought I wrote a set of deny at the project level, and then removed the loose set of allow at the user level. It turns out that the user-level allow is still in effect - because they are merged, not replaced. If you understand this, you will not “think that a certain opening is closed, but in fact it is open from another level.”
💡 To summarize in one sentence: the priority mantra “The more specific it is, the bigger it is” (command line>Local>Project>User, Managed capped); but array class configuration (especially permission rules) is a cross-layer merge to remove duplication, not an overwrite - this is the easiest counter-intuitive point to step on.
04 The most frequently used configuration items: which layer to place and why to use them
Now that the levels and priorities have been sorted out, let’s look at the fields that you actually touch most often. There are hundreds of officially supported keys in settings.json, but 90% of people use only these few keys every day. I picked them out and explained each one clearly “what it is for and which layer is best to put it on.”
Let me first show you an example of Although the sparrow is small but has all the internal organs, to give you an overall impression of its appearance (this is a simplified version of the official example):
{
  "$schema": "https://json.schemastore.org/claude-code-settings.json",
  "model": "claude-sonnet-4-6",
  "permissions": {
    "allow": ["Bash(npm run test *)"],
    "deny": ["Bash(curl *)", "Read(./.env)"]
  },
  "env": {
    "CLAUDE_CODE_ENABLE_TELEMETRY": "1"
  }
}
It is strongly recommended that you add the $schema line at the beginning. It points to the official JSON structure. After adding it, writing configurations in editors such as VS Code and Cursor will have automatic completion and real-time verification - if the field name is wrongly typed or the value type is wrong, the editor will mark it red on the spot. During the twenty minutes at the beginning when I was checking the field names word by word in the document, if I had added this line $schema, the editor would have prompted it. Official words:
Add this to your
settings.jsonto enable autocomplete and inline validation in VS Code, Cursor, and any other editor that supports JSON schema validation.
Let’s break down these high-frequency fields one by one:
model: Which model is used by default?
model determines which model this layer runs by default. The value is the model ID (like "claude-sonnet-4-6").
- Which layer to put: Depends on your needs. “I personally like to use a certain model” → user level; “Everyone can use Sonnet to save credit for this project” → project level.
- One point to note:
modelis different from most fields. It is only read once when the session is started. If it is changed, either restart it or use/modelto cut it in the session. The--modelstartup parameter and theANTHROPIC_MODELenvironment variable can temporarily override it (see Part 5 for details on the model).
This field has a very convenient usage: Assign different default models to different projects. For example, for a document-type project, the work is not heavy, and the model is hard-coded in its project-level settings.json and uses a relatively lightweight model; another core code project does not set it and maintains the stronger user-level default. In this way, whichever gear is used automatically for each project entered, and there is no need to manually switch /model every time - neither waste the quota of strong models on simple tasks, nor make do with hard projects. This is the practical value of the priority of “project level over user level”: The project level is customized for this project, and the user level covers all other projects.
permissions: whether to use a certain tool/command
This is specifically discussed in the 20th article - the three rules of allow (release), ask (ask every time), and deny (death), accurately control power according to tools and commands.
- Which layer to put: The safety bottom line that the team should adhere to (such as “ban
curl” and “disable reading.env”) → project level, enter git so that the whole team has it; if you want to save trouble, you want to release more → local level or user level. - Remember the article in Section 03:
permissionsis an array, cross-layer merging - don’t expect that writingdenyon a certain layer will push outallowon other layers.
env: Inject environment variables into the session
The key-value pairs written in env will be applied as environment variables to each session and the child process when Claude Code is run.
**Analogy: Work badges and equipment are issued uniformly before entering the workshop. ** No matter who comes to work today, this environment will be automatically configured as soon as they enter this workshop (session) - env is this set of “standard entry configuration”. The variables you declare here will be carried by every command and every sub-process run in the session.
- Typical uses: Turn on telemetry (
CLAUDE_CODE_ENABLE_TELEMETRY) and plug a fixed variable into a tool chain. - Which layer to put: Project-specific environment (such as a service address to which this project is connected) → project level; what you want globally → user level.
Hooks: Automatically run scripts at fixed times
hooks is the entrance to the “event-triggered automatic actions” that was mentioned repeatedly in the previous article and will be specially dismantled in the 33rd article - it is located in settings.json. For example, “automatically format the file every time it is modified” and “say hello at the beginning of every session.”
- Which layer to put: Stuck points that the team should run (such as “automatic lint before submission”) → project level; your personal automation habits → user level.
- For details on how to write it and what events it can monitor, you just need to know “its home is in
settings.json”. Chapter 33 will begin.
statusLine: Customize the bottom status bar
Article 14 talked about the “status line” at the bottom of the interface. statusLine allows you to customize what it displays - for example, plug in a script to display the current git branch, current model, and token usage in real time.
{
  "statusLine": {
    "type": "command",
    "command": "~/.claude/statusline.sh"
  }
}- Which layer to put: The status bar is a personal visual preference. Most people put it at the user level (
~/.claude/settings.json), which is common to all projects.
I compiled the experience of “which layer to put” these common fields into a table. When you are confused, you can check it directly:
| Configuration items | What it does | My default placement |
|---|---|---|
model | Default model | Personal preference → user level; project unification → project level |
permissions | Tool/command access | Safety bottom line → Project level (enter git) |
env | Inject environment variables | Project-specific → project level; global → user level |
hooks | Event-triggered automatic actions | Team stuck points → project level; personal habits → user level |
statusLine | Custom status bar | Personal vision → User level |
An easy confusion: not all configurations live in settings.json
Many people don’t know this, and they often remember it only after being educated about it. Claude Code also has another configuration file ~/.claude.json (note that it is .claude.json in the home directory and is not the same thing as ~/.claude/settings.json). It installs another type of stuff: your login session, the user/local scope MCP server configuration (Part 22 mentioned that the MCP configuration is stored here), the trust status of each project, and various caches.
The key pitfall is - There are a few configuration items that are officially stipulated to be placed only in ~/.claude.json. If you write them into settings.json, it will directly trigger an architecture verification error. Some of the official ones are: autoConnectIde (external terminal automatically connects to IDE), teammateDefaultModel (teammate default model) and so on.
A typical pitfall scenario is that I want to configure “automatic connection of external terminals to VS Code” and write it into settings.json. As a result, the $schema verification is marked red and /status also reports an error. After looking through the documentation, I found out that the home of this field is ~/.claude.json. So remember: settings.json manages “behavior switches”, ~/.claude.json manages behind-the-scenes data such as “session status/MCP/cache” - most of the time you only touch the former, but occasionally when a field “cannot be written into settings.json”, first think about whether it should go to ~/.claude.json.
💡 To summarize in one sentence: These are the high-frequency fields -
model(default model),permissions(control),env(environment variables),hooks(automatic actions),statusLine(status bar); “The whole team should have” put the project level into git, and “Personal Preferences” put the user level, add$schemato let the editor check for errors for you; pay attention to a few fields (such asautoConnectIde) lives in~/.claude.jsoninstead ofsettings.json.
05 Where to edit, when will the changes take effect, and how to confirm that it has actually been read?
The fields have been written, but there are still three especially practical questions that remain unresolved: where to make changes, whether to restart after making changes, and how to know that it has really taken effect. In the first twenty minutes of tossing, half of the time was spent on “not sure whether it has read this configuration.”
Where to edit: directly change the file, or use /config
Two paths:
- Use the editor directly to modify the JSON file - just find the file at the corresponding level according to the location of Section 02 and modify it. CLAUDE.md of this project also recommends “Prioritize using clear editing when changing files”, which is more controllable than typing commands temporarily.
- Type
/configin the session - the officially provided interactive setting interface, which can view the status and change some common switches (theme, detailed output, etc.).
An easily misunderstood point has been specifically clarified by the official: the Config tab in /config is not a complete view of the contents of your settings.json file. It is just an editor for a few fixed switches such as “theme, detailed output” and so on. Don’t expect to see every configuration you write in /config - you have to go to the file to see it completely.
When will the changes take effect: Most hot loading, two exceptions require restarting
This is good news - Claude Code will keep an eye on your settings file, and most key changes will take effect directly in the running session, without restarting. Officially stated:
Claude Code watches your settings files and reloads them when they change… This includes
permissions,hooksand credential helpers.
But there are two exceptions. They are “read only once at startup”. After the modification, you have to restart (or use the corresponding command to switch) before they are recognized:
| Field | How to take effect after modification |
|---|---|
model | Restart, or use /model in session |
outputStyle (output style, discussed in the next article) | Restart, or rebuild after /clear |
Remember the actual meaning of this: if you change permissions or hooks, it will take effect after saving, and then use **; but if you change model and find that there is no change, **don’t rush to suspect that you wrote it wrong - it will only be recognized after restarting. If the pitfall at the beginning occurred in permissions, it could have been detected by saving the disk, but it happened to encounter the special case of “level ignored”, which took so long.
How to confirm that it has actually been read: /status See “Setting sources”
This is the most critical trick, specialized in “I’m not sure which configuration it loaded”. Type /status in the session, and there is a line of Setting sources in it, listing which layers of settings are actually loaded in the current session - such as User settings, Project local settings (the specific label name shall be subject to the actual interface).
The official explanation of it is very practical:
The
Setting sourcesline confirms which sources are being read… The layer only appears in the list if that source has at least one key loaded, so an empty list means no settings sources were found.
This is a lot of information, let’s break it down and read:
- The layer you wrote ** appears in the list ** = the file was successfully read.
- The layer you wrote does not appear = Claude Code did not find/read it at all (mostly the path is wrong, such as writing
.claude/settings.jsoninstead ofsettings.json). - If there is a syntax error in the file (the JSON is broken, the value is illegal),
/statuswill directly report an error to you, saving you the trouble of guessing.
So after allocating a copy of settings.json, the first thing to do is to type /status to confirm that the layer is really in the list - If this step had been known earlier, the detour of the first 20 minutes could have been saved to two minutes.
The configuration does not take effect? Check this table
Gather all the “pitfalls” in this article into a checklist. Next time the configuration you write “doesn’t respond”, don’t be too quick to doubt the syntax. Check it yourself in this order. Basically, you can check it accurately:
| Phenomenon | ❌ Don’t doubt | ✅ Check this first |
|---|---|---|
| No response at all after changing | Is the field name written wrong? | /status Check whether your layer is in Setting sources - if it is not there, the path is wrong |
model remains unchanged after changing | Is the configuration broken? | model does not take effect until restart (or /model is cut now), the save is not enough |
defaultMode: "auto" does not work | Wrong spelling? | auto is ignored at project/local level, must be placed at user level (section 03) |
I wrote deny but a certain command can still run | Is deny written correctly? | Permissions Cross-layer merge, most of the other layers have allow but have not deleted it (Section 03) |
| A certain field cannot be written into settings.json | Is the JSON format wrong? | It may live in ~/.claude.json (like autoConnectIde, section 04) |
If you look at this table, there are almost no “grammatical errors” that are truly “grammatical errors” - most of the “invalidities” are due to the concepts of hierarchy, effective timing, and merge semantics not being fully understood. This is also the sentence I want to convey to you most in the beginning: settings.jsonThe difficulty is never how to write it, but to figure out its set of layered rules.
💡 To summarize in one sentence: Change the file or use
/config(the latter only handles a few switches);permissions/hookssave and hot load,model/outputStyleneeds to be restarted; After configuration, be sure to/statusand look at the “Setting sources” line to confirm that your layer is really read; if it does not take effect, check the layer level to check the syntax.
06 Hands-on: Write a user-level + project-level configuration, and use /status to verify that it really takes effect
Just watch and practice fake moves. The following will take you to write the two-layer configurations by hand, and then use /status to verify that they are really loaded** - run through the entire link of “Write File → Layer → Verify” in this article. Use minimal examples throughout and don’t rely on your existing complex environment.
Step one: Create a practice project (in the terminal)
mkdir settings-demo && cd settings-demoStep 2: Write a project-level configuration
Paste the following into settings-demo/.claude/settings.json (allow test commands, block curl). The first line $schema lets your editor do the validation easily:
{
  "$schema": "https://json.schemastore.org/claude-code-settings.json",
  "permissions": {
    "allow": ["Bash(npm run test *)"],
    "deny": ["Bash(curl *)"]
  }
}
Step 3: Write a local-level configuration
Then paste a private release in settings-demo/.claude/settings.local.json that belongs only to you and does not enter git**:
{
  "permissions": {
    "allow": ["Bash(git status *)"]
  }
}Expectation: After these two files are created, your project will have both “project-level” and “local-level” configurations. Note - As mentioned in Section 02, settings.local.json will be automatically gitignore (verified in the next step).
Step 4: Confirm that the local level is really ignored by git
git init -q && git status --shortExpected: You can see .claude/settings.json (project level, to be added to the repository) in the output, but not see .claude/settings.local.json - it is automatically ignored. Seeing this difference = the “local-level automatic gitignored” in Section 02 has been successfully verified here.
Step 5: Enter the session and use /status to verify that both layers have been read
claudeAfter entering, type:
/statusExpected: Find the Setting sources line in the pop-up status information. It should list Project local settings (and possibly the User settings you configured earlier). The specific label name shall be subject to the actual interface. See that all the layers you wrote are in the list = that configuration was successfully loaded. If a certain layer does not appear, go back to Section 02 to check whether the file path is misplaced.
Step 6: Use /permissions again to cross-confirm that the rules take effect
/permissionsExpectation: You can see the rules you just wrote - npm run test * and git status * are in the allow list, and curl * is in the deny list. Special Note: git status * comes from the local level, and the other two are from the project level, but they are all taking effect** - this is a living example of “cross-layer merging of permission rules, not overwriting” mentioned in Section 03.
After completing these six steps, you will have personally tested the core capabilities of settings.json: Writing in layers, automatically isolating private configurations, using /status to confirm loading, and using /permissions to see the merge effect. In the future, any layer or field will be allocated to the same process.
💡 In one sentence: practice ”** project level + local level two configurations →
git statusVerify that the local level is ignored →/statusCheck that both layers are loaded →/permissionsCheck the rules and merge**” - run through this link by yourself, and the two most convoluted points of layering and merging will be solved immediately.
07 Summary
In this article, we have clarified Claude Code’s “main switchboard” settings.json from the inside out - from “what it is” to “how many layers it is divided into, who controls whom, and how to verify after modification”, and lay out the configuration in a clear and orderly manner**.
Let’s review the core points together:
| Things you want to find out | Answers | Key points in one sentence |
|---|---|---|
| What is its relationship with CLAUDE.md | Two sets of things | CLAUDE.md is responsible for “what to remember”, settings.json is responsible for “how to work” |
| How many layers are there and where to put them | Three layers | User level ~/.claude/, project level .claude/ (enter git), local level .claude/settings.local.json (automatic gitignore) |
| Who listens to conflicts | The more specific, the bigger | Command line>Local>Project>User, Managed cap |
| The most counter-intuitive point | Array merging | Arrays such as permission rules are put together across layers to remove duplication, not overwriting |
| Which fields are frequently used | Five | model/permissions/env/hooks/statusLine |
| How to verify after modification | /status | Look at the line “Setting sources” to confirm that your layer is actually read |
You should now be able to: Distinguish what settings.json and CLAUDE.md are responsible for, know whether a configuration should be placed at user level or project level, understand the priority of “who suppresses whom” and the counter-intuitive exception of “array combination is not overwriting”, understand the high-frequency fields of model/permissions/env/hooks/statusLine, and use /status after configuration to confirm that it really takes effect. **This set of “layered configuration” capabilities is the wrench you use to change Claude Code from “installed and ready to use” to “fitting the workflow of you and your team.” **
The detour of the first twenty minutes was based on one sentence - I couldn’t figure out “which layer it was written on”. After this article, you can save yourself a lot of trouble: When the configuration does not take effect, don’t doubt the syntax first, first think “Did I put it on the wrong floor”, and then type /status to take a look.
Next article 32 “Output Styles” - You have just seen a special outputStyle field in settings.json. Do you remember that it is one of the two exceptions of “only read once at startup and takes effect after restart”? The next article will talk about it specifically: How to adjust Claude’s “speaking style and system prompts” so that it can be switched from the default “work assistant” to one more suitable for explanation, teaching or other scenarios. Think about it: if the same Claude changes his output style, how different will his answer style be for you?
32 · Output Styles: Change the “program” without changing the host
They all say, “If you want Claude to obey, just pile it into CLAUDE.md” - pile up agreements, pile up rules, and pile up everything it should remember.
To be honest, this is only half true. CLAUDE.md is indeed a good place to store “project background” (see Part 18 for details), but there is a type of need that is stuffed in the wrong drawer.
Which category? **“I hope the tone/role/format of its response will change every time”. ** For example: I want it to draw a picture first and then explain it every time, I want it to teach me why I write it while writing code, I simply want to use it as a writing assistant instead of a programmer. You write these requirements into CLAUDE.md, and it will work sometimes or not—because CLAUDE.md is “a user message attached to the system prompt”, a “request” for Claude to see, not a switch to change its “nature”. The switch that really changes “how Claude speaks” is called output styles.
Let’s put it this way: CLAUDE.md is the project information handed to new employees, and output styles directly rewrites his job description - “In this position, you are an engineer who immerses himself in programming, or a mentor who talks while doing it.” This article will explain how to flip this switch.
Let’s give you a scenario that will make you feel immediately: Let a person who doesn’t understand code at all use Claude Code to modify his resume. With the default engineer personality turned on, it always wants to “help you break this section into functions” and “do you want to add a test” - it is full of engineering thinking and is completely different from revising your resume. This is not a problem that CLAUDE.md can solve, which is why output styles exist.
After reading this article, you will get:
- Explain in one sentence exactly what is changed in output styles (spoiler: it’s “how to respond”, not “what you know”)
- What are the several built-in styles (Default, Proactive, Explanatory, and Learning) that come with Claude Code and when should they be switched?
- How to switch styles - and a pitfall of version changes: the old
/output-stylecommand is gone, how to switch now - Customize an output style of your own: how to write a Markdown file, what the frontmatter fields do, and don’t press the
keep-coding-instructionsswitch by mistake - What are the differences between output styles and CLAUDE.md,
--append-system-prompt, Subagent, and Skill? Let’s clarify them in a table and avoid confusion.
01 First understand: What it changes is “how to respond”, not “what to know”
Let’s nail down the core sentence of this article first, and then build on it:
**Output styles change how Claude responds, not what Claude knows. **
This is the exact words of the official document. What it means is: output styles do not inject Claude with any new knowledge about your project. They move Claude’s system prompt (the low-level instructions that are installed at the beginning of each session and define who Claude is and how he works) - setting the role, tone and output format for it.
**Analogy: The same host will change his style every time he changes the program. ** He is still the same person, and his business ability has not changed (his words and knowledge reserves are his own); but he has a calm tone when hosting “Xinwen Lianbo”, a bouncing tone when hosting children’s programs, and slows down the pace when hosting a teaching channel, stopping to ask questions while talking. **The change is “how this program requires him to speak”, not to replace him with another person. ** Output styles are to “change the program” for Claude - the model is still the same model, the ability has not changed at all, what has changed is the role, tone and format when it talks to you.
So when does it come in handy? The official judgment is very realistic:
Use one when you keep re-prompting the same voice or format every turn, or when you want Claude to act in a role other than software engineer.
(Sic, “voice” here refers to the response tone/format.)
Translated into vernacular, there are two signals:
- “The same sentence requires me to play it again every round” - For example, you have to tell me “draw me a flow chart when explaining” every time. After the fifth time, you should think: This should not be played by hand every round, but should be solidified into a pattern.
- “What I want it to do is not writing code at all” - For example, use it as a writing assistant or a data analyst. Claude Code’s default set of system prompts is adjusted for “efficiently completing software engineering tasks.” If you ask it to write a novel, the set of engineering instructions of “first limit the scope of changes, write comments, and verify the work” will get in the way.
Going back to the resume-changing scene at the beginning - this is a typical case of the second signal: Claude Code’s entire default personality is tuned for software engineering. If you ask him to help people change their resume, the set of engineering instructions of “limiting the scope of changes, writing notes, and verifying the work” all become interference. This kind of “stop being an engineer” job can’t be solved by writing a bunch of “Please forget that you are a programmer” in CLAUDE.md - CLAUDE.md is a request attached to it, and output style is the knife that changes its job description.
💡 In one sentence summary: What output styles changes is Claude’s system prompt - change its role, change its tone, and change its format. What changes is “how to respond”, not “what it knows”; you should think of it for two signals: retyping the same sentence every round, or wanting it to do work other than programming.
02 Four built-in styles: In addition to the default, there are three ready-made styles
You don’t need to write it yourself, Claude Code already has several built-in styles that can be cut out of the box. Let’s take a look at these files first.
The Default style is the one you have been using in the previous thirty-one articles - its system prompts are specially adjusted for “efficiently completing software engineering tasks”. Working hard, changing restraints, and verifying when necessary, this is Claude Code’s “job”. If you have no special needs, just use it.
In addition to the default, the official also has built-in three levels of additional styles. I will explain each of them in one sentence: “Compared with the default, there is something more”:
**Proactive (active type) - more daring to make decisions on their own and tend to take action rather than plan first. ** The official line: It will “execute immediately, make reasonable assumptions rather than pause for routine decision-making, and favor action over planning.” To put it bluntly, I mean less checking back and forth with you, less making plans, and making decisions on my own when it comes to small and routine decisions.
There is a confusing point here, which the official points out: Proactive provides a stronger “autonomous execution ** guidance**” than automatic mode, but it can be used without changing your permission mode - so you will still see the permission prompt before the tool is run. Permission mode (“Do interns ask you before they start” discussed in Chapter 20) is about “should I stop you and ask you?”, while Proactive is about “how aggressive its acting style is.” They are two different things, so don’t treat them as the same thing.
**Explanatory (explanatory) - gives you “knowledge points” while working. ** While helping you complete engineering tasks, it will insert segments of educational “Insights” to help you understand “why it is implemented this way and what the pattern of this code base is.” Suitable for when you want to understand the code by the way, not just get the results.
Learning (learning type) - collaborative learning and doing at the same time, and homework will be left for you. ** This is the most special level. It not only shares insights like Explanatory, but also leaves TODO(human) tags in the code, requiring you to write a small, strategic code snippet yourself. It’s like Claude sets up the scaffolding and leaves you to fill in the key lines - forcing you to actually get started instead of watching it perform throughout.
Put these three levels into a real sentence, and you will have a better understanding:
- For the same requirement “Add pagination to this list”, under Proactive there is a high probability that it will be modified directly without asking you “Do you want to make a plan first”;
- For the same requirement, Explanatory will tell you while changing it, “Why is cursor paging used here instead of offset? This is also written in other places in this project”;
- For the same requirement, under Learning it will write the outer framework and leave a line in the most critical function body
// TODO(human): implement cursor analysis here, hand the pen to you.
The four gears are lined up side by side, and it’s immediately clear who should play:
| Built-in styles | Core differences compared to default | When to cut it | Will the response be longer |
|---|---|---|---|
| Default (default) | —— | Normal software engineering, most of the time | Baseline |
| Proactive | More daring to make decisions on your own, less confirmation, and more prone to take action | If you think it’s inappropriate, you’d like to ask it back, and you want it to let go | Not necessarily |
| Explanatory | Interpret “Insights” while doing it | I want to understand the implementation ideas and code base patterns by the way | Longer (designed like this) |
| Learning | Explanation + leave TODO(human) for you to write by yourself | Learn scenarios, want to practice while doing them | Longer (designed like this) |
The last column “Will the response be longer?” should be taken out separately as a reminder: the official clearly stated that Explanatory and Learning are designed to produce longer responses than Default - because they need to insert explanations and leave homework. A long response means more output tokens (for how tokens are billed, see Chapter 06). So don’t leave these two as the default. Switch them when you want to learn, and switch back to Default after learning. This saves tokens and saves you from being swiped by a bunch of explanations every time.
A simple usage route: use Default for daily work; when you encounter an unfamiliar open source warehouse and want to understand its architecture while letting it change, switch to Explanatory; switch to Learning when you really want to calm down and learn a new framework and don’t want to just read it and type a few lines yourself. People who use Proactive the least are often more accustomed to it pausing to let people take a look before taking action - this is purely a personal preference. If you don’t like it, you can completely reverse it.
💡 In one sentence summary: There are four built-in gears - Default for working hard, Proactive for hands-off and less confirmation, Explanatory for talking while doing, and Learning for leaving homework for you while talking; the last two gears are more responsive and cost more tokens, switch on demand, and switch back to default after use.
03 How to switch: The /output-style command is gone
This section needs to be poured cold water on first, because there is a real pitfall of version changes hidden here - many commands that are still taught in old tutorials and old videos are invalid now.
You will most likely see this statement elsewhere: “Use the /output-style command to switch styles.” **This standalone command has been removed. ** The official document is clearly written:
The standalone
/output-stylecommand is deprecated in v2.1.73 and removed in v2.1.91. Use/configor edit theoutputStylesetting directly.
Therefore, there are two correct ways to switch styles, and I will spell them out for you.
Method 1: Click on /config menu (recommended, intuitive)
Type /config in the Claude session, find the Output Styles (Output Styles) item in the pop-up menu, and select the style you want. Official words:
Run
/configand select Output Style to choose a style from the menu. Your selections will be saved to.claude/settings.local.jsonat local project level.
Pay attention to the emphasis at the end of this sentence - The style you select in the menu will be written into the .claude/settings.local.json of the current project. This just follows the knowledge of settings.json in the previous article: settings.local.json is a project-level copy that belongs only to you and is not subject to version control (its positioning was discussed in Chapter 31). In other words, the style you change will only affect you and take effect in this project by default, and will not be imposed on teammates by submitting code.
Method 2: Directly edit the outputStyle field
If you don’t want to order from the menu, you can also write it by hand. Just add an outputStyle field to the settings file:
{
  "outputStyle": "Explanatory"
}
The value is the name of the style (the built-in ones are Explanatory, Learning, Proactive, or the name of a custom style). Which settings file this field is written in determines its scope - if you want it to be global default, write it to the user level ~/.claude/settings.json, if you want it to be exclusive to this project, write it to the project level. The priority rules of who wins are exactly the same as those mentioned in Part 31 and will not be repeated here.
An effective time that must be remembered
No matter which way you go, there is a point of “when does it count” after cutting. The official point is very accurate:
The output style is part of the system prompt that Claude Code reads once at the beginning of the session. Changes will take effect after
/clearor a new session.
**Analogy: The script of the program is sent to the host before it starts broadcasting. ** The program has been airing for half an hour. If you insert a new script temporarily, it cannot be changed in this episode - it will not take effect until the next episode starts. Same as the output style: it’s part of the system prompt, which Claude only reads once at the beginning of the session. If you switch the style in the middle, the current conversation will not change immediately. You have to clear it with /clear (as mentioned in Chapter 19, /clear means “clean the desktop and restart”) or simply open a new session, and the new style will really take effect.
Many people get stuck here when they change styles for the first time: they change the style to Explanatory in /config, and when they return to the conversation, they find that it is still busy with no explanation, and they immediately think “this function is broken.” It took me a long time to figure it out - No /clear, the old system prompt is still hanging in this session. /clear and the explanation will come out immediately. Remembering this pitfall will save you those ten minutes of madness.
💡 In one sentence: The old
/output-stylecommand has been removed. Now there are two ways to change the style - select ** in the **/configmenu (save insettings.local.json) or directly edit theoutputStylefield; after cutting, remember to/clearor open a new session to take effect. Don’t think it is broken like me.
04 Customize your own style: one Markdown file
Not enough built-in four gears? You can definitely write one yourself. The good news is that the barrier to entry is surprisingly low - a Markdown file is an output style.
The official stated the structure very simply:
The custom output style is a Markdown file: frontmatter for metadata, then description to be added to the system prompt.
There are two parts: frontmatter in the header (metadata wrapped with ---) + text below (the command you want to add to the system prompt). The following will take you through building one in three steps.
Step 1: Save the file to the right place
Like the extension points (Skill, Subagent) learned previously, the output style is also divided into three storage levels. The existence determines which projects it can be selected in:
| Level | Storage directory | Who can use |
|---|---|---|
| User Level | ~/.claude/output-styles | All your items can be selected |
| Project level | .claude/output-styles (under the project root directory) | Only the current project, can be submitted with the project and shared with teammates |
| Hosting policy level | .claude/output-styles in Hosting settings directory | Issued uniformly by the organization |
The logic of “project-level vs user-level” is the same as the one about settings in Part 31 and the memory in Part 25: If you use it every day and are common across projects, put it at the user level (~/.claude/output-styles); if it is specific to a certain project and you want collaborators to be able to use it, put it at the project level (.claude/output-styles), and it can follow git.
There is another naming rule to remember:
The filename becomes the style name, unless you set
namein frontmatter.
In other words, if you save a code-reviewer.md, its style name will be called code-reviewer by default; unless you write another name in frontmatter, then name shall prevail.
Step 2: Write frontmatter and body
Let’s take a look at this official example—a style of “drawing a picture first for every explanation”. I’ll put it up as it is first, and then break it down field by field:
---
name: Diagrams first
description: Lead every explanation with a diagram
keep-coding-instructions: true
---

When explaining code, architecture, or data flow, start with a Mermaid diagram showing the structure, then explain in prose.

## Diagram conventions

Use `flowchart TD` for control flow and `sequenceDiagram` for request paths. Keep diagrams under 15 nodes.
The upper part between --- is the frontmatter, and the lower part is the text instruction (“When explaining code, architecture, or data flow, first give a Mermaid diagram showing the structure, and then explain it in words…”). This text will be appended to Claude’s system prompts - from now on it will draw a picture first every time it explains it.
There are four fields supported by frontmatter. Let’s explain them one by one:
| Frontmatter field | What to do | Default value |
|---|---|---|
name | Style name (if not written, use the file name) | Inherited from the file name |
description | Style description, will be displayed in the /config selector | None |
keep-coding-instructions | Whether to keep Claude Code’s built-in software engineering instructions | false |
force-for-plugin | For plugin only: This style is automatically applied when the plugin is enabled, without the user having to select it manually | false |
The first two are easy to understand - name is the name, and description is a sentence description for yourself to recognize in the menu. The last two have to be discussed separately, especially keep-coding-instructions, which is the switch most likely to be pressed incorrectly in the entire custom style, and will be dismantled in the next section. force-for-plugin is only related to plug-ins (Part 24 mentioned that plugins can package and distribute various extension points, and output styles can also be carried away by plug-ins). You don’t need to write styles on your own in daily life. Just know that there is such a field.
Step 3: Switch to your new style
Save the file, write the content, return to the output style menu of /config, your new style will appear in the options (the sentence description you wrote will be displayed next to it), select it. The same rules - /clear` or open a new session to take effect.
💡 To summarize in one sentence: A custom style is a Markdown file - frontmatter writes metadata, and the body writes instructions to be appended to the system prompts; it is saved at the right level (user level across projects, project level follows the project), and the file name is the style name. After writing, go to
/configand select/clearto take effect.
05 The switch that is most likely to be pressed incorrectly: keep-coding-instructions
The previous section sold out a key point - the frontmatter field keep-coding-instructions is worth a separate section, because if you press it incorrectly, the effect of your custom style will be very different.
Let’s first talk about what it controls. As mentioned before, Claude Code’s default system prompts are filled with “software engineering instructions” - how to limit the scope of changes, how to write comments, and how to verify work. When you write a custom style, this set of built-in instructions will be “kicked out” by default. Official words:
Custom output styles exclude Claude Code’s built-in software engineering instructions… unless
keep-coding-instructionsis set totrue.
This field defaults to false, which means: By default, your custom style will replace the entire built-in engineering instructions, leaving only the part you wrote. Whether to keep it or kick it out depends entirely on whether your style requires Claude to do programming. To judge, just ask:
“With my style, is Claude still writing code?”
- Still writing code, just changing the way of speaking (for example, “Programming is still the same, but draw me a picture first every time”) → Set
keep-coding-instructions: trueto keep the built-in engineering instructions. The “Diagrams first” example in the previous section is like this - it wants to “draw pictures first when explaining”, but Claude is still programming normally, so it is officially set totrue. - Don’t write code at all (for example, use it as a writing assistant or data analyst) → Omit this field (let it default to
false), and get rid of the set of engineering instructions. It is no longer programmed, and the instructions “limit the scope of changes and write tests” are purely interference.
The official made this judgment very clear, and it is worth remembering it as it is:
When you change Claude’s communication style but are still programming (e.g. always answering with diagrams), keep them. When Claude doesn’t do software engineering at all (such as a writing assistant or a data analyst), omit them.
I put these two situations in a comparison table, and the consequences of pressing the wrong button are clear at a glance:
| What do you want to do with your style | keep-coding-instructions This setting | What will happen if you press the wrong button |
|---|---|---|
| ✅ Programming is still the same, only the response method is changed (draw a picture first, fix the format…) | true (retain the engineering instructions) | ❌ Set to false: It loses the engineering disciplines of “limiting the scope and verification”, and changing the code is messy |
| ✅ No programming at all (writing/data analysis/translation…) | Omit (default false) | ❌ Set to true: Your mind is still thinking about dismantling functions and adding tests, which is not in the same channel as the writing assistant you want |
Go back to the scene of changing your resume in Section 01 - the root is right here. At that time, what was needed was a “writing assistant” personality, and there should be no programming instructions at all. If you could write custom styles at that time and omit keep-coding-instructions** (let the engineering instructions be kicked off by default), it would not be tempted to “help you split this section into functions”. This switch is essentially answering “Does this new personality still work as an engineer?”
💡 To summarize in one sentence:
keep-coding-instructionsdefaults tofalse, which will kick out all the built-in engineering instructions**; for judgment, just ask “Does Claude still program in this way” - if you still want to program, settrueto keep it, if you don’t want to program, leave it out and kick it out, If you press the wrong personality, it will go astray.
06 How does it work at the bottom level: Enter the section prompted by the system
The previous sections mentioned sporadically “adding to system prompts”, “reading once at the beginning of the session”, and “kicking engineering instructions” - this section explains the underlying mechanism thoroughly at once. Understand how it works, and all the previous “whys” will be clear: why /clear is required when changing the style, why it affects every response, and why keep-coding-instructions can control the removal and retention of engineering instructions.
The official summary of the working principle is divided into three items. I will translate each item into words you can remember:
- All output styles have their own custom description added at the end of the system prompt.
- All output styles will trigger reminders during conversations to keep Claude in compliance with the output style instructions.
- Custom output styles exclude Claude Code’s built-in software engineering instructions… unless
keep-coding-instructionsis set totrue.
The first one: Your style command is spelled to the “end” of the system prompt. The system prompt is a low-level command that Claude installs at the beginning of each session. Your output style content is appended to the end of it - so it takes effect for every response in this session, not just a certain sentence.
Article 2: During the conversation it will repeatedly “remind” Claude to keep the style. After talking about AI for a long time, it is easy to forget the initial settings. This reminder mechanism is to regularly pick up the style description and read it again to ensure that it does not go astray.
The third article just explains the switch in the previous section: The custom style will “remove” the built-in engineering instructions from the system prompt by default, leaving only the part you wrote; keep-coding-instructions: true tells it “don’t remove it, keep it”. This is why this field can determine whether “Claude can still program or not” - it controls whether the engineering instructions in the system prompt are saved or destroyed.
A picture clearly illustrates “how system prompts are assembled”:
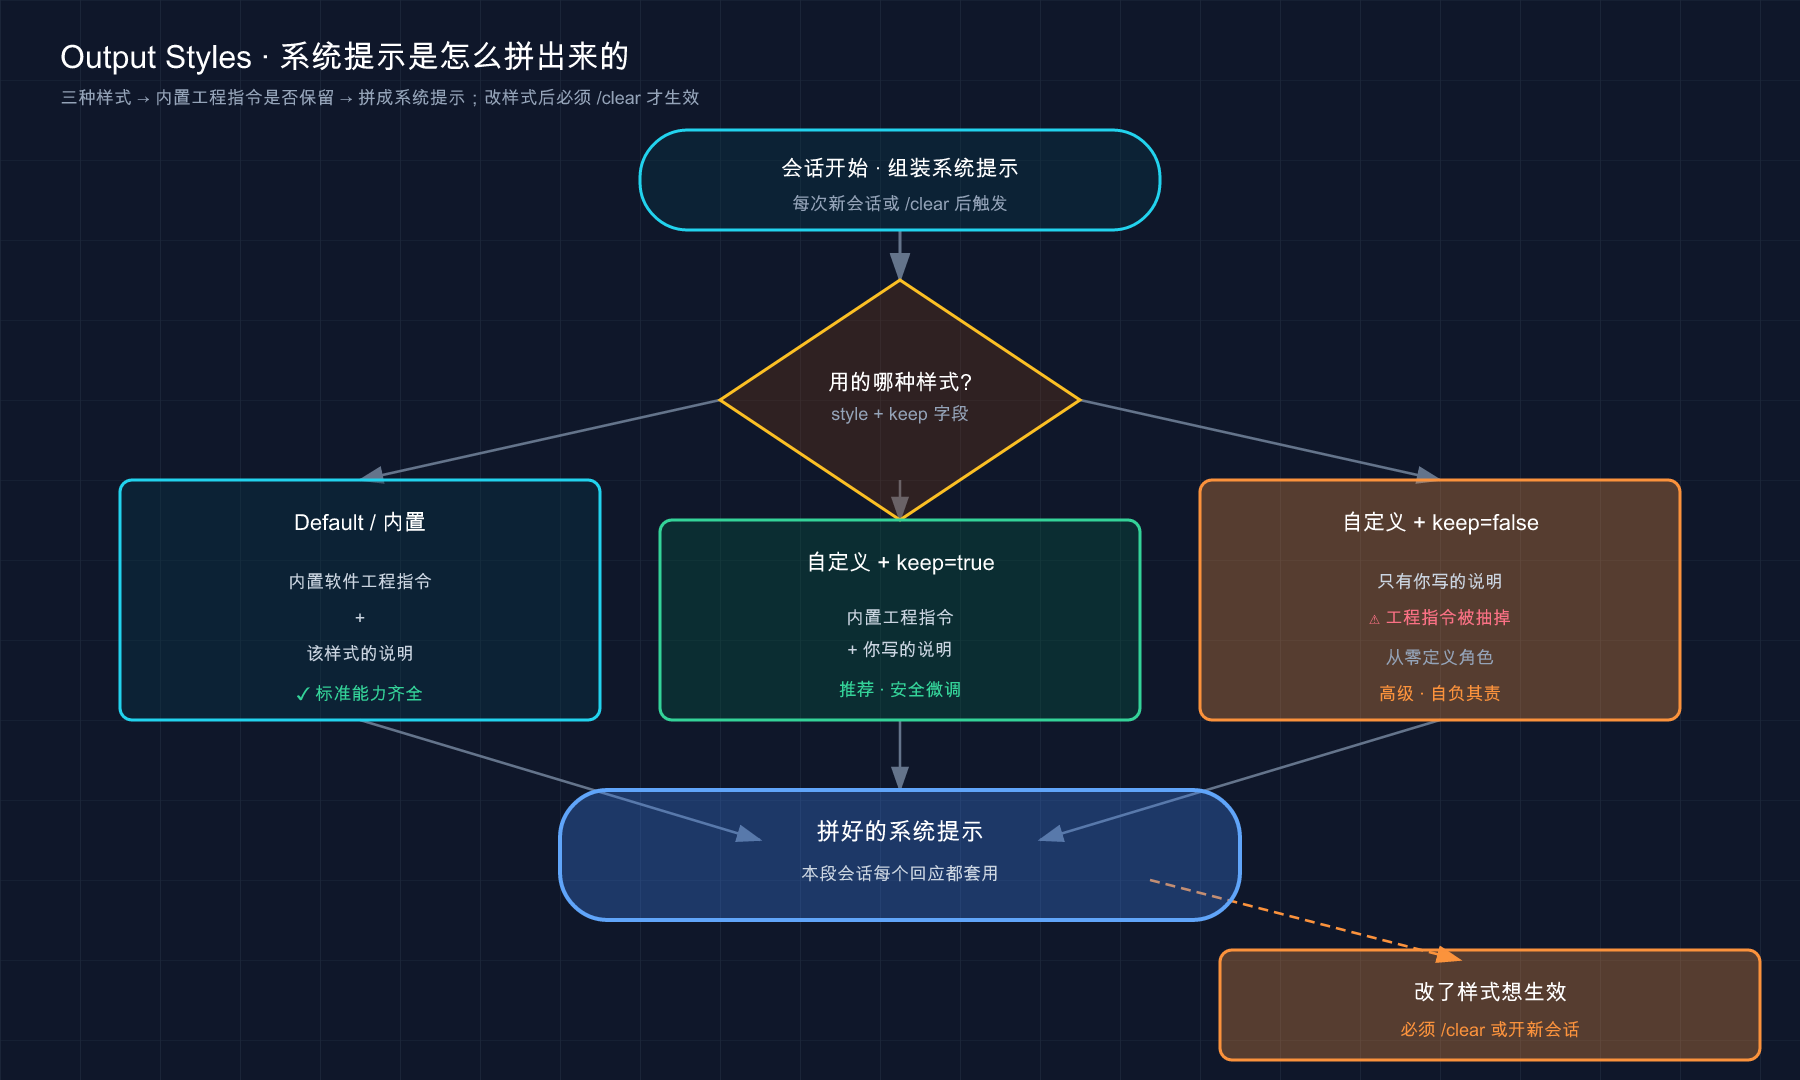
What this picture says is: at the beginning of the session, Claude Code assembles the system prompt according to the style you selected - the built-in style and the custom style with keep=true have engineering instructions, while the custom style with keep=false removes the engineering instructions and leaves only your instructions; after assembly, this prompt will take effect for every response in this session; and if you change the style midway, you will get /clear Or open a new session, and it will reassemble it with the new style** (the root of the pitfall in Section 03 is here).
Finally, let me mention token (see Chapter 06 for billing). The official statement is true:
Token usage depends on the style. Adding instructions to the system prompt increases input tokens, although prompt caching reduces this cost after the first request in a session.
Translated into vernacular: the style description will enter the system prompt, take up some points to enter the token; fortunately, Claude Code has prompt caching (prompt caching, caching the unchanged system prompts for reuse), this cost will be reduced after the first request in the session, so there is no need to be too anxious. What will really increase consumption significantly are Explanatory and Learning styles that are “designed to produce long responses” (mostly on output tokens). This is the same as the style you write yourself to let Claude generate as many things as you want - the longer the description, the more tokens it will produce, and the more tokens** you can use as needed.
💡 In one sentence summary: the output style command is spelled to the end of the system prompt, takes effect for every response in this session, and will be repeatedly reminded to keep it; the custom style is pushed out the built-in engineering instructions by default (only if
keep=trueis retained); changing the style requires/clearto reassemble; the style takes up some tokens, but with prompt caching, the long response style is the most expensive.
07 output styles vs CLAUDE.md / Skill / Subagent: What’s the difference?
After learning this, a question is likely to pop up in your mind: **This thing is different from the CLAUDE.md, Skill, and Subagent you learned earlier. It sounds like you can “customize Claude’s behavior.” What’s the difference? ** This section will be clarified at a time. The big list of “How to choose functions” in Chapter 30 is to select tools based on needs. Here we focus on “How to distinguish them from output styles”.
First, let’s seize the most unique feature of output styles—it directly changes the system prompt itself, and it takes effect for every response. Other functions are either “add a paragraph after the system prompt” or “load only at a specific time”. None of them go to the root of the system prompt like this. The official comparison table explains this difference thoroughly. I copied it over and added a simple sentence for each:
| Features | How it works | When to use it (instead of output style) |
|---|---|---|
| Output Style | Modify the system prompts directly and apply them to every response | What you want is “change the role/tone/default format every round” |
| CLAUDE.md (Part 18) | Attach a user message** after the system prompt** | What you want to teach is the project agreement and code base background, not the way of speaking |
--append-system-prompt | Append content to the system prompt without deleting anything | You only want to call the temporary add command for a certain time |
| Subagent (Part 23) | Use your own independent system prompts, models, and tools to run subagent | You have to hand over a focused job to an assistant with an independent context, and it will only hand over the conclusion after finishing the work |
| Skill (Part 26) | Load specific instructions when called / only when relevant | You have a reusable workflow that can be called out on demand |
In this table, what novices should distinguish most is the first two rows - output style vs CLAUDE.md. The two of them are the easiest to mix because they both “make Claude listen to you.” But the essence is very different:
**CLAUDE.md is installed with “content/background”, and output style is installed with “mode/role”. ** One answer is “What is this project and what are the agreements?” and the other answer is “What tone and format should you use to respond.” To put it more bluntly, let’s go back to the metaphor at the beginning: CLAUDE.md is the project information handed to the employee, and the output style is the job description given to him. You will not write “We use pnpm instead of npm” in the output style (that is the project agreement, enter CLAUDE.md), nor will you write “Please draw a picture first and then explain every time” in CLAUDE.md as an iron rule (that is the response method, it should be made into the output style). The official has left a special guide in the document, just in case you misplace it:
For instructions about your project, convention, or codebase, use CLAUDE.md instead.
As for --append-system-prompt, it is similar to output style in “both system prompts”, but one is one-time and the other is persistent: --append-system-prompt is a temporary post after the system prompt when you start a certain claude, and then go away; output style is a persistent personality that is saved in the configuration and applied to every session. This is the difference when it comes to commands - to temporarily try a certain style, you will have a session like this:
claude --append-system-prompt "这次回答都用中文、尽量简短"Turn it off and on again and it’s gone. But if you need this style every day, don’t type this string of parameters by hand every time, precipitate it into an output style, once and for all. Use the former when trying a sentence temporarily, and use the latter when it is fixed. This is the division of labor between them.
There is also Skill (Part 26) that deserves a distinction: Skill is a “reusable workflow that is loaded on demand” and usually does not occupy the system prompt. You /<name> or Claude will only bring it in when it is relevant; the output style is “a role setting that is always hanging and set in every response”. One is “recipes that can be pulled out only when needed”, and the other is “the hosting style that runs throughout the whole game” - the process of a specific task is called Skill, and the character’s tone that changes throughout the whole process is called output style.
There is also a common confusion in the other direction: if you want Claude to “answer in a concise style and with less nonsense”, the first reaction is to write CLAUDE.md. As a result, it works sometimes and sometimes doesn’t work - because things like style should be determined by changing the system prompt (output style), rather than relying on the “attached request” in CLAUDE.md to remind you. This is the same type of error as the “three hundred lines of interfaces inserted into CLAUDE.md” in Part 30: **things were not put into the right drawer. **
💡 To summarize in one sentence: The only thing about output styles is to directly change the system prompt and apply it to every response; the easiest thing to mix with it is CLAUDE.md - CLAUDE.md installs the project background (content), and the output style installs the role tone format (mode); use
--append-system-promptto temporarily add instructions at one time, and use Subagent for assistants that require independent scopes.
08 Hands-on: Write a custom style that “draw pictures first and explain later” and run it through
Just watch and practice fake moves. This section will take you through creating a custom output style from scratch, cutting it out, and verifying with your own eyes that it actually works. We will do the most classic official method of “draw pictures first and then explain”. The whole process does not rely on any existing complex projects you have. You can practice it by just finding a directory.
Step one: Create style file
We save it to the user-level directory (~/.claude/output-styles) so that you can select it for any future projects. Create directories first, then files:
mkdir -p ~/.claude/output-stylesThen use your favorite editor to create a new file diagrams-first.md under ~/.claude/output-styles/ and fill in the following content (I have translated the text into Chinese for your convenience; follow the same instructions as Chinese Claude):
---
name: Diagrams first
description: 每次解释都先画一张图,再用文字说明
keep-coding-instructions: true
---

解释代码、架构或数据流时,先给一张展示结构的 Mermaid 图,再用文字解释。

## 画图约定

控制流用 `flowchart TD`,请求路径用 `sequenceDiagram`。每张图节点控制在 15 个以内。
Note keep-coding-instructions: true - because Claude is still programming normally in this style, but has the habit of “drawing first”, so the built-in engineering instructions must be kept (judgment discussed in Section 05).
Step 2: Switch to this style
Enter the Claude session, type /config, enter the Output Style menu, you should see a Diagrams first (with the sentence description you wrote next to it), select it.
claudeAfter entering, type /config, move the arrow keys to “Output Styles”, press Enter, and select Diagrams first.
Expectation: You can see the item Diagrams first in the menu, and the description “Draw a picture first for every explanation…” hangs next to it. see it in the list = the file was correctly identified. If you don’t see it, 80% of the time it’s because the file is not saved in the right directory, or the --- of frontmatter is missing.
Step 3: /clear to make it take effect
Don’t rush to ask questions after selecting - /clear` first (remember the pitfall in Section 03? The system prompts you to read it only once at the beginning of the session):
/clearStep 4: Ask a question to verify that it really draws the picture first
After clearing the table, ask it a question that “needs explanation” and see if it obediently posts the picture first:
解释一下用户登录的请求是怎么从前端走到数据库的Expected: Its answer will first throw out a Mermaid diagram (mostly a sequenceDiagram, drawing the request path of front-end → back-end → database), and then explain it in words. Seeing the order of “picture in front, text in back” = your custom style takes effect.
For comparison, you can use /config to switch back to Default, then /clear, and ask the same question - it will only give text and no pictures. **This difference between the former and the latter is irrefutable evidence that output style actually changes “how to respond”. **
Step 5: Cleanup (optional)
If you don’t want to keep this style, just delete the file:
rm ~/.claude/output-styles/diagrams-first.mdAfter deleting it, it disappears from the /config menu. (If you are currently using it, remember to switch back to Default in /config first.)
After running through these five steps, you will have gone through the complete link of “Create file → Cut style → /clear to take effect → Verify → Clean”. In the future, if you make any custom styles, you just need to change the text instructions and adjust keep-coding-instructions as needed. The process is the same.
💡 Summary in one sentence: There are only five steps to customize the style - Create
.mdfile, select/config,/cleartake effect, ask questions to verify “pictures in front and text in the back”, delete files and cleanup; switch back to Default and ask the same question for comparison, the difference is visible at a glance.
09 Summary
In this article we break down output styles - the switch that changes “how Claude responds to you” instead of “what does Claude know”.
Let’s review the core points together:
| What you want to do | How to do it | Key points |
|---|---|---|
| Understand what output styles are | Change the role/tone/format in the system prompts | Change “how to respond” but not “what to know” |
| Use ready-made built-in styles | Default / Proactive / Explanatory / Learning | The last two levels of response are longer and cost more tokens, and can be cut as needed |
| Switch styles | /config menu selection, or edit outputStyle field | The old /output-style command has been removed**; it will only take effect after switching /clear |
| Customize a style | Write a Markdown file (frontmatter + text) | The file name is the style name; save the user level across projects, and the project level to follow the project |
| Decide whether to keep engineering instructions | keep-coding-instructions | true if you are still programming, or omit if you are not programming (default false) |
| Distinguish between CLAUDE.md | Determine whether the pretense is “method” or “content” | Character tone format→output style; project background agreement→CLAUDE.md |
You should now be able to: Explain clearly in one sentence what output styles are changed, when to switch the built-in four files, use /config (instead of the abandoned /output-style) to switch the styles correctly and know that /clear is required to take effect; write a Markdown custom style yourself, press the keep-coding-instructions switch correctly, and understand its boundaries with CLAUDE.md, Skill, and Subagent. **To put it bluntly, you now have a key to “changing Claude’s personality” - the same model, which allows him to change from an engineer to a mentor, to a writing assistant, and to change clothes according to the job. **
Going back to the opening sentence “If you want to customize, just add it to CLAUDE.md” - now you should understand: It is right to add project background to CLAUDE.md, but “how to respond” such as “change the tone, change the role, change the format” is under the control of output styles. If you put it in the right drawer, both are easy to use.
Next article 33 “Hooks” - Output styles are “change the way Claude talks”, but in the end it still depends on Claude himself “willing to do it”. Is there a mechanism that can make something happen automatically without Claude’s conscious effort? For example, “Every time it changes a file, it automatically runs the formatting process” and “A certain dangerous command must be blocked.” This is what Hook does - automatic stuck points that are executed as soon as the event is triggered. The previous article 30 left you an introduction, and the next article will completely dismantle it. Think about it: What things have you told Claude several times, but you still want a hard constraint to “make sure he does it every time”?
33 · Hooks: Automatically pull the trigger at a fixed time
Imagine this number: In a certain week, the number of times Claude manually typed prettier --write after he finished changing the code was 23 times.
23 times. The same action was repeated mechanically 23 times. What’s even more outrageous is that there were two omissions in the middle - after submission, it was rejected by CI’s format check, and the process had to be run again.
At this time, you should think about one thing: ** Why should people rely on people to remember and Claude to realize this kind of action that “has to be done every time and the content is exactly the same”? ** I wrote in CLAUDE.md “Remember to run prettier after modifying the file”, but one of the three times I couldn’t remember it - because it was just a request, not a guarantee.
With a hook and one line of configuration, the problem is completely gone: Since then, every time Claude edits a file, the format will automatically run, and he has never hit prettier again, nor has he been called back by CI. This article will explain this thing that can “automatically pull the trigger” from what it is to how to configure and adjust it.
After reading this article, you will get:
- Explain in one sentence what Hook is and the fundamental difference between it and “request written into CLAUDE.md”
- In the life cycle of Claude’s work, what “opportunities” can be hooked (
PreToolUse/PostToolUse/Stop/SessionStart, etc.) -Which file should the hook be placed in? How to narrow thematcherto “only trigger when the file is changed” - Three real examples that can be copied directly: automatic formatting after modification, blocking dangerous commands, and sending notification after completion
- What is the dialogue between the hook and Claude (stdin’s JSON, exit code, stdout) - this is the key to understanding everything
- When the hook does not trigger and an error is reported, how to find out step by step
01 First understand: what exactly is Hook and what “guarantee” is it?
Let me give the conclusion first: **Hook is “a command or request that is automatically executed as soon as a certain event occurs” - it does not rely on Claude to decide whether to do it or not, and the triggering is guaranteed. **(The most commonly used is the shell command, but also supports HTTP endpoints, MCP tools, LLM prompts, etc.)
The official definition is very simple, so here it is:
Hooks are user-defined shell commands that are executed at specific points in the Claude Code lifecycle. They provide deterministic control over the behavior of Claude Code, ensuring that certain operations always occur, rather than relying on the LLM to choose to run them.
Pay attention to the two words in it: “deterministic control” and “always happen”. This is where Hook’s destiny lies.
**Analogy: Automation rules posted at home (“When… then…”). **Have you ever set up rules for your smart home - “When someone opens the door, **turn on the lights” “When I leave home, **turn off all the sockets”. Once the conditions are met, the action will inevitably take place, no one needs to remember it. Hook is the rule installed for Claude Code - you define “when a certain event occurs, **run this command”, and it will be executed automatically and is unstoppable.
Here we need to nail down one of the most critical differences: What is written into CLAUDE.md is a “request” - it has a high probability of complying, but it may be missed; What is paired with Hook is “guaranteed” - as long as the event is triggered, the action will be executed, and it has nothing to do with whether Claude remembers it or not. Official words:
Instructions such as “Never edit
.env” in CLAUDE.md or skills are requests, not guarantees. ThePreToolUsehook that prevents editing is enforced.
This is the root of the 23 times at the beginning: “Run prettier after modification” written in CLAUDE.md is a request, and it will miss once every three times; it is a guarantee if it is configured as a Hook, and it will not miss once.
Here are a few scenarios that you are likely to encounter and are worthy of “guarantee”. Let’s experience them first:
- “Every time you change a file, automatically format/run lint” - Don’t type it by hand, and don’t expect it to be conscious.
- “Commands such as
rm -rfand deleting the production database, please stop me”——To stop it definitely, you cannot rely on prompts - “It will send me a desktop notification when it finishes its work or waits for me to type” - you can do other things instead of staring at the terminal
💡 To summarize in one sentence: Hook is an “automatic action triggered by an event”, and its core value is to turn “request” into “guarantee” - CLAUDE.md. What you ask it to do may be missed, but the event hooked up by Hook will be executed as soon as it is triggered.
02 What “opportunities” can hook the child: Understanding life cycle events
Hook cannot be hung at any time, it must be hung at a specific “timing” in Claude’s work process. These opportunities are officially called events. If you want to use Hook well, the first step is to recognize “when do I want this to happen”.
Recall the “agency cycle” mentioned in Chapter 03 - Claude’s work is a circle of “think → do → see”. These events happen to be scattered before and after this cycle. Officially, they are divided into three levels according to trigger frequency. This classification is particularly easy to remember:
- Once per session:
SessionStart(on session start/resume),SessionEnd(on session end) - Once in each round of dialogue:
UserPromptSubmit(when you have just submitted the prompt and Claude has not started processing it),Stop(when Claude has finished answering this round) - Each tool call in the agent loop:
PreToolUse(before a certain tool is executed**),PostToolUse(after a tool is successfully executed**)
It’s a bit abstract just to say it. Draw a picture and you can understand at a glance where these most commonly used events are stuck:
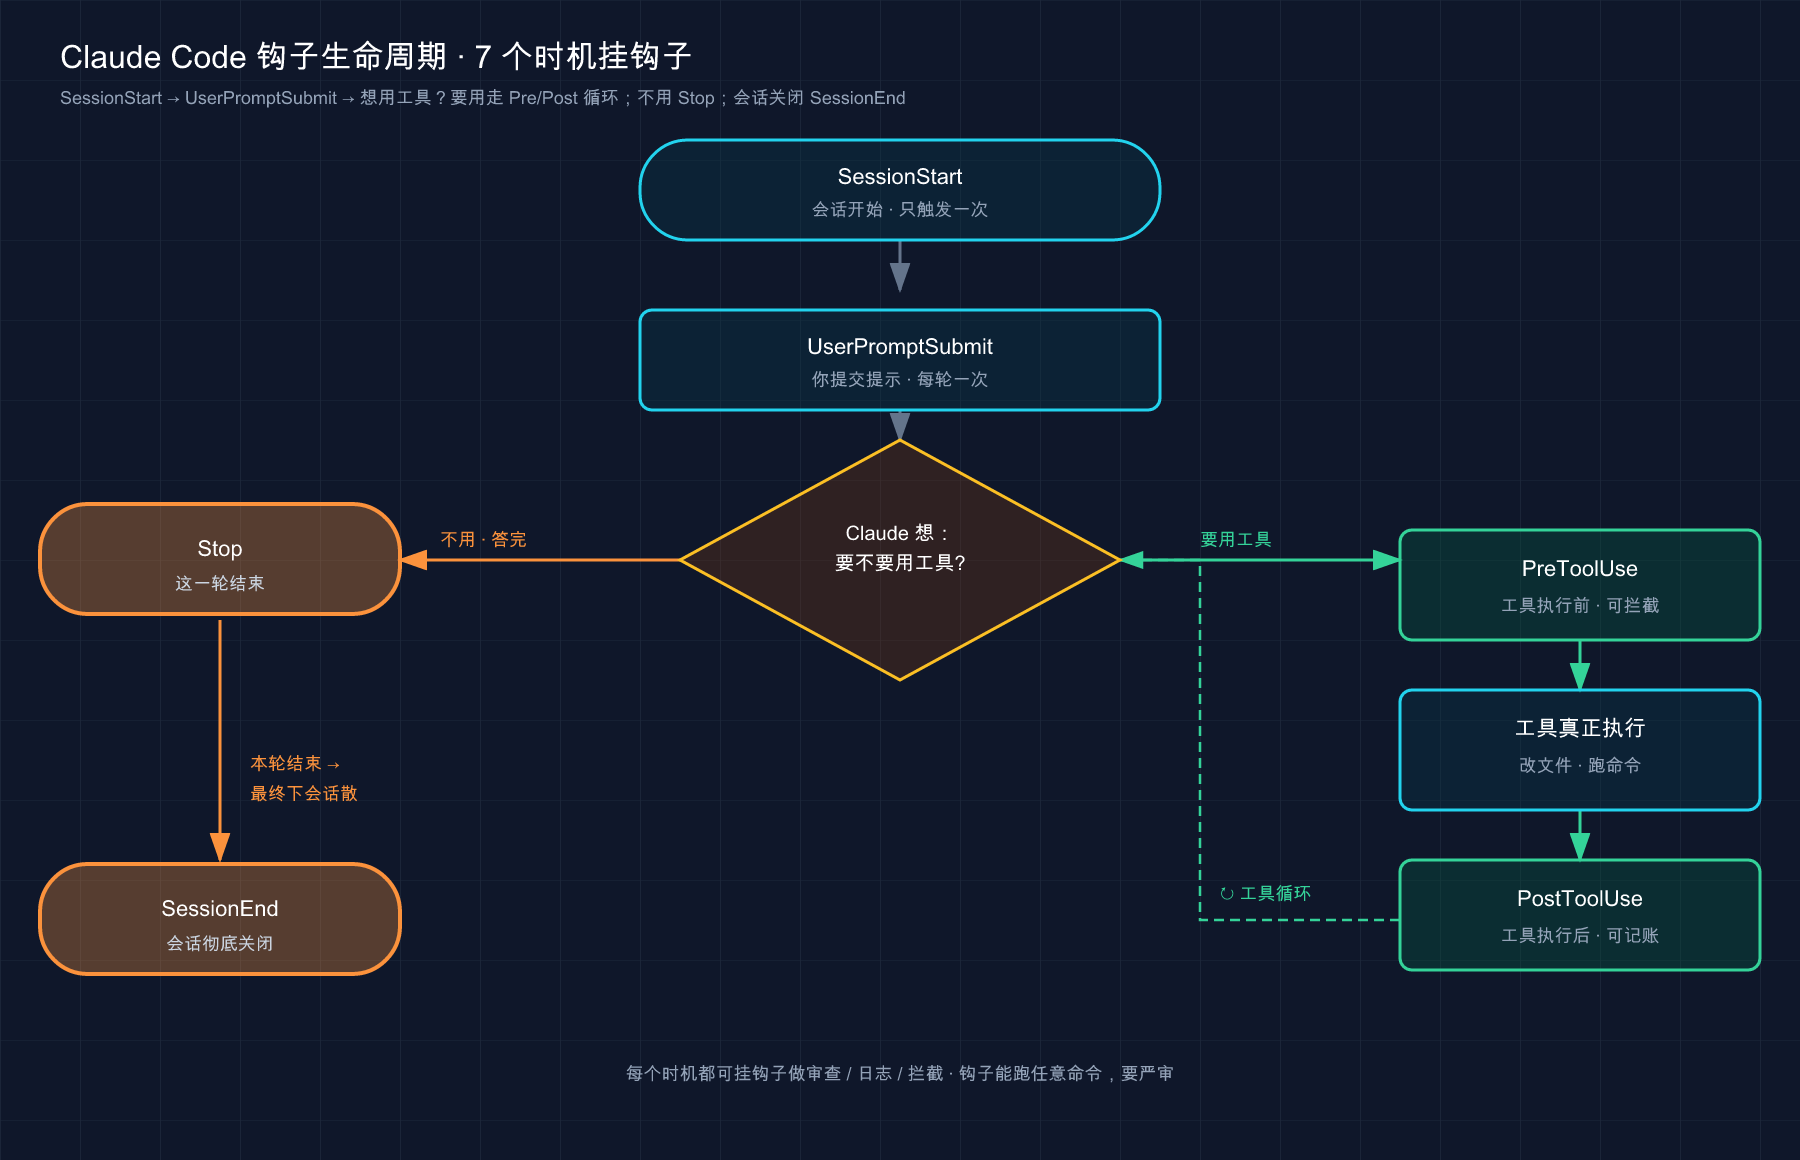
This picture spreads out the cycle of “think → do → see”: when you enter the session, it is SessionStart, you speak UserPromptSubmit, and then enter the cycle of “do you want to use a tool?” - every time you move a tool, there is PreToolUse in front and PostToolUse in the back. After this cycle, it is Stop, and the end of the entire session is SessionEnd. **At which step you want the action to occur, hang the corresponding event. **
These six are the most commonly used on a daily basis. In fact, there are more than thirty officially supported events (such as PreCompact/PostCompact before and after compression, FileChanged when the file is changed, ConfigChange when the configuration is changed, SubagentStart/SubagentStop when the subagent starts and stops, etc.), but for beginners, first understand the following four thoroughly, which can cover 90% of the scenarios**:
| Event | When to trigger | The most typical usage |
|---|---|---|
PreToolUse | Before a tool is executed ** | Block dangerous commands and protect sensitive files (can prevent operations) |
PostToolUse | After a tool is successfully executed | Automatically format the file after changing it / run lint |
Stop | Claude finished answering this round | Reminder “The work is not done yet, continue” and scan the work area |
SessionStart | When a session is started or resumed | Inject project status (such as the most recent commit) into the context |
There is a trick to remember this table: Look at Pre and Post in the name - Pre is “before”, so it is the only one that can stop the action before it happens; Post is “after”, the tools have run out, it can only “make up for it afterwards” (formatting, logging), and cannot stop it. This difference is explained in detail in the next section.
💡 To summarize in one sentence: Hook is hung on specific events in Claude’s life cycle, and is divided into three levels according to frequency (per session / per round / per tool call); novices must first understand the four of
PreToolUse(previous, able to block),PostToolUse(post, last hit),Stop(finished), andSessionStart(opening).
03 Where to place the hook and how to narrow the matcher
Now that we know what events can be linked, let’s see how to write them. Hook is written in the settings file (settings.json) - the set of configuration files discussed in Chapter 31. Which file is written in determines the scope it manages:
| Which file is allocated to | Effective scope | Can it be shared with the team |
|---|---|---|
~/.claude/settings.json | All your projects | No, only on your machine |
.claude/settings.json (project root) | Current project only | Yes, can be submitted to git |
.claude/settings.local.json (project root) | Current project only | No, gitignore |
This is the same logic as “Project File Cabinet vs. Workstation Drawer” when talking about configuration in Chapter 31: Hooks that the whole team should have (such as “Format after modification”) are written into the project’s .claude/settings.json and submitted to git; only the ones you want (such as sending notifications to your desktop) are written into ~/.claude/settings.json.
What does Hook configuration look like?
Let’s look at the smallest complete example first - “Every time you use Edit or Write to modify the file, automatically run prettier formatting”, which is the part that cured the 23 problems. .claude/settings.json written into the project root directory:
{
  "hooks": {
    "PostToolUse": [
      {
        "matcher": "Edit|Write",
        "hooks": [
          {
            "type": "command",
            "command": "jq -r '.tool_input.file_path' | xargs npx prettier --write"
          }
        ]
      }
    ]
  }
}
Don’t be scared by this layer of nesting. It has three layers. If you take it apart, you will understand immediately:
"PostToolUse"——Which event to hang (here: after the tool is executed)."matcher": "Edit|Write"- Narrow down to which tools are triggered (here: only after theEditorWritetools, not afterBashorRead).- The inner
hooksarray - the actual action to be run:"type": "command"means running a shell command,"command"is that command.
The jq in this command is a small tool for parsing JSON (install it with brew install jq on Mac, and apt-get install jq on Ubuntu). Its function will be discussed in the next section - simply put, it is to extract the file path just changed from the data passed by Claude and feed it to prettier.
matcher: Make the hook “only trigger when it should be triggered”
matcher is the most important field to understand in Hook configuration. Bottom line: Without it, the hook will fire “every time” on that event; with it, you can narrow the scope.
**Analogy: The security guard’s entry rules - if you are not here to deliver goods, do not enter the gate. ** Without a matcher hook, it is like asking the security guard to “register anyone who comes”, which is very inefficient; with a matcher, it becomes “Only the courier registers when he comes, and others are allowed to go directly”. What matcher does is the job of “delimiting the trigger range”.
For tool events (PreToolUse/PostToolUse), matcher matches tool name. There are three ways to write it, look at this table:
| matcher you wrote | meaning | example |
|---|---|---|
"Edit|Write" | Exactly match these tools (| is “or”) | Only triggered after Edit or Write |
"Bash" | Exact match for a single tool | Only triggered when running a Bash command |
"" or omitted | match all, triggered every time | this event will be run every time it occurs |
Note: matcher is case-sensitive, and writing edit will not match the Edit tool - this is one of the most common reasons why novice hooks are not triggered.
There is another point that novices tend to overlook: Some events do not support matcher at all (such as UserPromptSubmit, Stop), because they do not have a “tool name” to filter, and they are always triggered every time. Adding matcher to these events will be silently ignored.
💡 To summarize in one sentence: Hook is written into
settings.json(global in the main directory, project in.claude/), and the configuration is three-level - event, matcher, action;matcheris responsible for narrowing the hook to “only trigger on the tool that triggers”, and is case sensitive.
04 How to talk between hook and Claude: stdin, exit code, stdout
This section is the key to understanding everything. Why can the previous jq command get the file path? How does a hook “block” a command? The answer lies all in this “dialogue mechanism”.
The mechanism itself is very simple, with only three pipelines: Claude feeds the event data from stdin to your script → the script does the work → the script uses “exit code + stdout” to tell Claude what to do next. Dismantle one by one.
Input: Claude hands you a bunch of JSON from stdin
Once the event is triggered, Claude Code will send data related to this event as a piece of JSON to your command from the standard input (stdin). For example, when Claude wants to run a Bash command, the message received by the PreToolUse hook looks like this:
{
  "session_id": "abc123",
  "cwd": "/Users/sarah/myproject",
  "hook_event_name": "PreToolUse",
  "tool_name": "Bash",
  "tool_input": {
    "command": "npm test"
  }
}
You see - What Claude wants to do, which tool to use, and what the parameters are, are all in it. The jq -r '.tool_input.file_path' in Section 03 is to extract the tool_input.file_path (the file path to be changed) from this JSON. jq is a tool specialized in parsing JSON, and -r allows it to output plain text (without quotes).
Output: Use the “exit code” to tell Claude the next step
After the script has finished its work, it relies on the exit code to give instructions to Claude. This is the core convention of Hook. Just remember three numbers:
| Exit code | Meaning | Effect |
|---|---|---|
0 | No objection, proceed as normal | Continue the operation (PreToolUse does not mean approval**, proceed with the permission process as usual) |
2 | **Stop! ** | The operation is blocked; what you write to stderr will be given as feedback to Claude to adjust |
| Others (such as 1) | An error occurred, but no blocking | The operation continues, and the terminal displays a hook error message |
The key point is exit 2 - this is the only way for the hook to “press the brakes”. Pay attention to a counter-intuitive pitfall:
For most hook events, only exit code 2 blocks the operation. Claude Code treats exit code 1 as a non-blocking error and continues operation, even though 1 is a traditional Unix failure code. If your hook is intended to enforce policy, use
exit 2.
Translated into adult language: If you want to block the operation, you must use exit 2, not exit 1. Many people write exit 1 according to the Unix habit. As a result, the hook “reports an error but does not block it” and the command still runs. This is the most common mistake when writing an interception hook for the first time - the script clearly judged the dangerous command and printed a warning, but because it was conveniently written as exit 1, Claude ran anyway, which made him sweat.
There is another detail related to “whether it can be blocked”: Only Pre type events can actually block operations. PostToolUse cannot stop it even if it receives exit 2 - because the tool has finished running and is done, it can only display stderr to Claude. This echoes the sentence in the previous section, “Pre can block, Post can only last hits.”
Advanced: Use stdout to return JSON for more detailed control
The exit code can only have two levels: “block/no block”. If you want more detailed control (such as telling Claude the specific reason while blocking, or injecting a piece of information into its context), change it to exit 0 and print a piece of JSON to stdout.
Use exit code 2 with stderr for “blocking”, or JSON with exit code 0 for “structured control”. Don’t mix the two: Claude Code ignores JSON when you exit 2.
Here are two of the most common JSON outputs:
① PreToolUse wants to intercept and explain the reason - use permissionDecision:
{
  "hookSpecificOutput": {
    "hookEventName": "PreToolUse",
    "permissionDecision": "deny",
    "permissionDecisionReason": "这条命令会动生产库,禁止执行"
  }
}
permissionDecision has four values: "deny" (block it and send the reason to Claude), "ask" (pop up the permission box and ask you as usual), "allow" (skip the permission box and let it go directly), "defer" (delay the execution and let the tool recover later, suitable for asynchronous approval scenarios in non-interactive mode).
There is a security red line that must be made clear here, echoing the permissions and security in Chapters 20 and 21: The hook returns "allow" and cannot bypass the denial rules in your settings. Official words——
Return
"allow"to skip interactive prompts but not override permission rules. If a deny rule matches a tool call, the call will be blocked even if your hook returns"allow".
In other words: Hook can only “tighten” restrictions and cannot “relax” them beyond what is allowed by permission rules. This is a very important security design - it ensures that malicious hooks cannot tear down your security guardrails by returning allow. In turn, the interception priority of the PreToolUse hook is extremely high: even if you turn on --dangerously-skip-permissions (skip all permissions), a hook that returns deny can still block it**. Therefore, using Hook to force the team’s red line is really fatal.
② SessionStart wants to put some information into the context - just print text directly to stdout (these events are special, stdout will be fed to Claude as the context). For example, tell it the last 5 commits as soon as the session opens:
{
  "hooks": {
    "SessionStart": [
      {
        "hooks": [
          {
            "type": "command",
            "command": "git log --oneline -5"
          }
        ]
      }
    ]
  }
}
💡 To summarize in one sentence: Hook and Claude communicate through three channels - stdin feeds JSON in, exit code gives instructions, and stdout performs fine control; remember “
exit 2can only be stopped (not 1)” “Don’t mix exit codes and JSON” “Hook can only tighten, not relax permissions”. These three, you can catch 70%.
05 Three real examples that can be copied directly
Enough theory, here are three commonly used hooks that you can copy directly. Each one is clearly marked “which event is attached, where it is narrowed, and which file it is allocated to.”
Example 1: Automatically format the file after modification (PostToolUse)
It’s the one that cured those 23 problems. It’s the most practical and risk-free. Strongly recommended for every project. Write to .claude/settings.json in the project root:
{
  "hooks": {
    "PostToolUse": [
      {
        "matcher": "Edit|Write",
        "hooks": [
          {
            "type": "command",
            "command": "jq -r '.tool_input.file_path' | xargs npx prettier --write"
          }
        ]
      }
    ]
  }
}Logic: Every time Claude uses Edit/Write to modify the file → the hook extracts the file path from the JSON of stdin → throws it to prettier --write for formatting. From now on, the format will always be unified, so you don’t have to worry about it. Replacing prettier with eslint --fix, gofmt, and black is all a routine.
Example 2: Block dangerous commands (PreToolUse + script)
This uses “exit 2 interception”. When commands are complex, writing the logic into a separate script is much cleaner than shoehorning it into JSON.
Step 1, save the script to .claude/hooks/block-dangerous.sh:
#!/bin/bash
# block-dangerous.sh:拦截 rm -rf 这类危险命令
INPUT=$(cat)
COMMAND=$(echo "$INPUT" | jq -r '.tool_input.command')

if echo "$COMMAND" | grep -q "rm -rf"; then
  echo "Blocked: 检测到 rm -rf,已拦截" >&2   # 写到 stderr,会反馈给 Claude
  exit 2                                       # exit 2 = 阻止这次工具调用
fi

exit 0   # 其余命令放行,走正常权限流程
Step 2, add executable permissions to the script (required for Mac/Linux, otherwise Claude cannot run it):
chmod +x .claude/hooks/block-dangerous.shStep 3, register it in .claude/settings.json and hook it to PreToolUse of the Bash tool:
{
  "hooks": {
    "PreToolUse": [
      {
        "matcher": "Bash",
        "hooks": [
          {
            "type": "command",
            "command": "\"$CLAUDE_PROJECT_DIR\"/.claude/hooks/block-dangerous.sh"
          }
        ]
      }
    ]
  }
}
The $CLAUDE_PROJECT_DIR here is an environment variable provided by Claude Code, pointing to the project root directory - use it to spell the path, and the hook can find the script no matter which subdirectory it runs in, which is more stable than a hard-coded relative path.
⚠️ This section returns to the main security thread of Part 21: Hooks are shells that run with your full user rights and can delete any file you can delete. The official has repeatedly emphasized that before adding any hook, check its commands first, especially do not copy the entire script from an unknown place and stuff it into the settings.
Example 3: When it requires your input, send a desktop notification (Notification)
When Claude asks for your approval in the middle of doing something, or when he finishes answering and waits for your next sentence, you may have already moved on to other things. Hang up a notification hook and it will proactively call you. This uses the Notification event (triggered when Claude sends a notification).
macOS Write into ~/.claude/settings.json (this “call me” hook is your personal preference and should be considered globally):
{
  "hooks": {
    "Notification": [
      {
        "matcher": "",
        "hooks": [
          {
            "type": "command",
            "command": "osascript -e 'display notification \"Claude Code 在等你\" with title \"Claude Code\"'"
          }
        ]
      }
    ]
  }
}
Platform differences (just copy the official native commands):
| Platform | Notification command (fill in command) |
|---|---|
| macOS | osascript -e 'display notification "..." with title "Claude Code"' |
| Linux | notify-send 'Claude Code' '...' |
| Windows | Using PowerShell’s MessageBox (the official documentation has complete snippets) |
If the notification does not pop up on macOS, it is probably because the Script Editor has not obtained the notification permission - go to “System Settings → Notifications” to find the Script Editor and turn on the switch. It was easy to make no sound during the first configuration. After struggling for a long time, I found out that this permission was not given.
💡 Summary in one sentence: The three hooks are in increasing order of risk - Formatting (
PostToolUse, zero risk, recommended for everyone), blocking commands (PreToolUse+script, rememberchmod +xandexit 2), and sending notifications (Notification, platform commands are different); the script path is most stable with$CLAUDE_PROJECT_DIR.
06 Hands-on: 5 minutes to set up a hook and watch it trigger
You can’t remember it just by watching it. Next, I will help you configure a safest and easiest to see the effect hook - Every time Claude finishes running a Bash command, this command will be recorded in a log file. You don’t need to touch any code in the whole process, just add a section of configuration, and you can verify it with your own eyes after running it.
This exercise uses jq. If not installed: run brew install jq on Mac, and sudo apt-get install jq on Ubuntu. You don’t need magic to access the Internet to pretend or not.
Step one: Find a practice directory and open its project settings file
Find an empty directory (don’t practice in an important project) and create .claude/settings.json in it. If the file already exists and has other content, add the hooks block as a new key, don’t overwrite it entirely. File content:
{
  "hooks": {
    "PostToolUse": [
      {
        "matcher": "Bash",
        "hooks": [
          {
            "type": "command",
            "command": "jq -r '.tool_input.command' >> ~/claude-bash-log.txt"
          }
        ]
      }
    ]
  }
}
This hook: every time the Bash tool runs (PostToolUse + matcher: "Bash") → extract the command from the JSON of stdin → use >> to append the claude-bash-log.txt written into the main directory.
Step 2: Start Claude in this directory and confirm that the hook has been registered
claudeAfter entering, enter /hooks:
/hooksExpected: A read-only hook browser pops up, listing all events. Find PostToolUse and there should be 1 hook next to it. Select it to see the details: event, matcher (Bash), source file (Project, that is, the project’s .claude/settings.json), and the command. **See it in the list = Hook registration was successful. **
The /hooks menu is read-only - it only allows you to check, not add or change. To change the hook, edit settings.json directly, or ask Claude to change it for you.
Step 3: Let Claude run a Bash command to trigger the hook
Press Esc to return to the dialog and let it run a harmless command:
帮我用 ls 看一下当前目录有哪些文件It will call the Bash tool to run ls. **After this run, the PostToolUse hook should be triggered. ** (When the hook is successfully executed, it is “silent” and the terminal will not specifically prompt - this is normal.)
Step 4: Verify that the hook really ran - check the log file
Open a new terminal and read the log:
cat ~/claude-bash-log.txtExpected: The ls command just now appears in the file (as well as other Bash commands that Claude ran during this session). See that the command has been written down = the hook is really automatically triggered after each Bash call, and your “automation rule” is established.
Step 5: Cleanup (optional)
Dismantling it after practice is very simple - just delete the hooks in .claude/settings.json (the hooks do not have a separate “delete command”, just remove the entry from the configuration). The log file rm ~/claude-bash-log.txt is deleted.
After running through these five steps, you will have gone through the complete link of “Write configuration → /hooks Confirm registration → Trigger event → Verify side effects”. Any hooks configured in the future will essentially follow this process, which is nothing more than changing events, changing matchers, and changing commands.
💡 To summarize in one sentence: For practice, a zero-risk hook like “recording Bash commands” is the most stable - Write it into
.claude/settings.json, use/hooksto see it registered, let Claude run the command to trigger, check the log file to verify; see the side effects happen with your own eyes, which is more useful than memorizing the ten definitions.
07 The hook does not trigger / an error is reported, how to check
Hooks that don’t work well after being configured are the most common sticking point for newbies. Don’t make blind guesses, search in the following order, and you can basically locate it. I organized the official troubleshooting list into “Symptoms → How to Check”:
| Symptoms | Most likely causes / How to check |
|---|---|
| Hooks are not triggered at all | ① Run /hooks to see if it is registered; ② matcher is case-sensitive, edit cannot match Edit; ③ The event is wrong (if you want to block the operation, use PreToolUse, not PostToolUse) |
/hooks does not have the hook I configured at all | ① The JSON format is wrong (JSON does not allow trailing commas and comments); ② The file location is wrong (the project hook is in .claude/settings.json, and the global one is in ~/.claude/settings.json); ③ Restart the session after the change has not taken effect |
Terminal reported hook error | The script unexpectedly exited with non-zero value. Test it manually (see the command below); if command not found is reported, it is probably because the script path is incorrect, use an absolute path or $CLAUDE_PROJECT_DIR; if jq: command not found is reported, it means that jq is not installed |
| The script does not run | Forgot to add executable permissions to the script on Mac/Linux, please add chmod +x |
| I wanted to stop but didn’t | Most probably I wrote exit 1 and changed it to exit 2 (see the pitfall in Section 04) |
The two most practical troubleshooting methods are highlighted separately:
① Manually feed fake data test script. There is no need to actually trigger it in Claude, just create a JSON pipe and feed it to the script to see if its exit code is correct:
echo '{"tool_name":"Bash","tool_input":{"command":"rm -rf /tmp/x"}}' | ./block-dangerous.sh
echo $?   # 看退出码:拦截脚本这里应该输出 2
This is the standard action for adjusting interception hooks - feed the script separately first, and then hang it on Claude, so as to avoid trying again and again in a real session.
② Open the debugging log to see the details. If you want to see “which hooks are matched, what is the exit code, and what are stdout/stderr”, use --debug to start, and the log will be written to ~/.claude/debug/<session id>.txt:
claude --debugOr you can open it by typing /debug directly in the session. There will be lines similar to this in the log. You can see at a glance whether the hook has run and how it has run:
[DEBUG] Executing hooks for PostToolUse:Bash
[DEBUG] Hook command completed with status 0
There is another one-click switch worth knowing: If you want to temporarily turn off all hooks (for example, if you suspect that a certain hook is causing trouble), just add "disableAllHooks": true to the settings file. There is no need to delete them one by one.
💡 In one sentence: Don’t guess if the hook doesn’t work, follow the sequence of “
/hooksto see the registration → check if the matcher case and event selection are correct → manually feed the JSON test script →--debugto see the log”; if you want to stop it, first check whetherexit 1is written.
08 Summary
In this article, we talk about Hook from “what it is” to “how to configure and adjust it” - It is an “automation rule” installed for Claude Code: as soon as a certain event is triggered, it will run an action for you without stopping.
Putting the core together to review:
| What you want to do | How to implement it | Key points |
|---|---|---|
| Understand what Hook is | Automatic shell commands triggered by events | Turn “request” into “guarantee” without relying on Claude’s consciousness |
| Choose the right time to mount | Recognize life cycle events | Pre can block, Post can last, Stop has finished answering, SessionStart has started |
| Write a hook | Configure into settings.json | Three layers: event + matcher (case sensitive) + action |
| Let the hook talk to Claude | stdin / exit code / stdout | exit 2 can only stop it, do not mix exit code and JSON |
| Block dangerous operations | PreToolUse + script | Remember chmod +x, Hook can only tighten but not relax permissions |
| The hook is not working | Check in order | /hooks to see the registration, manually feed JSON test, --debug to see the logs |
You should now be able to: Explain clearly the fundamental difference between Hook and “request written into CLAUDE.md” (guarantee vs request); know which step of Claude’s work process PreToolUse/PostToolUse/Stop/SessionStart hangs on; follow the template to write a hook with matcher in settings.json; understand the hook by stdin/exit code/stdout Talk to Claude, and remember “exit 2 to stop”; when the hook is not triggered, know to check from /hooks and --debug. **The drudgery of typing prettier 23 times at the beginning, now you have the ability to permanently solve it with one line of configuration. **
Hook is a very hard-core piece in the “System Configuration and Optimization” group - it gives you certainty control over Claude’s behavior, instead of just “please ask it”.
Next article 34 “CLI Reference Manual: Commands and All Flags” - Along the way, you have typed a lot of commands starting with claude and used flags such as --debug and --dangerously-skip-permissions, but they are actually just the tip of the iceberg. The next article will sort out all the commands and flags of the claude command line system, and use it as a “dictionary” that can be easily browsed. Think about it: How many claude signs can you roll off your tongue right now? After reading that article, you will find that you have missed at least half of the switches that can save you trouble.