06 | Claude Code in 16 Hours: Images, CLAUDE.md, and Context Management
Layer multimodal input, CLAUDE.md, and context management so that project rules stay concise and useful.
17 · Pictures and Multimodality: Post a screenshot and it will understand
For example, you want to restore a screenshot of a page given by a designer into a web page. Previously, we had to look at the image pixel by pixel - what is the spacing, the size of the font, and the degree of rounded corners of the buttons. It would take a whole morning just to pick out the values.
At this time, just drag the PNG directly into the Claude Code window and type “Generate the corresponding CSS according to this design draft”**.
A few minutes later, it spit out a whole piece of CSS - the layout, color matching, rounded corners, and shadows were all correct. Paste it into the project, and when the browser refreshes, it will be almost exactly the same as the design draft. The efficiency gap is immediately apparent: showing it is much faster than telling it.
To put it bluntly, the saying “a picture is worth a thousand words” is true in a literal sense at Claude Code. Today I will explain thoroughly “how to feed pictures + what can be done by feeding pictures”.
After reading this article, you will get:
- Three ways to insert images into Claude Code, just follow them (including a shortcut key that Mac users must use)
- Three serious uses of pictures: posting error screenshots, restoring design drafts, and reading diagrams/architecture diagrams
- A criterion for judgment: When to post pictures and when to just type
- How to use multiple pictures, how Claude quotes pictures, and how to open the one he says with one click
01 Why do you need to show it pictures instead of just typing?
Let’s talk about the conclusion first: When something is “more difficult to describe than taking a screenshot”, it’s time to take a picture.
This is the standard for judging the black and white text in official documents - “Use images when the text description is unclear or cumbersome”.
**Analogy: A picture is worth a thousand words. ** You describe to a friend what a red-green error pop-up window looks like. You say for a long time, “There is a red cross in the upper left corner, a line of small words below, and a button on the right…” The other person is still confused; but if you take a screenshot and throw it over, he will understand everything with an “oh”. Showing pictures to Claude is the same thing - save your effort in organizing language and save it’s effort in guessing.
What scenes are particularly appropriate for the above image? They are mainly used in these three categories:
| Scene | How tiring it is to type a description | The picture above is so tedious |
|---|---|---|
| The page is misaligned/the style is wrong | ”This div is shifted to the right by about twenty pixels, and it overlaps with the one below” | Take a screenshot and you can see it is misaligned at a glance |
| Error pop-up window/Console red text | Align a long list of stacks by hand typing or copying | Throw the screenshot in and give the context together |
| Restore the design draft / imitate a component | ”The main color is a purplish blue, and the rounded corners are not too big or too small…” | Give me a picture and let me measure it myself |
There is a key difference that needs to be made clear here: Claude Code is looking at the “content in the picture”, not taking screenshots for you. You have to do the screenshot step yourself (the screenshot tool that comes with the system will do). It is responsible for “understanding the picture you gave me.”
💡 One sentence summary: The judgment criterion is just one sentence - The description is more tiring than the screenshot, so just the picture; the official quote is “use images when the text is unclear or cumbersome”.
02 Three ways to feed images: drag, paste, and give paths
How to insert the picture? The official document gives three methods, choose any one, the effect will be the same. I’ll rank them in order of “difficulty to get started from low to high.”
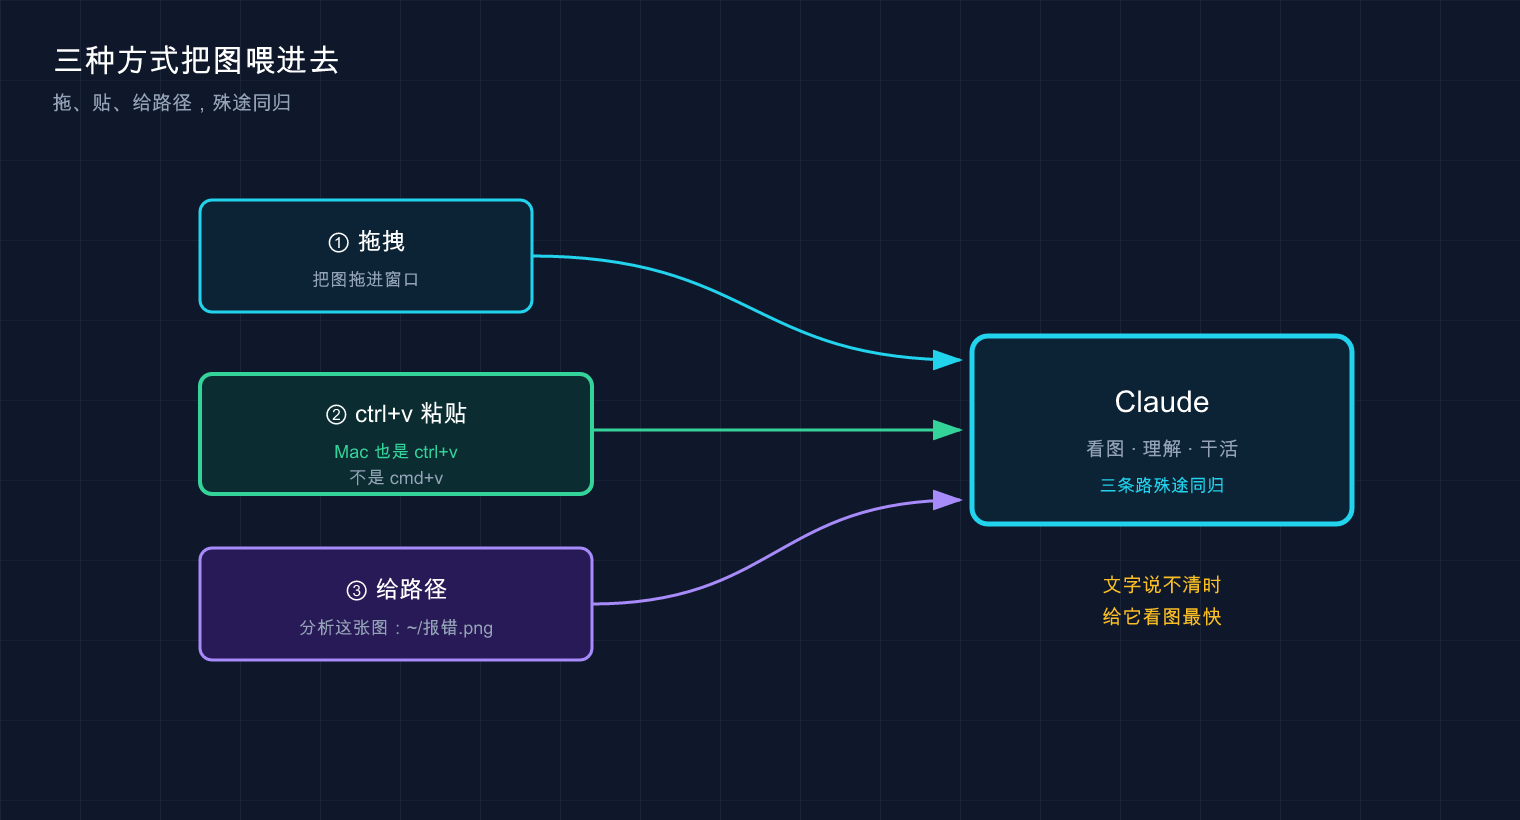
This picture combines three image adding paths into one place: drag and drag into the window, copy and paste with ctrl+v (Mac also uses ctrl+v), or directly give the file path - all three methods lead to the same goal, they all feed the image to Claude and let him “watch it work”.
Method 1: Drag directly into the window (the most intuitive)
Drag the image file from the Finder/File Manager into the terminal window running Claude Code, let go, and it will go in.
This is the most mindless way - just like you drag files into the WeChat chat box and send pictures. Novices usually start with this, with zero learning cost.
Method 2: Copy the image and paste with ctrl+v (the most common, but there is a pitfall)
Many times the image is not saved as a file at all - you just took a screenshot or right-clicked “Copy Image” from the web page. At this time, it is best to paste it directly.
But here is the biggest pitfall of the entire article, which the official document specifically emphasizes:
Copy the image and paste it into the CLI using ctrl+v (do not use cmd+v).
**Note: You also use ctrl+v to paste pictures on Mac, not the cmd+v you are used to. **
How counterintuitive is this? Mac users have been copying and pasting text using cmd+v for ten years, and the muscle memory is ingrained in them. The first time I posted a screenshot, it was easy to press cmd+v out of habit. As a result, a long list of garbled paths appeared in the terminal, and the image was not included at all. I thought it was not supported. You will understand after looking through the documentation - ** In many terminals, cmd+v sticks to the file path text, and only ctrl+v can reliably feed the image itself to Claude**.
(Additional note: Some terminals such as iTerm2 also recognize cmd+v to paste images, but the behavior of each terminal is inconsistent. ctrl+v is the method that works everywhere, remember it and you will not step into pitfalls.)
Remember this:
| Platform | For pasting pictures | Do not use |
|---|---|---|
| Mac | ctrl+v | ❌ cmd+v (most terminals will paste the path text) |
| Windows / Linux | ctrl+v (if the terminal intercepts ctrl+v in WSL, use alt+v instead) | —— |
A small detail: After the pasting is successful, a placeholder mark of [Image #1] will appear in the input box (officially called “chip”), indicating that the image has been mounted, and you can continue typing in this prompt.
Method 3: Directly provide the image path (most suitable for scripts/saved images)
If the image has been saved as a file and you know the path, the easiest way is to type the path directly in the prompt and let it read it by itself:
Analyze this image: /path/to/your/image.pngJust replace /path/to/your/image.png with the real path of your image (both relative paths and absolute paths are recognized). This method does not rely on mouse dragging. It is best to use ** when it is written in a script or the image is hidden deep in a directory of the project.
💡 Summary in one sentence: Drag into the window /
ctrl+vto paste / directly give the path, choose one of the three; Mac users must memorizectrl+v, do not presscmd+v.
03 Use 1: Post error reports and UI screenshots to give it “live”
The first and most practical scenario - give it the screenshot of the problem and let it watch the scene and solve the case.
Why is this trick useful? Because of many error reports and style issues, the text is not fully conveyed. There are icons, colors, and layouts in an error pop-up window. You can only describe it roughly by typing with your hands; this is especially true for UI misalignment. The difference of a few pixels can be seen with the naked eye, but cannot be explained with the mouth.
**Analogy: When you go to the hospital, don’t just describe “it hurts here” with your mouth. Take a picture and show it to the doctor. ** When you say “there is a dull pain in the lower right corner of your stomach,” the doctor can only guess; with a CT scan, it will be clear where the problem lies. The screenshot is the “picture” given to Claude.
How to do it specifically? Feed in the screenshot (choose from three methods), and then add a sentence to highlight your appeal. The official demonstration tips are in place:
Here's a screenshot of the error. What's causing it?Or, UI issues:
Describe the UI elements in this screenshotFor example, when adjusting a React page, there is a button that is far to the right, and I can’t find anything wrong with it after flipping over the CSS. At this time, directly took a screenshot of the misaligned picture and threw it in, and added a sentence “Why is this button squeezed to the right?” Claude took a look and said, “Your parent container has a padding-right, plus the button’s own margin, and it is stacked together” - If you point it out in one sentence, just change it to one line. If I were to describe this dislocation by typing, I would probably have to go back and forth several times.
💡 Summary in one sentence: For error reports and UI problems, screenshots are “live photos” - showing it to it will resolve the case much faster than telling it to it.
04 Use 2: Restore the design draft, take screenshots and directly output the code
This is the scene at the beginning where “the efficiency gap suddenly widens”. Let’s talk about it separately - Give it a design draft and let it spit out code that can run.
Why is this the most amazing move? Because it saves the most grueling physical work of “design → code”. Facing image values, adjusting spacing, and testing colors were originally the most boring part of the front-end. Now we leave it to it to produce an approximate version, and then you can fine-tune it.
**Analogy: Take a photo and ask a tailor to make clothes based on it. ** You don’t need to report every measurement to the tailor. Just put the sample photos in front of him and he will be able to publish the pattern, materials and stitching himself. For Claude, the screenshot of the design draft is the “sample photo”.
Official demonstration tips, just remember these two sentences to get started:
照着这张设计稿生成对应的 CSSWhat HTML structure would recreate this component?The first sentence lets it generate CSS according to the design draft, and the second sentence lets it infer the HTML structure that can reproduce this component. Use these two sentences together, and the skeleton of a static component will come out.
To be honest, you have to have a reasonable expectation: It is not a pixel-level replica, it is to give you a starting point with a high degree of completion. Like the CSS at the beginning, the overall layout and color matching are all correct, but there are two places where the padding is a few pixels off. Just adjust it manually. But this has saved at least an hour - Writing CSS from scratch and modifying 80% of the draft given by it are completely two workloads.
| Restore design draft | ❌ Purely handwritten | ✅ Feed it with screenshots |
|---|---|---|
| Measure the value | Pick out the pixels one by one | It is estimated according to the picture |
| Create a skeleton | Start from an empty file | Directly give a version that can run |
| Your job | Start from scratch | Change the last 10% or 20% |
💡 One sentence summary: Screenshot of the design draft + “Generate the corresponding CSS according to this design draft”, it will give you 80% of the draft, and you make up the last 20%, all you save is manual labor.
05 Use 3: Read charts and architecture diagrams to make it “understand the structure”
The third use is that it can also understand charts, database schemas, and architecture diagrams—these “structural” diagrams.
Why list it in a separate category? Because the first two categories (error reporting, design draft) pictures are “interfaces”, and this type of pictures are “relationships” - who is connected to whom, how data flows, and how modules are layered. This relationship is particularly convoluted in words, but clearly visible in pictures, which is exactly what Claude likes.
**Analogy: When teaching a new colleague about the system, drawing a block diagram on the whiteboard is more effective than teaching it for half a day. ** You dictate to a newbie, “User service adjusts order service, and order service depends on inventory and payment…”, he hears it in confusion; on the whiteboard, he connects several boxes and draws an arrow, and he immediately understands. Screenshot this block diagram to Claude and the effect will be the same.
The official demonstration tips cover the two directions of “reading” and “modifying”:
This is our current database schema. How should we modify it for the new feature?Are there any problematic elements in this diagram?The first sentence is take the existing database structure diagram and ask it how to change the table for the new function; the second sentence is let it review the diagram to see if there is anything unreasonable.
A very common usage: when taking over an unfamiliar project, the other party throws over an architecture diagram PNG and feeds it directly to Claude, asking him to first explain how the system runs. It can read the modules and calling relationships from the picture, and give you an overview - much faster than staring at the picture yourself, which is equivalent to someone taking you through the picture first.
💡 One sentence summary: For “relationship” diagrams such as charts, schemas, and architecture diagrams, feed them as background and let them understand the structure and then help you modify or review them.
06 Multiple pictures, quotes, and one-click opening: several useful little operations
Finally, I will add a few details to make you use it more smoothly, which are all mentioned in the official documentation.
You can feed multiple pictures at one time
No need to post them one by one - You can put multiple pictures into the same prompt. For example, “This is the old design draft, this is the new design draft, tell me what has been changed.” Give them both together for comparison. This is often done when revising design drafts to avoid switching descriptions back and forth.
Claude How to cite images: [Image #1]
When Claude mentions a certain picture you gave in the reply, it will use numbers like [Image #1], [Image #2] to refer to it-the number of the picture is the number. When there are multiple pictures, this number allows you to identify “which picture it refers to” at a glance.
Click on the picture it says
The [Image #N] that appears in its reply can be clicked on. According to the official statement:
When Claude references an image (e.g.
[Image #1]),Cmd+Click(Mac) orCtrl+Click(Windows/Linux) links to open the image in the default viewer.
In other words, if you want to confirm which picture it refers to, Cmd+Clickon Mac orCtrl+Click` on Windows/Linux will open the picture for you with the default picture viewing tool of the system.
| Operations | Mac | Windows / Linux |
|---|---|---|
| Paste image | ctrl+v | ctrl+v |
Click to open [Image #N] | Cmd+Click | Ctrl+Click |
Note that the “division of labor” of these two shortcut keys is reversed: Paste images using ctrl, but click on image links on Mac using Cmd. Don’t forget about it.
💡 Summary in one sentence: One prompt can contain multiple images. Claude uses
[Image #N]to refer to it, and **click on that number (Cmd+Clickon Mac) to open the image for verification.
07 Do it yourself: drag a picture and let it read, get it done in three steps
Just talk without practicing the tricks. Below, use any picture on your computer to go through the complete process of “feed the picture → it will understand” in three steps. No project is required, just a picture on the desktop.
Step one: Find a picture and remember its location
Take a screenshot, or just find an existing PNG/JPG. Mac screenshots are saved to the desktop by default, and the file name is in the form of Screenshot 2026-06-10 PM 3.20.15.png. Drag it to an easy path, such as placing it directly on the desktop.
Step 2: Start Claude Code in any directory
claudeExpected: A welcome screen appears with an input box at the bottom. (You don’t need to choose a directory when reading pictures. You can start it anywhere.)
Step 3: Feed the picture in and let it describe
There are three methods to choose from. Newbies recommend direct drag: drag the image from the desktop into the terminal window, let go, and the [Image #1] mark will appear in the input box. Then continue typing:
这张图里是什么?用中文描述一下你看到的内容Enter.
Expectation: Claude reads this picture and tells you in Chinese what is in the picture - if it is a screenshot, it will talk about the interface elements, if it is a photo, it will describe the content of the picture. Seeing that it accurately stated the things in the picture = the picture feeding was successful and the whole process ran smoothly.
⚠️ Mac users want to try the “copy and paste” method: first copy the image in preview/browser, then return to the terminal and press ctrl+v (not cmd+v). If after pressing, a string of file path text pops up instead of the [Image #N] mark, most likely because you pressed cmd+v, delete it and try again.
💡 One sentence summary: Drag in /
ctrl+v/ to give the path, feed the picture in three steps, and see Claude accurately describe the content of the picture, it is a run through.
08 Summary
In this article, you learned how to enable “visual” for Claude Code - from being able to only type to being able to directly view pictures for it.
Let’s string together the key points:
| Dimensions | Key points |
|---|---|
| How to feed | Drag into the window / ctrl+v Paste / Give the path, choose one of the three |
| The biggest pitfall | Use ctrl+v to paste images on Mac, don’t press cmd+v |
| Three major uses | Report errors/take UI screenshots to the site, restore the design draft and produce code, read charts/architecture diagrams to understand the structure |
| When to post pictures | When text descriptions are more tiring than screenshots |
| Multiple Pictures and Quotes | Add multiple pictures to one prompt, Claude uses [Image #N] to refer to it, click the number to open |
You should now be able to: Feed any screenshot, design draft or architecture diagram to Claude Code, and let it look at the picture to help you detect errors, generate code, and smooth out the structure; and remember the most counter-intuitive ctrl+v on Mac. This ability to “show it to it” will make your cost of describing the problem plummet in the future - Many needs that used to take a long time to type can now be solved with a picture and a sentence.
Next article 18 “CLAUDE.md User Guide” - We have been feeding pictures and requirements before, but we have to explain the project background repeatedly every time. Is there a way for Claude to automatically know what it is and what rules he should follow as soon as he enters the project? The next article will talk about the “entry manual” for it - CLAUDE.md. Once it is configured, you will no longer need to repeat it.
18 · CLAUDE.md User Guide: Write project rules into its memory
It is said that the more detailed CLAUDE.md is written, the better, but to be honest, the most useless CLAUDE.md is exactly the one that wrote three hundred lines and Claude didn’t listen to a single one.
Imagine a CLAUDE.md left by the predecessor in the project that was taken over. It is full of details: company background, product vision, team introduction, technology selection and the ins and outs… Only after turning to the second screen did I see a useful sentence “Use pnpm instead of npm”. The result? Claude still gives you npm install at every turn.
**The problem is not that it is disobedient, that the rule is buried in two hundred lines of nonsense, and the attention has long been diluted. **
CLAUDE.md (Claude’s project memory file) is an artifact once written, but a burden if not written correctly - it occupies your context window for each session, and the more bloated it is, the less space is left for real work. Today we will break it down: how many layers it is divided into, what should be written, what should not be written, how to reference other files, and how to maintain and streamline it.
After reading this article, you will get:
- What does the three levels of CLAUDE.md (user level/project level/subdirectory level) manage and how to arrange the loading order?
- A list of “what to write vs. what not to write” to avoid the pitfalls of 90% of novices who fill it with nonsense.
- The correct way to reference other files using the
@syntax, and its true cost to context - The official method of temporarily making up a memory during a session, adding a set of “good vs. bad” comparison tables as templates
ℹ️ This article only focuses on how to write and maintain the file CLAUDE.md. The one-click generation method of
/inithas been discussed in 12 “Project Initialization”, and the wider automatic memory (auto-memory) mechanism is left to 25 “Memory System” Special chat.
01 First understand: What is CLAUDE.md?
Let me give the conclusion first: **CLAUDE.md is a “persistent instruction” written by you to Claude. It will be read once every time you open a session and put into the brain as the background of the project. **
Why is it needed? Because every Claude Code session starts with a blank piece of paper - last time you carefully explained “use pnpm, don’t touch the legacy directory, and run the test like this”, this time it doesn’t remember anything. Without CLAUDE.md, do you have to explain it again every time? Is it annoying?
**Analogy: Onboarding manual for new employees. ** On the first day a new guy comes, you won’t stand next to him and dictate the rules around the clock. You give him a manual: what the project is about, how to submit the code, and which minefields to ignore. He read it himself and got started. CLAUDE.md is Claude’s onboarding manual - the one he reads again every day before going to work.
But there is a key understanding here. The official document states it very straightforwardly:
The contents of CLAUDE.md are passed as user messages after the system prompt, rather than as part of the system prompt itself. Claude reads it and tries to follow it, but there is no guarantee of strict compliance.
Translated into adult language: **CLAUDE.md is a “strong recommendation”, not an “iron rule”. ** It shapes Claude’s behavior, but is not a hard enforcement layer. So the more specific and concise you write it, the more firmly it will stick. Do you expect it to 100% block a dangerous operation? That is Hook’s job, not CLAUDE.md’s job - the division of labor between the two will be discussed in a later chapter.
When should you add content? The official gave several very practical signals:
- Claude made the same mistake for the second time - Explain that this must be written down and solidified
- You typed again in this session Correction of the sentence you typed in the previous session
- During the code review, it was discovered that it should have known a certain convention of this code base for a long time.
- New teammates need the same background to get started quickly
💡 One sentence summary: CLAUDE.md is the onboarding manual that Claude must read every time he starts working. It is “strongly recommended” level rather than “iron rule” level. The more specific it is, the more effective it will be.
02 Three levels: who is in charge of the overall situation and who is in charge of individual projects
There is more than one copy of CLAUDE.md, it can be placed in several places, and the range of effects ranges from large to small**. Novices are most likely to get confused here, let’s clarify it once.
According to the official documentation, these three layers are commonly used (plus a local variant):
| Hierarchy | Where to put | Regardless of the scope | Enter or not git |
|---|---|---|---|
| User level | ~/.claude/CLAUDE.md | All projects on your machine | No entry, purely personal preference |
| Project level | ./CLAUDE.md or ./.claude/CLAUDE.md | Current project | ✅ Advance, team sharing |
| Subdirectory level | Any subdirectory/CLAUDE.md | Claude only loads files in that directory after reading them | ✅ Advanced, suitable for multi-module warehouses |
| Local (variant) | ./CLAUDE.local.md | Current project, only you | ❌ Add .gitignore |
There is also a “managed policy layer”, which is deployed by the IT administrator to the system directory (
/Library/Application Support/ClaudeCode/CLAUDE.mdfor macOS), which is loaded before the user level and cannot be excluded by individuals. Individual users usually cannot encounter it and will be omitted in this article; for enterprise scenarios, you can check the official documentation.
**How to divide labor? Remember a sentence: personal habits are placed at the user level, and team rules are placed at the project level. **
- User Level (
~/.claude/CLAUDE.md): Allows personal preferences that are common across projects. For example, “Reply in Chinese”, “Speak out your ideas before changing the code, don’t start directly”, “Submit information in English”. These have nothing to do with specific projects and are habits of “you”, so they are effective for all projects and do not enter the git of any project. - Project Level (
./CLAUDE.md): Put rules that are exclusive to this project and that the entire team should abide by. Technology stack, build commands, directory conventions, and prohibited modification lists. It follows the code into version control, and new colleagues will come with this set of specifications when they clone it. - Subdirectory level: Only useful for large warehouses. For example, the front-end directory contains a copy that is exclusive to the front-end, and the back-end directory contains a copy that is exclusive to the back-end. It is not loaded normally. Only when Claude actually reads the files in that directory, the CLAUDE.md is brought in - save context.
The analogy is still an induction manual: User level = your personal work habits book (take it with you when changing companies); project level = employee handbook issued by this company (returned when you leave); subdirectory level = additional details within a certain department (will only be issued to you when you are transferred to that department).
Take a common user-level configuration: put a sentence in ~/.claude/CLAUDE.md: “When encountering multiple implementation solutions, list the options for me to choose instead of silently deciding for me”. This is true for every project you have, so putting it at the user level is the easiest - After configuring it once, you don’t have to explain this sentence again in a new project.
💡 Summary in one sentence: Personal habits are written at the user level (
~/.claude/CLAUDE.md), team rules are written at the project level (./CLAUDE.mdinto git), and large warehouses are split by modules at the subdirectory level.
03 Loading order: Why “speaking later is more effective” at the project level
The previous section listed three levels, so when they exist at the same time, who has the final say? This is another common misunderstanding that needs to be corrected.
**Official rules: Load in order from the broadest scope to the most specific scope. The instructions closer to your startup directory are read later. **
How to arrange it specifically? Claude Code goes all the way up from the directory you are currently in. If there is CLAUDE.md in each layer along the way, it will be included, and finally it will be assembled into a whole piece of context. The order is roughly:
用户级 ~/.claude/CLAUDE.md
        ↓(先读)
(目录树里更靠上的)父目录 CLAUDE.md
        ↓
项目根 ./CLAUDE.md
        ↓(后读,离你最近)
子目录 CLAUDE.md(只有 Claude 读那个目录的文件时才加进来)
Note two important points, both from official documents:
**First, all found files are “spliced” and not “overwritten”. ** They all enter the context, not the later ones override the previous ones. Therefore, user-level and project-level take effect at the same time, and there is no such thing as “if the project-level is set, the user-level will be invalid”.
**Second, instructions closer to the working directory are “last read”. ** When two rules fight - for example, the user level says “use single quotes for strings” and the project level says “use double quotes” - the project level that is closer is usually more dominant because it speaks later. To put it bluntly, project rules can override your personal habits, which is exactly the desired effect of teamwork.
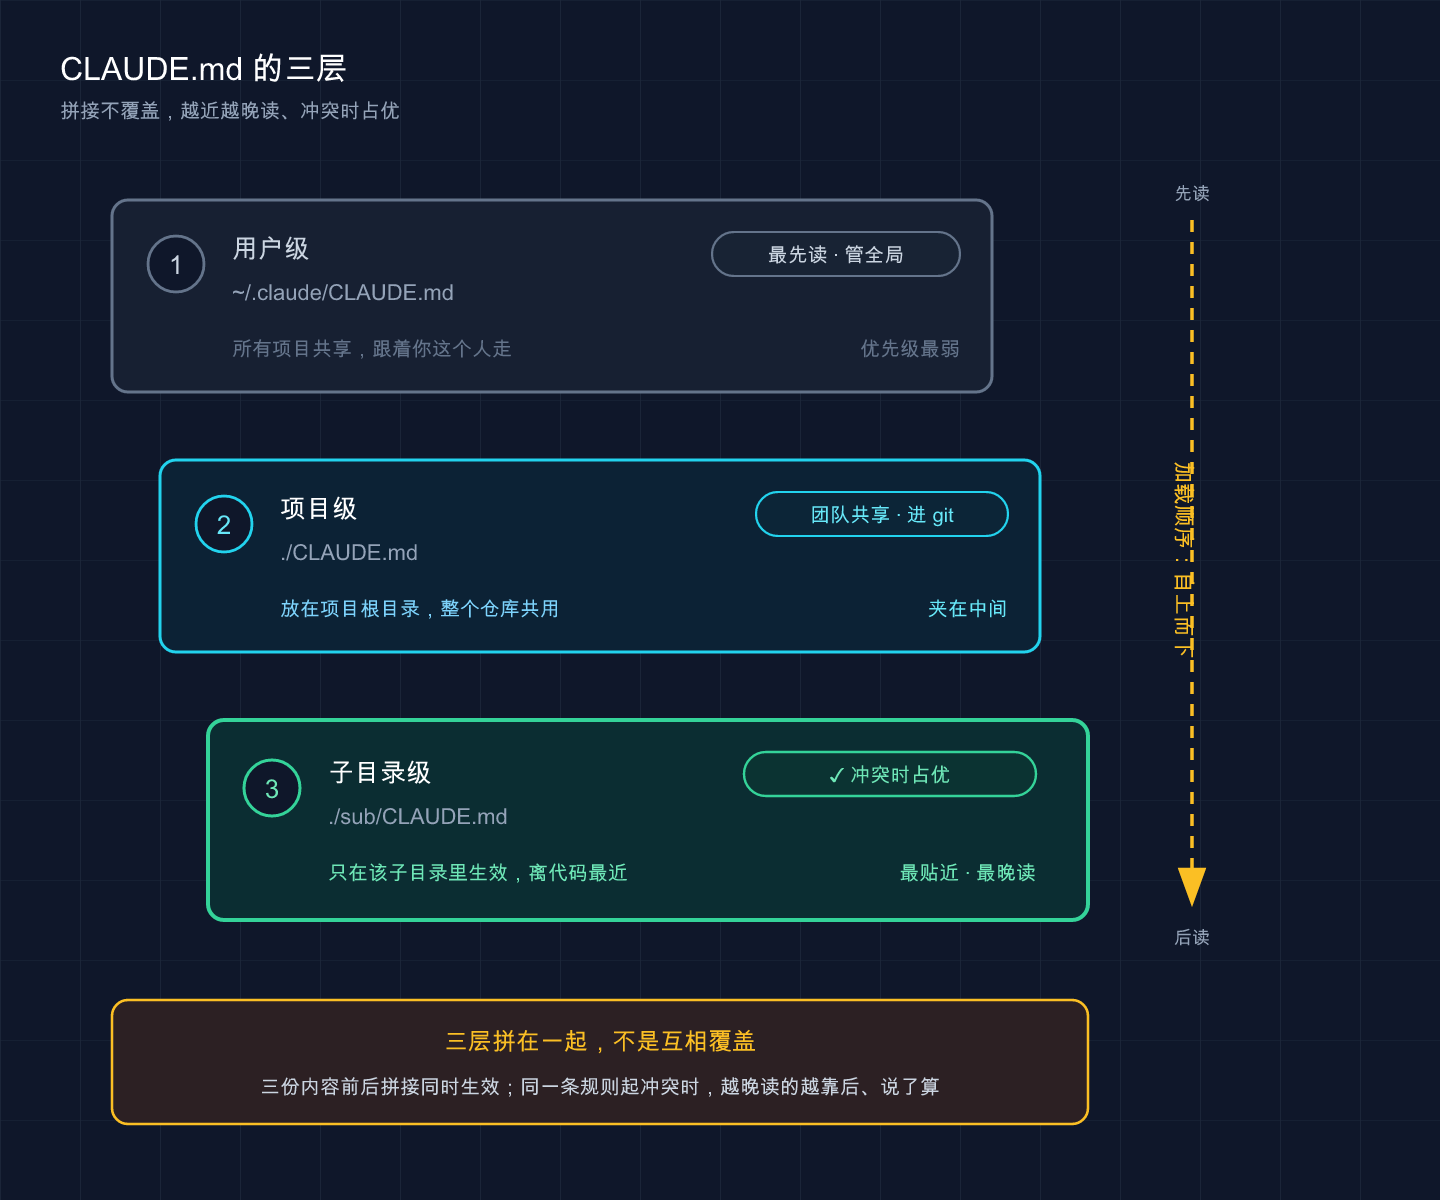
This picture stacks three layers together from top to bottom: User level (manage all projects, read first), project level (current project, enter git), subdirectory level (closest to the code, take precedence in case of conflicts); the arrow on the right marks the “top to bottom” loading order, and the iron law at the bottom points out - the three layers are spliced, not overwritten, and the closer to the code, the later it is read and has the final say.
There is a common misconception that needs to be corrected here. Many tutorials on the Internet write the priority as “project local → project root → subdirectory → global”, This is the opposite of the loading direction officially described. It’s easy to be biased by this statement, but it becomes clear after reading the official documents: the official clearly states that it is loaded “from the broadest scope to the most specific scope”, and the project instructions appear after the user instructions**. The official version shall prevail, don’t remember it wrong.
There is another thoughtful detail: CLUDE.md in the project root will be automatically read back from the disk after /compact (compression session) and will not be lost. However, the nested CLAUDE.md in the subdirectory will not be automatically re-injected, and it will have to wait until Claude reads the files in that directory next time. Therefore, important rules should be placed at the root of the project as much as possible, and don’t bury them too deep.
💡 Summary in one sentence: Multi-layer CLAUDE.md is spliced rather than overwritten. The closer it is to the working directory, the later it will be read and the more dominant it will be in case of conflict, so project rules can override personal habits - don’t remember the official loading direction backwards.
04 What to write vs what not to write
This section is the key to the entire article. **CLAUDE.md If you don’t write well, 90% of the time it’s because you haven’t written clearly what you should write, and you’ve crammed a lot of things that shouldn’t be written. **
Let’s talk about what should be written first - the official one-sentence summary: **Write “the facts that Claude should maintain in every conversation.” ** Translated into a list, these are the five categories:
| Category | What to write specifically | Example |
|---|---|---|
| Project Overview | Explain in one sentence what this project is | ”Order management backend based on FastAPI” |
| Technology stack | Language, framework, database, key tools | ”Python 3.11 / PostgreSQL / pytest” |
| Commonly used commands | How to run tests, builds, and checks | uv run pytest, uv run ruff check. |
| Coding Conventions | Style, naming, and writing methods that must be followed | ”Functions must have type annotations” “Double quotes for strings” |
| Clear “Don’t do it” | Minefield, no modification of files, operations that must be asked first | ”No modification of migrations/ existing files” |
Among them, commonly used commands are the most frequently referenced - Claude will come here to read the commands before running tests and building, so as to avoid guessing or using them incorrectly. The prohibited list is a guardrail to prevent it from being “smart but getting into trouble”: Which directories are read-only for legacy code and cannot be changed, which files must be told to you before they are changed, and which key files are prohibited from outputting content.
Let’s talk about things that shouldn’t be written. This is the hardest hit area for novices:
- ❌ Long story background: company introduction, product vision, historical origin of technology selection - Claude is not needed for writing code, it is purely for context.
- ❌ Outdated information: I changed the package manager but did not update CLAUDE.md. It also said npm, which misled it.
- ❌ Things you can tell just by looking at the code: Don’t repeat what each file in the directory structure does, and don’t copy the code style defined by the ESLint configuration again. **Claude can read the code himself, and repeating it is just taking up space. **
The official attitude on this matter is very clear, and they have given specific red lines:
Each CLAUDE.md file targets under 200 lines. Longer files consume more context and reduce compliance.
Why does 200 lines matter? Because CLAUDE.md grabs the same context window as your conversation. If you cram in three hundred lines of nonsense, it will take up a large workbench at the beginning, and the space left for real tasks will shrink - and important rules will be drowned in nonsense, attention will be diluted, and compliance will not increase but decrease. This is the root cause of the “three hundred lines no one listens to” at the beginning.
There is a useful way: **Before writing each item, ask yourself, “Can Claude see the code and derive it by himself? If so, delete it.” ** With this knife, the CLAUDE.md that took over the project can be cut from more than 300 lines to 80 lines, leaving only hard constraints that it cannot push out. After the cut, the number of times it uses the wrong package manager is visibly reduced.
💡 Summary in one sentence: Write “facts that should be remembered in every conversation” (overview/technology stack/commands/conventions/restricted areas), delete everything that Claude can deduce by himself by looking at the code, and keep the full text within 200 lines.
05 Citing other files: @ syntax and its costs
Sometimes you already have existing specification documents in your project—an API design guide, a database convention. **There is no need to copy the content into CLAUDE.md, just use the @ syntax to reference it. **
The writing method is very simple. Write @ and add the path anywhere in CLAUDE.md:
有关项目概述,请参阅 @README,可用命令见 @package.json。

# 其他指令
- git 工作流 @docs/git-instructions.md
When Claude reads CLAUDE.md, he will expand the contents of these referenced files and load them into the context together. There are a few official details, please remember them and don’t fall into any trap:
- Relative paths are resolved relative to the file containing the reference, not relative to your working directory. This is easy to get wrong.
- Absolute paths are also acceptable; the referenced files can also reference other files, up to four recursive hops**.
- The first time you encounter a reference outside the project, Claude Code will pop up an approval box to list these files for your confirmation; if you reject it, the reference will remain disabled and the box will no longer pop up.
But here is the most critical cognition, which the official has repeatedly emphasized, and it is also the easiest pitfall:
Imported files are expanded and loaded into the context on startup. Splitting imports into
@pathhelps organization but does not reduce context, since imported files are loaded on startup.
**To put it bluntly: @ is quoted as “organizing”, not “saving money”. ** Many people think that by splitting the content into external files and shortening the CLAUDE.md body, the context is saved - ** Wrong. ** The referenced files are still fully loaded into the window at the start, and the context that should be taken up is not lost at all. Imagine taking out a 500-line specification and using @ to quote it. You think you have lost weight, but when you look at /context (check the context occupancy), you see that none of the tokens that should be eaten are missing.
So the principle is: **@ references are used to make the structure cleaner and easier for humans to maintain, but to save context, you must rely on “streamlining content” or “path range rules”, not by splitting files. ** Don’t make the single file you reference too large, otherwise it will still be a drag.
By the way, a related note: If you have some purely personal project preferences that you don’t want to enter into git (such as your local sandbox URL, favorite test data), don’t write it into ./CLAUDE.md, write it into ./CLAUDE.local.md, and then add it to .gitignore. It is loaded together with CLAUDE.md and processed in exactly the same way, except that it will not be submitted and will not affect teammates.
💡 One sentence summary:
@pathintroduces external documents for the sake of “clean structure”, but the referenced content is still fully included in the context, without omitting token; I want to avoid deleting the content; my personal preference is to putCLAUDE.local.mdand gitignore.
06 Maintenance: make up for it during the session and streamline it regularly
CLAUDE.md is not provided once it is written, it must follow the project leader. This section talks about two maintenance actions: how to replenish one at a time and how to lose weight regularly. **
What should I do if I want to temporarily add a message during the session?
It’s often like this: while chatting, you corrected Claude and thought, “You should abide by this every time from now on and remember it.” The most trouble-free official method is to say it directly in the dialogue:
把「数据库操作必须走 Service 层,别在路由里直接写 SQL」这条加进 CLAUDE.mdClaude will write this into the CLAUDE.md file for you. You can also type the /memory command at any time. It will list all CLAUDE.md, CLAUDE.local.md and rule files loaded in the current session. Click to open them in the editor. You can also change them manually. **If you want Claude to decide how to word it, use the first option; if you want precise control over the wording, use /memory to edit it yourself. **
ℹ️ A reminder of version differences: In the early days of Claude Code, typing a sentence starting with
#in the input box could quickly add memory. This set of interactions has changed in the new version - Based on the official current practice: either directly ask Claude to “add to CLAUDE.md”, or use/memoryto edit it yourself. When you type “remember xxx”, Claude will probably store it in its own automatic memory (auto-memory, which is the topic of 25 “Memory System” by default); if you want to explicitly add CLAUDE.md, just say “add CLAUDE.md”.
Regularly streamline and delete outdated and conflicting ones.
A hidden danger of official roll call: **When two rules conflict with each other, Claude may choose one at random. ** So you have to review it regularly and clear out the outdated and conflicting ones. When to trigger downsizing:
- Changed the package manager/build tool (old commands must be deleted, leaving them is misleading)
- Added or removed important dependencies
- Set up new programming conventions (check to see if they conflict with the old rules)
- Found that CLAUDE.md has quietly increased to over 200 lines
To judge whether a rule is good or not, it depends on whether it looks like a “rule” rather than “prose”. The official comparison is very practical, I compiled it into a table:
| ❌ Vague prose (useless) | ✅ Specific rules (works) |
|---|---|
| The code should be neat | The function should not exceed 50 lines, if it exceeds it, it must be split |
| Write as many tests as possible | Each new function must have a corresponding unit test |
| Pay attention to safety | User input must first pass sanitize() before entering the database query |
| The legacy directory is not important | Modification of any files in the legacy/ directory is prohibited |
| It is better to use pnpm | Only use pnpm for dependency management, disable npm and yarn |
The words on the left are like saying nothing - “neat”, “try your best” and “pay attention” are all subjective words. Claude cannot verify it and naturally cannot execute it stably. Each item on the right is specific enough to be verified: 50 lines, must have tests, must pass a certain function. The official words are “write instructions that are specific enough to be verified.”
When writing CLAUDE.md, you might as well develop a hard habit: After writing each rule, be the referee and judge “whether this rule is violated at a glance”. If you can’t tell, it means the writing is inaccurate. Go back and change the details.
💡 Summary in one sentence: Just add one and ask Claude to “add to CLAUDE.md” or edit it with
/memory; regularly delete outdated and fighting rules; Good rules look like “rules that can be verified at a glance”, not prose like “clean and try your best”.
07 Do it yourself: Get a qualified CLAUDE.md for your toy project
It’s useless to talk without practicing. Let’s use a minimal project to walk through the complete process of “create file → write rules → verify loading”. Just keep knocking and it will be done in five minutes.
Step 1: Build a toy project and initialize git (Mac/Linux)
mkdir claude-md-demo
cd claude-md-demo
git init
echo 'def add(a, b):
return a + b' > main.pyExpected: There is a main.py and a .git directory in the claude-md-demo directory. Git initialization is to enable this CLAUDE.md to be under version control (a prerequisite for team sharing).
Step 2: Handwrite a streamlined project-level CLAUDE.md
Use your favorite editor to create a new CLAUDE.md in the project root directory and paste the following (note that it only has a few lines in total - this is what a good CLAUDE.md should look like):
# add-demo — 一个演示用的最小 Python 项目

只有一个 `add` 函数,用来演示 CLAUDE.md 怎么写。

## 常用命令
- `python -m pytest` —— 运行测试

## 编程约定
- 所有函数必须有类型注解
- 字符串一律用双引号

## 注意事项
- 不要修改 `main.py` 里 `add` 的函数签名,只能在内部加逻辑Expected: CLAUDE.md appears in the project root directory, and the content is the above sections. **The full text is less than 15 lines - keep this sense of length in mind, and don’t let the real project expand out of control. **
Step 3: Start Claude and verify that it actually read
Start in the project directory:
claudeAfter starting, type this command to confirm the loading status:
/memoryExpectation: You can see the ./CLAUDE.md you just wrote in the list. **As long as it is in the list, it means that Claude has indeed loaded it into the context for this session. ** This step is the officially recommended troubleshooting method - if a certain rule is not followed, the first thing to do is to check /memory to see if the file is loaded.
Step 4: Let it do a task that violates the agreement and see if it obeys the rules
Exit /memory and return to the input box, type:
给 add 函数加上类型注解Expectation: In the diff given by Claude, the type annotations are written in the project convention, and will not change the parts that are prohibited from being changed except the function signature. If it is changed according to “functions must have type annotations” in your CLAUDE.md - Congratulations, this onboarding manual has taken effect.
⚠️ In case you find that it does not click CLAUDE.md: first confirm that the file is loaded in
/memory; then check whether the rule is written too vaguely (such as “neat”); finally, see if there are two rules fighting. These three steps are the official standard troubleshooting sequence, and you can basically locate the problem if you follow them.
💡 Summary in one sentence: Go through “Create file → write less than 15 lines of streamlined rules →
/memoryto confirm loading → let it work to verify whether it obeys the rules”, if it doesn’t work, press/memory→ check for ambiguity → check for conflicts, this official sequence of troubleshooting.
08 Summary
In this article, you have understood CLAUDE.md, “Claude’s project memory” from beginning to end:
| Dimensions | Key conclusions |
|---|---|
| What is | An onboarding manual that must be read for every session, “strongly recommended” level, not an iron rule |
| Divided into several levels | User level (individual) / project level (team enters git) / subdirectory level (on demand) |
| Loading order | Splicing does not cover, the closer it is, the later it will be read, and it will take precedence in case of conflict |
| What to write | Overview / Technology stack / Commands / Conventions / Forbidden areas, delete all code that can be self-certified |
@ Quote | Used to organize the structure, regardless of context (still loaded in full) |
| Maintenance | Let Claude “Add CLAUDE.md” or edit /memory; delete outdated conflicts regularly; Be like rules, not like prose |
You should now be able to: Determine whether a piece of information should enter CLAUDE.md and which layer to put it in; write rules that are specific enough to be verified instead of empty words; use @ to reference external documents and be clear about their contextual costs; after the project has been running for a long time, you will know how to make up for it and slim down regularly. **One sentence - you can write a CLAUDE.md that Claude really wants to listen to, instead of writing three hundred lines of CLAUDE.md that no one cares about. **
Next article 19 “Context Management” - This article repeatedly mentions that “CLAUDE.md will occupy the context window” and “@ references are still fully loaded.” So what exactly is this context window, what will happen if it is full, and how to use /context and /compact? The next article will specifically talk about this workbench. Here’s a quick thought: Which one do you think consumes more tokens from CLAUDE.md or a whole conversation?
19 · Context Management: Don’t let it “amnesia” and don’t burn the token
When I first started using Claude Code, it was easy to do something stupid.
Taking over an unfamiliar medium-sized project, I thought, “Let it read the entire warehouse before starting, so that it can understand the overall situation best.” So I said: “Read all the files of this project, and then tell me the architecture.”**
The result? It really just read one file after another, and the terminal scrolled. After reading more than 20 files, it became obviously slower and sluggish. When you start to ask it to fix a login bug, it actually asks “Which file is the auth module you mentioned?” - It just read that file ten minutes ago. Before it finished its work, it lost its memory and burned a lot of tokens.
After I figured it out, I realized: The fuller the context window, the better. If it is full, it will become stupid. Today I will explain this “workbench” thoroughly - what it is, what will happen if it is full, how to use /compact and /clear to clean it up, how to check the usage in real time, and how to save tokens from the source.
After reading this article, you will get:
- An analogy that makes you think through the “context window” and what happens when it’s full
/compact(compressed),/clear(cleared), directly open a new session, when to use the three, a table explains clearly- Use
/contextand/usageto track specific occupied actions in real time + expected output - Five token-saving habits that are used every day, each of which comes from real mistakes.
- Understand what “auto-compact” is doing behind the scenes, and don’t be surprised by its sudden interruption.
01 Context Window: How big is Claude’s “workbench”
Let’s first establish this core concept.
Context window - It is the total capacity of all content that Claude can “see” at the same time in this session, calculated in token (the smallest billing unit for model processing text).
It contains not just the words you typed, but a whole bunch of stuff. The official context-window.md breaks it down very clearly and I will translate it into adult words for you:
| What to put into the workbench | When to come in | How much to take |
|---|---|---|
| System prompt words (Claude’s code of conduct) | Every time you start, you can’t see it | Fixed a piece |
| Your CLAUDE.md (global + project) | Full load at startup | Check how big the file is |
| Auto memory | Load at startup (with upper limit) | Medium |
| Every sentence you type | Sentence after sentence | Usually very small |
| Every file it reads | It appends each one it reads | Biggest head, fastest burn |
| Command output, tool results | Append after each tool call | Log/Extremely fast for large files |
Did you see that? You think the conversation is mainly “what you said”, but in fact the bulk of it is the files it reads and the command output. The previous time I asked it to read more than twenty documents, it was equivalent to filling the workbench with other engineering drawings, leaving not much room for “working”.
**Analogy: workbench size. ** Think of Claude as a carpenter working at his bench. The table is so big, the drawings, tools, semi-finished products, and the notes you handed him all have to be spread out on this table. The table is big, so he can take care of many things at the same time; when the table is full, he has to push the earlier drawing aside - and he “forgets” the information on that drawing.
How big is this table? Depends on the model you use. Most models are in the order of 200,000 tokens, and some models (such as those marked with [1m]) can reach 1 million. But remembering a sentence is more useful than remembering numbers:
**No matter how big the platform is, it has boundaries. The more stuffed it is, the dumber it will be. **
💡 To summarize in one sentence: the context window is Claude’s workbench, and the majority of it is the files it reads, not the words you say. The table has boundaries, and when it is full, it starts to “drop” early information.
02 What will happen if the workbench is full: it will become slower, stupider, and even “lose its memory”
This is the most important judgment to remember in this article: The fuller the context, the better. When it reaches a certain level, Claude’s performance will visibly decline.
Why? The more things there are on the table, the thinner the model’s “attention” is spread, and the earlier irrelevant content begins to interfere with the current task. The industry calls this phenomenon “context rot”.
How do you know it’s “declined”? I have summarized a few first-line symptoms. If you hit any one of them, you should be alert:
- It started to be inconsistent, forgetting the plan you two had clearly made before
- Answers become vague and general, with less and less details, and start talking nonsense
- Repeatedly ask what you have already answered (just like the beginning sentence “Which file is auth in?”)
- You correct the same problem more than twice and it’s still spinning in circles
For example, when we wrote a data migration script, we chatted for more than an hour and debugged it repeatedly. Later, it brought back the wrong solution that we rejected together in the first half. It’s not that its capabilities have degraded, it’s that the context has been polluted by an hour of debugging garbage.
The table is really full. What will Claude do? It will automatically compact (auto-compact) - details in Section 05. Here’s what you need to know first: It is a passive life-saving action, the timing is not up to you, and it may even interrupt you suddenly in the middle of a critical task.
So the correct posture is: Don’t wait for it to automatically compress, take the initiative. How to manage? Then go down.
💡 In one sentence: Overcrowded context will trigger “context decay” - inconsistency, generalization, and repeated questions; Instead of repeatedly correcting on a contaminated platform, it is better to take the initiative to clean up.
03 Two broomsticks: /compact compression vs /clear clearing
Clean up the workbench. Claude Code gives you two brooms. They have completely different uses. Don’t use them for mixing.
/compact: “Pack and flatten” the things on the table, but keep them
What /compact (compression) does is: summarize the current long conversation history into a streamlined summary, then replace the original verbatim record with the summary, and continue working on the same task.
Analogy: Organize the scrap paper spread out on the table into a page of key points. ** You have been discussing with your colleagues for two hours, and the table is full of useless sketches. /compact is to summarize the pile of sketches into a page of “We finally decided on A, rejected B, and the next step is to do C”, which frees up the desktop, but the conclusion is still there.
The key point is that it supports instructions to tell it what to focus on:
/compact 保留认证流程的架构决策和已确认的 API 格式,丢掉调试中的无效尝试The English example given by the official costs.md is /compact Focus on code samples and API usage (focus on keeping code samples and API usage), which means the same thing.
When to use /compact: The task has not been completed yet, but the context is almost full, but what we talked about earlier will be used later. For example, if a function is half completed, the architectural decisions made in the early stage cannot be discarded, but the command output of a bunch of trial and error in the middle can be discarded.
/clear: clear directly and start over
/clear (clear) is even more ruthless: Clear the entire conversation history, which is equivalent to opening a brand new conversation.
But don’t be afraid - /clear will not touch your CLAUDE.md and automemory, they will still be loaded automatically in new sessions. What you lose is only “the content of this conversation”, and the project specifications and long-term memory are still there.
**Analogy: For a completely new task, simply clean up the countertop and start working again. ** After the last job is done, the next job is completely out of reach. It would be more efficient to clear the entire table than to leave the previous mess alone.
The original words of the official costs.md suggest: When switching to unrelated work, use /clear to start over because “stale context will waste tokens on each subsequent message.”
There is an iron rule worth setting down here: If you correct the same question twice and it still doesn’t work, don’t waste time on this conversation. Just /clear. With the lessons learned these two times, rewrite a more accurate prompt word and ask it again. A clean table + better tips almost always win over continuing to argue in a polluted context - This is the most valuable experience in actual testing.
💡 To sum up in one sentence:
/compactmeans “package and flatten, keep and use”,/clearmeans “clear the whole thing, change the job and restart”; If it’s not right after correcting it twice, don’t hesitate,/clear.
04 Monitor usage: Use /context and /usage to see how much is left on the table
It’s too metaphysical to judge “whether it’s almost full” based on your feelings. Claude Code gives you two commands to let you see real numbers. Don’t mix up these two names.
/context: The stand is occupied by something.
/context/context will use a colored grid chart to visualize the real-time occupancy of the current context, and list it by category - how much is system prompts, how much is CLAUDE.md, how much is each MCP service, how much is the conversation history, and will also give optimization suggestions. The official context-window.md is clear: If you want to know your real context usage at any time, run /context.
A habit worth developing is: take a basic look at /context before starting a big task. If you find that a certain MCP service takes up a large area, or CLAUDE.md is ridiculously bloated, clean it up first before working on it.
There is also a
/memorycommand in the package, which is used to check which CLAUDE.md and automatic memory files are loaded at startup - use it to check if you suspect that it has “remembered something wrong”.
/usage: See how many tokens/how much money was burned in this session
/usageThe Session block at the top of /usage gives the token usage statistics of the current session, which are also converted into US dollars based on local estimates. The official costs.md looks roughly like this:
Total cost:            $0.55
Total duration (API):  6m 19.7s
Total duration (wall): 6h 33m 10.2s
Total code changes:    0 lines added, 0 lines removed
Description of expected output: Total cost is the estimated cost of this session (calculated locally, which may differ from the actual bill. The authoritative figure is subject to Claude Console); Total duration (API) is the actual time it takes to call the model; Total duration (wall) is the total time you have opened this session.
⚠️ Reminder: The session cost for Pro/Max subscribers is included in the subscription. This dollar amount is not directly related to your bill, just look at the relative magnitude. We have talked about the specific packages and billing in Part 06. This article only looks at tokens from the perspective of “context”.
Do you find it troublesome to type manually every time? The official also supports the permanent display of context usage in the status bar (statusline), so that it remains on the screen. Please see the official statusline documentation for specific configuration methods, which will not be discussed in this article.
💡 One sentence summary:
/contextlooks at “what is occupying the stage”,/usagelooks at “how many tokens/how much money was burned this time”; Before starting a big task, take a look at the basics of/context.
05 Auto-compact: It will save itself, but don’t count on it
“Automatic compression” has been mentioned several times before. This section explains what it is.
auto-compact - is Claude Code’s built-in life-saving mechanism: When the context is about to reach the upper limit of the window, it will automatically summarize the conversation history into a summary, freeing up space to continue working, saving you from hitting the wall and reporting an error. The official costs.md lists it alongside prompt caching as one of Claude Code’s two means of “automatically optimizing costs”.
**Analogy: automatic unloading on the assembly line. ** The conveyor belt is almost full, and the system collects and compacts the old materials by itself to prevent the entire line from getting stuck. You don’t have to worry about it, it triggers automatically.
It sounds very considerate, but I advise you not to rely on it for two reasons:
First, the timing of its triggering is not up to you. It’s possible that you were letting it do a critical step, and the stage was just full, so it stopped and compressed first - the rhythm was completely interrupted.
Second, automatic compression is “commandless” compression. The moment it triggers is precisely when the context is at its fullest and the model is at its dullest. At this time, it decides on its own what to throw away and what to keep, and it may suppress the things you think are important.
So the correct approach is to take the initiative: when you feel that the conversation is getting longer and /context displays a higher occupation, do /compact yourself first, and give it instructions to tell it to retain the key points. Active compression has two benefits - you have the final say when it happens, and you have the final say what is retained.
There is another trick that is more worry-free: Write compression preferences directly into CLAUDE.md. The official costs.md gives a way to write it by adding a paragraph to CLAUDE.md:
# Compact instructions

When you are using compact, please focus on test output and code changes
In this way, every time you compress (no matter manual or automatic), it will give priority to retaining the content you specify, which is equivalent to providing insurance for automatic compression. For example, writing “Keep confirmed solution decisions and interface conventions during compression” in the CLAUDE.md of commonly used projects will save you the need to manually remind them every time.
💡 In one sentence: Automatic compression is life-saving, but it interrupts you and may also suppress important information; instead of waiting for it, it is better to take the initiative to
/compactwith instructions, or hard-code the retention preferences in CLAUDE.md.
06 Five tips to save tokens: Don’t let the table fill up so quickly from the source
Cleaning up the table is the remedy, but not letting it fill up so quickly is the best policy**. The following five tips can be used every day. Each trick is based on the “context” perspective and has nothing to do with the package price.
**The first tip: Don’t take big projects when practicing. ** It’s the same as Part 07 - during the learning and testing phase, build a toy project with three or five files. There are few files, it reads less, the table is clean, and you can clearly see what it does. The root cause of the “amnesia after reading more than 20 documents” at the beginning is that I picked up an unfamiliar medium-sized warehouse.
**Second tip: Use @ to point to the file accurately, don’t let it fill the warehouse to find it. ** Rather than “fix the login bug” and let it go through files one by one, it is better to directly @src/api/auth.ts fix the 401 problem. The official costs.md puts it very straightforwardly: Fuzzy requests trigger broad scans, specific requests make it work efficiently with minimal file reads. @ just fixes its gaze directly on that file.
**Third tip: Don’t stuff too many demands at once. ** Throw away five unrelated tasks in one go. The files it reads and the output it generates will blow up the table. The ** is divided into five small questions, and each time one piece of ** is done, the table is always fresh.
**The fourth trick: Split long tasks and clear them after completing one section. ** Don’t expect to carry a big feature from start to finish in one session. After completing a relatively independent stage, close /compact once; cut to a completely irrelevant part, and reopen /clear.
**The fifth trick: Throw lengthy operations to the subagent. ** Tasks such as running tests, reading a lot of logs, and checking documents, which will produce massive output, are handed over to the subagent - ** It tosses on its own independent workbench, and only brings the conclusion summary back to your main conversation **. In the example given by the official context-window.md, the subagent reads 6100 tokens of the file, and only 420 tokens are occupied when returning to the main context. There is a special article behind the sub-agent, but here we first know that it is a context-saving tool. (Link will be added in due course)
Compare “remediation” and “prevention” together, and you will know where to put your efforts:
| How | Nature | When |
|---|---|---|
/compact | Remedy·Compression retained | The task is endless, the context is too high, and the previous article needs to be used |
/clear | Remedy·Clear and restart | Cut to irrelevant tasks, or the pollution is too heavy |
Open a new session directly (exit and then claude) | Prevention·thorough cleaning | If you want an absolutely clean table, don’t even use this memory trace |
@ refers to the file accurately | Prevention·read less files | This should be done every time when making a request |
| Toy project practice | Prevention·from the source | Learning and testing stage |
| Subagent runs lengthy tasks | Prevention and isolation of output | Run tests / read logs / check documents |
💡 To sum up in one sentence: Cleaning up the table is a remedy, reading less files, breaking down small tasks, and throwing them to sub-agents is a prevention; the most important muscle memory to develop is-use
@to point to the file when making a request.
07 Hands-on: Go through context management in three steps
You can’t remember it just by watching it. A minimal process is used below to allow you to see with your own eyes how the context increases and how /compact suppresses it**. Start claude in any project directory and follow along.
Step 1: Check the basics before starting
After starting Claude, the first thing to do is:
/contextExpected: The terminal lists the category occupancy of the current context - you will see that system prompts, CLAUDE.md, etc. have already occupied a section (it is occupied before chatting, this is normal), and a total usage and optimization suggestions are given at the bottom. **Write down this initial number. **
Step 2: Deliberately “feed” it some content and see the changes
Let it read a few files and chat for a few rounds, such as:
读一下这个项目的主要源码文件,给我讲讲整体结构Wait until it has finished reading and answering, then type again:
/contextExpectation: The usage has obviously increased, and the numbers in the dialogue history and file columns have become larger**. This is the process of “filling the workbench”, you can see it with your own eyes.
Step 3: Use /compact to press it back
/compact 保留这个项目的整体结构结论,丢掉逐个文件的原始内容Expected: A prompt similar to “Conversation compacted” will appear on the terminal. The compression is completed silently in the background and the summary will not be displayed to you. After compressing, take a look at /context. The occupation of the conversation history column should be reduced - the structure and conclusion are still remembered, but the original bytes of each file are compressed into a summary.
Contrast verification: Run /context once before and after compression. If the number of tokens in the conversation history is higher than before and then lower, it means that /compact has taken effect. I want to verify that it “has not lost its memory” and then ask “What is the structure of the project you just summarized?”, it should still be able to answer it.
⚠️ One detail: compression is a lossy operation. It retains the focus and general context you specified, but the verbatim output from earlier tools is lost. So the really important conclusion is to develop the habit of going to CLAUDE.md as mentioned in Chapter 18 - directly ask Claude to “add CLAUDE.md”, or use
/memoryto edit it yourself, which is safer than pressing it in the conversation.
💡 In one sentence: run
/context→ feed content →/compact→ then/context, you will see with your own eyes how the context increases and how compression pushes it back; compare the number of tokens in the conversation history before and after, and you will know whether it has taken effect.
08 Summary
In this article, we have touched the “Context Window” workbench from the inside out:
| What you learned | Explained in one sentence |
|---|---|
| What is the context window | Claude’s workbench, the main reason is that the file it reads is not your words |
| What happens when it’s full | Trigger contextual decay—slowness, generality, inconsistency, amnesia |
/compact | Pack and flatten for later use, you can specify the key points to be retained with instructions |
/clear | Clear the entire job and restart, leaving CLAUDE.md and memory unchanged |
/context · /usage | One looks at “what is occupied”, the other looks at “how much is burned” |
| Automatic compression | Life-saving mechanism, but it will interrupt you and may miss the point. It is better to take the initiative |
| Save token | Toy project, @ refers to files, don’t stuff too much, split tasks, lose sub-agents |
You should now be able to: Understand what is in the context window and why it is full. Claude will become stupid; use /compact when it is time to compress and /clear when it is time to restart; use /context and /usage to monitor the occupancy in real time; and use a bunch of token-saving habits from the moment the request is made, so that there is always room for work on the platform.
In the final analysis, the essence of managing context is just one sentence: save Claude’s limited attention on things that really matter. **
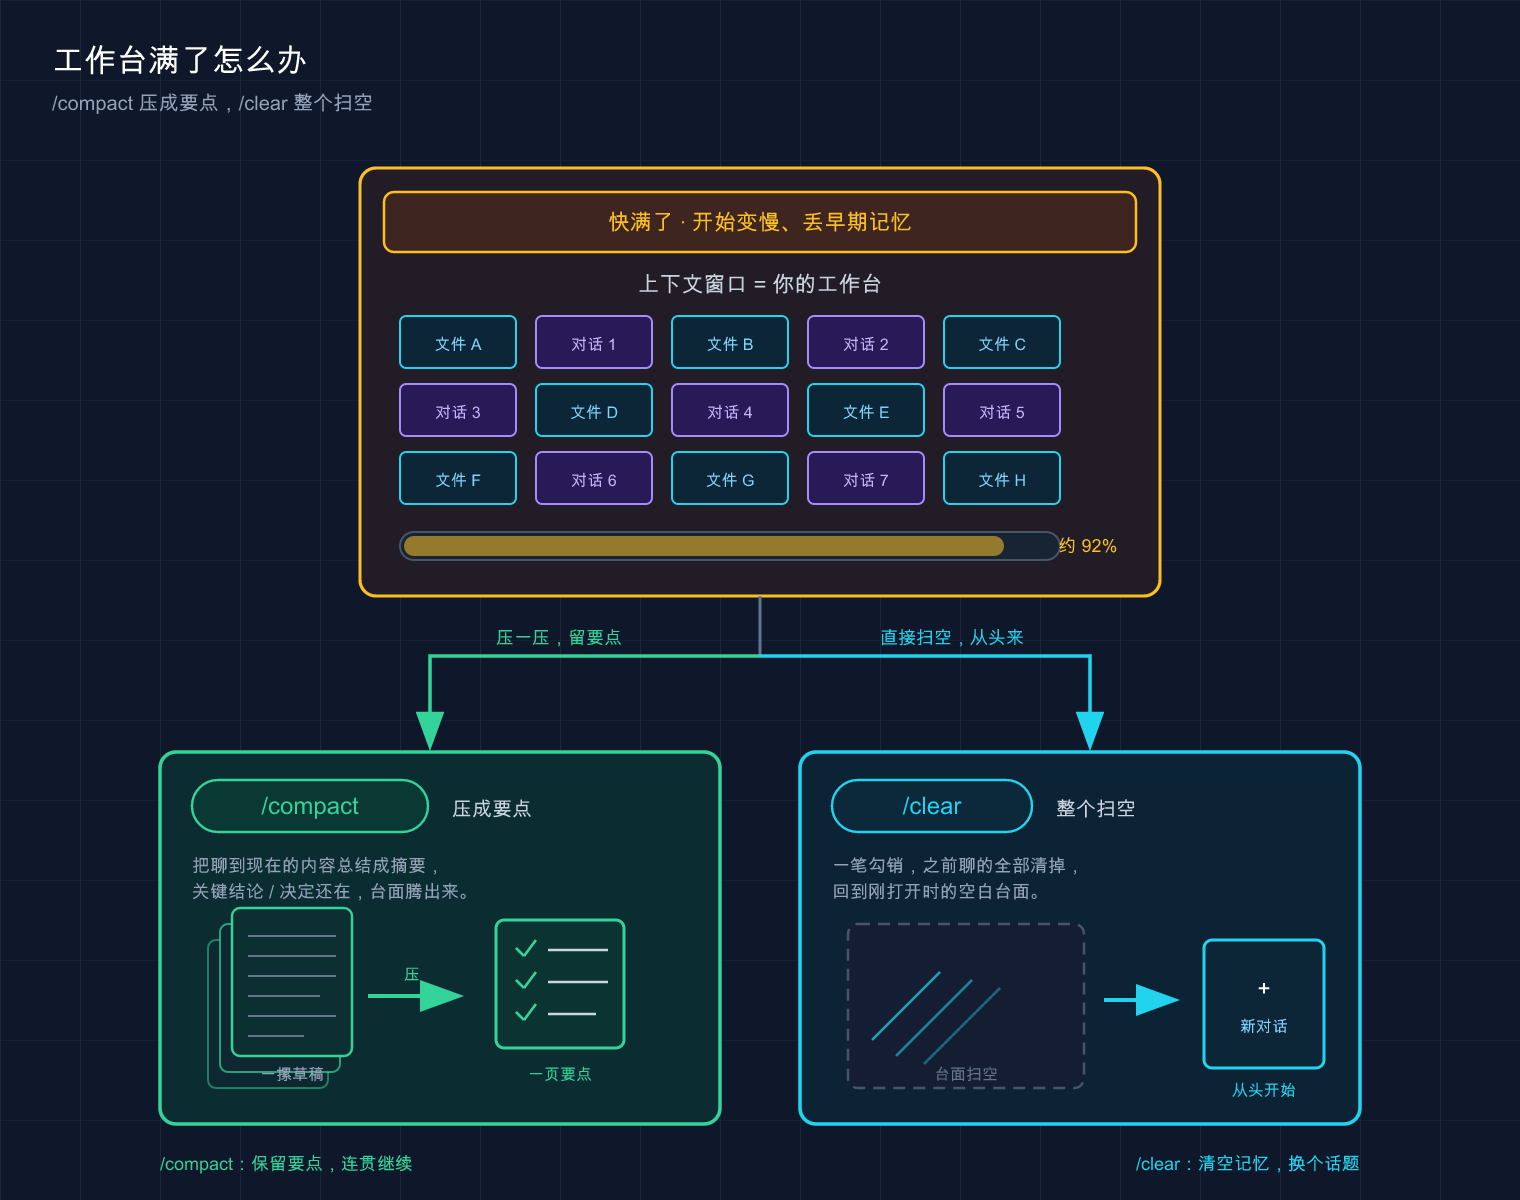
This picture compares the context window to a workbench: it is full of files and conversations (about 92% in the picture), and you rely on /compact to compress a pile of chats into one page of highlights (keep it for continued use), or /clear to clear the entire table (start from scratch)** - the former keeps the information, the latter the picture is clean.
Next article 20 · Permission Configuration - In this article we are concerned with “how much Claude can remember”, and in the next article we will be concerned with “how much it can do”. When it reads files, changes code, and runs commands, it has to ask you first, and which ones can be released. How to set up a set of permission rules that are both safe and convenient? I’ll leave you with a question to think about first: **Are you willing to let it run git push directly without your nodding? **