03 | Claude Code in 16 Hours: Run a First Task and Choose the Right Entry Point
Complete a first verifiable task in a low-risk project and choose an entry point that fits where you work.
07 · First use: Run through the first example
Brothers, the first few articles are all foreshadowing - installed, logged in, and selected the package.
The tools are there, but you probably still feel a little confused: How do you use this thing? I open the terminal and what happens? **
To be honest, when many people ran Claude Code for the first time, they stared at the cursor for almost a minute, not knowing what to type. Afraid of messing up the code if I say the wrong thing.
Don’t be nervous. Today we will go through the simplest process: build a small project with only a few lines of code, let Claude understand it first, and then let it help you change a line. The whole process takes no more than five minutes, and you will have the first successful experience in your life of “Claude helped me change the code and got it correct”. That’s enough - once you get through it once, everything else will fall into place.
After reading this article, you will get:
- A complete set of action procedures from starting the terminal to completing the first task, just follow it
- Understand what each piece of the “Welcome Screen” is after Claude Code is launched
- A hello world-level actual combat that works and gives the expected output
- Several key reminders to help you “avoid getting into trouble the first time” (how to grant permissions, how to revoke errors if they are corrected)
01 First build a “toy project”
Let’s talk about the conclusion first: For first time use, don’t use your formal project to practice, build a toy project.
Why? Because there are so many formal project files and complex dependencies, even if Claude reads it for a long time, you can’t clearly see what it does. The toy project only has two or three files. You can understand what has been changed in it at a glance - this is for learning.
**Analogy: Learn to drive first by going to an empty field. ** No one gets on the highway as soon as they get their driver’s license. First find an empty space with no one around, get familiar with the accelerator and brakes, and know how much to turn the steering wheel. A toy project is your empty space - screw it up, just rebuild it.
For people who have never touched the command line, no one who practices on a company project for the first time will not panic - just the few seconds of scrolling when Claude reads the file are enough to make the palms of the hands sweat. Another way is to create a small file with three lines of code first, run it all in five minutes, and you will gain confidence instantly.
Open your terminal (Terminal on Mac, Git Bash or PowerShell recommended on Windows) and type the following lines:
mkdir hello-claude
cd hello-claude
The meaning of these two lines is: Create a new folder called hello-claude and enter it. mkdir = make directory (create a folder), cd = change directory (enter a folder).
Next, create the simplest Python file. For Mac/Linux:
echo 'def add(a, b):
    return a + b' > main.py
Writing multiple lines for echo in Windows PowerShell is a little troublesome. You can directly use Notepad to create a new main.py and paste the following two lines into it and save it:
def add(a, b):
    return a + b
💡 Summary in one sentence: The first time I use Claude Code, I first build a toy project with two or three lines as a “training ground”. If it is broken, it can be rebuilt without panic or trembling.
02 Start Claude and understand the welcome screen
The project is built, now start Claude Code in the same folder. Confirm that your terminal is currently in the hello-claude directory (it is still there after cd was entered just now), type:
claudeNote: Be sure to start claude in the project directory, do not start it naked on the desktop or home directory. Because Claude Code treats your current directory as a workspace - it reads files wherever you start it. This is the most common pitfall for novices: start it in the home directory and then ask “What does this project do?” Claude was confused because the home directory is not a project at all.
**Analogy: When you invite a decorator to come to your home, you must first lead him to the house to be decorated. ** You can’t argue with him for a long time at the gate of the community. He has to stand in the house to know which wall to smash and where to route the wires. cd into the project directory and then start claude, which is to “bring the master in”.
After startup, you will see a Welcome Screen, which according to the official documentation contains your session information, recent conversations, and the latest update prompts. For beginners, you only need to recognize three things:
| What you see | What are you going to do |
|---------|--------|-----------|
| The bottom input box/cursor | The place where you talk to Claude | Type directly and hit Enter to send |
| /help in the prompt | View all available commands | Type a command if you can’t remember it |
| /resume in the prompt | Continue a previous conversation | Leave it alone for the first time |
The input box is the main battlefield. You don’t need to learn any special syntax, just think of it as a chat box that can read your code - just ask in plain English.
If you want to make sure you are in the right place, you can ask the simplest question first:
这个项目做什么?Claude will read the file in the current directory (here is main.py), and then tell you what this project is for. You don’t have to manually “feed” files to it during the whole process - The official documentation clearly states: Claude Code will read the project files by itself as needed, and you don’t have to manually add context.
💡 Summary in one sentence: Type
claudein the project directory to start, and recognize the “input box +/help” to start the work; It will read the file by itself, you just need to use vernacular to express your requirements.
03 Let Claude read the code first
The first real task is not to let it change the code, but to let it interpret the code.
Why explain first? Two reasons: First, it allows you to confirm that Claude has indeed read your file** (rather than making it up); second, there is zero risk in interpretation tasks** - it only reads and speaks, and will not touch you a word, so it is most suitable for the first time to test the waters.
**Analogy: On the first day when a new colleague joins the company, you will not directly give him the core module to refactor. Instead, you will first ask him to “read the code and tell me what this piece of work is for.” ** Listen to him speak once, and you will know whether he understands it and whether he is reliable. Let Claude explain the code, this is the “first day of employment” action.
Type in the input box:
解释 main.py 这个文件在做什么,用新手能理解的方式说明Enter. Claude will read main.py and then give you a vernacular explanation. The main idea is: an add function is defined here, which receives two parameters a and b and returns the result of their addition.
This step is successful, which means that two things are established: Claude Code is installed correctly, the login status is normal, and it is indeed reading your real file. Once the foundation is stable, the next step is to dare to let it change.
Divide the instructions for Claude Code into three categories, and you will have a clear idea when using them in the future:
| Type of command | What it does | Examples | Risks |
|---|---|---|---|
| Explanation | Let it read and tell you | ”Explain this code” | Zero risk, no files |
| Modification | Let it modify the existing code | ”Refactor this function” | Moving files, approval required |
| Generative | Let it write new things | ”Add a test case” | Can create/modify files, need approval |
💡 Summary in one sentence: For the first task, use the “interpretation type” to test the waters - confirm that it has read your file and the foundation is stable, and then let it do it.
04 Let Claude change a line of code (key: it will ask you first)
Now comes the climax: Let Claude actually change the code.
Following the above conversation, type directly:
给这个函数增加类型注解,并补充基本的错误处理At this time the most critical scene comes - Claude will not directly change your file. It will:
- Find the file that needs to be changed (here is
main.py) - Let me show you what you plan to change it to in the form of a diff
- Stop and wait for your approval
- Once you click “Agree”, it is actually placed.
This is an iron rule repeatedly emphasized in official documents:
Claude Code always asks for permission before modifying a file. You can approve individual changes, or enable Accept All mode for this session.
**Analogy: The intern will ask you a question before taking action. ** A reliable intern will not change the production code without your consent - he will come over with the revised manuscript: “Boss, I want to change it like this, do you think it will work?” You nod before he moves. Claude Code is this kind of “ask first, act later” intern by default.
You will see a prompt for you to choose, which usually means these options:
| Your choice | Effect | When to use |
|---|---|---|
| Agree / Yes | Apply this change | I understand the diff and feel there is no problem |
| Agree, and don’t ask again in this session | Subsequent changes are automatically applied | You already trust it and want to speed it up |
| Reject / No, and tell it the reason | No changes, you can add requirements | There are things you don’t want in the diff |
For the first time, I strongly recommend that you just choose “Agree” honestly and don’t rush to “Accept All”. To be honest, when you first get started, it is easiest to save trouble and set the permissions as loosely as possible (I will talk about --dangerously-skip-permissions in a later chapter, as the name suggests “dangerously skipping permissions”). As a result, it changes five or six files in a row without you looking carefully. By the time you react, you can no longer tell which changes you want and which ones it added on its own initiative**. There is only one lesson: the less familiar the child is, the more important it is to stop it step by step.
Tips for understanding diff: Red / - starts with deleted old lines, green / + starts with new lines added. Your main.py will probably start with:
def add(a, b):
    return a + b
It becomes something like this (the specific writing method of Claude may be slightly different, but the meaning is the same):
def add(a: float, b: float) -> float:
    if not isinstance(a, (int, float)) or not isinstance(b, (int, float)):
        raise TypeError("a 和 b 必须是数字")
    return a + b
A type annotation (a: float) has been added, and basic error handling has been added (an error will be reported if it is not a number). At this moment, you have completed your first “human-computer collaboration to change the code”.
💡 Summary in one sentence: Claude always ask you first before changing files - honestly choose “Agree” for the first time, understand the diff and then nod, don’t try to turn on full auto quickly.
05 What to do if you make a mistake: two “regret medicines”
The biggest fear of novices is: **What if it is corrected wrongly or messed up, and I can’t see it, what will happen? **
Don’t worry, there are two regret medicines, and they are very easy to use.
**Article 1: Just say “change it back” in the dialogue. ** Claude remembers what it did during this session. If you are not satisfied, tell it directly in plain language:
刚才的改动我不满意,帮我改回原来的样子It will roll back the changes. Analogy: Tell a colleague, “The version you just made doesn’t work, so stick to the original one.” - You don’t have to manually cut it back line by line.
**Item 2: Use checkpoints to backtrack. ** This is Claude Code’s “game save” mechanism - it will automatically record the state before each file is edited, and you can jump back with one click.
**Analogy: Loading game save files. ** You saved the file before the boss battle. If you lose, you don’t have to start over from the beginning. You can just load the file and return to the save point. Checkpoints are files that Claude secretly saves for you before taking action.
How to trigger? According to official documentation:
/rewindOr when the input box is empty, press the Esc key twice, and the backtracking menu will pop up.
⚠️ One detail (clearly mentioned in the official documentation): If there is text in the input box, double-clicking Esc clears the text, but does not open the backtracking menu. So to backtrack, first make sure the input box is empty.
One more thing needs to be made clear - Checkpoints can only undo file changes made by Claude through its editing tool, which is not the same as Git. The official advice is spot on:
Think of checkpoints as “local undo” and Git as “permanent history”.
In other words, checkpoints are suitable for immediate regrets such as “Oh, this step has been changed, jump back”; the really important progress must be saved by Git submission (how to use Git, I will talk about it later).
| Regret Medicine | How to use | Suitable scenarios | Limitations |
|---|---|---|---|
| Said “change it back” in the dialogue | Type directly to tell Claude | Just finished the change, but I am not satisfied with one or two things | Rely on it to understand what you mean |
Checkpoint /rewind | Type /rewind or double-click Esc in the empty input box | Want to accurately jump back to a certain state | Only the files changed by Claude, not Git |
💡 One-sentence summary: Don’t panic when you make a mistake, just “change it back” + checkpoint
/rewindto get the bottom of it; but the real progress should be handed over to Git for archiving**.
06 Get started: Complete your first mission in five minutes
Just watch and practice fake moves. Next, string the previous sections into a complete process that can be followed and has expected output. Open a terminal and follow along.
Step One: Build the Toy Project (Mac/Linux)
mkdir hello-claude
cd hello-claude
echo 'def add(a, b):
    return a + b' > main.py
Windows users: mkdir hello-claude and cd hello-claude, create main.py using Notepad and paste the two lines of Python.
Expected: There is a main.py in the hello-claude folder, and the content is the two lines of the add function. You can type ls (or dir on Windows) to confirm that the file is there.
Step 2: Start Claude Code
claudeExpected: A welcome screen appears with an input box and cursor at the bottom. If you are prompted to log in, it means that the previous login steps have not been completed. Go back and go through the login in Part 02.
Step 3: Let it interpret the code
Type in the input box:
解释 main.py 这个文件在做什么,用新手能理解的方式说明Expected: Claude reads main.py and tells you in vernacular that this is a function that “adds two numbers”. See it says exactly what the add function does = success.
Step 4: Let it change the code and approve it
给这个函数增加类型注解,并补充基本的错误处理Expected: Claude gives a diff (red - for old lines, green + for new lines), then stops and waits for you to choose. After understanding, select “Agree/Yes”.
Step 5: Confirm implementation of changes
Exit Claude (type exit or press Ctrl+D) and return to the terminal to view the file:
cat main.py(Windows PowerShell uses type main.py)
Expected: Type annotations (like a: float) and error handling (raise TypeError(...)) appear in main.py. ** Matches the diff you just approved = the whole process is passed, congratulations! **
⚠️ In case of stuck permission error (such as
Error: EACCES: permission deniedseen on Mac/Linux), the specific modification method varies depending on the scenario. The “Frequently Asked Questions” will be explained in detail later. Here, you should first know that there is such a pitfall.
💡 Summary in one sentence: Follow the five steps, running through is more important than understanding - after getting the first successful experience of “Claude helped me correct it”, the rest will fall into place.
07 Summary
In this article, you have done one thing: Completely completed the first task of Claude Code - from building the project, starting it, explaining the code, to modifying the code and approving it.
Let’s review the core actions together:
| Steps | Actions | Key points |
|---|---|---|
| Build a project | mkdir + cd + create a file | Practice with a toy project first |
| Start | Type claude in the project directory | Where you start, it reads there |
| Explanation | ”Explanation of xxx file” | Zero risk, first make sure it reads the file |
| Modify | Make requests in plain English | It will diff first and wait for your approval before taking action |
| Regret | ”Change back” / /rewind | Checkpoint is local undo, Git is the permanent history |
You should now be able to: Open a terminal, start Claude in the correct directory, use natural language to let it read and modify a piece of code, understand the diff it gives, and know how to go back if you make a mistake. This set of actions is the minimum core that you will use in all future Claude Codes - The fancy functions that follow are essentially additions to this cycle of “asking for requirements → viewing diff → approving/repenting”.
Next article 08 “VS Code Integration” - The command line works, but you may be more accustomed to writing code in the editor and looking at diff to see it more clearly. The next article will teach you how to install Claude Code into VS Code and let it work side by side with your code.
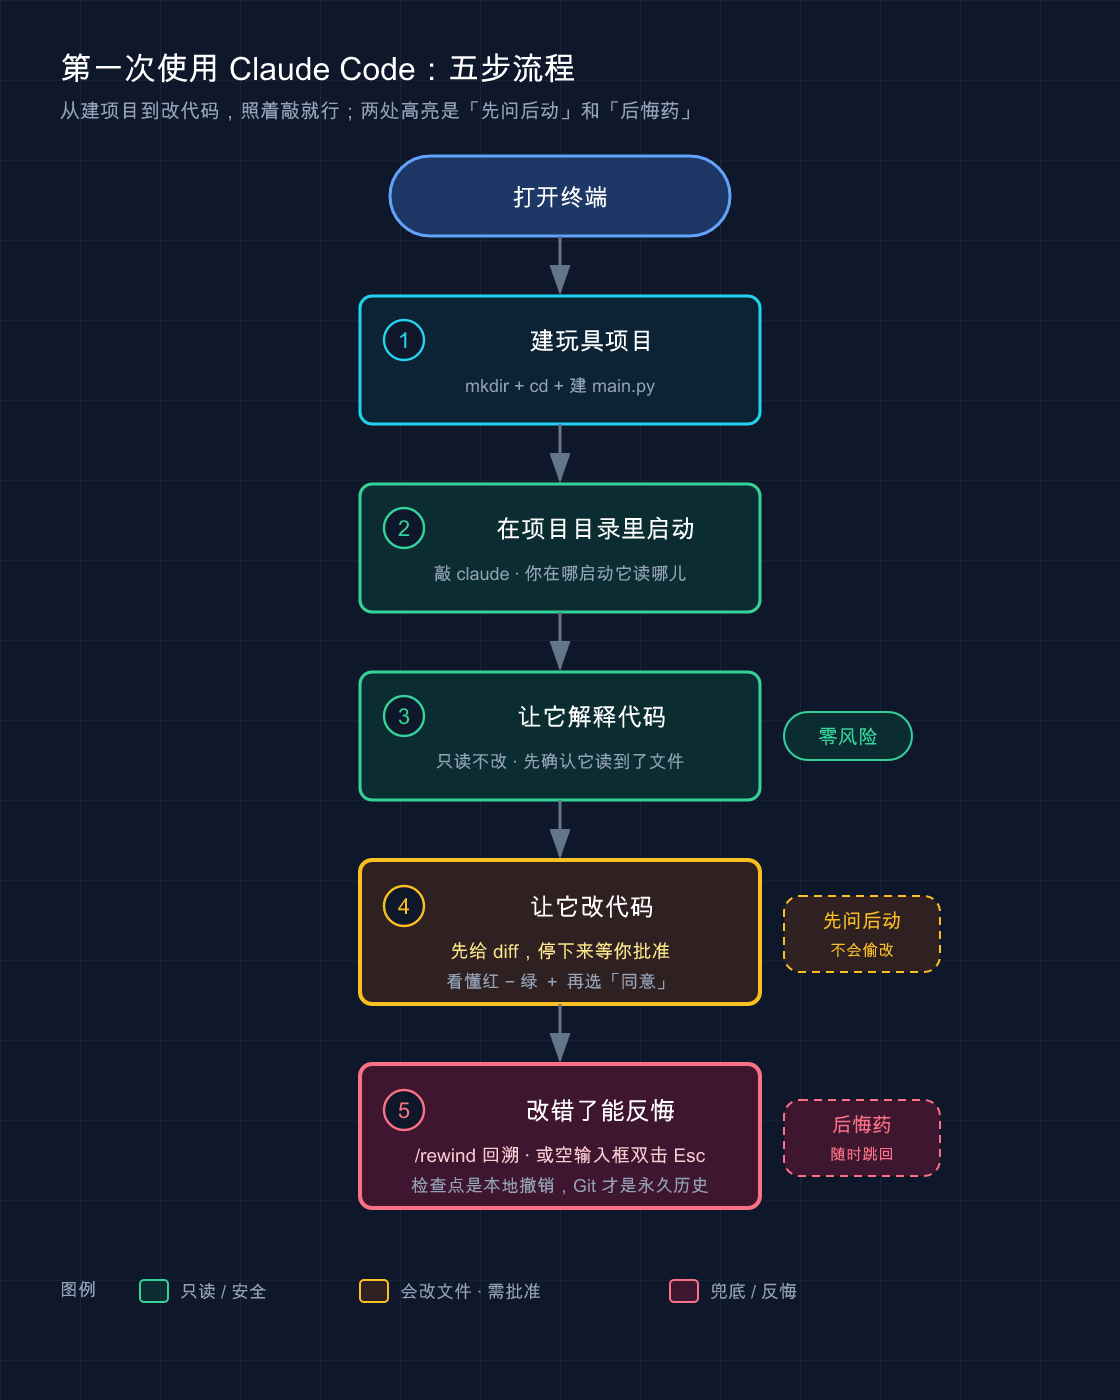
This picture connects the five steps of this article into a vertical process: build a toy project → start claude in the project directory → let it explain the code (green, read-only, zero risk) → let it change the code (amber highlight, wait for your diff to approve it first, that is, “ask first, act before”) → use /rewind to correct mistakes and backtrack (rose red highlight, “regret medicine”). The two highlights are the safety guardrails that novices should remember most.
08 · VS Code integration
When I first started using VS Code for extensions, it was easy to do something stupid.
Claude Code is running well in the terminal. After installing the extension, I want to try the graphical interface. I open an empty folder and scroll left and right, but I can’t find the official “Spark icon” (the spark-shaped icon in the toolbar, the entrance logo of Claude Code in the IDE). At this time, it is easy to think that the installation is broken. After uninstalling and reinstalling, restarting, and clearing the cache, I struggled for almost 20 minutes. Finally, I flipped through the document and discovered that the icon only appears when you open a specific file. Simply opening the folder is not enough. Looking for icons in an empty workspace, I can’t find them for the rest of my life.
To put it bluntly, VS Code integration is not difficult, but it and the terminal are two sets of interactive logic, and some “taken for granted” will make you stuck at the very beginning. This article will mark these pitfalls for you in advance.
After reading this article, you will get:
- Complete steps to install the Claude Code extension in VS Code (including Cursor and other branches), plus a troubleshooting list for “icon not found”
- How to use the three unique features of the graphical interface: side-by-side diff (review changes line by line),
@mentions, and plan review - A comparison table of “Which extension vs CLI should I use?”, plus a set of commonly used shortcut keys
01 First figure out: what is the relationship between extension and CLI
“I already know how to use claude in the terminal, do I still need to install the extension?” Let me first conclude: Extensions do not replace the CLI, but add a graphical interface to it. When installing the extension, the CLI will be brought along, and the two share the same ~/.claude/settings.json configuration; the conversation history can be restored, but it is not synchronized in real time - if you are halfway through the conversation in the extension, you can run claude --resume in the terminal to actively continue the conversation.
**Analogy: One kitchen, two ordering windows. ** CLI is to place orders at the kitchen window - fast, comprehensive, and you can order everything; the extension is the lobby waiter, who can help you make the menu illustrated with pictures and text, and make it more intuitive to view the order progress. However, there are some “hidden menus” that can only be ordered by standing at the window. **The kitchen is the same and the dishes are exactly the same. **
When to use which one? The official gave Zhang an ability comparison, which is summarized as follows:
| Features | CLI (Terminal) | VS Code Extensions |
|---|---|---|
| Commands and skills | All | Subsets (type / to see what’s available) |
| MCP server configuration | Complete | Partial (added with CLI, managed by /mcp in the panel) |
| Checkpoints | Support | Support |
! bash shortcut keys | Supported | Not supported |
| Tab completion | Supported | Not supported |
| Side-by-side diff, selected code as context | Requires connection to IDE | Native, ready to use out of the box |
In a word: For “working with files” such as writing code and reviewing changes, extensions are obviously easier to use; bash shortcut keys and tab completion such as !ls are only available in CLI. The general usage is to mainly open it in the extension. If you want to run commands in batches or use commands that are not included in the extension, just type claude directly on the integrated terminal - the history is accessible and seamless switching is possible.
💡 In one sentence: Extension and CLI are two faces of the same engine. They share history and configuration and can be switched at any time according to the work at hand. There is no need to choose one or the other.
02 Installation: Three postures, plus troubleshooting if the icon cannot be found
Take a look at the version before installing
Official mandatory requirements: VS Code 1.98.0 or higher, versions lower than this cannot be installed or will not work (click “Help → About” to see the version number). When you open the extension for the first time, you will be asked to log in to your Anthropic account; the company uses third-party providers such as Bedrock and Vertex AI, and the configuration methods are different and are mentioned separately at the end.
Three installation methods
Method 1: Search in the application market (most stable, recommended for novices)
Press Cmd+Shift+X (Mac) or Ctrl+Shift+X (Windows/Linux) in VS Code to open the extension view, search for Claude Code, and click Install.
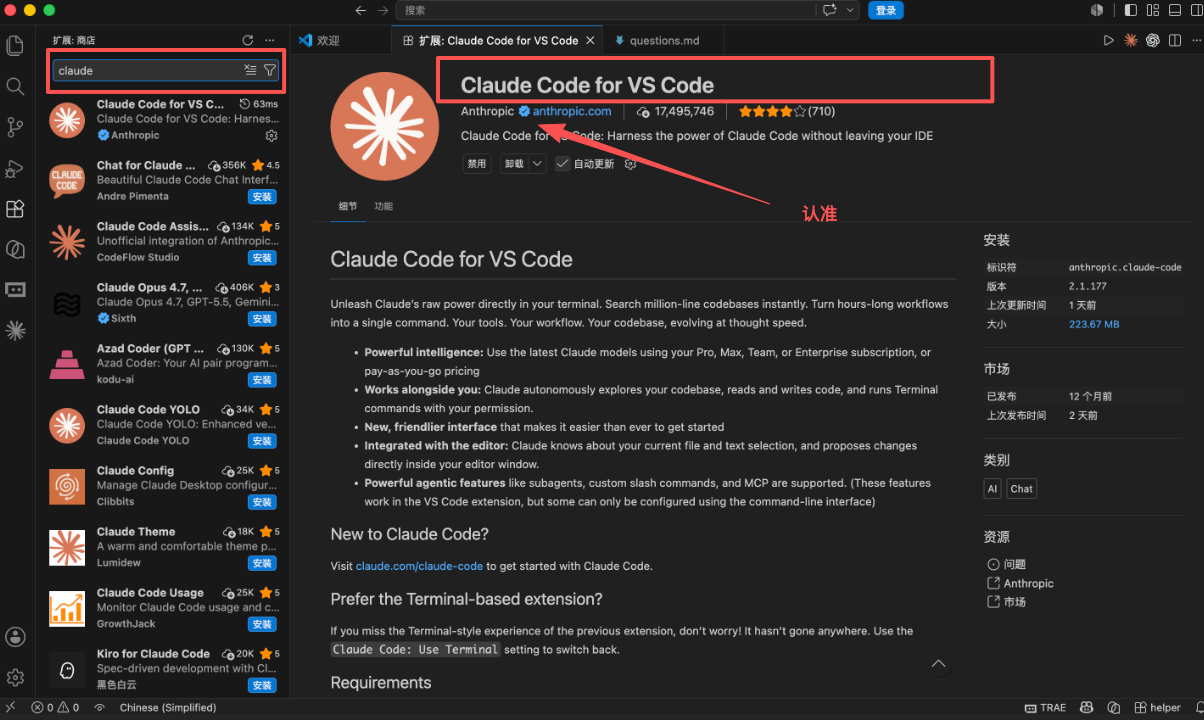
The picture above is what it looks like when searching for Claude Code in the extended view: the red box that says “Claude Code for VS Code” and the publisher with a blue certification check mark Anthropic are official, so look for it and click on it to install it.
Here is the easiest pitfall for beginners: Search for Claude Code and a bunch of extensions with similar names will pop up. Make sure the publisher is Anthropic and don’t pretend to be a third-party counterfeit.
Method 2: Click the link to install directly
When VS Code is open, clicking the link vscode:extension/anthropic.claude-code will jump directly to the extension installation page (Cursor replaces vscode: with cursor:).
Method 3: Non-mainstream editor/when it cannot be installed
Extensions can also be installed in other branches of VS Code (Cursor, Devin Desktop, Kiro, etc.) - search for Claude Code in their extensions view, or install from the Open VSX Registry. If you can’t install it, don’t give in. The official solution is to run claude directly on the integrated terminal.
Domestic tips: Installation, login authorization, and then letting Claude work must be connected to the Anthropic service. Magic Internet access is required for the entire process, which is consistent with the terminal version.
Can’t find the icon after installation? Check this list
This is the pit at the beginning. After installation, the extension will not pop up by default, so you have to call up the panel yourself. The fastest way: First open a specific file, and then click the Spark icon (a small icon that looks like a spark) in the toolbar in the upper right corner of the editor.
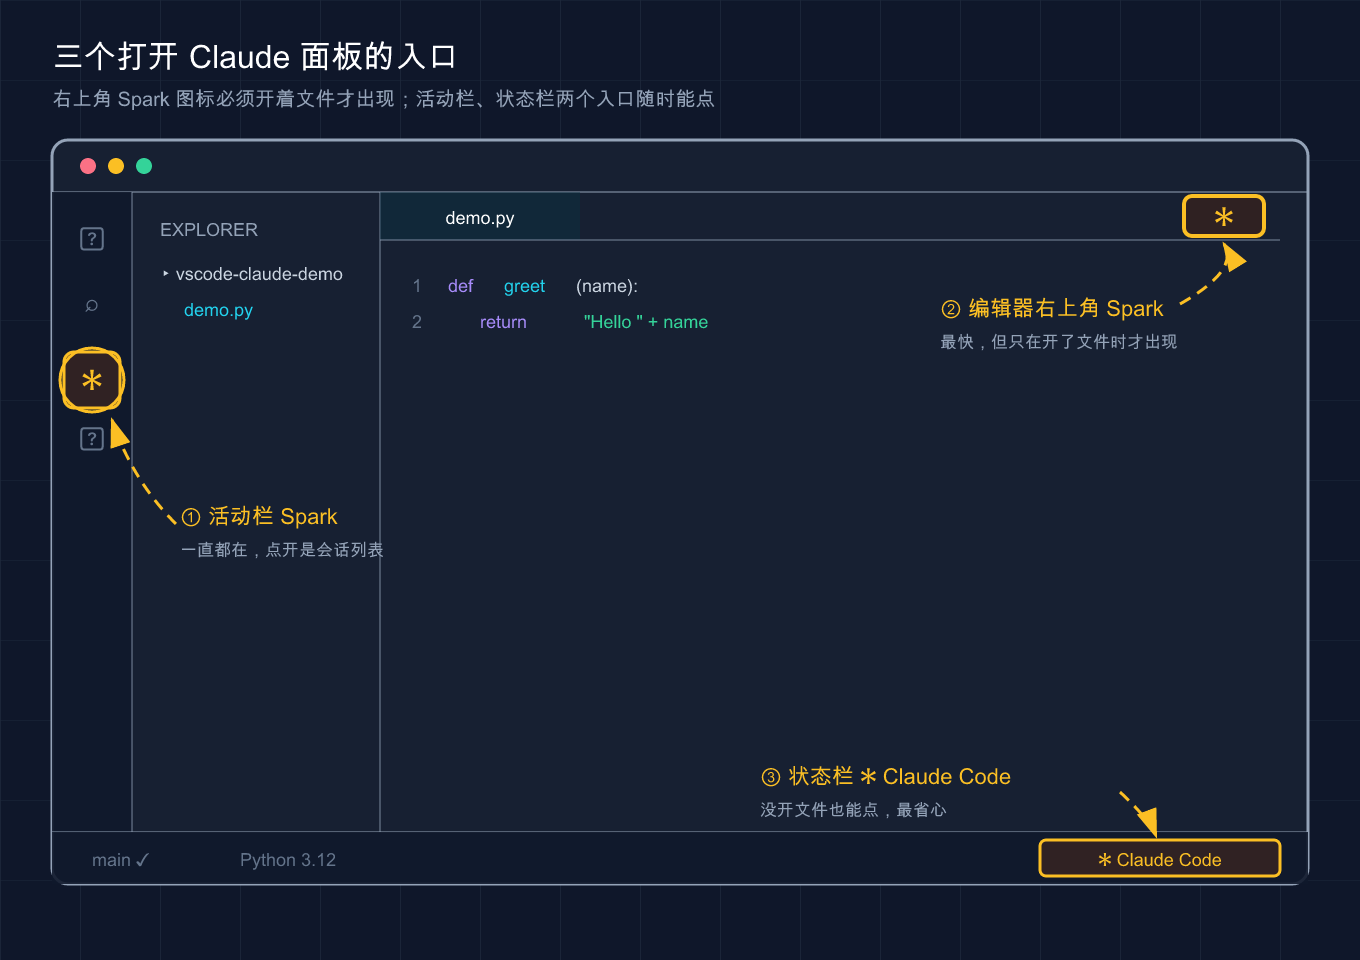
The above picture marks the locations of the three entrances: the Spark icon in the upper right corner of the editor (②, the fastest but only appears when the file is open), Spark in the activity bar (①, always there), and ✱ Claude Code in the status bar (③, you can click it even if the file is not open).
**The key point is: the Spark icon only appears when you open the file, not just opening the folder. ** If you still can’t see it, check it in the official order:
| Phenomenon | Troubleshooting actions |
|---|---|
| There is no icon in the upper right corner of the editor | Open a file first (not just the folder) |
| File opened or not | Confirm VS Code ≥ 1.98.0 (Help → About) |
| The version is enough | Run Developer: Reload Window in the command panel to reload the window |
| Reloading is useless | Temporarily disable other AI extensions (Cline, Continue, etc.), which may conflict |
| The workspace is in “restricted mode” | The extension does not work in restricted mode, the workspace needs to be trusted |
If you really can’t find the Spark icon, there are two alternative entrances:
- The Spark icon in the activity bar (the vertical icon on the far left) - this is always there, click to open the conversation list.
- ✱ Claude Code in the Status Bar (lower right corner of the window) - You can click it even if the file is not open. This is usually more convenient, so you don’t have to worry about whether to open the file or not. You can also use the command panel (
Cmd+Shift+P/Ctrl+Shift+P) to enterClaude Code.
The login screen will appear when you click on the panel for the first time. Click Login and complete the authorization in the browser. (If you set ANTHROPIC_API_KEY but are still asked to log in, it is probably because VS Code did not inherit the terminal environment variables. The official solution is to start VS Code from the terminal with code. and bring the variables in.)
💡 In one sentence: To install the extension, look for the publisher of Anthropic. The Spark icon must be open to open the file to appear - if you can’t find the file, open it first. If that doesn’t work, use the entry in the status bar in the lower right corner.
03 diff view: Confront the changes and nod after seeing them clearly
This is the first function that many people became fans of. When modifying files in the terminal version, diff is drawn with text symbols, which makes it difficult to make changes when the file is large and there are many changes. The extension moves this matter into the native diff view of VS Code - red and green highlights for additions and deletions, the same look and feel as you usually see when watching Git diff.
Analogy: “revision mode” comparison before signing the contract. ** The other party sent back the revised contract, with the original draft on the left and the revised version on the right. Every addition and deletion was clearly marked - you didn’t sign with your eyes closed, you read it item by item before putting pen to paper. The same goes for Claude when he changes code. When you put your changes out there and ask for permission, you have three options: Accept, reject, or just tell it to change it to something else.
There is another detail that is easily overlooked and will only be noticed after using it for a while: Accept Claude’s suggestion that you can manually change it directly in the diff view. After making the change, it will know “you have changed it” and no longer go down according to the old version. For example, let it reconstruct a function with more than 200 lines, and it will make seven or eight changes in one breath. If you glance at a place in the diff and write the boundary judgment upside down, you can correct it on the right side and then accept it, which saves you a round of back and forth.
💡 In one sentence: The diff view puts every change in front of you. You can see it clearly, make changes on the spot, and then decide whether to accept it or not. It is much safer than the text diff of the terminal.
04 @ Mention and select code: feed the context correctly
The biggest waste of letting Claude work is that it “doesn’t know which piece of code you are talking about” and therefore guesses in circles. **There are two tricks in the extension to feed the context quickly and accurately. **
The first trick: @ mentions files/folders
Enter @ in the prompt box, followed by the file name or folder name, and Claude will read the content. It supports fuzzy matching without typing the full name:
> 解释一下 @auth 的逻辑(会自动匹配 auth.js、AuthService.ts 等)
> @src/components/ 里有什么?(文件夹记得加结尾的斜杠 / )
**Analogy: Throw information into the group before the meeting. ** Instead of verbally describing “the file related to that login”, it is better to throw the file to it directly @ to save it from rummaging through the project and making mistakes. For very large PDFs, you can also enable it to read only specified pages (such as pages 1-10) without having to read the entire page.
The second trick: select the code and it will automatically see it
This method is more trouble-free than @: Select a piece of code directly in the editor, Claude will automatically see it, and “XX line has been selected” will be displayed below the prompt box. If you directly ask “Why does this section report an error?”, it will know which section you are referring to.
Several common supporting techniques:
- Insert reference with line number: Press
Option+K/Alt+Kto automatically insert a mention with path and line number like@app.ts#5-10(editor focus required). - Temporarily prevent it from being selected: Click the “Selection Indicator” at the bottom of the prompt box to switch. The “slash eye” icon appears to indicate that this section is hidden from Claude - This is useful when you just want to copy.
- Drag files as attachments: Hold
Shiftwhen dragging files to the prompt box; click×on the attachment to remove.
For example, when troubleshooting a style bug, the CSS is nested five or six levels. Directly select the suspicious rule and say “Why doesn’t it take effect here?”, It locates the overflow: hidden of the parent element in two rounds and cuts out the child elements - just describing that nesting section in words would take a long time to type.
⚠️ The selected text and currently opened file will be sent to Claude along with the prompt by default. For sensitive files like
.env, the official recommendation is to add aReadrejection rule to the path. Once matched, it will not reach Claude (subject to the official documentation).
💡 One sentence summary:
@mentions feeding files and selecting code to automatically feed context - directly eliminate the biggest guessing cost of “which paragraph are you talking about”.
05 Plan review: Let him submit the plan first, and then start after you approve it
This section is probably where expansion improves the terminal experience the most. Let’s talk about the permission mode first: click the mode indicator at the bottom of the prompt box to switch. Claude Code has the following levels:
| Patterns | Claude’s behavior | When to use |
|---|---|---|
| Normal Mode (default) | You will be asked whether you agree before each operation | Unfamiliar tasks, want to check the whole process |
| Plan Mode | Describe what you plan to do first and wait for your approval before taking action | Big changes, many files, want to see the plan first |
| Auto-accept mode | Make changes directly without asking one by one | Trustworthy repeated changes in small batches |
There is also a fourth level
bypassPermissions(bypassing all permission checks), which needs to be turned onallowDangerouslySkipPermissionsin the settings. It is only suitable for completely isolated sandbox environments and is not recommended for daily use.
**Analogy: The intern asks if you want to do something before doing something. ** The normal mode is “raise your hand and ask first at each step”, and the automatic acceptance is “let him do it” - and the plan mode is the most special. Like an intern, he will first hand over a copy of “I plan to do this” to you for review, and you will nod before starting to work.
The plan mode in VS Code has a benefit that the terminal cannot give: Claude will automatically open the plan as a complete Markdown document, and you can add inline comments on it. Instead of replying in general terms “The second step is wrong”, directly write “Don’t touch the database here, add cache first” next to the line “Second step”. It will take in your opinions before starting work - much more accurate than verbal rework.
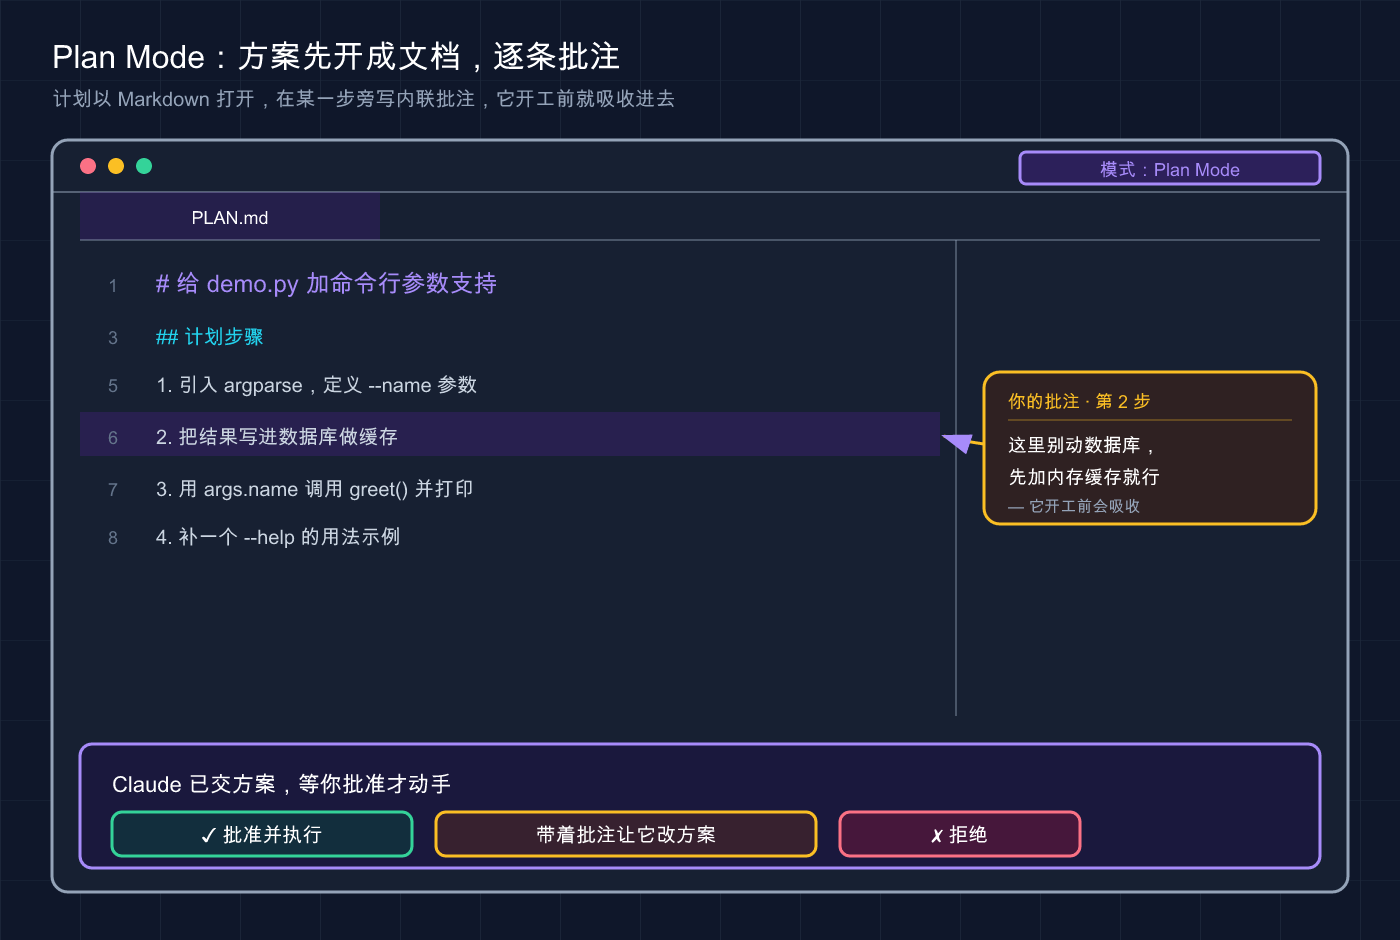
The picture above is a Markdown plan document opened in plan mode: Claude lists each step, and you write an inline comment next to the “Step 2” line (“Don’t touch the database, add the memory cache first”), and it will absorb this comment before approving the start of work.
Want to make it the default? Change claudeCode.initialPermissionMode in the settings to plan. A safe habit is to switch to plan mode first for any changes to “multiple files and more than 50 lines”. There is a common lesson here: If you want to save trouble and enable automatic acceptance throughout the entire process, and let it add logs to a module, it may also “optimize” the import order of several files, and it will take ten minutes to figure out where it has changed. **For major changes, always look at the plan first, and frame it in the planning stage, which is much cleaner than cleaning it up afterwards. **
💡 Summary in one sentence: Planning mode = Read the plan first and then start. You can also comment on the Markdown plan item by item - Cut multiple files before making major changes, saving a lot of rework.
06 Hands-on session: Run through the entire graphical interface process in 10 minutes
Let’s go through it from scratch, and each step will give “what you should see”. If you follow it, you can check whether it is installed correctly and whether it will work.
Step 0: Build a minimal practice project
There is no need for a real project, just create a new empty folder and put the file in it. Terminal run:
mkdir vscode-claude-demo && cd vscode-claude-demo
printf 'def greet(name):\n    return "Hello " + name\n\nprint(greet("world"))\n' > demo.py
code .Expected: Open this folder with VS Code, and you can see demo.py in the explorer on the left. (Open this folder manually without installing the code command line tool.)
Step 1: Open the Claude panel and log in
Click on demo.py (Remember, you must open the file), click on the Spark icon in the upper right corner, click Login when the login screen appears for the first time, and complete authorization in the browser.
Expected: The Claude Code dialogue panel appears on the right, and “Not logged in” is no longer displayed at the top.
Step 2: Select the code + let it change and see the inline diff
Select the two lines of the greet function in demo.py, and “2 lines selected” should be displayed below the prompt box. Now enter:
帮我把它改成用 f-string,并加上类型注解Expectation: Claude did not ask you “which function” (indicating that the context was selected and fed in), and a side-by-side diff popped up directly - on the right, change return "Hello " + name to return f"Hello {name}", add a type annotation to the signature, and an accept/reject prompt appears below. See it clearly and click Accept.
Step 3: Try Scheduling Mode
Click the mode indicator at the bottom of the prompt box to switch to Plan Mode, and enter a slightly larger requirement:
给这个文件加上命令行参数支持,让用户能从终端传入名字Expectation: Claude does not change the file directly, but first opens a Markdown plan document to list what he plans to do (such as introducing argparse). You confirm or write a comment next to a step and it executes it. At this point, you have used the three core elements of inline diff, selected mention, and plan review**.
07 Easy collection: Commonly used shortcut keys and “switch to CLI”
A set of commonly used shortcut keys (from the official, platform differences are marked):
| Operation | Shortcut keys | Description |
|---|---|---|
| Switch focus (Editor ↔ Claude) | Cmd+Esc / Ctrl+Esc | Whichever panel the cursor is in, the shortcut key will work |
| Open conversation in new tab | Cmd+Shift+Esc / Ctrl+Shift+Esc | Open several more conversations to work in parallel |
Insert @ mention reference | Option+K / Alt+K | Requires editor to have focus |
| Reopen the session you just closed | Cmd+Shift+T / Ctrl+Shift+T | Enabled by default |
| Start a new conversation | Cmd+N / Ctrl+N | Off by default, you need to turn on enableNewConversationShortcut in the settings |
There is a pitfall in macOS Tahoe+: the system “Game Overlay” occupies
Cmd+Escby default and will truncate it. Go to “System Settings → Keyboard → Keyboard Shortcuts → Game Controller” to clear that check, or rebindClaude Code: Focus inputto another key.
**Want to go back to the CLI style interface? ** Open the integrated terminal (Cmd+` / Ctrl+`) and run claude - CLI will automatically connect to VS Code, and you can still use native diff (for external terminals, run /ide to connect manually); or check Use Terminal (useTerminal) in the settings to let the extension start directly in terminal mode.
Third-party providers (Bedrock / Vertex AI / Foundry): First check Disable Login Prompt (
disableLoginPrompt), and then configure~/.claude/settings.jsonaccording to the provider’s guide (subject to the official documentation).
💡 One sentence summary:
Cmd+Escis most commonly used to change focus,Option+Kis used to insert references, if you want to get back to the terminal flavor, just runclaudeor checkuseTerminal- the graphics and command line can be changed as you wish.
08 Summary
This article moves Claude Code from the terminal to VS Code. The core things are:
- Extension ≠ Replaces CLI: The same engine, shared history and configuration, use extensions to write code, and switch to the terminal if you want CLI-specific functions.
- The first level after installation is to find the icon: Look for the Anthropic publisher. The Spark icon will only appear if the file is open. If you can’t find it, use the status bar entry in the lower right corner.
- Three graphical interfaces are cool: side-by-side diff (see clearly before nodding, can make changes on the spot),
@mention/selected code (feed accurate context), plan review (read the plan first, can comment one by one).
You should now be able to install extensions independently, review changes with side-by-side diffs, feed accurate context with @ and selections, and plan ahead of major changes. **This process runs smoothly, and you can rely on it stably when writing code every day. **
Next article 09 JetBrains integration - If your main focus is JetBrains family buckets such as IntelliJ IDEA and PyCharm, Claude Code also has native plug-ins. We’ll look at what’s the same and what’s different from the VS Code extension, as well as a few configuration points specific to JetBrains users.
09 · JetBrains Integration
A: “I spend time in PyCharm every day. Does the VS Code extension have nothing to do with me?”
B: “There is a native plug-in, install it and press Cmd+Esc to call Claude out of the editor.”
A: “So it is the same thing as the VS Code extension? Are diff and @ mentioned?”
B: “The kernel is the same CLI, but the interface is not made by the same group of people - some parts are the same, and you have to change your attitude in some places. For example, it runs in the IDE’s own terminal by default, not an independent panel.”
This is a question often asked by people who use GoLand to write backends. It is very typical: JetBrains users are always worried that they are “second-class citizens”, and good things are given to VS Code first.
To be honest, this worry is half right and half wrong. Right: The JetBrains plug-in is indeed lighter than the VS Code extension. It connects the CLI to the IDE and allows information to flow on both sides, rather than making a large and comprehensive graphical panel. What’s wrong: None of the core experiences that should be missing.
This article will explain clearly: How to install, how to connect, what is the difference compared with VS Code, and how to fill in several pitfalls exclusive to JetBrains (ESC key, WSL, remote development).
After reading this article, you will get:
- Complete steps to install the Claude Code plug-in in IntelliJ / PyCharm / WebStorm and other JetBrains IDEs
- “IDE built-in terminal” and “external terminal
/ide” two connection methods, when to use them respectively - A comparison table of “JetBrains plug-ins vs VS Code extensions”, plus JetBrains exclusive shortcut keys
- Official solutions to three high-frequency pitfalls: ESC key interrupt failure, WSL2 “cannot detect IDE”, and remote development
01 First clarify: what exactly does the plug-in do?
Many people are confused after installing the plug-in: “I installed the plug-in, but why don’t I see a chat panel like VS Code?”
Let me give the conclusion first: The JetBrains plug-in is not an independent chat window, it is a “bridge”. The body of Claude Code is still the CLI running in the terminal. The job of the plug-in is to connect the IDE and CLI - the code you select in the editor, the lint errors reported by the IDE, and the changes Claude wants to make can be automatically transmitted back and forth between “IDE” and “Claude in the terminal”.
**Analogy: AirDrop between mobile phone and computer. ** Files and clipboards were originally stored on separate devices. After AirDrop was enabled, the two devices “understood” each other - copied on the computer and pasted directly on the phone. The plug-in is the channel between the IDE and Claude: You select a piece of code in PyCharm, and Claude in the terminal “sees” it immediately, no need to copy and paste.
So there is a key understanding:
In JetBrains, the place where you talk to Claude is the integrated terminal that comes with the IDE - not a newly opened side panel.
This is the biggest somatosensory difference from VS Code: VS Code extends you a graphical dialogue panel; JetBrains allows you to run claude in the built-in terminal, and the plug-in feeds the context behind the scenes. The conversation is in the terminal, diff pops up to the IDE native viewer, it has the advantages of both sides, and there is almost zero learning cost - commands, shortcut keys, / slash commands are all the same as the terminal. The first time I installed a plug-in in IntelliJ, I was originally worried about having to adapt to the interface again, but I found that it was the familiar terminal Claude, but it suddenly “grew eyes” and could see what you selected and where the IDE marked it in red.
💡 In one sentence: The JetBrains plug-in is an “airdrop” between the IDE and the CLI. The conversation occurs in the built-in terminal and the diff is popped into the IDE. It is not an independent chat panel.
02 Which IDEs are supported? Check the number first.
JetBrains is an entire family, not a single piece of software. The good news is: Claude Code plugin covers almost all the mainstream.
Official support list clearly listed:
| IDE | Main language/scenario |
|---|---|
| IntelliJ IDEA | Java / Kotlin, backend, Android expertise |
| PyCharm | Python, data, AI, scripts |
| WebStorm | Front-end JS/TS |
| PhpStorm | PHP |
| GoLand | Go |
| Android Studio | Android development (based on IntelliJ) |
The official statement is that “applicable to most JetBrains IDE” - JetBrains IDEs not on the list (RubyMine, CLion, Rider, etc.) are most likely to be used, but there is no official endorsement. If you can install it, use it. If there is any problem, it will be treated as “not explicitly supported”.
**Analogy: Different models of the same brand share a vehicle engine system. IntelliJ, PyCharm, and WebStorm are like cars, SUVs, and sports cars from the same manufacturer, with different positioning but the same underlying platform (all built on IntelliJ Platform). So one plug-in takes all, all the steps in this article, whether you use IntelliJ or GoLand, the menu path is the same. The following demonstration uses PyCharm.
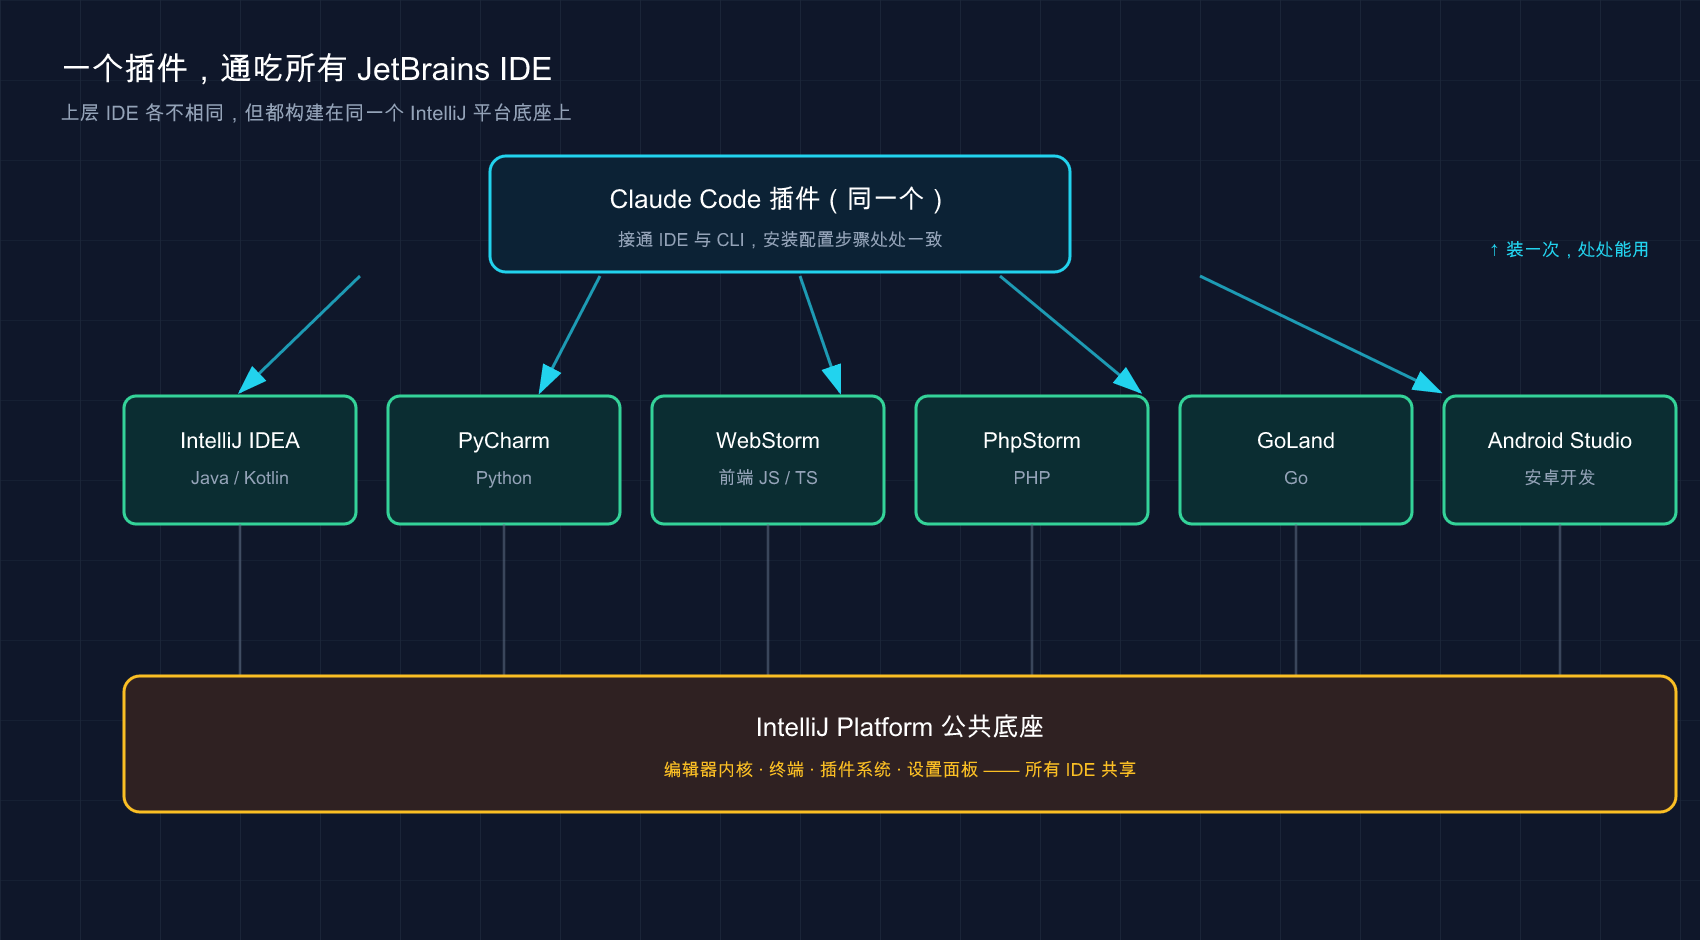
The above picture clearly draws this relationship: there is only one Claude Code plug-in at the top, which is fanned out to adapt to each IDE; while IntelliJ IDEA, PyCharm, WebStorm, etc., although each manages a different language, they all sit on the same IntelliJ Platform base - so a plug-in is installed once and can be used everywhere, and the installation and configuration steps are consistent everywhere.
💡 In one sentence: All mainstream JetBrains IDEs support it, they share the same IntelliJ platform base - the installation and configuration steps are exactly the same in which IDE.
03 Installation: plug-in + CLI, both are indispensable
This step is the most likely to go wrong, because JetBrains integration requires two things to be in place: plug-ins, and Claude Code CLI ontology, neither one will work.
**Analogy: Mobile App + Backend Account. ** After installing the App (plug-in) but not registering a backend account (CLI), it will be an empty shell when you open it - the plug-in is responsible for interface integration, and the “backend” that really does the work is the CLI. **So make sure the CLI is there before installing the plug-in. **
Step 1: Make sure the CLI is installed
If you follow this series and read it from the beginning, the CLI will be installed in Part 02. If you are not sure, just run in any terminal:
claude --versionExpected output: Print out a string of version numbers, similar to 2.x.x (Claude Code).
If it prompts command not found, it means that the CLI has not been installed yet. Go back to 02 Installation and install it, or use the official installation command (different platforms):
# macOS / Linux / WSL
curl -fsSL https://claude.ai/install.sh | bash

# Windows PowerShell
irm https://claude.ai/install.ps1 | iex
Domestic Tips: Installing the CLI, subsequent login authorization, and letting Claude work, the entire process must be connected to Anthropic’s services, and magic Internet access is required. This is consistent with both the terminal version and the VS Code version.
Step 2: Install JetBrains plug-in
You can go both ways, but I recommend the first one.
Method 1: IDE Lisou (recommended)
- Open your JetBrains IDE
- Go to Settings → Plugins (Mac shortcut key
Cmd+,, Windows/LinuxCtrl+Alt+S) - Switch to the Marketplace tab
- Search for Claude Code
- Click Install
- Be sure to restart the IDE after installation
Method 2: Go to the official website of the plug-in market to install
Directly visit the Claude Code page of the JetBrains plug-in market and install according to the page instructions.
Note that the plug-in name has the [Beta] suffix - indicates that it is still in the Beta stage and its behavior may change with the version (subject to the official documentation). The functionality works, but don’t treat it as a guaranteed stable version.
Step 3: Restart the IDE (don’t skip it)
The official emphasized one sentence:
**After installing the plugin, you may need to completely restart the IDE for it to take effect. **
“Complete restart” means to completely exit and then reopen, not to close the window. It’s easy to fall into this trap - after installation, run claude in the IDE, but the integrated function is not activated, thinking that the plug-in is broken; Quit IntelliJ completely and reopen it, everything is normal. This pitfall is also officially listed as the first in the “plug-in not working” troubleshooting, which shows how common it is.
| ❌ Easy pitfalls | ✅ Correct approach |
|---|---|
| Only the plug-in is installed, not the CLI | First use claude --version to confirm that the CLI is installed |
| Use it without restarting after installation | Completely exit the IDE after installation and then reopen it ** |
| Find similar plug-ins and install them | Look for the official Claude Code [Beta] |
| Restart and close the window and the problem will be over | ”Complete restart” = completely exit the process and restart it |
💡 In one sentence summary: JetBrains integration = CLI body + plug-in, both must be installed; Be sure to completely restart the IDE after installation. This is the most frequent reason for “it does not take effect after installation”.
04 Connection: Two postures, depending on where you start
After the plug-in is installed and the IDE is restarted, the next step is to “connect” Claude Code to the IDE. **After being connected, selection sharing, diff popping into the IDE, and diagnostic sharing will be activated. ** The connection method depends on where you start Claude from.
Position 1: Start from the IDE built-in terminal (recommended, automatically connected)
The most trouble-free. Open the integrated terminal that comes with the IDE (usually there is a Terminal tab at the bottom) and run directly:
claudeExpected: Claude Code starts, all integrated functions are automatically activated, without any manual connection actions. Because you start it “in the belly” of the IDE, the plug-in naturally knows which IDE to connect to.
**Analogy: Connecting to Wi-Fi in your living room. ** When you turn on your phone at home, it will connect automatically without entering the password. This is the experience when starting Claude with the built-in terminal - the environment is correct and the connection is completed automatically.
Position 2: Start from an external terminal and use /ide to connect manually
If you are used to using independent terminals such as iTerm and Windows Terminal, start Claude first and then connect it manually:
claudeThen enter in the Claude dialog:
/ideExpected: Claude lists the detected JetBrains IDE, selects the corresponding one, the connection is established, and the function is activated. Analogy: To connect to Wi-Fi at someone else’s house, you have to manually select the network - /ide is this action.
An easily overlooked premise: start from the project root directory
No matter which posture, the official emphasizes:
**If you want Claude to have access to the same files as the IDE, launch Claude Code from the same directory as the IDE project root. **
To put it bluntly: whichever project is opened by the IDE, start claude** in the root directory of that project. When started in a directory like ~/Downloads, the files Claude sees will not match the projects in the IDE. Starting with the built-in terminal naturally satisfies this point - which is another reason why the recommended position is one.
| Startup source | Connection method | Project directory |
|---|---|---|
| IDE built-in terminal | Automatically activated, no operation required | By default, it is in the project root directory ✅ |
| External terminal (iTerm, etc.) | Manually run /ide and select IDE | You need to cd to the project root directory yourself |
Generally, it is enough to use the IDE’s built-in terminal for the whole process - the connection is automatically completed, the directories are naturally aligned, the terminal and the code are in the same window, and Cmd+Esc jumps between the two with one click. Unless you already have an external terminal open and are running something else, use /ide to temporarily connect it.
💡 In one sentence: IDE built-in terminal startup = automatic connection, natural directory alignment (recommended); external terminal startup = run
/ideto connect manually. Either way, start from the project root directory.
05 What it can do: Five integrated functions
After connecting, the plug-in officially lists five “gains”. Let’s talk about them one by one, focusing on the differences with VS Code. For a summary, see the comparison table at the end of this section.
- ① Quick Start: Press
Cmd+Esc(Mac) /Ctrl+Esc(Windows/Linux) in the editor to directly open Claude, or click the button in the UI. This is the most frequently used - I want to ask a question while writing code. There is no need to click on the terminal label with the mouse, and the focus will be over with a shortcut key. - ② Selection context sharing: The currently selected code or open tab in the IDE is automatically shared with Claude. Select a paragraph and ask “Why does this paragraph report an error?”, it will know which paragraph you are referring to.
- ③ File reference shortcut key: Press
Cmd+Option+K(Mac) /Alt+Ctrl+K(Linux/Windows) to insert a file reference in the form of@src/auth.ts#L1-99, with path and line number, so that Claude can locate it accurately. - ④ Diff View: Code changes are displayed** directly in the IDE’s diff viewer** instead of using text symbols in the terminal (it may not be enabled by default, you must set
auto, as discussed in the next section). - ⑤ Diagnostic sharing: IDE’s lint warnings and syntax errors with red and yellow lines are automatically shared with Claude. It can directly “see” where the red lines are, without you having to repeat the error.
Two safety/error-prone points are highlighted separately:
⚠️ Safety (Same as VS Code): If a file hits the
Readrejection rule you set, its selection sharing will be blocked and will not be sent to Claude (subject to the official documentation). It is recommended to add sensitive files such as.env.⚠️ Error-prone: The file reference shortcut keys are different from VS Code - VS Code is
Option+K/Alt+K, JetBrains has one more key, which isCmd+Option+K/Alt+Ctrl+K. It is easiest to press the wrong key when switching from VS Code.
Diagnosis shares this experience the most. JetBrains’ code checkbook is one of the strongest in the industry - in the past, you had to copy the red error reports to the terminal Claude, but now it can read them directly. For example, PyCharm marks an “unused import” and adds a few yellow lines with mismatched types. Just say “fix the problems marked by the IDE”, and it will fix them step by step according to the diagnosis, without you posting a line to report an error.
| Integrated features | JetBrains | VS Code | Remarks |
|---|---|---|---|
| Quick Start | Cmd/Ctrl+Esc | Cmd/Ctrl+Esc | Consistent |
| Selection / Tag Sharing | ✅ Automatic | ✅ Automatic | Consistent |
| File reference shortcut keys | Cmd+Option+K / Alt+Ctrl+K | Option+K / Alt+K | **Different! ** |
| Diff pops into IDE | ✅ (requires auto) | ✅ | Consistent |
| Diagnosis Sharing | ✅ Automatic | ✅ Automatic | Consistent |
| Dialog interface form | IDE built-in terminal | Independent graphics panel | Core differences |
💡 Summary in one sentence: Among the five major benefits, selection sharing, diagnostic sharing, diff popping into IDE and VS Code are basically the same; The biggest difference is that the dialogue runs in the built-in terminal, and press one more key for the file reference shortcut key.
06 Configuration: Call out diff and then adjust the plug-in
Installing and connecting it is not enough. There are two configurations that are worth spending two minutes to adjust. The experience is much different.
Configuration 1: Set the diff tool to auto (important)
As mentioned before, diff can be popped into the IDE, but this depends on a configuration item. Run /config in Claude Code, find the diff tool (diff tool), and set it to auto:
/config| Value | Effect |
|---|---|
auto | Changes show side-by-side in the IDE’s diff viewer (recommended) |
terminal | Changes stay in terminal draw with text symbols |
It is strongly recommended to set auto here - since you are using an IDE, take advantage of JetBrains’ useful side-by-side diff view. Terminal text diff is really troublesome when making more than one change.
Configuration 2: Plug-in settings (Settings → Tools → Claude Code [Beta])
The settings of the plug-in itself are hidden in Settings → Tools → Claude Code [Beta]. A few things worth knowing:
- Claude command (Claude command path): Default is
claude; if yourclaudeis not in the standard PATH, you can fill in the absolute path (such as/usr/local/bin/claude) ornpx @anthropic-ai/claude-code. **When clicking the Claude icon prompts “command not found”, this is probably where the configuration is required. ** - Suppress the “Claude command not found” notification: If you find the notification annoying, you can turn it off.
- Enable Option+Enter multi-line input (macOS only):
Option+Enterinserts a newline in the prompt box after enabling it. If the Option key is accidentally captured and affects typing, turn it off. After the change, you need to restart the terminal. - Enable automatic updates: Automatically checks for and installs plugin updates, applied on reboot.
Among these items, the most important thing to remember is the Claude command path on the top line - click the Claude icon to report “command not found”. Nine times out of ten, it needs to be configured.
💡 Special note for WSL users: Set the Claude command to
wsl -d Ubuntu -- bash -lic "claude"(replaceUbuntuwith your WSL distribution name).
💡 In one sentence: Go to Claude Code, run
/config, set diff toauto, and then go to Settings → Tools → Claude Code [Beta] to adjust the plug-in - the Claude command path is the key to troubleshooting “command not found”.
07 Three pitfalls for JetBrains users
The following three pitfalls are more likely to be encountered by JetBrains users than by VS Code users. The official solutions are listed separately.
Pitfall 1: ESC key interrupt failure
There is an old problem in the JetBrains terminal: **You want to press ESC to interrupt the operation that Claude is running, but the focus jumps to the editor and the operation is not completed. ** The reason is that it binds ESC to “move focus to the editor” by default. Solution:
- Go to Settings → Tools → Terminal
- Choose one: Uncheck “Move focus to the editor with Escape” (Move focus to the editor with Escape), or click “Configure Terminal Shortcut Keys” to delete the “Switch focus to Editor” binding
- Apply changes
After changing ESC, you can interrupt normally. It is strongly recommended to change it as soon as you install it - otherwise when Claude runs away and you want to stop it, but there is no response when pressing ESC, you are really in a hurry.
Pitfall 2: WSL2 prompts “No available IDE detected”
When using Claude Code + JetBrains IDE on WSL2, running /ide often reports “No available IDEs detected”. The root cause is not that the plug-in is broken, but that the WSL2 NAT network or Windows Firewall blocks the connection between “Claude in WSL2” and “IDE on Windows” (WSL1 is not affected). The official has given two solutions, recommended solution one (release firewall), because it does not change the existing network mode:
# 第一步:在 WSL shell 里查 IP
hostname -I
# 假设输出 172.21.123.45,记下子网 172.21.0.0/16
# 第二步:以管理员身份开 PowerShell,建防火墙规则(IP 范围按你的子网改)
New-NetFirewallRule -DisplayName "Allow WSL2 Internal Traffic" -Direction Inbound -Protocol TCP -Action Allow -RemoteAddress 172.21.0.0/16 -LocalAddress 172.21.0.0/16Then restart the IDE and Claude Code for the rules to take effect.
The second option is to cut WSL2 into a “mirror network” (requires Windows 11 22H2 or higher), add the [wsl2] section to the .wslconfig in the Windows user directory, set networkingMode=mirrored, and then wsl --shutdown to restart. **Don’t mess with the mirror network when using Windows 10, just use option one. **
Pit 3: Remote development, plug-ins must be installed on the “remote host”
If you use JetBrains’ Remote Development - the local client connects to the remote server to write code - there is a counter-intuitive point:
**The plug-in must be installed on the “remote host”, not on your local client machine. **
The installation path is Settings → Plugin (Host). A common problem is that a plug-in is installed on the local client but cannot be connected. It takes a long time to find out that the plug-in is installed in the wrong place. **Remember: The plug-in will be installed on whichever machine Claude actually works on. ** The remote host does the work in remote development, and the plug-in belongs to it.
| Pit | One sentence solution |
|---|---|
| ESC cannot interrupt | Settings → Tools → Terminal, cancel “Escape to move focus to the editor” |
| WSL2 cannot detect IDE | Allow Windows Firewall (recommended) or switch to a mirrored network and then restart |
| Remote development cannot connect | The plug-in is installed on the remote host (Settings → Plugin (Host)), not the local client |
💡 In one sentence: Change the terminal shortcut key if ESC fails, firewall cannot detect WSL2, remote development plug-in installs remote host - These three are exclusive high-frequency pits of JetBrains. After installation, you can easily change the ESC one.
08 Hands-on session: Run through the entire process in JetBrains in 10 minutes
The following set of steps is taken from scratch, and each step is given “what you should see”. Just follow it and you will be able to test it yourself. **Demonstrated with PyCharm, the steps are exactly the same for other JetBrains IDEs. **
Step 0: Confirm that the CLI is running - run claude --version, expected to print the version number (such as 2.x.x (Claude Code)); if command not found is reported, go back to 02 installation.
Step 1: Install the plug-in and restart - PyCharm → Settings → Plugins → Marketplace, search Claude Code → Install, Quit PyCharm completely and then reopen. Expected After restarting, you can see Claude Code [Beta] under Settings → Tools.
Step 2: Build a minimum practice project - Create a new file demo.py:
def greet(name):
    return "Hello " + name

print(greet("world"))
Step 3: Launch Claude from the IDE’s built-in terminal - Open the Terminal tab at the bottom of PyCharm and run claude. Expected The integration function is automatically activated (built-in terminal startup, no /ide required); you will be guided to log in to your Anthropic account for the first time, and the browser will complete the authorization.
Step 4: Set diff to auto - Run /config in Claude and set the diff tool to auto, so that the next change will pop up in PyCharm’s diff viewer.
Step 5: Select the code + ask a question to verify the selection sharing
Select the two lines of the greet function in the editor, return to the Claude terminal, and enter:
这段选中的函数有什么可以改进的地方?Expectation: Claude answered based on the two lines you selected (it may be recommended to use f-string and add type annotations) - It did not ask you “which function”, indicating that selection sharing is effective. This is a key step to verify whether “airdrop” is successful.
Step 6: Let it change and watch the diff pop up into the IDE
Then enter:
帮我把它改成用 f-string,并加上类型注解Expectation: Because auto was set in the previous step, the changes** are displayed side by side in PyCharm’s diff viewer—the original return "Hello " + name on the left, the changed return f"Hello {name}" on the right, and the signature also adds type annotations. See it clearly before accepting it.
At this point, you have gone through the four core things of installing the plug-in, connecting to the CLI, sharing the selection, and popping the diff into the IDE**. If it asks you which function in step 5, or diff does not pop up in the IDE in step 6, go back and check in sections 03, 04, and 06.
09 Summary
This article puts Claude Code into the JetBrains family bucket. The core is the following:
- The plug-in is a “bridge” not a “panel”: it connects the IDE and CLI, the conversation runs in the IDE’s built-in terminal, and the diff is popped into the IDE’s native viewer, unlike VS Code which gives you an independent chat panel.
- Two things need to be installed during installation: CLI body + plug-in, both are indispensable; Be sure to completely restart the IDE after installation. This is the most frequent reason for “installation not taking effect”.
- There are two ways to connect: IDE built-in terminal starts automatic connection (recommended), external terminal runs
/ideto connect manually; both are started from the project root directory. - Three exclusive pitfalls: ESC interrupt failure (change the terminal shortcut key), WSL2 cannot detect the IDE (release the firewall), and remote development plug-ins are installed on the remote host.
You should now be able to: install the plug-in independently in your own JetBrains IDE, connect Claude to the IDE, use selection sharing to feed the context correctly, and have changes popped into the IDE’s diff viewer for review. **JetBrains users are not second-class citizens - there is no missing core experience. **
At this point, the two major IDE camps of VS Code and JetBrains are covered. **What they have in common is that they all need to have an IDE first, and then connect Claude to it. ** What if you don’t want to open an IDE at all, but just want a standalone, out-of-the-box Claude client?
Next article 10 Desktop apps——Claude Code also has an independent desktop application that is not attached to any editor and can be used by double-clicking it. Let’s take a look at who it is suitable for, how to choose between it and the IDE integrated version, and what conveniences it has that the IDE version cannot give.
10 · Desktop app (Desktop)
It is said that the command line is the “orthodox gameplay” of Claude Code, and the desktop app is at most a simplified version for novices - To be honest, this judgment is now outdated.
Many people thought so at first. But once you change three unrelated requirements at the same time, you open three tabs in the terminal, and you get confused every time you change it: which tab is changing the login, which one is reconstructing the data layer, and you have to go back and forth several times to see if you have made the mistake. Change the desktop app and try the same job again. There are three sessions listed in the left column. Each session is automatically separated by Git worktree. The changes do not contaminate each other. You can switch to them with one click. Only then did I realize that this thing is not a “simplified version of CLI”, it is another way of working.
More importantly, the desktop app, VS Code extension, and command line all run the same underlying engine and share the same CLAUDE.md and configuration. So this is not “changing to a weakened tool”, but the same Claude Code is changed to a shell that is more suitable for parallelism and visual review.
This article will explain to you clearly when to use it and when to return to the terminal honestly.
After reading this article, you will get:
- Complete steps to install desktop apps on macOS / Windows, plus clear explanation of “Why Linux doesn’t work”
- Three unique features of the desktop app: parallel sessions + Git isolation, integrated terminal/file editing, and how to use visual diff review
- A comparison table of “Which desktop app vs terminal vs IDE extension should be used?” and a command to move the terminal session to the desktop with one click
01 First figure it out: What exactly is a desktop app?
When many people see “desktop application”, their first reaction is: isn’t that just the client of claude.ai and a chat box in a shell?
No. ** Conclusion first: ** The desktop app is a complete Claude Code with a graphical interface, specially designed for “running multiple sessions at the same time”. It runs the same engine as claude in the terminal. It can directly read and write your local files, change code, and run commands. It just moves these operations into a window with a sidebar and a pane layout.
**Analogy: The same car, but with a different instrument panel. ** The command line is a pure digital instrument like that in a racing car - full of information and fast response, but you have to understand each reading by yourself; the desktop app is the large-screen central control of a family car - parallel tasks, change diff, and application preview are all displayed on the surface, which can be scanned at a glance. The engine is the same, and the running results are exactly the same. The only difference is whether you feel comfortable sitting in it.
There is a confusing point here: after the desktop app is opened, there are three tabs at the top, don’t make a mistake about which one you want to go to.
| Tabs | What to do | Can I touch your files |
|---|---|---|
| Chat | Normal conversation, similar to claude.ai | ❌ Can’t |
| Cowork | Dispatch and long agent tasks | In cloud virtual machines, do not touch local |
| Code | Interactive programming, read and write local files directly | ✅ Yes, each step can be reviewed and approved |
This article only talks about the Code tab - it is the “desktop version of Claude Code”. Chat and Cowork are two other functions of Claude Desktop and have little to do with our code writing line.
💡 In one sentence: The desktop app is not a chat client shell, it is a complete Claude Code with a graphical interface, just look for the Code tab.
02 Install it: three platforms, very different
Let’s put the most important one first: Linux does not have a desktop app.
This is not something missing from the installation, but it is clearly not provided by the official government - Linux users please use the CLI directly (I talked about how to install it in the previous article 02). So below I only talk about macOS and Windows.
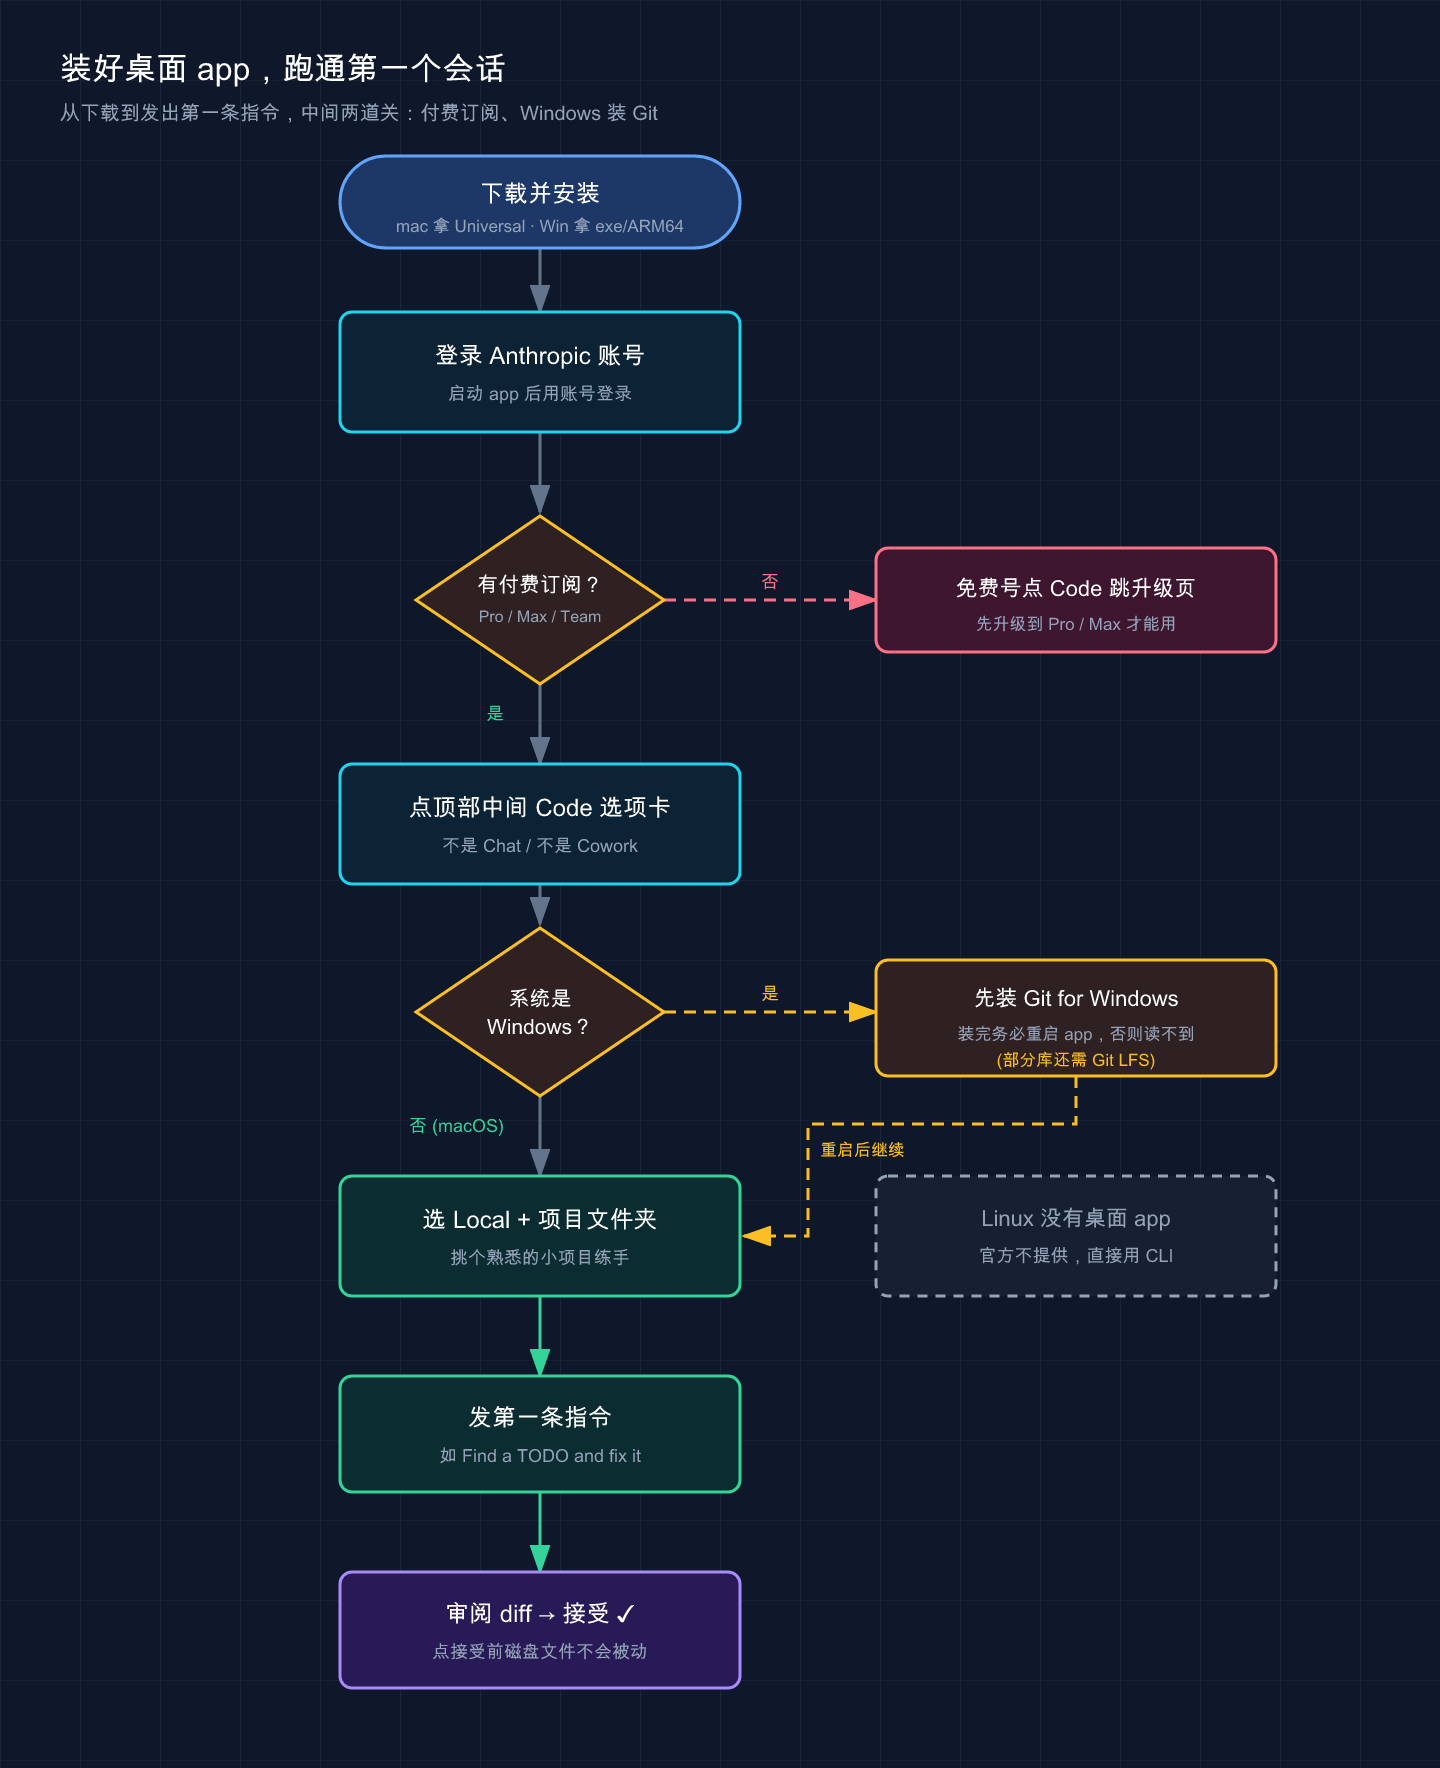
This flowchart strings together the entire path from downloading to issuing the first command, and marks two levels that are easy to get stuck: paid subscription (free account click Code will jump to the upgrade page) and Windows installation of Git (you need to restart the app after installation). The lower right corner also reminds you that Linux does not have a desktop app. Each step is detailed below by platform.
Confirm before installing: You must have a paid subscription
Many people have fallen into this trap. The Code tab of the desktop app requires a Pro, Max, Team or Enterprise subscription. Clicking on the free account will directly prompt you to upgrade. A common pitfall scenario is: clicking Code with a free account keeps jumping to the upgrade page, thinking that the installation is broken - in fact, the subscription is not in place.
macOS
Go to the official download page to get the Universal version (common to Intel and Apple Silicon), download .dmg, install it, drag it into the application folder, log in with your Anthropic account after startup, and click the Code tab in the top middle.
macOS generally comes with Git, and desktop apps rely on it for parallel session isolation. If you are not sure, run this command in the terminal to confirm:
git --versionThe expected output is similar (the version number is not important, as long as it can be printed):
git version 2.39.5 (Apple Git-154)Windows
Download the .exe installation program for x64 processor; Windows ARM64 needs to download the ARM64 installation package separately, don’t get it wrong.
Windows has a hard threshold that macOS does not have: The local session of the Code tab must first install Git for Windows. It’s easy to fall into this trap on a newly installed Windows - if you click Code without Git installed, a red message Git is required pops up, and the session cannot be started at all. After installing Git remember to restart the application, otherwise it will not be able to read.
In addition, some libraries on Windows require Git LFS. If you encounter an error like Git LFS is required by this repository but is not installed, go to git-lfs.com to install it, run git lfs install, and then restart the application.
An important reminder: the desktop app comes with Claude Code, so you don’t need to install Node.js or CLI separately. But on the other hand, if you still want to type
claudein the terminal, the CLI must be installed separately (see Part 02) - the two are two separate programs, only sharing configuration.
💡 In one sentence: Linux does not have it, and the free account cannot be used; macOS can be used out of the box with the Universal version, Windows must first install Git and then restart.
03 Cool point one: parallel sessions + Git automatic isolation
This is the most worthwhile reason to use desktop apps, bar none.
Let’s talk about the problem first: the pain of terminal parallelism
You must have encountered this scenario: you have three tasks at hand: fix a login bug, add a set of tests, and refactor tool functions. In the terminal, you can only open three tabs and run one claude each, but they change files in the same working directory - session A changes utils.js, session B also wants to change it, and the changes on both sides will fight with each other.
How to solve the desktop app
The desktop app’s approach is very clean: Click + New session on the sidebar to open a new session. If the project is a Git warehouse, it will automatically pull an independent Git worktree for this session.
**Analogy: A separate study room in a library. ** You and two other people are both looking at the same set of books (the same warehouse), but each person is assigned to a soundproof research room (worktree). Each reads and writes his own notes without interfering with each other. After you have sorted them out (submitted), the results will be brought back to the main library. Changes in one session will never pollute another session before you commit.
The sidebar lists all your sessions, Ctrl+Tab / Ctrl+Shift+Tab cycles between them (these two keys all platforms use Ctrl, not Cmd). Want to watch two sessions at the same time? Hold Cmd on macOS and Ctrl on Windows and click on another session in the sidebar, it will open in split screen next to it.
Several practical details
- Where to save worktree: Default is
<project root>/.claude/worktrees/. You can change it to another directory in “Settings → Claude Code → Worktree location”. - Want to bring gitignore files such as
.envinto worktree: Create a.worktreeincludefile in the project root directory and list the files to be brought (subject to the official documentation). - How to clear a session after it is finished: Hover the mouse over the session in the sidebar, click the archive icon, and the corresponding worktree will be deleted.
- Auto-archive after PR merge or close: Turn on Auto-archive after PR merge or close in “Settings → Claude Code”, and the local session that has finished running will be closed by itself.
A habit worth developing is: One PR for one session. After changes are submitted, PRs are opened, and merges are completed, the session is automatically archived, and the desktop is always clean. There is no need to manually remember “which tab is doing what.” Compared with opening five or six tabs in the terminal and counting by yourself, the mental burden is much lighter.
💡 In one sentence: Every session automatically copies a Git worktree, and multiple requirements can be changed in parallel without contaminating each other - this is the most practical advantage** of desktop apps over terminals.
04 Cool point 2: Integrated terminal + file editing, no need to switch back and forth
The Code tab of the desktop app is organized around panes: chat, diff, preview, terminal, file, plan, task… you can arrange it however you want. Drag the pane title to move the position, drag the edge of the pane to change the size, just like building blocks.
Note: The pane layout, integrated terminal, and file editor set requires Claude Desktop v1.2581.0 or higher. If the version is low, go to “Check for Updates” to update it first (subject to the official documentation, the version number may change).
Integrated terminal: share the same environment with Claude
Open a terminal from the Views menu, or simply press Ctrl+` (this key is also Ctrl on all platforms).
The best thing about it is that the terminal opens in the session’s working directory and shares the same environment as Claude. So when you run npm test or git status in this terminal, what you see is the file that Claude is changing, and there will be no misalignment like “Claude changed it but what I see in the terminal is the old one”.
This solves an old trouble when using VS Code extensions: I used to have to ensure that the terminal cd goes to the right directory, but now I don’t have to – it is already in the right place.
Reminder: The integrated terminal is only available in local sessions and cannot be used in remote sessions.
File editor: click on the path to change it
Click any file path in chat or diff and the file will be opened in the file pane. Change directly and click Save to write back to disk.
If the file has been changed on the disk after you open it (for example, Claude moved it again), the pane will warn you and let you choose to overwrite or discard it, so that you will not overwrite other people’s changes.
One detail: When you click on paths such as HTML, PDF, pictures, and videos, you do not open them in the file pane, but go to the Preview Pane - this will be discussed in detail in the next section. The file pane is available locally and in SSH sessions; changes to files in remote sessions must be done directly by Claude.
Just a quick note: view mode
Chat history collapses tool calls into summaries by default (Normal mode). If you want to see what Claude did at each step, press Ctrl+O to cycle to Verbose; if you want to see only the final results and changes, switch to Summary. Verbose is useful when debugging “why is it doing this?” Summary is fastest when scanning the results of multiple sessions in parallel.
💡 Summary in one sentence: The terminal shares the working directory and files can be modified by clicking on them - all the development tools are in one window, so there is no need to switch to full screen applications.
05 Cool point 3: Visual diff review, you can see clearly at a glance whether corrections have been made or not.
This is the most intuitive improvement** of the graphical interface compared to the pure terminal**.
In the terminal, after Claude has finished modifying the code, the diff is a green and red text stream; the desktop app turns it into a visual interface that can click, annotate, and allow Claude to self-review.
How to read diff
After Claude changes the file, a small indicator like +12 -1 will appear (12 lines added, 1 line deleted). Click it to open the diff viewer: The left column lists the changed files, and the right side shows the specific changes of each file.
Comment directly on a certain line
This is the most useful part of the entire diff review: Click on any line in the diff, a comment box will pop up, enter your feedback and press Enter. If you want to comment on multiple lines, just click on each line and write one by one, and finally submit all the comments at once:
- macOS:
Cmd+Enter - Windows:
Ctrl+Enter
Claude will read your comments and make changes as required. After the changes are made, a new diff will be given to you for review. This time and again, it is much more accurate than typing in the terminal to describe “Change the variable name on line 23” - You just click on that line and speak.
Let Claude review himself first
There is a Review code button in the upper right corner of the diff viewer. Click it, Claude will review this change before you submit it, leave comments directly in the diff, and you can reply or let it change.
Note that it reviews high-signal issues: compilation errors, obvious logic bugs, security vulnerabilities, and the like. It doesn’t pick code style, format, or things that the linter can catch - just leave those to the linter.
Open a PR after the change, CI can still keep an eye on it
After opening the PR, a CI status bar will pop up in the session, and Claude Code uses GitHub CLI to poll and check the results. Two switches worth knowing:
- Auto-fix: CI hangs, Claude automatically reads the failure log and tries to fix it.
- Auto-merge: Automatically merge the PR after all checks pass (the merge method is squash, and you need to enable auto-merge in the GitHub warehouse settings).
Prerequisite: PR monitoring requires you to have installed and logged in GitHub CLI (
gh) on your machine. If you have not installed it, the desktop app will prompt you to install it when you open PR for the first time.
After actual testing, the combination of line-by-line annotation + review code can replace most of the “first pass of human code review”. In the past, Claude had to scan the files one by one to find problems after making changes, but now he lets him review it by himself first, and only reviews the high-signal points marked by it, which saves a lot of eyesight in one round.
💡 To summarize in one sentence: diff can be clicked to annotate line by line, and it also allows Claude to self-examine high-signal issues first, and then configure CI to automatically fix it - “correction is not corrected” changes from relying on eyesight to relying on the interface.
06 Desktop app vs terminal vs IDE extension: Which one to use?
Speaking of this, you may be even more confused: you clearly have the terminal claude and the VS Code extension, and now there is a desktop app. Which one should you use? **
Let’s first set the tone with an official quote:
If you want to manage parallel sessions, arrange panes side by side, and visually review changes in a single window, use Desktop; if you need scripting, automation, or prefer a terminal workflow, use CLI.
Compare the three and choose according to “what do you care about most”:
| What matters most to you… | Terminal CLI | VS Code / JetBrains extension | Desktop app |
|---|---|---|---|
| Parallel multi-session + Git isolation | Manually open tabs and manage worktree by yourself | General | ✅ Automatic worktree and sidebar switching |
| Visual diff, line-by-line annotation | Plain text diff | ✅ Inline diff | ✅ diff + annotation + self-review |
| Write code in a familiar editor | ❌ | ✅ Right in your IDE | Comes with a file editor, but not your IDE |
| Scripting/Automation/Headless Run | ✅ --print, Agent SDK | Partial | ❌ Interactive only |
!bash shortcut keys, Tab completion | ✅ | Part | ❌(Terminal native convenience not available) |
| Application preview, CI monitoring, scheduled tasks | Need to build by yourself | Parts | ✅ Native UI |
| Linux | ✅ | ✅ | ❌ Not available |
| Third-party model (Bedrock/Vertex/Foundry) | ✅ | ✅ | Only connects to Anthropic API by default (Vertex/gateway can be configured for enterprise deployment) |
Do you see the way through? The three are not substitutes, they each have their own home field:
- Requires scripting, running CI pipeline, and using domestic/third-party models → Use CLI honestly, desktop apps cannot do these things.
- The main thing is to write code in VS Code / JetBrains → Use IDE extension, the code and AI are in the same window.
- Push several independent tasks at the same time and want to review them visually → Home of desktop apps.
And they can be used at the same time, even in the same project - sharing CLAUDE.md, MCP server, hooks, skills, and settings.json. A convenient combination is: Extend daily coding in VS Code. Once you need to roll out three or four independent requirements in parallel, switch to the desktop app, and only go back to the terminal to write scripts if you need batch automation.
⚠️ Note: Commands such as /permissions, /config, /agents, and /doctor that will pop up the interactive panel in the terminal cannot be used in the Code tab and will reply to you isn't available in this environment. To change permission rules or configurations, edit settings.json directly, or run it back to the standalone CLI.
💡 Summary in one sentence: CLI manages automation, IDE expansion manages coding, and desktop app manages parallelism + visualization—the three share configurations and each plays their own home field. Just adjust according to current needs.
07 Do it yourself: Install the desktop app and run through the first session
Just watch and practice fake moves. Let’s go through the minimum process from installation to running through the first session. Each step will give you the expected results that you can verify by yourself.
Step 1: Install and open the Code tab
Install according to Section 02 (for macOS, get the Universal version, and for Windows, install Git first). Open the app, log in, and click the Code tab in the top middle.
✅ Self-inspection: If you can see the session sidebar on the left and the prompt box in the middle, it means that the Code tab is normal. If you click Code to jump to the upgrade page → you have a free account and must subscribe to Pro/Max first.
Step 2: Select environment + project folder
Before sending the first message, the prompt area must be equipped with four things:
- Environment: Select Local (run on your local machine, read and write files directly). There are also Remote (cloud) and SSH (your own remote machine). It is easiest to use Local first.
- Project folder: Click Select folder, Pick a small project that you are familiar with - don’t practice with a large ancestral warehouse.
- Model: Select from the drop-down menu next to the send button. Opus / Sonnet / Haiku are all acceptable. You can change it during the session.
- Permission Mode: Keep the default “Ask permission” (
default), which is the most stable for novices.
Step 3: Send the first command
Enter a specific small task in the prompt box, such as the official example:
找一条 TODO 注释,把它修掉Or:
给这个代码库创建一个 CLAUDE.md,写上项目说明Press Enter to send.
Step 4: Review and accept changes
Because it is in “ask permission” mode, Claude will not directly change the file, it will first give you a diff. You will see:
- A diff view showing where each file needs to be changed.
- Accept/Reject button
- Real-time progress of Claude’s processing
✅ Expected results: The files on the disk will not be passive** until you click Accept. This is the sense of security of the “Ask for Permissions” mode - look clearly and then nod. If you refuse, Claude will ask you how you want to change it.
Step 5 (optional): Move the terminal session to the desktop
If you were halfway chatting in the terminal claude and wanted to switch to the desktop app, you don’t need to reopen it**. In a terminal session type:
/desktopClaude saves the current session, opens it in the desktop app, and exits the CLI.
Note:
/desktopis only available on macOS / Windows, and only when you log in with a Claude subscription - API key login, or Bedrock / Vertex / Foundry deployment are not supported (subject to official documentation).
08 Summary
This article clearly explains the third entry point of Claude Code - desktop app. The core points are these:
- It is a complete Claude Code with a graphical interface, not a chat shell: the same engine as the terminal, sharing CLAUDE.md and configuration, look for the Code tab.
- The three platforms for installing it are very different: Linux does not have it; the free account cannot be used (pro/max is required); Windows must install Git first and then restart.
- Three unique cool points: Parallel sessions + Git worktree automatic isolation, integrated terminal/file editing sharing the same environment, visual diff that can annotate line by line and allow Claude to self-review.
- Three play their own home games: CLI for automation, IDE extension for coding, and desktop app for parallelism and visualization, which can be used at the same time.
You should now be able to: independently install desktop apps on macOS / Windows, open multiple parallel sessions and understand that they are isolated by worktree, use visual diff to review and annotate Claude’s changes, and know when to switch back to the terminal. **If you run the parallel set smoothly and push several requirements at the same time, you will no longer be in a hurry. **
Next article 11 Web version and cloud (Web/mobile) - What is going on with the Remote environment in the desktop app and the ability to monitor progress on the mobile phone? We will take a look at how to let Claude Code continue to work for you in the cloud when you don’t turn on the computer, or even when you are not at your workstation.
11 · Web version and cloud: put Claude Code into browsers and mobile phones
I was on the high-speed rail a while ago and received a message - the installation command was written incorrectly in the README of an online warehouse and had to be changed quickly.
**I didn’t bring a computer with me, just a mobile phone and the intermittent WiFi in the car. **
In the past, this was just “wait until later”. But I took out my phone and opened claude.ai/code, selected the warehouse, typed “Correct the installation command in the README, the npm package name should be xxx”, and put the phone back in my pocket. **When I was waiting to leave the website, a modified branch was already lying on GitHub waiting for me to submit a PR. It took about ten minutes before and after, and I didn’t type a single line of commands, and the computer was not turned on the whole time. **
These are the two things we are going to talk about in this article: Web Version (runs in the cloud and connects to GitHub) and Remote Control (let your phone/any device take over your local session). To put it bluntly, it is to dismantle the premise that “you must sit in front of the computer and type commands”.
⚠️ Note: Both the web version and Remote Control are currently in the research preview (research preview) stage, and functions and details may change at any time. This article is subject to the current version of the official document.
After reading this article, you will get:
- Find out what the web version is: no installation required, running in a cloud sandbox, and connected to your GitHub repository
- A complete set of web-based operation procedures from logging in to submitting tasks and then submitting PRs, just follow it
- How Remote Control works: Start a session on your computer and continue the command using your mobile phone/other browsers
- A comparison table of “web version vs local CLI vs Remote Control” to know when to use which one
- deep-links Fragmentary but useful details such as one-click conversations and domestic access points
01 First distinguish three things: local, web, and remote control
Let me pour some cold water on it at the beginning: Many people turn the “desktop app”, “web version” and “Remote Control” into a pot of porridge as soon as they get started. As a result, they use it in the wrong scenario, and the more they use it, the more confused they become. Let’s take a minute to break them apart.
**Analogy: Same job, three ways to get on the job. **
- Local CLI/Desktop app: You go to the office to work in person, and your computer, files, and tools are all at hand - the desktop app mentioned in the previous article is this kind, and the code runs on your own machine.
- on the web: You send a remote colleague who works on the cloud server rented by the company. You only need to assign work to him in the browser and see the results. The code runs on Anthropic’s cloud and doesn’t touch your computer.
- Remote Control: You are in the office and your work is running on the computer in your office, but you use your mobile phone to remotely control that computer. The code still runs on your machine, and your phone is just a “remote control window”.
Remember this most critical dividing line:
**Whose machine is the code running on? ** The web version runs on the Anthropic cloud; Remote Control is always running on your own machine, just like the local version.
This line determines everything - whether you can access your local files, whether you want to clone the warehouse online, and whether it will stop when the Internet is disconnected. All subsequent trade-offs are derived from here.
💡 Summary in one sentence: The local version is “attend the job in person”, the web version is “send cloud colleagues”, and Remote Control is “remote control of your computer with your mobile phone”; First find out which machine the code is running on, and the rest is easy to understand.
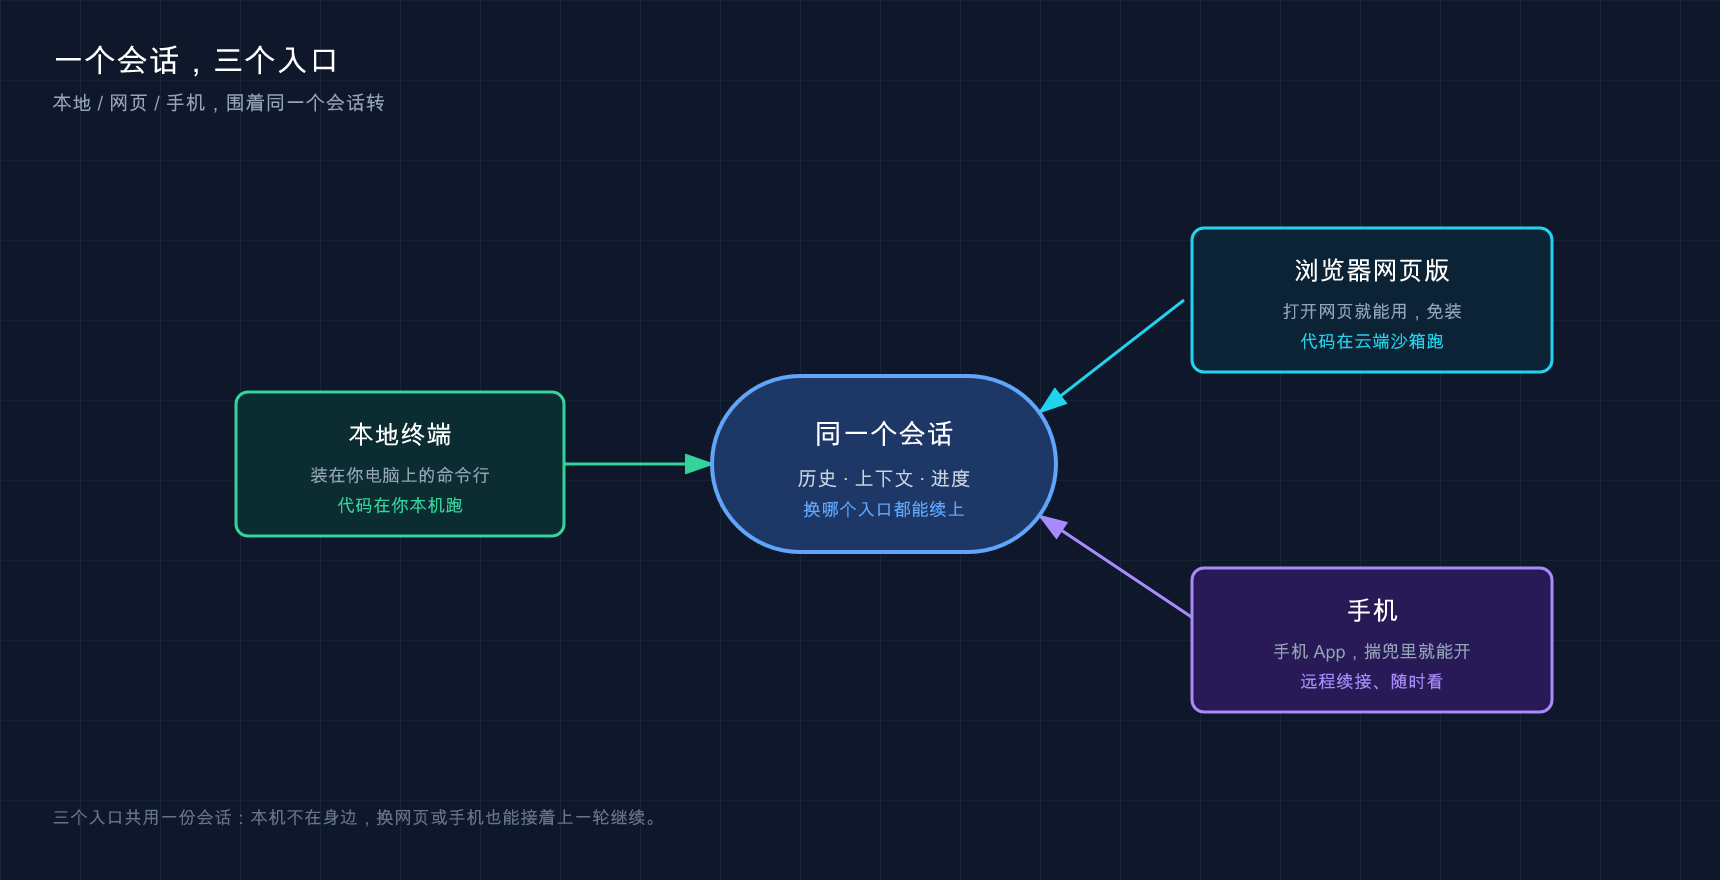
You can figure out by looking at this picture: which end is just a window and which end is where the real work is done.
02 What is the web version: you can use it by opening it in the browser
Let me give the conclusion first: **The web version is to move Claude Code to the cloud. You don’t need to install anything, you can just open the web page and let it work. After finishing the work, you will be given a PR directly. **
It runs on claude.ai/code, running in a cloud virtual machine (cloud VM) managed by Anthropic - this is a one-time isolation machine, and your warehouse is newly cloned for each task.
**Analogy: Rent a disposable cloud computer and burn it after use. ** You don’t need to configure the environment and install dependencies yourself. When the machine in the cloud is turned on, Python, Node, Go, and Docker are already pre-installed with a lot of tools. Claude reads the code on that machine, changes the code, runs tests, and then pushes the changes to you as a GitHub branch. **That machine is completely isolated from your local computer. If it crashes or is damaged, it won’t hurt a hair on your head. **
It is suitable for these types of real-life scenarios:
- Run multiple tasks in parallel: Each task has an independent session and independent branches, without fighting with each other. For example, you can dispatch three tasks at once - fix a flaky test, add an API document, and reconstruct the log module. Three cloud sessions are running at the same time, and you can just drink coffee and wait for the results.
- Repository not cloned locally: You want to take a look at a certain warehouse and make some changes, but you have not cloned it locally. The web version will clone it for you every time, eliminating the need for you to
git cloneand configure the environment. - Don’t want to configure the local environment: I changed to a new computer, or on someone else’s machine, and I am too lazy to install a long list of dependencies.
There are two prerequisites that need to be stated clearly to avoid your busy work being in vain:
- It requires a GitHub repository. The web version relies on cloning the GitHub repository to work. It cannot start without a repository.
- Currently in Research Preview, open to Pro, Max, Team users, and Enterprise users with Premium or Chat + Claude Code seats.
There is another cool point: Sessions persist across devices. The task you assigned on the computer browser will still be running in the cloud when you close the web page. You can then open the Claude app on your phone to continue watching the progress. The scene where I changed the README on the high-speed train at the beginning relied on this - lock the screen after assigning tasks, and then check the results when I arrive at the station.
💡 Summary in one sentence: Web version = one-time cloud sandbox + connection to GitHub warehouse + no installation required, suitable for parallel running, changing local uncloned warehouses, and not wanting to configure the environment; the prerequisite is that there is a GitHub warehouse and you are a Pro/Max/Team user.
03 Web version vs local CLI: Which one should you use?
These two are not substitutes, but division of labor. After actual testing, the judgment standard is just one sentence:
**Does this job require touching anything on my computer? ** If you need it, just use the local CLI; if you don’t need it, it’s easier to run it in the cloud.
Why? Because the cloud machine in the web version only has things in your warehouse - anything that you only install and configure on your own computer (such as a local tool, the global command in your ~/.claude/CLAUDE.md, the MCP server added by claude mcp add), the cloud cannot see it. In order for the cloud to be used, the configuration must be submitted to the warehouse (such as .claude/settings.json, .mcp.json written into the warehouse).
Here is a comparison table to see the trade-offs at a glance:
| Dimensions | on the web | local CLI / desktop app |
|---|---|---|
| Where the code runs | Anthropic Cloud VM | Your own machine |
| Chat from | claude.ai or mobile app | Your terminal/desktop UI |
| Can you use your local configuration | ❌ Only the ones in the warehouse | ✅ All in |
| Do you need GitHub | ✅ Required (or bundled with local repository upload) | ❌ Not required |
| Will it continue to run even if the connection is disconnected | ✅ It will still run even if the webpage is closed | ❌ It will stop when the terminal is closed |
| Run multiple tasks in parallel | ✅ Naturally good at it, each occupying one session | You need to open multiple worktrees by yourself |
| Permission Mode | Only “Auto-Accept Editing” and “Plan” | Available in all modes |
There is one line that I have to click on: There are only two permission modes in the web version - “Auto accept edits” and “Plan mode”. There is no default mode that you are familiar with in Part 07.
What does this mean? By default, Claude in the cloud will directly push the branch after modifying the file, and will not stop waiting for you to agree line by line. Therefore, when sending a cloud task, the task description must be clearly written and specific - it will not look back and ask you “Can this be changed?” I suffered this loss the first time I used it: I sent a vague “optimize this log module” to save trouble. When I came back, I found that it had restructured the entire set of logs and changed the connection ports on its own initiative. It was far from the small changes I wanted. I simply abandoned the last branch and re-deployed it. Later, I learned well and clearly stated the file name, what needs to be changed, and expected behavior for all cloud tasks.
💡 Summary in one sentence: Use the local CLI when touching local things. If you don’t touch local things, use the web version if you want to parallelize it or want to use it everywhere; remember that the web version defaults to “automatically accept edits”, so the task description must be specific.
04 Remote Control: Let your phone take over your local session
The web version is “moving work to the cloud”, **Remote Control (remote control) takes a different approach: the work is still running on your computer, but you can command it from your mobile phone/any browser. **
Let me give the conclusion first: **Remote Control allows you to start a local session at your desk, and then continue the chat from your mobile phone on the sofa, or the browser of another computer - the code runs on your own machine from beginning to end, and nothing goes to the cloud. **
**Analogy: Install a remote control for your computer. ** Your file system, local MCP server, various tools, project configurations - all are still there and can be used, no different from when you are sitting in front of the computer. The web and mobile interfaces are just a “window” in the local session. You send commands through the window and work on the computer behind the window.
The fundamental difference between it and the web version is still the old dividing line:
**Remote Control executes on your machine, so your local MCP server, tools, and project configurations are still there. The web version runs on the Anthropic Cloud. **
When to use it? The official judgment is very clear: If you are doing local work and want to change the device temporarily and continue working on it, use Remote Control. A very typical scenario-ask Claude to run a time-consuming refactoring on the company computer before get off work. You can just go home and open the Claude app on your mobile phone. The session is still connected to the company computer. You can watch where it goes while lying on the bed and send it the next command**.
Starting is also simple. Run this line in your project directory to enter “server mode”. It will hang in the terminal and wait for remote connections:
claude remote-controlAfter running, a session URL will be displayed in the terminal. Pressing the space bar can also bring up a QR code - scan it with your phone to open the session directly in the Claude app.
If you are already in a Claude Code session and want to convert the current session to remote, you don’t need to reopen it. Just type:
/remote-control(You can use the alias /rc if it’s too long.) It will inherit your current conversation history and still give you a URL and QR code.
Remember a few hard prerequisites. If you are not satisfied, you will not be able to connect:
- Version: Requires Claude Code v2.1.51 or higher, check with
claude --version. - Login method: You must log in with the claude.ai account
/login, API key is not supported. - The local process must be always open: Remote Control is essentially a local process running on your computer. As soon as you close the terminal and exit
claude, the session ends.
There is also a very considerate thing: when Remote Control is alive, Claude can send push notifications to your mobile phone when a long task is finished or you need to make an idea. You can also directly request it in the command, such as “Notify me when the test is finished.” (Push notifications require v2.1.110 or higher.)
💡 Summary in one sentence: Remote Control = local session + mobile phone/browser as a remote control, the code runs on your machine and all local configurations are done;
claude remote-controlstarts the service and connects by scanning the code, but the local process cannot be closed.
05 Don’t get confused: --remote and --remote-control are two different things
The two look so much alike that the official documentation has repeatedly emphasized that it is easy for novices to fall into this trap at the beginning - They are basically working in opposite directions. A one-line table explains:
| Command | Direction | What to do | Where does the code run |
|---|---|---|---|
claude --remote "task" | local → cloud | start a new cloud session from terminal** | Anthropic Cloud VM |
claude --teleport | Cloud → Local | Pull a cloud session back to local** to continue | Your machine |
claude --remote-control | (nothing to do with cloud) | Open local session to mobile phone/webpage monitoring | Your machine |
You can see the clue:
--remote(with tasks) = I am at the terminal, but I want to throw my work to the cloud and run away, freeing up my hands to do other things.--teleport= I want to drag the session on the cloud back to the local and continue working on it (for example, I need to use local tools). Note that this is one-way: you can pull a cloud session back to local, but you cannot push an existing local terminal session to the cloud.--remote-control= It has nothing to do with the cloud at all, it just opens a window for my local session to be viewed/controlled by other devices.
To give a common usage: Complex tasks can be planned in local Plan Mode first (let Claude come up with the plan but not touch the code). When the plan is satisfied, push it to GitHub, and then say claude --remote "Execute the migration plan in docs/" to dump the execution to the cloud and run it autonomously. You control the strategy, and the physical work is done in the cloud - This set of “local planning and remote execution” is very easy to use.
💡 Summary in one sentence:
--remotesends the work to the cloud,--teleportbrings the cloud session back to the local (one-way),--remote-controlopens the remote window in the local session - three directions, don’t forget to mix.
06 deep-links: A link directly starts a conversation
Finally, add a small but beautiful function: deep-links.
The problem it solves is: sometimes you want to give others (or your future self) a one-click starting point - click on the link, Claude Code will open in the corresponding warehouse, and the prompt words will be filled in for you.
**Analogy: Send a “click-to-use” shortcut to a colleague. ** Compared to explaining to people “You clone this warehouse, cd into it, and then type this paragraph”, it is much easier to just send a link to it, the other party clicks it, the session is opened, and the prompts are filled out. Typically used in incident handling manuals, monitoring alarms, and CI failure notifications - click on it to start working in the problematic warehouse with diagnostic prompts.
A deep link is a URL starting with claude-cli://, which looks like this:
claude-cli://open?repo=acme/payments&q=review%20open%20PRsrepo specifies a GitHub owner/name repository, q is a prefilled prompt word (URL encoding is required, %20 is a space). Click it, and a new terminal will pop up on your machine. Claude Code is launched in your local clone of acme/payments, and the prompt box has been filled in with “review open PRs”. There is a prerequisite to note: repo only knows the path of claude that you have run at least once** - if you have never started Claude Code in that clone, it will not find the record, and the session will fall back to your home directory, not the repository directory.
Here are some security settings that are very important to remember:
The deep link itself never performs any action. It just selects the directory and fills the prompt into the input box. **Nothing will be sent to the model until you read the content and press Enter yourself. **
In other words, even if you click on a deep link from a page you don’t trust, it will only type in the words for you, and the initiative is always in your hands. (Deep linking requires v2.1.91 or higher.)
💡 Summary in one sentence: deep-links uses a
claude-cli://link to help you “select the warehouse + fill in the prompts” to start a session with one click, but only fill in and not send, everything is controllable before pressing Enter.
07 Hands-on: Start a local session and take over it with your mobile phone
There is no point in talking without practicing. The following minimal exercise allows you to experience “computer starts a session and mobile phone takes over” - No need for GitHub or any projects, it can be done in a few minutes.
Step one: Confirm that the version is new enough
claude --versionExpected: Version number ≥ 2.1.51. If it is lower than this number, upgrade with claude update first, otherwise Remote Control cannot start.
Step 2: Start server mode in any folder
Just find a directory (you can also use the hello-claude from Chapter 07) and type:
claude remote-controlExpectation: The terminal will not enter the chat as usual, but will display a “Waiting for remote connection” status, plus a session URL. That’s right - Server mode is just hanging here waiting for the phone to connect.
Step 3: Call up the QR code
In that status interface, press the space bar.
Expectation: A QR code is drawn in the terminal. (If you haven’t installed the Claude mobile app yet, you can type /mobile in the newly opened Claude Code first, and it will give you the QR code for downloading the app.)
Step 4: Scan the QR code with your mobile phone to take over
Scan this code with a phone with the Claude app installed.
Expectation: When this session is opened in the Claude app on your phone, the terminal on your computer will display the connection status change. At this time, you send a sentence on your mobile phone, such as:
列出当前目录下有哪些文件Expectation: Run it on your computer (it reads the directory of your machine), and the results will be displayed on your phone simultaneously. **See the files in the current directory of your computer listed on your phone = You have successfully taken over the local session with your phone and the entire process has been run through. Congratulations! **
Step 5: Close the stall
Return to the computer terminal and press Ctrl+C to stop claude remote-control.
Expected: Server mode exits, and the remote session ends - remember, as soon as the local process is closed, the session is gone.
⚠️ If the mobile phone cannot be connected, or it says “Remote Control requires claude.ai subscription”, 90% of the time it is because the login method is wrong: Remote Control only recognizes the claude.ai account, not the API key. First log in with the claude.ai account in the terminal
/loginand confirm thatANTHROPIC_API_KEYis not set in the environment.
08 Domestic visit: Prepare your magic online first
All the functions discussed in this article cannot avoid a realistic threshold - They are all connected to the claude.ai domain name: the web version runs on claude.ai/code, and Remote Control and mobile apps also send requests to Anthropic’s servers.
So the conclusion is very straightforward: Domestic users must prepare the “Magic Internet” before using the web version, Remote Control, and mobile app, otherwise the page cannot be opened, the mobile app cannot be connected, and there is no response after scanning the QR code. This is the same as the network requirement when installing the local CLI earlier, but this time even the mobile terminal must be in a network environment that can be accessed normally.
An easily overlooked detail: Claude in the cloud session is accessing the network from Anthropic’s cloud infrastructure, not from your network. So the machine in the cloud pulls the npm package, clones the GitHub repository and uses its own channel, which has nothing to do with your local magic Internet connection - The only place where you need magic Internet access is “How to connect the browser/mobile phone to claude.ai”.
💡 Summary in one sentence: The web version/Remote Control/mobile app are all connected to claude.ai, Prepare magic Internet access before using it in China; however, the networking within the cloud session goes through Anthropic’s own network and is not your responsibility.
09 Summary
In this article, we have completely liberated Claude Code from “having to sit in front of the computer and type commands”. We mainly focus on two things: Use the browser directly without installation (web version), and Use your mobile phone/any device to take over the local session (Remote Control).
Let’s nail the core differences again:
| What you want to do | Which one to use | Where does the code run |
|---|---|---|
| Don’t want to install the environment, change a local uncloned repository | Web version | Anthropic Cloud |
| Run several independent tasks at the same time | Web version (one session each) | Anthropic Cloud |
| Run half of the game locally, change your phone and continue commanding | Remote Control | Your machine |
| Move local tasks to the cloud and run them autonomously | claude --remote | Anthropic Cloud |
| Give others a link to start a conversation with one click | deep-links | Click to link to that machine |
You should now be able to: Distinguish the fundamental differences between the local, web version, and Remote Control (on which machine the code runs on), know how the web version can connect to GitHub to submit tasks and PRs, the default is “automatically accept edits”, so the tasks must be written specifically, and you can use claude remote-control + scan the code to let the phone take over the local session, and you will no longer confuse --remote and --remote-control. **This set of “available anywhere” capabilities is a key step to truly integrating Claude Code into your daily workflow. **
Next article 12 “Project initialization: Use /init to generate CLAUDE.md” - Whether you use Claude Code locally, on the web or on your mobile phone, whether it does well depends largely on whether there is a decent CLAUDE.md in that warehouse. The next article will teach you how to use a /init command to let Claude go through the project himself and generate the first version of the “Project Specification”. You might as well think about it first: **If you let a new colleague take over your project, what three things would you want to tell him first? **