04 | Claude Code in 16 Hours: Build CLAUDE.md and Project Structure with /init
Use /init to create a CLAUDE.md draft and organize project structure and development conventions.
12 · Project initialization: use /init to generate CLAUDE.md with one click
Brothers, let me first talk about a common stupid operation.
When I first started using Claude Code, I took over a Node back-end project left by a former colleague and started working on it without running /init. The first time you asked “How to run the test”, it went through package.json before replying to you; after opening a new session twenty minutes later, it went through the same question again from the beginning; in the afternoon, when I changed tasks, it asked for the third time “Is npm or pnpm used for this project?”
By this moment, I was really fed up with it - it wasn’t that it was stupid, it was because I didn’t give it a “project manual” and it had to start from scratch every time**. Once you learn how to enter a project, type /init first, and all these duplications will be gone: it will figure out the project at once, write it as a CLAUDE.md and save it,** and then every session will start with this context, and there is no need to explain it repeatedly**.
To put it bluntly, /init does one thing: turn “Claude gets to know your project again every time” into “know it once and remember it for a long time”. This article explains how to use it, what it looks like when generated, and what it saves you.
After reading this article, you will get:
- Understand the core pain points solved by
/init: from “re-exploring each time” to “generating long-term memory once” - A set of simple operations: start
claudein the project root directory and type/init - Know what is done behind it: scan the structure, identify the technology stack, and generate a CLAUDE.md draft
- Understand what the generated CLAUDE.md looks like and what each piece is for.
- A key understanding:
/initis just the starting point, the draft needs to be manually patched (how to patch it up is left to Part 18)
01 Why is there /init: Claude’s “amnesia” problem
Let me talk about the conclusion first: Every time Claude Code opens a new session, it is in a state of “amnesia” - it does not remember what you said to it last time.
It’s not a bug, it’s the design. The official documentation clearly states:
Every Claude Code session starts with a fresh context window.
**Analogy: A new intern comes to work every day. ** This intern is quite capable, but there is a problem - What he was taught today will be taught to another person tomorrow, and he must be taught it all again. You tell him “We use pnpm instead of npm” “The tests are in the tests/ directory” “You need to run lint before submitting”. The next day a new one comes and you have to tell it all over again.
This is what it would be like without CLAUDE.md. This is where the pitfall of the previous Node project came from - it’s not that Claude has a bad memory, it’s that it doesn’t have a cross-session memory carrier at all.
What to do? The official provides two sets of mechanisms for transferring knowledge across sessions. This article only discusses the first set:
| Mechanism | Who will write | What is installed |
|---|---|---|
| CLAUDE.md file | You (can be drafted by /init) | Directives and rules: project architecture, build commands, conventions |
| Auto Memory | Claude himself | The experience and debugging experience accumulated in his work |
Note that automatic memory has a hard limit: Each session only loads the first 200 lines or 25KB, and the excess is not entered into the context - so relying on automatic memory to stuff too many things is unreliable, CLAUDE.md is the main force.
CLAUDE.md (project memory file) is the entry manual written for “interns who change people every day” - you write it in advance and put it in the project. Claude reads it first every time he starts, and he immediately “remembers” what the project is about.
And /init is a command that helps you generate the first draft of this manual with one click.
💡 One sentence summary: Claude loses his memory every time he opens a session. CLAUDE.md is his cross-session memory carrier -
/inithelps you write out the first draft of this memory with one click.
02 What is /init: Let Claude write his own instructions
/init is a slash command built into Claude Code (a command starting with / in the input box).
What it does can be summarized in one sentence: Let Claude scan your project by himself and generate a CLAUDE.md draft specific to this project.
The official documentation describes it very accurately:
Run
/initto automatically generate the starting CLAUDE.md. Claude analyzes your code base and creates a file containing build commands, test instructions, and project conventions it discovered.
**Analogy: Have new employees write their own onboarding manual. ** Generally, the induction handbook is written by old employees for newcomers to read. But /init does the opposite - it lets the “newcomer” read the entire project by himself first, and then organize what he has read (what technology is used, how to divide directories, how to run commands) into a manual. Whether you read it correctly or not, you will know when you look back and review it.
The benefits of this design are very real: Claude can pick out the objective facts in the project (technology stack, directory structure, and script commands) by scanning it by himself, without you having to type word by word. The energy you save is enough to fix the things it can’t sweep out (such as the team’s branch naming convention).
When should you use it? Generally, there are several triggering opportunities:
- Taking over a project left by someone else - You are not familiar with it yourself, so it is a good time for it to be scanned and given to you.
- My own project does not yet have CLAUDE.md - I have been using it naked, it is time to make up for it
- clone an open source project and want to change it - first get the project map through
/init, and then start.
💡 One sentence summary:
/initLet Claude read the project himself and organize the objective facts into a CLAUDE.md draft - you save the effort of picking up the facts and concentrate on making up for what it can’t sweep out.
03 How to run: enter the directory, start, and type commands
The operation is so simple that it’s a bit anti-climactic - After starting claude, type /init in the input box and it’s done.
**Step one: Start Claude Code in the project root directory. **
This step is key. You must cd into the root directory of the project and then start it. You cannot start it naked on the desktop or home directory. Article 07 emphasized: Wherever you start, Claude will use it as a workspace and read files there. Run /init in the home directory. It will scan a bunch of messy personal files and sweep away all the loneliness.
cd /path/to/your-project
claude
**Step 2: Type /init in the input box and press Enter. **
/initThat’s it. You don’t have to do anything next, Claude will run the rest by himself - the whole process does not require manual operation, it will analyze and output automatically.
So what exactly is it doing behind the scenes? I have seen it run many times, and the process is roughly like this:
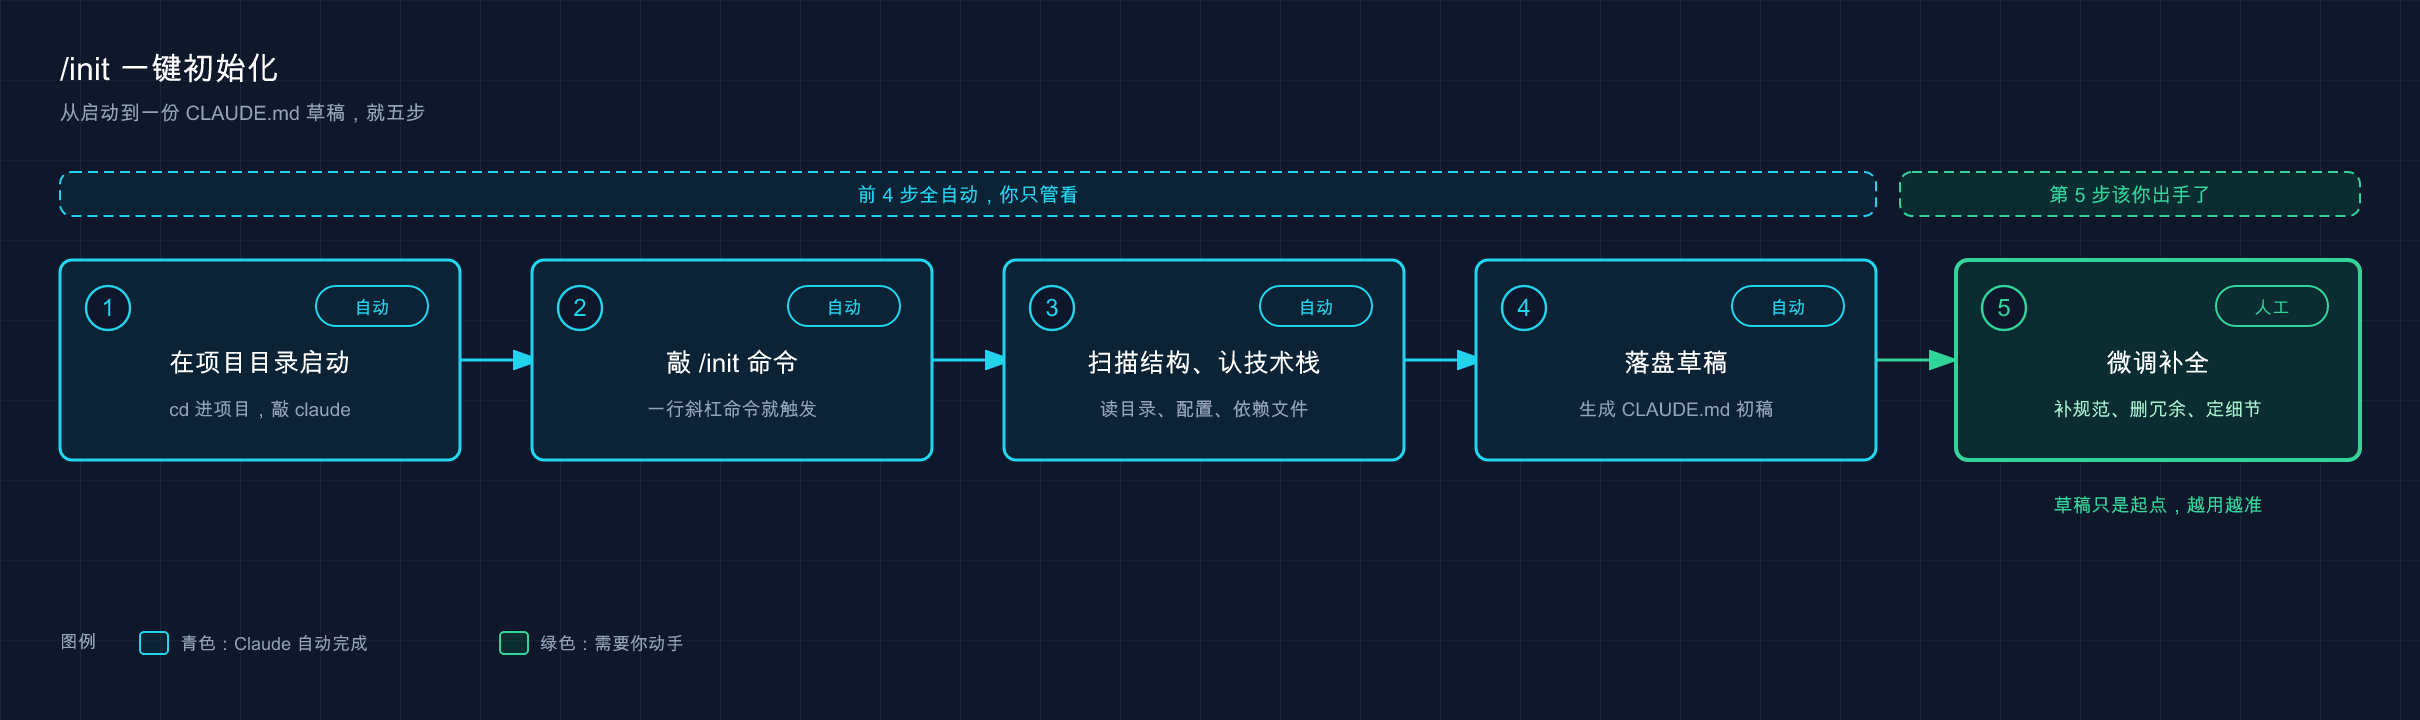
The whole thing is strung together in one line: Start claude in the project directory → type /init → Claude scans the project structure and identifies the technology stack → downloads a draft of CLAUDE.md → you then manually fine-tune the completion. The first four steps are basically automatic, and the last step of “manual fine-tuning” is the key to turning the draft into a good manual. This article will be discussed first, and Part 18 will be dedicated to it.
The official term for this step is “analyze your code base.” Specifically what files are scanned, in practice they are roughly in the following categories (it will basically turn them over when you run it):
- Dependency list:
package.json(Node),requirements.txt(Python),pom.xml(Java) and the like - used to determine the technology stack and commands that can be run - Existing documentation:
READMEand the like - understand what the project is about - Configuration file + code structure: Find out how to divide directories and where the entrance is
⚠️ An easily overlooked detail: If there is ** CLAUDE.md in the project,
/initwill not overwrite it rudely. The official documentation clearly states this - at this time it will suggest improvements instead of covering them. I typed/initagain in a project that had already written CLAUDE.md. I was originally worried that it would be in vain, but it turned out that it honestly listed a few suggestions that “can be added here” and the original text was not touched. This design is quite thoughtful.
💡 Summary in one sentence:
cdinto the project root directory, startclaude, type/init, and leave the rest to it to automatically scan - when there is already CLAUDE.md, it only recommends improvements and does not overwrite it.
04 What does the generated look like: CLAUDE.md draft disassembly
After running /init, there will be an additional CLAUDE.md file in the project root directory. Open it and you’ll see a clearly structured Markdown.
**Analogy: A standard project description. ** It is not a running account, but divided into good parts - what the project is for, what technology is used, how to divide the directory, how to type the command, and what are the agreements. A new person (including Claude after the “amnesia” in the next session) glances at these pieces and knows what the project is about.
The generated content usually covers the following areas (the specific fields will be determined by Claude according to the actual situation of your project, the following is a typical look):
# 项目名称

## 项目概述
简述这个项目是做什么的、核心功能是什么。

## 技术栈
- Frontend: React + TypeScript
- Backend: Node.js + Express
- Database: PostgreSQL

## 目录结构
- `src/components/` - React 组件
- `src/api/`        - API 层
- `tests/`          - 测试文件

## 常用命令
- 启动开发服务器:`pnpm dev`
- 运行测试:`pnpm test`
- 代码检查:`pnpm lint`

## 开发规范
- 使用 TypeScript strict 模式
- 提交前先跑 `pnpm test`
Let’s talk about its value piece by piece – this is what Claude has been asking you over and over again:
| This piece | What does it contain | What does it save you from duplication |
|---|---|---|
| Project Overview | Project purpose, core functions | No need to explain “What is this project for” every time |
| Technology stack | What framework, language, and database are used | No need to ask “Is this React or Vue” every time |
| Directory structure | What are the key directories and where are the entrances | No need to look for “Which folder is the API code in” every time |
| Commonly used commands | How to start, test, and check | No need to look through package.json to find commands every time |
| Development specifications | Project conventions (such as strict mode) | No need to remind you to “remember to turn on strict mode” every time |
Do you understand? In the previous Node project, the questions asked about “how to run the test” and “whether to use npm or pnpm” were all eaten up by the “common commands” and “technology stack” at once. Once the manual is written and placed there, Claude reads it by himself at the beginning, and these repeated conversations are cleared directly.
As for where to put this file - the official location is ./CLAUDE.md (or ./.claude/CLAUDE.md) in the project root directory. /init will put it in the right place for you by default, so you don’t have to worry about the path. The more detailed hierarchical relationship (how the user level and project level are superimposed) will be left to Chapter 18.
💡 Summary in one sentence: The generated CLAUDE.md is divided into several parts: “Overview/Technology Stack/Directory/Commands/Specifications”. Each block accurately answers a type of duplication that has been asked repeatedly before - where to put the file
/initwill help you figure it out.
05 Key understanding: /init is the starting point, not the end point
This is the sentence I want you to remember the most in this article: /init generates a draft, not a final draft.
Why does it have to be done manually? Because there are some things that Claude can’t find even if he scans the entire code base - they are not in the code at all, only in the minds of you and the team.
Here are a few examples that Claude himself would never be able to deduce:
- Branch naming convention: You have agreed on
feature/xxxandfix/xxx. In which file are these written? No. Claude can’t scan. - Deployment process: Does merging into
mainautomatically trigger deployment, or do you need to click manually? It can’t be seen in the project code. - Code Review Requirements: “PR must be approved by two people” “Core module changes must be planned in Plan Mode first” - this is an implicit agreement of the team.
- Business background: Why is this area designed like this, which module is likely to cause trouble when touched - these “whys” are hidden in your mind.
The correct approach is to iteratively optimize rather than write to death in one go.
The previous Node project is the control group of the negative teaching material: after /init is finished, I think everything is fine, and there is no need to fix it. As a result, a deployment script written by myself was missing from the “common commands” it generated (because the script was hidden in scripts/ and not exposed in package.json), and Claude naturally did not scan it. Manually add a line “deployment ./scripts/deploy.sh” to CLAUDE.md to complete it. So the correct habit is fixed: after running /init, read it through immediately, and manually fill in the hard constraints that it cannot sweep out.
So the correct posture is this contrast:
| ❌ Incorrect usage | ✅ Correct usage |
|---|---|
/init is left alone after running, and is used as a final draft | /init is read through after running, and is used as a draft review |
| Expect it to sweep out all the team’s agreements | Manually fill in the hard constraints (branch, deployment, review) that it cannot sweep out |
| Once generated, write it down and never move again | Continuously iterate as the project evolves and delete outdated ones |
Just remember this division of labor: /init is responsible for quickly extracting objective facts and laying the foundation (it is strong in this area), and you are responsible for filling in subjective agreements and business background (only you know this area). The cooperation of both parties makes for a truly useful CLAUDE.md.
As for “how to change this draft into a concise and easy-to-use manual” - such as how to design the hierarchy, how to use reference splitting, and how to maintain it for a long time - that is the job of the 18th “CLAUDE.md User Guide”. You only need to “have it” for this article, and then you can talk about “writing it” in the next step.
💡 Summary in one sentence:
/initonly pulls out the objective facts to lay the foundation. The hard things that it cannot scan, such as team agreements and deployment processes, must be filled in manually - only after the draft has been reviewed will it count.
06 Hands-on: Run /init for a minimal project
Just talk without practicing the tricks. The following uses a minimum project of two or three files to take you through /init to completely run it and verify that it indeed generates CLAUDE.md. It doesn’t rely on any complicated environment, just follow the instructions.
Step One: Build a Minimal Project (Mac/Linux)
mkdir init-demo
cd init-demo
echo '{"name": "init-demo", "scripts": {"test": "echo test ok"}}' > package.json
echo 'console.log("hello from init-demo");' > index.js
Windows PowerShell users: mkdir init-demo, cd init-demo. Create the two files package.json and index.js using Notepad, paste the contents in the single quotes above and save them.
Expected: There are two files package.json and index.js in the init-demo folder. You can see them both by typing ls (dir on Windows).
Step 2: Start Claude Code in the project directory
claudeExpected: A welcome screen appears with an input box at the bottom. Confirm that the terminal is currently in the init-demo directory.
Step 3: Run /init
Type in the input box:
/initExpectation: Claude starts scrolling - you’ll see it reading package.json, index.js, analyzing the project, and then writing files. After running it, it will tell you that CLAUDE.md has been generated. Because this project only has two files, the whole process is very fast, from a few seconds to more than ten seconds.
Step 4: Confirm CLAUDE.md is generated
Exit Claude (type exit or press Ctrl+D) and return to the terminal to see:
cat CLAUDE.md(Windows PowerShell uses type CLAUDE.md)
Expectation: The terminal prints out a copy of Markdown, in which you can at least see the project name init-demo, the technology stack is Node.js / JavaScript, and the test command (echo test ok) is recognized as “Run Test”**. Seeing these = /init ran through, it really understood and recorded your small project.
Step 5 (optional): Verify it “remembers”
Re-enter claude and ask:
这个项目的测试命令是什么?Expectation: It will directly tell you the test command without having to go through package.json - because the answer is already written in CLAUDE.md that it read at the beginning. This time, you will see with your own eyes that “amnesia” has been cured.
⚠️ Small reminder: In a real project,
/initscans many files and generates much richer content. It will run slower than this demo, so just wait patiently for it to finish scanning; after scanning, don’t forget what is said in Section 05 - Read it through and fill in the hard constraints that it cannot scan.
💡 Summary in one sentence: Create a minimal project with two files, type
/initinclaude, exitcat CLAUDE.md, and see it read the project with your own eyes - then ask a test command to verify that the “amnesia” has been cured.
07 Summary
This article explains one action: The first thing to do when entering a new project is to type /init and let Claude write the first draft of the project specification.
Let’s string together the key points:
| Dimensions | Conclusion |
|---|---|
| What to solve | Claude loses his memory in each session, CLAUDE.md is a cross-session memory carrier |
| What is /init | The command that lets Claude scan the project and automatically generate a CLAUDE.md draft |
| How to run | cd into the project root directory → start claude → type /init |
| What it does | Scan the structure, identify the technology stack, extract the commands, and write it into a draft |
| What does it look like | Overview / Technology Stack / Directory / Commands / Specifications |
| Key understanding | The draft is not the final draft - the team agrees that it must be manually supplemented |
You should be able to: Enter any project, start claude in the root directory and type /init, let it automatically generate a copy of CLAUDE.md, understand what each piece of the generated content is, and understand that this is just the starting point - the objective facts will help you lay the groundwork, and the subjective agreement requires you to complete it yourself. From now on, Claude is no longer “a new person with amnesia every day”, but a veteran who has read your project manual at the beginning.
Next article 13 “Project Structure” - After you run /init, the “directory structure” in CLAUDE.md was scanned out by Claude. But in addition to CLAUDE.md, a project also has a bunch of “Claude Code exclusive files” such as the .claude/ directory, settings.json, custom commands, MCP configuration, etc., each of which performs its own duties. What do they contain and what do they look like? The next article will take you through clarifying the project structure at once.
13 · Project structure: What does Claude Code put in your project?
They say “don’t worry about the .claude folder, it will handle it by itself”, but to be honest, you can only really use Claude Code if you understand it**.
Why do you say that? Because almost all the “advanced gameplay” of this tool - custom commands, permission control, sub-agents, skills - fall on the disk, and they are all files and directories in .claude/. If you don’t understand its structure, you can only stare blankly when you encounter problems such as “Why did my assigned permissions not take effect?” “My teammates pulled the code but there was no order from me.”
I did a stupid thing when I first started: to save trouble, I wrote a configuration containing the database password directly into .claude/settings.json, and pushed it up together with git push. By the time I reacted, the key was already lying in the warehouse history - In the end, I could only change the password and rewrite the history, which took more than half an hour. Later I figured out that this kind of thing should be placed in settings.local.json, and Claude Code will gitignore that file for you by default. **A misplaced file can make such a big difference. **
This article does not teach you how to configure each file deeply (those are reserved for a special article later). It only does one thing: draw you a panoramic map so that you can tell at a glance “what it is for, where to put it, whether it belongs to the project or me, and whether to submit it.”
After reading this article, you will get:
- A panoramic view of the
.claude/directory: what each file/subdirectory does - The fundamental difference between the two sets of “project-level” and “user-level” configurations (follow the project vs. follow you)
- A cheat sheet: what should be submitted to git and what must be entered into
.gitignore - A hands-on session that you can get started with at a glance. See with your own eyes what these two levels of directories look like.
01 First understand one thing: Claude Code has “two homes”
Let me give the conclusion first: The configuration of Claude Code is divided into two parts - one follows the project, and the other follows you. If you understand this, everything will be smooth sailing.
**Analogy: The company’s “project filing cabinet” and your own “workstation drawer.” ** The project filing cabinet (project level) contains things that everyone in the project must look at - project specifications, who can do what operations, and newcomers can get started by following the information in the cabinet. Your workspace drawer (user level) contains your personal habits - your handy shortcuts, your personal preferences, and these will follow you when you change projects.
There are two locations on the disk:
| This stall | Where is | Who is influenced | Who is followed |
|---|---|---|---|
| Project level (Project) | ./.claude/ in the project | All collaborators of this warehouse | Follow the project (submit to git, shared by the team) |
| User | ~/.claude/ in your home directory | You, in all your projects | Follow you (on your machine, never commit) |
Here are two terms to click on first:
Project scope: The configuration is stored in the warehouse, entered into git, and shared by the whole team. You change the rules and submit them, and your teammates will pull them down and they will take effect simultaneously.
User scope: The configuration is stored in the home directory of your computer ~/.claude/, only takes effect for you and will never enter any warehouse. If you switch to any project in the company, this system will follow you.
To give a common usage: put purely personal preferences such as “Reply in Chinese” and “What prefix to use for commit information” in the user-level ~/.claude/CLAUDE.md - in this way, when opening any project, Claude will follow your habits. And project facts such as “this project uses pnpm instead of npm” are written into the project-level ./CLAUDE.md and submitted to be shared by the whole team. **Personal habits and project specifications should be placed in two places from the beginning to save worry later. **
💡 Summary in one sentence: Claude Code has “two homes” -
./.claude/in the project (follow the project, enter git, and share with the team) and~/.claude/in the home directory (follow you, not enter git, only effective for you).
02 Open project-level .claude/: What’s in it
Now open the ./.claude/ folder in the project and take a look. The structure of a used project may look like this:
your-project/
├── CLAUDE.md                ← 项目说明书(也可放 .claude/CLAUDE.md)
├── CLAUDE.local.md          ← 你的个人项目偏好(进 .gitignore)
├── .mcp.json                ← 团队共享的 MCP 服务器配置(进 git)
└── .claude/
    ├── settings.json        ← 团队共享配置:权限、hooks、模型默认值
    ├── settings.local.json  ← 你的个人配置覆盖(自动 gitignore)
    ├── commands/            ← 自定义斜杠命令,每个 .md 一条 /命令
    ├── rules/               ← 模块化的项目规则(CLAUDE.md 拆出来的)
    ├── skills/              ← 技能:可被 /调用 或 Claude 自动调用的工作流
    └── agents/              ← 子代理:各有独立上下文的专项助手
Let’s talk about what they do one by one. This article only touches on “what it is and who controls it.” There are separate articles for each in depth usage:
**CLAUDE.md - Project description. **
Claude reads the first file every time he enters the project. What the project is, how it runs, and any agreements are all written here. There is an essential difference between it and .claude/settings.json: CLAUDE.md is a “guidance” for Claude (it tries to follow it after reading it, but it is not a hard constraint), and settings.json is a “configuration” enforced by Claude Code.
The official mentioned a detail:
CLAUDE.mdcan be placed in the project root directory, or.claude/CLAUDE.md- the latter can make the project root directory cleaner.
**CLAUDE.local.md - your personal project preferences. **
Instructions stacked on top of CLAUDE.md and only relevant to you, such as “My local database is port 5433”. You need to add .gitignore manually (selecting personal options when running /init will help you add it).
**settings.json - a configuration center shared by the team. **
Control whether Claude can perform certain operations (permissions), when to run your scripts (hooks), and set which model to use by default for this project. ** Entering git is the security baseline of the team. **
**settings.local.json – your personal configuration overrides. **
The same JSON format as above, but only valid for you and not submitted. If you want to temporarily release permissions without affecting your teammates, just write it here. When Claude Code writes this file for the first time, it will automatically configure git for you to ignore it - this is the file at the beginning that “should have been used, but was missed”.
There is a detail here that is officially named: it adds the ignore rule to your global
~/.config/git/ignore(not.gitignorein the project), so you cannot find this line when you look up the.gitignoreof the project. If you want the whole team to ignore it, you have to add a line to the project.gitignoreyourself.
**commands/ - Custom slash command. **
Each .md file in the directory becomes a /filename command. Save the command you repeatedly entered as a file, and you can call it by pressing / next time. Officially, commands/ and skills/ have been unified into the same underlying mechanism. It is recommended to use skills/ for new commands (supports packaging of attachment files). commands/ continues to be compatible but is no longer a recommended path.
**rules/ - Modular project rules. **
When CLAUDE.md is too long (official recommendation is to control it within 200 lines), the rules are split into multiple files under rules/ according to the theme, such as testing.md, api-design.md.
**skills/ - Skills. **
Each skill is a subdirectory with a SKILL.md inside. It can be called manually by /skill name, or it can be used by Claude to automatically determine whether it should be used based on the task.
**agents/ – subagent. **
Each .md defines a dedicated assistant with an independent context window that is not accessible to the main dialog. Suitable for parallel work or isolation tasks.
**.mcp.json – Team-shared MCP server configuration. **
Place it in the project root directory, parallel to .claude/. The MCP (Model Context Protocol) server can be configured in two places: the .mcp.json here is entered into git to be shared by the whole team, such as database tools or internal APIs used by the team; and personal MCP configuration (such as tools that only you use) is stored in ~/.claude.json and will not be entered into any warehouse. The difference between the two is: project sharing vs personal use.
💡 Summary in one sentence: In the project-level
.claude/,CLAUDE.md/rules/are the “guidance” for Claude,settings.jsonis the “enforcement” configuration of Claude Code, andcommands/skills/agents/are the “extensions” you install for it.
03 In the same directory, there is also a set in ~/.claude/
This is the easiest point to confuse newbies, but it is actually the simplest: The directory names above have almost the same copy in the user-level ~/.claude/.
commands/, rules/, skills/, agents/, CLAUDE.md, settings.json - these are in the project and also in ~/.claude/. There is only one difference:
(User-level ~/.claude/ also has several unique directories that are not available at the project level - themes/, keybindings.json, output-styles/, workflows/, etc., which will be introduced one by one in subsequent articles.)
**If it is placed under ~/.claude/, it will take effect on all your projects; if it is placed under project ./.claude/, it will only take effect on that one project. **
Here are two usages and you will understand:
- A
/commit-zhcommand (generates Chinese commit information), placed in~/.claude/commands/- this way it can be used in any project without having to reconfigure it for each project. - But the command “deploy to the company’s test environment” is obviously only related to that one project, so put it into the project’s
.claude/commands/and submit it for the whole team to use.
In addition to these “twin” directories, there are two files in the ~/ main directory that only appear at the user level, and you basically don’t need to touch manually, just recognize them:
| File/Directory | Where | What is | Do you want to care |
|---|---|---|---|
~/.claude.json | Home directory | Application status: login state (OAuth session), theme, personal MCP server, trust records of each project and UI preferences | Basically not touched, rely on /config to change |
~/.claude/projects/ | User level | Session records of each project; automatic memory is placed in its <project>/memory/ subdirectory | No need to write, it maintains itself |
One more thing to say here is auto memory: it and CLAUDE.md are two different things. CLAUDE.md is the instruction you wrote to Claude; automatic memory is the note that Claude wrote to himself (for example, it figured out your build commands and the pitfalls you have stepped on). It exists under ~/.claude/projects/<project>/memory/ and is reused across sessions. **Don’t confuse these two: one is written by you and the other is written by it. **
💡 One sentence summary:
commands/skills/These directories have their own project level and user level. The difference is only “manage one project” or “manage all your projects”;~/.claude.jsonand~/.claude/projects/are exclusive to the user level, and you basically don’t need to touch them manually.
04 Which ones should go into git and which ones should never be submitted
This section is the most practical. The pitfall of leaking the key at the beginning lies here. **First of all, here is an iron rule: anything with “local” or a key will not be entered into git. **
Why do some submit and others not? The logic is very simple - submit if the team wants to share it, and don’t submit if it is only related to you or your machine.
**Analogy: The items in the project file cabinet need to be registered and stored (into git), but the personal belongings in your workstation drawer do not need to be handed over. **
Classify the common documents in the project according to whether they should be submitted or not. You will not go wrong if you follow this list:
| File/Directory | Enter git? | Why |
|---|---|---|
CLAUDE.md | ✅ Submit | Project description shared by the team |
.claude/settings.json | ✅ Submit | Team Shared Permissions/Configuration Baseline |
.claude/commands/*.md | ✅ Submit | Standardized commands for team reuse |
.claude/rules/*.md | ✅ Submit | Modular rules shared by the team |
.claude/skills/, .claude/agents/ | ✅ Submit | Team-shared skills and sub-agents |
.claude/settings.local.json | ❌ Do not submit | Personal override; Claude Code will automatically help you gitignore |
CLAUDE.local.md | ❌ Do not submit | Personal project preferences; you need to manually add .gitignore |
| Any file containing a key/token/password | ❌ Never submit | Entering the warehouse history is equivalent to leaking |
A few practical reminders:
**settings.local.json You don’t need to worry about gitignore. ** The official statement clearly states: When Claude Code creates this file, it will automatically configure git to ignore it. If you want to temporarily release permission locally, writing here is the most stable way.
**CLAUDE.local.md requires you to add .gitignore yourself. ** It is different from settings.local.json and will not be automatically ignored - it will be added for you when you run /init and select the “Personal” option, otherwise remember to add a line manually.
**Keys should never be hard-written into any configuration files. ** The officially recommended approach is to use environment variables to reference in the configuration, such as writing ${GITHUB_TOKEN} instead of pasting the token in plain text - Claude Code reads it from your shell environment when it starts, and the token does not fall into the file at all. This advice was implemented to the letter.
💡 Summary in one sentence: Team-shared files (
CLAUDE.md,settings.json,commands/, etc.) must be entered into git; those with “local” and any key containing will never be submitted - thesettings.local.jsonsystem will automatically ignore it for you, andCLAUDE.local.mdrequires you to add it manually.
05 Who should listen if there is a configuration conflict: Priority is explained clearly with a picture
You may have thought of a question: **User-level settings.json and project-level settings.json both set the same item, who listens to it? **
The official priority order is as follows (from high to low):
Managed(组织托管,最高,谁都盖不住)
  ↓
命令行参数(--permission-mode 这类,仅当次会话)
  ↓
Local(settings.local.json)
  ↓
Project(项目 settings.json)
  ↓
User(用户 ~/.claude/settings.json,最低)
**Memory tip: The more “specific” and “closer to the current operation”, the higher the priority. ** Organization management > What you temporarily specified on the command line this time > What is local to your project > What is shared by the project > What is your global default.
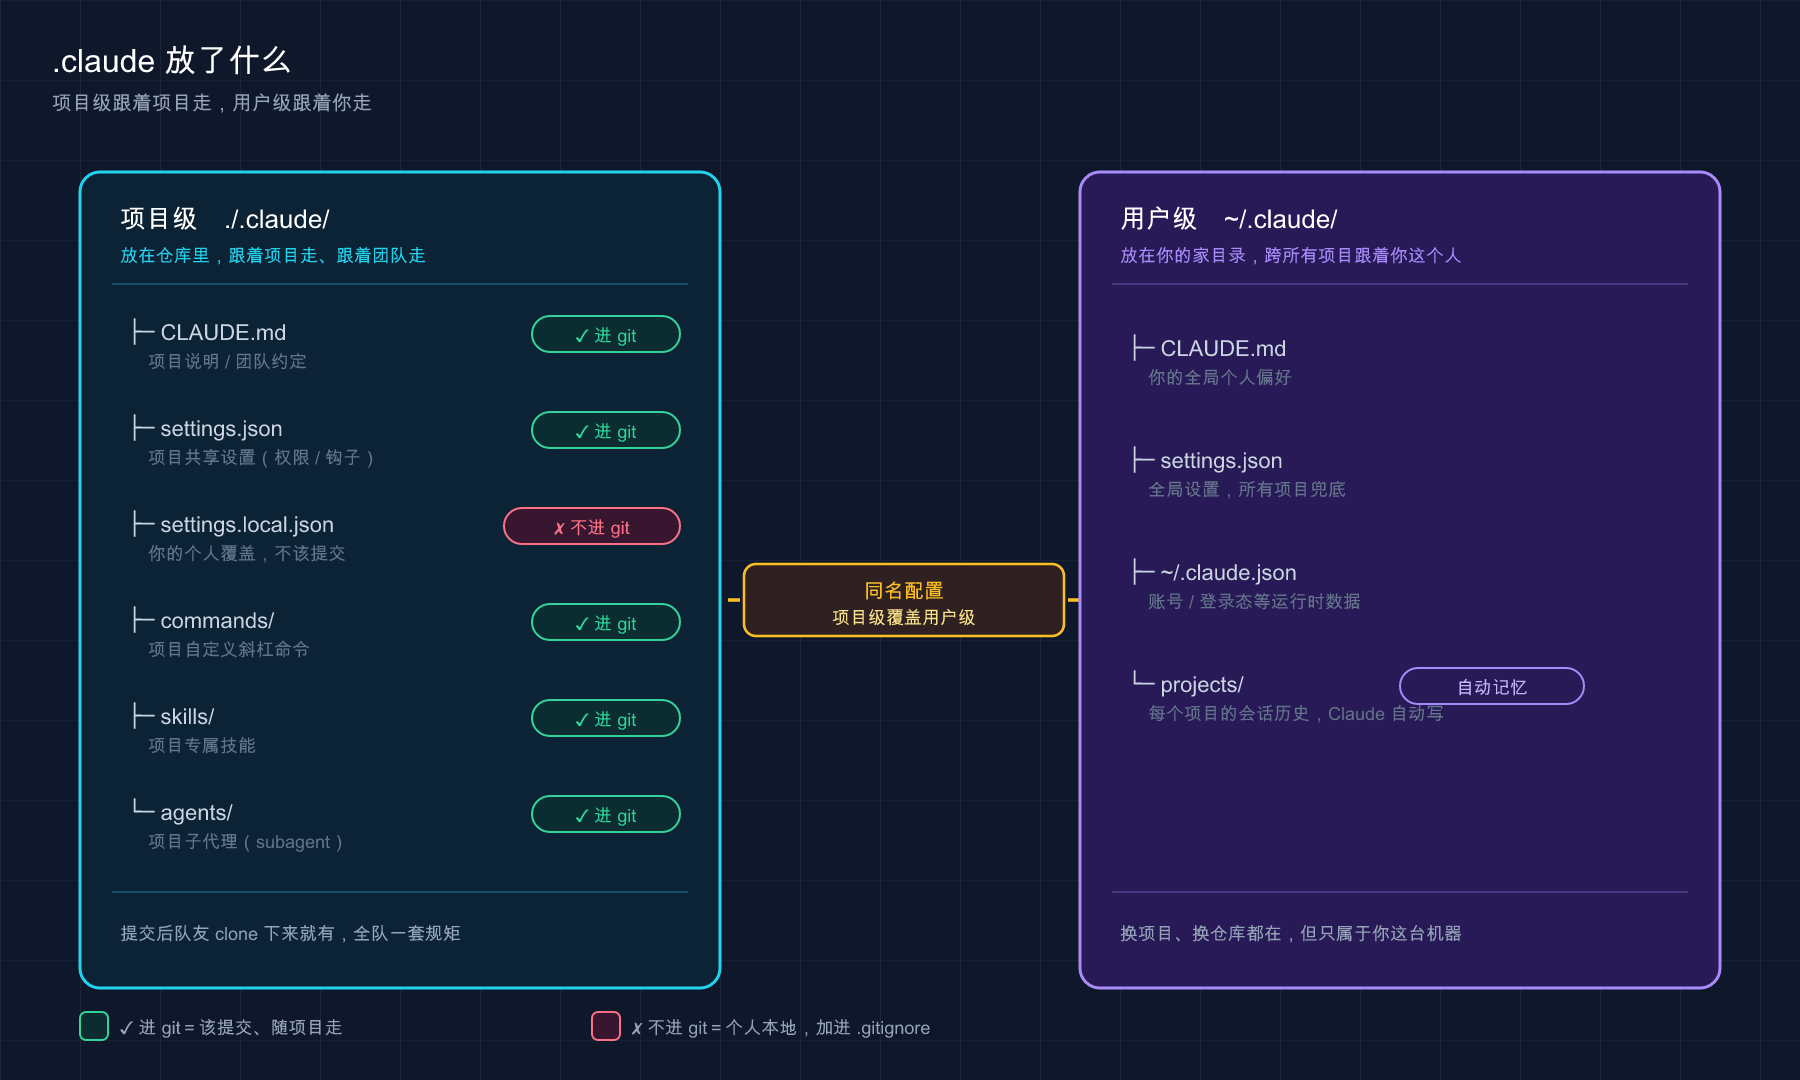
This picture places two trees side by side: Project-level ./.claude/ on the left (follow the project, enter git as needed to share with the team), and user-level ~/.claude/ on the right (follow you, manage all your projects) - Remember which tree controls what, so that the subsequent configuration will be placed where there will be no confusion.
But there is a pitfall that is particularly easy to step on, and it must be taken out separately - not all settings follow the “override” logic:
| Setting type | When multiple scopes exist at the same time | Example |
|---|---|---|
| scalar value (single value) | Take the most specific one, override | model: use the project’s setting |
| Array value (list) | Cross-scope merge, no override | permissions.allow: user’s + project’s + local overlay |
It’s easy to suffer from this difference: I’ve stumbled upon it myself once – I denied a certain command in the user-level settings.json, and I thought it would be disabled globally. However, when I moved it to a project, it still ran without error. At that time, I stared at the configuration for a long time and didn’t figure it out. It was later discovered that permission rules are merged, not overridden. If project-level allow is allowed, it will be evaluated together with user-level rules. Therefore, don’t expect to rely on user-level “one-size-fits-all ban” for permissions. You must understand the merging rules.
💡 Summary in one sentence: The priority from high to low is Managed → Command Line → Local → Project → User; but it must be distinguished - scalars such as
modelare “overrides”, and arrays such aspermissions.alloware “merging and overlaying”.
06 Hands-on: See these two levels of directories with your own eyes
Just looking at the pictures is worse than taking a look yourself. The following set of commands are only for reading and not writing. They are very safe. If you follow them, you can understand the “two homes” clearly.
Step one: Look at the user level of your home directory ~/.claude/
Open a terminal and type (Mac/Linux):
ls -a ~/.claudeWindows PowerShell uses:
dir $HOME\.claudeExpectation: You’ll see settings.json, projects, possibly commands, skills, etc. - depending on how deep you are with Claude Code. **As long as things are listed, it means that the “home” of the user level exists and is in effect. **
Step 2: Look at the project level .claude/ in a project
Just cd into a project that you have run Claude Code on (if not, go back to the previous article and use /init to create one), and then:
ls -a .claudeExpectation: At least you can see settings.local.json (if you have granted permissions before), and possibly settings.json. **This is the project-level “filing cabinet”, which is separate from the main directory one. **
Step 3: Verify that settings.local.json is indeed ignored by git
In this project (it must be a git repository), type:
git check-ignore .claude/settings.local.jsonExpected: The terminal ** echoes this file path ** (.claude/settings.local.json), which proves that it has been ignored by git - this is what Claude Code automatically does for you. If nothing is output, it means it is not ignored, and you’d better add this line to .gitignore manually.
Step 4 (optional): Take a look at the project instructions
cat CLAUDE.md(Windows PowerShell uses type CLAUDE.md)
Expected: Print out the content generated by the previous /init. This is the first file Claude reads every time he enters the project, now you know where it lies.
⚠️ A reminder:
git check-ignoreonly makes sense in git repositories. If this project has not yet hadgit init, this command will reportfatal: not a git repository. Please turn it into a git repository and try again.
💡 Summary in one sentence:
ls -a ~/.claudelooks at the user level,ls -a .claudelooks at the project level,git check-ignore .claude/settings.local.jsonverifies ignoring - three read-only commands to see “two homes” and “who is ignored by git” at once.
07 Summary
In this article, we took a look at Claude Code’s “family background” in the project. To review in series:
| What do you remember | What is it specifically |
|---|---|
| Two Homes | Project ./.claude/ (Follow the project and enter git) + Home Directory ~/.claude/ (Follow you and not enter git) |
| Guidance vs Configuration | CLAUDE.md / rules/ is the guidance for Claude; settings.json is the enforced configuration |
| Twin directories | commands/ skills/ agents/ One set each for project level and user level, the difference is whether to manage one or all |
| git red line | Those with “local” and keys will never be submitted; settings.local.json will be automatically ignored by the system |
| Priority | Managed → Command Line → Local → Project → User; scalar override, array merge |
You should now be able to: Open any project and take a look at a file in .claude/ to know what it does, whether it belongs to the project or to you, and whether to submit it; you also know who to listen to when there is a configuration conflict. This panoramic map is the base map for all subsequent special articles - After learning how to configure settings.json, how to write CLAUDE.md, and how to create skills and sub-agents, you can find its location on this map.
Next article 14 “Interactive Interface and Shortcut Keys” - Now that you can understand the “static map” of the directory structure, it’s time to get familiar with the “Operation Panel” of Claude Code. The next article will take you through every part of the interface, and then train the most commonly used shortcut keys into muscle memory, so that you can type quickly and steadily.