05 | Claude Code in 16 Hours: Interface, Shortcuts, Prompting, and Daily Workflows
Use the interface, shortcuts, and a strong prompt structure to define goals, context, and acceptance criteria.
14 · Interactive interface and shortcut keys: Put your hands in the right place
“Hey, what’s the difference between pressing Esc once and pressing Esc twice?”
“Yes, it’s far from it. Press once to apply the brakes - make Claude stop; press twice to reverse - return the entire conversation to the previous point.”
”…I’ve been using it as a key before.”
To be honest, this is the most confusing sentence for newbies. The interface of Claude Code looks simple, just an input box with a few lines of words, but underneath there is a whole set of keyboard actions and special symbols. Those who know it can use it quickly, while those who don’t know it all rely on the mouse and press Enter**. The same happened to me in the first two weeks - one time it started frantically modifying a bunch of files following my vague words. I stared at the scrolling output for almost three minutes, and saw the changes getting worse and worse. Then I suddenly remembered, “Wouldn’t it stop if I pressed Esc?” At that moment, I really wanted to beat myself up.
This article does not teach you to make demands (that is for the next article), but only does one thing: Let you put your hands in the right place.
After reading this article, you will get:
- An “interface partition map” - where are the input boxes, status lines, and mode prompts, and what to look at
- A high-frequency shortcut key cheat sheet that can be posted next to the monitor (Esc, Ctrl+C, Ctrl+D, Shift+Tab, up arrow…)
- How to use the two special prefixes
@!in the input box, plus a sentence explaining what/and#are for - How to input multiple lines (too many people have stepped on this trap)
01 First understand this screen: what parts is the interface divided into?
Let me give the conclusion first: Claude Code’s interface, you only need to recognize three parts-input box, status line, mode/permission prompt. It’s all “talking” to you in other scrolling areas, so you don’t need to specialize in it.
**Analogy: Look at a car dashboard. ** You don’t need to recognize all the indicator lights when driving, but you must be able to find the steering wheel, gear position, and fuel gauge at a glance. The interface is the same, just recognize the main operating area and a few key readings and you can drive away.
After claude is started, the layout from bottom to top is roughly like this:
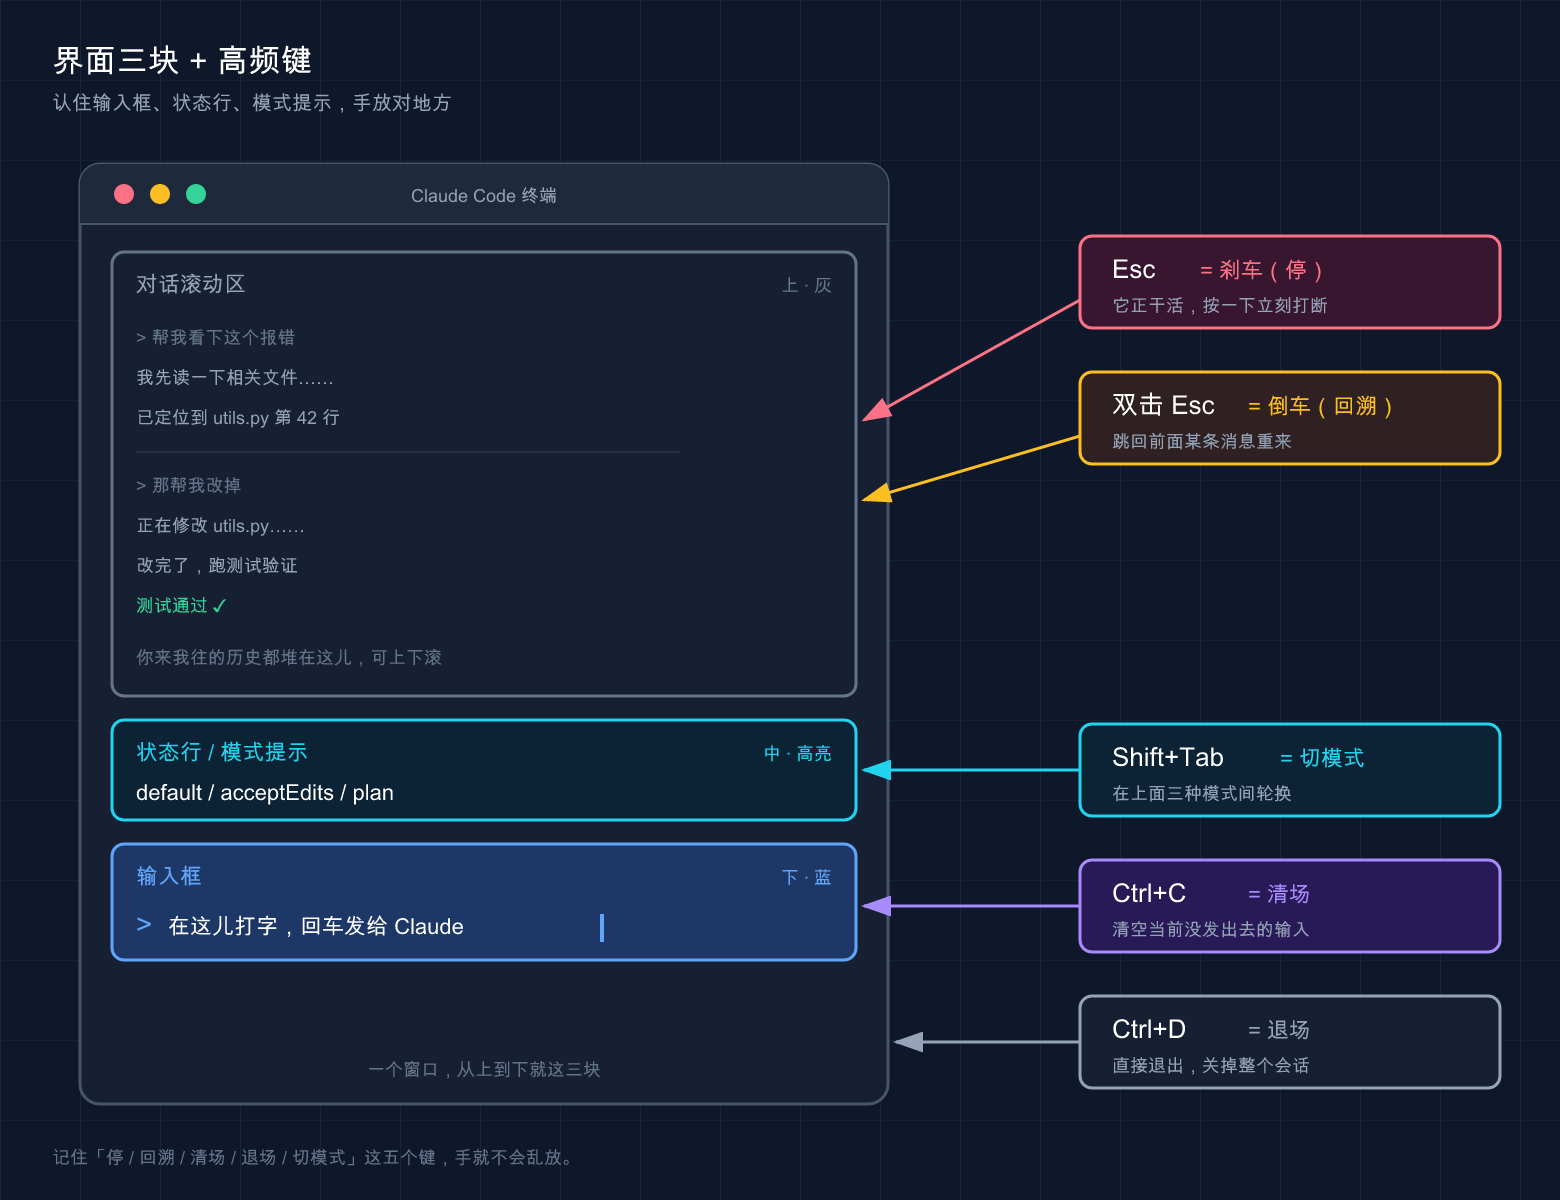
- Input box: The bottom line is usually preceded by a
>prompt. This is your only entrance to talk to Claude. Typing, pasting code, and typing special commands are all here. - Status Line/Footer: The few lines of small words immediately above and below the input box. It will display some contextual information - such as which directory you are currently in, whether there are any background tasks running, and if your branch has an open PR, the official documentation says that it will also display a clickable “PR # number” link in the footer. The underline color represents the review status (green = approved, yellow = pending review, red = request for changes, gray = draft).
- Mode/Permission Prompt: Tell you whether it is “normal mode”, “plan mode (plan)” or “automatically accept edits (acceptEdits)”. This is the area you should keep an eye on - it determines whether Claude will ask you before taking action.
Here is a scene where novices are particularly prone to panic: The screen suddenly changes color, or half of it is blank. Don’t think it’s broken. The official has given a special key Ctrl+L to force the screen to be redrawn, and the input and conversation history will be retained. The most common thing I encountered was running Claude in tmux, switching to another window to do something, and then switching back to a screen full of garbled characters. The first time I encountered it, I really thought that the session was hung up, and I stretched out my hand to restart it. Later I realized that a Ctrl+L would be clean - now I reflexively press it as soon as the screen is blurred.
💡 Summary in one sentence: The interface requires three pieces of “input box + status line + mode prompt” to start working. Don’t panic if the screen is too long,
Ctrl+Lredraws.
02 High-frequency shortcut keys: like gear shift and horn, you don’t have to look down once you’re familiar with them
This is the core of this article.
**Analogy: The gear shifter and horn in a car. ** Novice drivers always glance at the gear, but experienced drivers know which gear they are in as soon as they put their hands together, and press the horn when they raise their hands - because these actions are built into muscle memory and do not occupy their attention. Shortcut keys are like this: In the first three days, you have to press them according to the table. Once you are familiar with them, keep your hands on the keyboard and focus only on the output.
The table below has all been checked against the official interactive-mode.md / keybindings.md, and the selected ones are all used by novices every day. It is recommended that you post the screenshot next to the monitor and remember it after a week:
| Shortcut keys | Function | When to press |
|---|---|---|
Esc | Interrupt Claude’s current answer or tool call | It’s off track / You want to change your mind, use brake |
Esc Esc (when the input box is empty) | Open the back menu and jump back to the previous point | If you want to cancel the previous round, reverse and return to the archive |
Ctrl+C | Interrupt; when there is nothing to interrupt, clear the input for the first time and exit for the second time | Want to clear half of the input |
Ctrl+D | Exit the Claude Code session | Finish the work, Close the door and leave |
Shift+Tab | Cycle through permission modes (default / acceptEdits / plan…) | Want it to “plan first and don’t do it” or “let go and change it yourself” |
↑ / ↓ (up/down arrows) | Flip through the command history (when the cursor is at the edge) | Resend the last command without retyping |
Ctrl+L | Redraw screen (preserve input and history) | Screen is / half blank |
Ctrl+R | Reverse search command history | Want to find “my last long command” |
Ctrl+O | Switch to detailed transcription view | Want to see which tools it adjusts |
Pick three that are most likely to be confused and explain them separately:
Esc once vs twice: brake or reverse
The official documents write these two things clearly, which translated into human language is:
EscClick = Apply the brakes. Claude is answering or adjusting tools. As soon as you press it, it will stop at the moment. The completed part will be retained, and you can continue to add a sentence and re-direct it.Escpressed twice = Reverse. But there is a prerequisite-the input box must be empty. When you are empty, double-click Esc, and the back menu will pop up (the checkpoint/backtrack mentioned in Part 07), allowing you to jump back to the previous state.
⚠️ This is the most confusing point (officially written clearly): if there is text in the input box, double-clicking Esc will “clear this text and save it into the draft history”, not to open the back menu. So to go back, first clear the input box.
It’s easy for newbies to stumble on this - they typed half a sentence in the input box, wanted to go back, and pressed Esc wildly, but the text disappeared, the menu didn’t come out, and they were confused. It’s easy to do once you understand it: Clear first, then double-click Esc.
Ctrl+C vs Ctrl+D: Clear or exit
Both of them mean something like “stop”, but they are completely different things:
Ctrl+C= Clear the field without leaving the field. If there is a task running, interrupt the task; when there is no task, press the first time to clear the words in your input box, and click the second time to exit.Ctrl+D= Exit directly. Exit the entire session at once (it sends the EOF signal).
By the way, a little trivia: these two keys are clearly marked as “reserved shortcut keys” in the official documentation. They are hard-coded and cannot be rebinded (there is also Ctrl+M in the same batch, because it is equivalent to carriage return in the terminal). Therefore, no matter which terminal or system, Ctrl+C / Ctrl+D behaves the same, so feel free to use it.
Shift+Tab: Switch between “Ask or Not” with one click
Shift+Tab is probably the most commonly used shortcut key in daily life. It cycles between several permission modes:
- default: Will stop and ask you before changing the file.
- acceptEdits (automatically accept edits): Editing operations are no longer asked one by one to speed up.
- plan (planning mode): Only make plans without taking action, suitable for aligning ideas before making major changes.
- and other additional modes you enable (such as
auto/bypassPermissions).
Permission Mode (Permission Mode), to put it bluntly, is the switch that “will the intern ask you before doing anything”.
Press Shift+Tab to circle between them, and the status line will show you which mode you are currently in in real time. The specific purpose of each mode and how to configure it is discussed in Part 20 “Permission Configuration”. Here you only need to remember: if you want to change the mode, just press Shift+Tab.
(One platform difference: Officially stated that in some Windows configurations (older terminals that do not support VT mode, older Node/Bun runtime), this key defaults to Alt+M instead of Shift+Tab. If it doesn’t work, try changing it.)
💡 One sentence summary:
Esconce to brake and twice to reverse,Ctrl+Cto clear the scene,Ctrl+Dto exit,Shift+Tabto switch to “Ask you or not” - These four are welded into muscle memory, and you are halfway there.
03 Special prefixes in the input box: @ and ! are two quick knives
Just being able to press buttons is not enough. The input box of Claude Code is actually “intelligent” - certain symbols placed at the beginning will trigger completely different behaviors. The official list is very clear in the “Quick Commands”. The most useful ones for novices are these two: @ and !.
**Analogy: Typing @ in the mobile phone input method will automatically pop up the contact. ** You don’t need to remember your full name, just type @ and it will list the candidates for you to choose from. @ also has the same flavor in Claude Code, except that it selects files.
@: precisely name a file/directory
Type @ directly in the input box, which will trigger file path auto-completion - it will list the files in the current project for you to select. You can then type a few letters to filter and select.
Why use it? Because this is the most accurate way to “pin” a specific document into your sentence. For example, if you want it to read a certain file:
@src/auth.ts 这里的登录逻辑有没有问题?By typing like this, Claude knows exactly which file you are referring to, and there is no need for it to guess or search through the entire project. @ is basically indispensable when writing complex instructions - The project is large, and there are many files with the same name. In the vernacular, “that auth file” often makes mistakes. @ means there is no ambiguity.
!: No need to wait for approval, just run a shell command directly
Type ! at the beginning of the input box, followed by a command to enter Shell mode (Bash mode): This command runs directly in your terminal without Claude’s approval or the need for it to “understand” your words before running it for you. The output after running will be added to the conversation context.
! git status! ls -laWhen will this stuff smell good? When you want to take a quick look at the status of the warehouse, you don’t want to tell them what you want to do and wait for another round of approval. For example, if you are halfway through the change and want to confirm the current git status, just type ! git status, and the result will come out immediately. Claude also “sees” the output, and he can talk about the status in the next sentence.
Will Claude reply after the run? In two cases, the cost accounts are also different:
- **Default (from v2.1.186): Automatically reply to you. ** For example, after
! npm testis run, it will directly explain where it failed without you having to ask again. It saves trouble, but this reply is charged according to a common prompt word - so by default!saves the back and forth of “describing requirements + waiting for approval”, not tokens. - **Set
respondToBashCommands: falseinsettings.json: only record, no reply. ** Return to the old behavior before v2.1.186 - the output only goes into the context, no model calls are initiated at the moment, and the selling point of “token saving” is back. Strictly speaking, it is not zero cost: this output will be charged according to the input token along with your next message, which is usually small enough to be ignored; but if!runs a long log that refreshes the screen, the tail will be significant.
How to choose: If you want it to comment on the output (for example, after running a test and listen to it explain where it crashed), use the default; if you just want to “feed” live data into the dialogue and control the rhythm yourself, set false.
Several practical details officially mentioned:
- To exit Shell mode: Press
Esc,Backspace, orCtrl+Uon an empty prompt. - It supports history-based completion: press
Tabwhile typing a command, and you can complete!commands that you have run before in this project.
What about / and #?
You may have seen these two elsewhere, but here they are explained clearly in one sentence, so don’t confuse them:
/(starting with slash) = Invoke command/Skill. Typing a/brings up a long list of available commands (/help,/clear, etc.). **This set of slash command systems contains a lot of content. We will leave it to Chapter 36 “Slash/Command” to expand it. ** In this article, you only need to know that “/is the command entry”.#(starting with pound sign) = Historically, there has been a usage of “using#at the beginning to quickly write an item into memory (CLAUDE.md)”, but the behavior is different in different versions. How Claude Code “remembers” your preferences and how to write CLAUDE.md are the main topics of Part 18 “CLAUDE.md User Guide” and Part 25 “Memory System”. We will discuss them systematically there. I won’t expand it here, lest you press it and find that the version doesn’t match.
If you put the four prefixes together and compare them, you won’t be able to remember the string:
| Starting symbol | What is triggered | One sentence | Do you want to go into details in this article |
|---|---|---|---|
@ | File path auto-completion | Accurately name a file | ✅ As mentioned above |
! | Shell mode | Run bash directly, output into the context, Claude will answer the call by default | ✅ As mentioned above |
/ | Command/Skill Menu | Command entry for controlling sessions | ❌ Reserved for Part 36 |
# | (Related to memory, version related) | Go to CLAUDE.md to remember things | ❌ Leave it to Chapter 18 / 25 |
💡 Summary in one sentence:
@names files,!runs commands smoothly, these two are quick tools used every day;/and#each have their own articles, this article only needs to recognize their existence.
04 Multi-line input: Enter always sends the words, what should I do?
This is a high-frequency “stuck point” that needs to be discussed separately.
Here comes the problem: You wanted to give Claude a relatively long instruction divided into several lines, but pressed Enter to change the line, but the words were sent directly - it was submitted in half a sentence. Eight out of ten newbies have fallen victim to this trick in the first week.
The reason is simple: Enter` in the input box defaults to “Send”, not “Line Break”. To change lines, you have to use another key. The official gives several ways to play, ranked from “least picky terminal” to “most convenient”:
| How to play | How to press | Scope of application |
|---|---|---|
| Backslash escape | Type \ first, then press Enter | All terminals will work, if you can’t remember anything else, remember this one |
| Control Sequence | Ctrl+J | Any terminal will do, no configuration required |
| Shift+Enter | Shift+Enter | iTerm2, WezTerm, Ghostty, Kitty, Warp, Apple Terminal, Windows Terminal** out of the box** |
| Option+Enter (macOS) | Option+Enter | On macOS, Option needs to be assigned to the Meta key first |
A safe habit: Just remember \ + Enter is enough - because it “works in all terminals”, you don’t need to adapt again when changing machines or terminals. Once you’ve settled on a certain terminal, try Shift+Enter which is more convenient.
If you are using VS Code, Cursor, Alacritty, Zed, Devin Desktop and the like (their built-in terminals do not support Shift+Enter line breaks by default), the official solution gives you a once and for all solution: run /terminal-setup to automatically install the line break binding.
There is a more comfortable way to play: If you find it frustrating to write long commands in a small input box, you can press Ctrl+G and write directly in your default text editor. After writing, save and bring it back. This is basically what I do when writing complex requirements with dozens of lines and formats. It is much more comfortable than typing hard in the terminal.
💡 Summary in one sentence: Press Enter by default to “send” rather than “line feed”; Line break is remembered as
\+Enteris universal, long commands can be written directly withCtrl+Gto open the editor.
05 Hands-on: Try all these keys in three minutes
If you don’t practice it, you will forget it tomorrow. Below is a set of minimum verification process that does not rely on any complex projects and can be run by just finding a folder. Open a terminal and follow along.
Step one: Go to any folder with files and start
cd ~/Desktop
claudeExpected: The welcome interface appears, with an input box at the bottom (the one in front of it is >).
Step 2: Try ! Shell mode
Type in the input box (note the ! at the beginning of the top space):
! echo hello-shortcutsEnter. Expectation: The terminal prints out hello-shortcuts directly (without going through the “asking for approval” step), the command and output are recorded in the conversation, and then Claude will simply reply to the output (under the default settings) - this is the complete process of Shell mode.
Step 3: Try ↑ to read history
When the input box is empty, click the up arrow ↑.
Expected: The ! echo hello-shortcuts just now is transferred back to the input box as it is. This is the command history. You don’t need to type again to reissue the command. Press Esc or Ctrl+U to clear it first.
Step 4: Try Shift+Tab to switch modes
Press Shift+Tab once, then again, and again.
Expectation: The mode prompts in the status line cycle between default / acceptEdits / plan (switch between which modes you enable). When you see that line of words changing, it means you got it right. Press a few more times to switch back to default.
Step 5: Try multi-line input
Type a letter, then press \ and then Enter, then type the second line:
第一行 \
第二行Expected: \ + Enter causes the cursor to move to the next line instead of sending the “first line”. That’s right.
Step Six: Exit
Press Ctrl+D.
Expected: Exit Claude Code directly and return to the normal terminal.
After running through these six steps, you will have verified all the !, history, Shift+Tab, multi-line, and exit discussed in this article with your own hands.
⚠️ A possible episode: If you find that Option key shortcuts such as Option+Enter do not work on macOS, it is because the terminal has not configured Option as a Meta key. This is a terminal settings issue, not a bug in Claude - \ + Enter will always work, so use it first.
💡 Summary in one sentence: Follow these six steps and run through it yourself,
!,↑history,Shift+Tab,\+Enterto change the line,Ctrl+Dto exit** and you will have gone through the muscle memory**, which is better than looking at the table ten times to remember it.
06 An advanced sentence: All keys can be changed
Leave a hook at the end. The above keys are all default values, but Claude Code supports custom shortcut keys - if you feel that any key is not comfortable, you can change it.
According to the official documentation (requires v2.1.18 or higher, use claude --version to check), run:
/keybindingsWill create/open ~/.claude/keybindings.json, where you can rebind. However, there are a few keys that cannot be changed - the Ctrl+C and Ctrl+D mentioned earlier are hard-coded reserved keys.
**Advice to novices: don’t rush to change it yet. ** The default configuration has been repeatedly polished by the official. Use it first, and wait until you clearly feel “I press this button every day, but the position is awkward” before touching it. It usually takes almost a month of use before you really want to change a certain key. Before that, the default one is enough.
💡 One sentence summary: If the key is not convenient, you can use
/keybindingsto change it, but newbies should be familiar with the default one first, and don’t mess with the configuration as soon as you get started.
07 Summary
This article does not teach you how to make requests, but specifically teaches you to put your hands in the right place - where to look at the interface, how to press keys, and how to use special symbols.
Put the core movements into a list and put it in your pocket:
| What do you want to do | Click this |
|---|---|
| Make it stop (keep what it has done) | Esc |
| Return to the previous point (clear the input box first) | Esc Esc |
| Clear input / Exit | Ctrl+C / Ctrl+D |
| Switch to “ask or not” mode | Shift+Tab |
| Turn / search command history | ↑ / Ctrl+R |
| The screen took time to redraw | Ctrl+L |
| Name a file | @ |
| Run commands easily | ! |
| Multi-line input newline | \ + Enter |
You should now be able to: Recognize the input box, status line and mode prompts of the interface at a glance; use Esc to brake accurately, Shift+Tab to switch permission modes; use @ to name files, and ! to run commands; no longer be fooled by “enter and send half a sentence”. After you are familiar with these actions, your interaction with Claude Code will change from “switching back and forth with the mouse and keyboard” to “keeping your hands on the keyboard” - the gap in efficiency widens here.
Next article 15 “How to ask questions and give instructions” - Once the hands are in the right place, the next step is the “mouth”. For the same request, people who know how to ask can get it done in three sentences, but people who don’t know how to ask can go back and forth for five rounds and still get off track. Let’s talk about the next article: How to talk to Claude so that it can listen accurately and do the right thing? **
15 · How to ask questions and give instructions: speak to Claude’s heart
To tell the unpalatable truth: when many people first started using Claude Code, they used it as a search engine.
Imagine this scenario: a function in the project reports an error, and you snap over and say “Fix this bug”, without even saying which file or what error is reported, just press Enter and wait to watch the show. As a result, it “guessed” what it thought was a bug and changed three files, but none of them was what you really wanted to fix. You stare at the diff on the screen in confusion, muttering to yourself, “This AI is not good.”
When I think back, I understand - it’s not the thing that doesn’t work. The problem is not with Claude at all, his sentence is too bad: the amount of information is approximately zero, it can only be filled in by the brain. I made a mistake, who can I blame?
Let’s put it this way: Claude Code’s ceiling is largely locked by the way you ask questions. For the same model and the same project, people who know how to ask for it can get it done in just three sentences, while people who don’t know how to ask for it can rework it for five rounds and still get angry. Today I will explain to you the universal speaking rules of “how to clearly state a sentence of requirements” - not to teach you to memorize templates, but to teach you to understand “what does Claude need to know so as not to go astray”.
After reading this article, you will get:
- A comparison table of “Bad Questions vs. Good Questions”. If you follow these changes, the rework rate will be reduced immediately.
- Four hard core methods for raising requirements: being specific, giving context, giving acceptance criteria, and planning complex tasks in advance
@is the correct way to quote a file to circle the range.- An experiment of “two interpretations of the same requirement” that can be followed to see the difference with your own eyes
01 What’s so bad about bad questions?
Take a look at the rollover above. “Fix this bug”, from Claude’s perspective, the information is ridiculously lacking:
- Which bug? It has to guess where you are talking about.
- Which file? It has to be translated into full projects.
- What is the expected correct behavior? It doesn’t know at all and can only make up its mind based on “generally speaking what it should be”.
**Analogy: Bringing in new people. ** If you tell a new intern, “Get that thing,” he’ll be lucky if he gets it right. Change it to “Change the color of the login button in the upper right corner of the homepage from gray to brand blue #1A73E8”, and he can do it right with his eyes closed. **The more specific the instruction, the less likely the newbie will go astray; the more vague you give him, the more he has to guess, and the greater the chance of making a wrong guess. ** Claude is exactly the same.
Let’s look at this set of comparisons repeatedly emphasized in the official documents (translated into Chinese according to the official meaning):
| Scene | ❌ Bad Question | ✅ Good Question |
|---|---|---|
| bug fix | ”Fix the login error" | "User reported login failure after session timeout. Check the authentication process in src/auth/, focusing on token refresh. First write a failed test that can reproduce the problem, and then fix it” |
| Write tests | ”Add tests to foo.py" | "Write tests to foo.py to cover the boundary case where the user has logged out, don’t use mocks” |
| Ask the code | ”How did the broken API of ExecutionFactory be designed like this?" | "Look through the git history of ExecutionFactory and summarize how its API evolved step by step into what it is now” |
| Add function | ”Add a calendar component" | "Let’s first look at how to implement existing components on the homepage. HotDogWidget.php is a good example. Follow this model to implement a calendar component that allows users to select months and turn years forward and backward. In addition to existing libraries in the code base, do not introduce new libraries” |
Do you see the way through? **Good questions all do one thing: feed Claude things in advance that he would have to guess. **
💡 Summary in one sentence: The problem with bad questions is that “the information gaps are all filled by Claude’s brain.” A good question is to guess what it is going to be, and you must make it clear in advance.
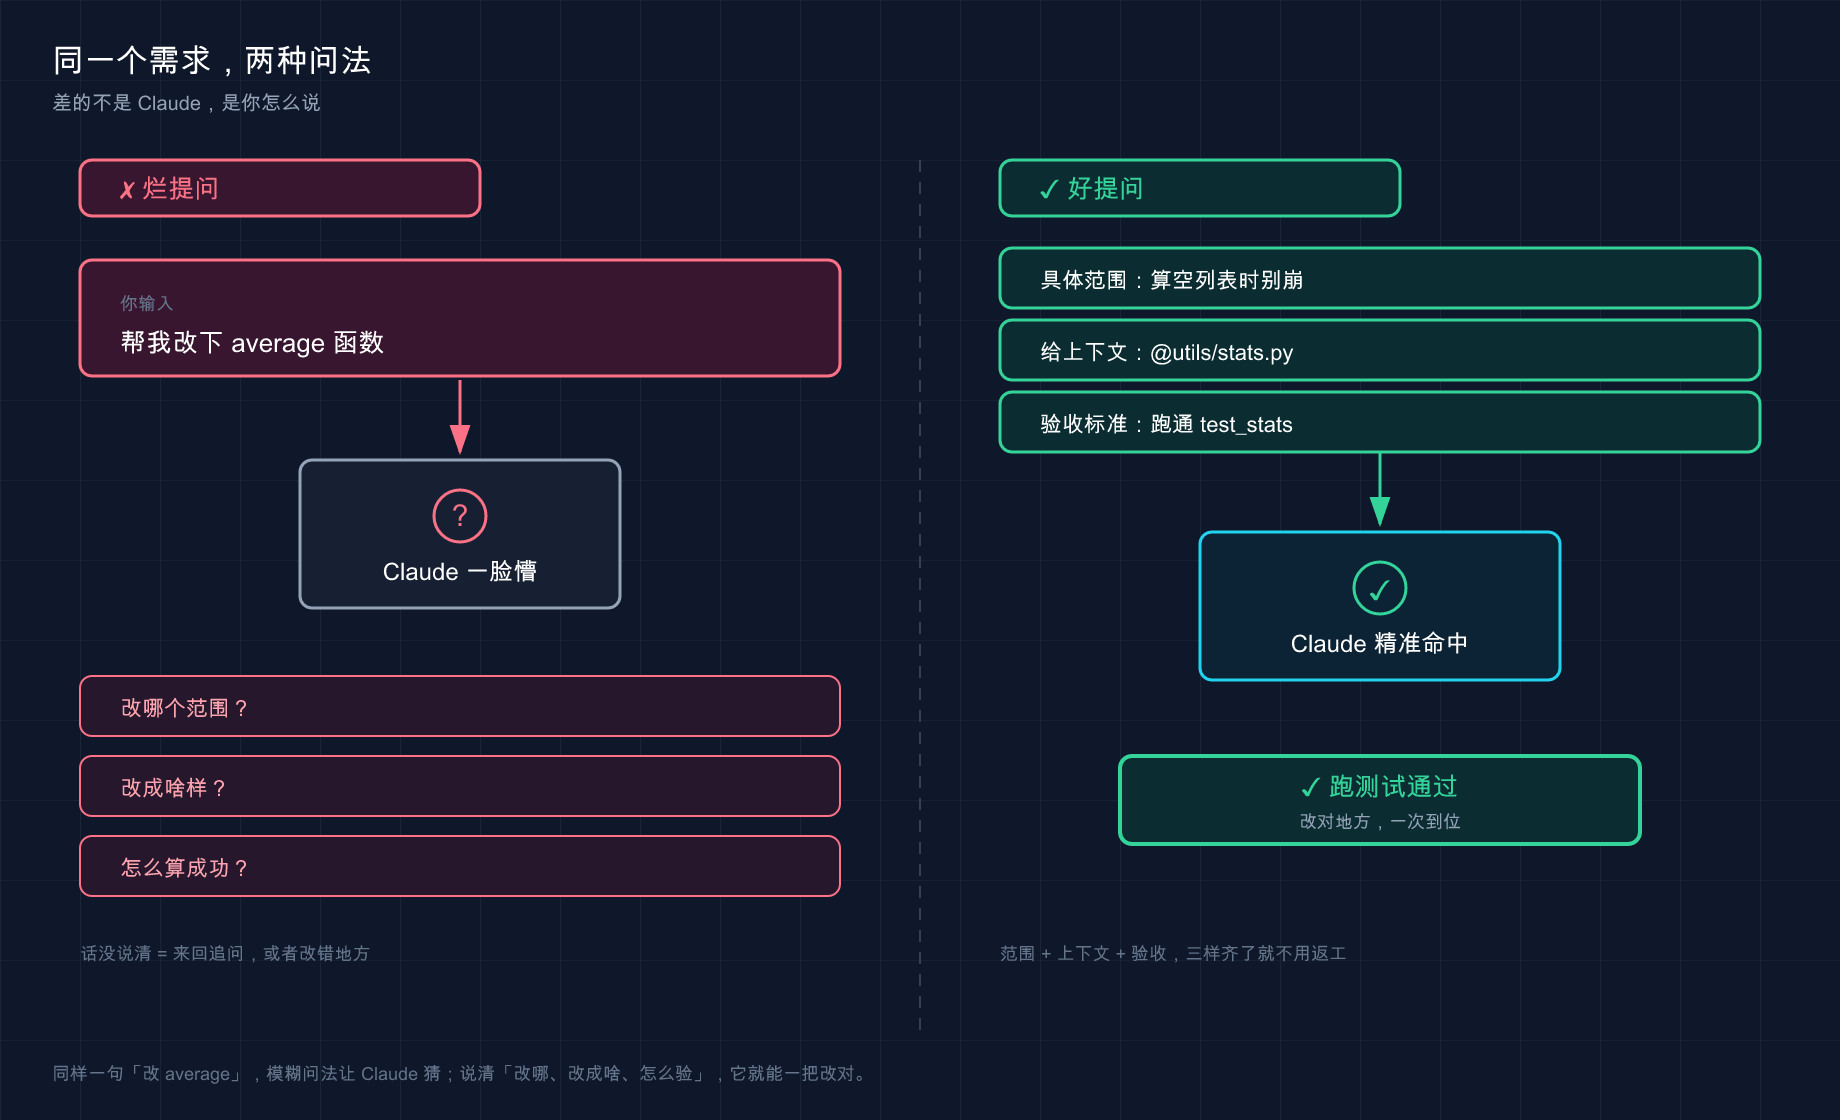
This Before/After puts together two ways of asking for the same requirement: The left side asks vague questions, and Claude can only make up his mind and ask a bunch of questions; the right side combines the scope, context (@file), and acceptance criteria, and it hits the target in one go and runs the test directly. The difference isn’t Claude, it’s how you say it.
02 Mental Method 1: Concrete > Fuzzy
This is the most important of the four mental principles, not one of them.
There is a sentence in the official document that is particularly worth remembering. The original sentence is:
The more precise your instructions, the fewer corrections you will need.
Translated into vernacular: **Say one more sentence in the front and save three rounds of rework later. ** You think “saving trouble” means typing a few less words, but in fact, the few words you miss typing will eventually become the price of pulling back and forth, which will be doubled back to you.
**How specific is it? **Three dimensions are crammed in:
First, define the scope—which file, which function, and which scenario. Don’t let it look like a needle in a haystack of projects.
Second, state the constraints - “Don’t introduce new libraries”, “Maintain backward compatibility”, “Don’t touch test files”. If you don’t say it, it will follow its own preferences, and turning back may not be what you want.
Third, point to a reference - “Follow the pattern of HotDogWidget.php”. This method is the most worry-free after actual testing: Instead of describing the style you want in words, it is better to just give it a ready-made example that you are satisfied with, and it will copy it, and it will be exactly the same.
Here’s a counter-intuitive exception that needs to be made clear: **It’s not absolutely wrong to ask vague questions. ** When you are in the “exploration stage” and have no idea about the direction, an open question “Do you think there is anything that can be improved about this document?” can actually reveal something you didn’t even think to ask. The official official quote is “When you are exploring and can correct the direction, vague prompts can be useful.” **The rule is: be extremely specific when you want results, and intentionally leave blanks when looking for inspiration. **
It’s easy to step on this boundary when making a small tool - at the beginning, I wanted to see how Claude understood the messy code, and I deliberately asked a very broad question. The several improvement points it gave were really inspiring; but once you have a clear goal in mind, asking vague questions is a waste of rounds, and it has to guess what you want again every time.
💡 Summary in one sentence: If you want to determine the result, be as specific as possible (scope + constraint + reference). Only leave it blank on purpose when you are actively looking for inspiration.
03 Tip 2: Give context, don’t let it guess.
In addition to being specific, the second trick is to feed the “material” directly to its mouth** instead of describing where the “material” is with your mouth.
The two most frequent actions are enough to remember for more than half of the time:
**First, use @ to reference the file. ** Type @ in the input box, and the file path completion will pop up. After selecting it, ** the complete content of the file will be directly inserted into the dialog ** - Claude does not need to find and read it first, saving one step and not finding the error.
参考 @src/types/user.ts 里的类型定义,给 UserService 补上类型注解This is 10,000 times more reliable than “There is a user type file in the project, go find it.” The official documentation clearly states that the @ quote “reads the complete contents of the file before responding”.
**Analogy: USB interface. ** @ is like inserting a “file USB flash drive” directly into Claude’s workbench - plug it in and use it, and the data it needs will be available in a second; if you just say “the data is in the second cabinet of the archives on the third floor”, it will have to go there by itself. If you go wrong, it will delay things even more.
**Second, if you report an error, post the entire paragraph directly. ** This is worth training into muscle memory - when encountering a traceback, don’t generalize “it reported a null pointer”, paste the complete stack as it is:
运行时报了这个错,帮我定位原因:
TypeError: Cannot read properties of null (reading 'userId')
    at getUserProfile (src/services/user.ts:42:18)
    at async ProfileController.getProfile (src/controllers/profile.ts:15:20)
Why post the whole paragraph? Because the file name, line number, and call chain all exist in the stack, Claude can accurately locate it by following user.ts:42. If you summarize it again, it is equivalent to deleting all these key coordinates, and it will have to guess again.
| What you want to give | ❌ Describe with your mouth | ✅ Feed directly |
|---|---|---|
| The content of a certain file | ”There is a file that handles authentication in the project” | @src/auth/session.ts |
| An error report | ”It reported an undefined error” | Paste the complete traceback as it is |
| A UI problem | ”The button position is wrong” | Paste the screenshot directly (Claude supports image reading) |
| An interface specification | ”Follow our API specification” | @docs/api-spec.md |
In a word: **Anything that can be “posted” should never be “said”. ** Claude, reading the original material is always more accurate than reading your second-hand retelling of the material.
💡 Summary in one sentence: Use
@to put files, use paste to put error reports and screenshots directly in front of it**, don’t let it guess based on your description.
04 Tip 3: Give a “verifiable” success standard
This is the easiest to ignore, but it is very powerful: **You have to let Claude know “what counts as success”, and it is best for Claude to test this standard himself. **
Why is it important? The official document breaks down the underlying logic——
Claude stops when the job looks complete. Without a check it can run, “looks done” is the only available signal, and you become a validation loop: every error is waiting for you to notice it.
What does it mean? If you don’t give standards, Claude will stop working based on “it feels almost right”. You are the one who really helps to check and accept it. You have to catch every loophole personally. But once you give it a test that can pass “pass/fail”, this cycle will close on its own: it will finish → run the check → see the results → if it fails, continue to make changes, without you watching at all.
Compare it and you will understand:
| Task | ❌ No acceptance criteria | ✅ Verifiable criteria given |
|---|---|---|
| Write a function | ”Implement a function to verify email" | "Write a validateEmail function. Example use case: user@example.com is true, invalid is false, user@.com is false. Run the test after writing” |
| Modify the UI | ”Make this dashboard look better" | "[Post the design draft] Follow this implementation, then take a screenshot of the result, compare it with the original draft, list the differences and modify them” |
| Repair the build | ”The build failed" | "The build reported this error: [Post error]. Fix it and verify that the build passed. Fix the root cause and don’t suppress the error” |
Pay attention to the last line of the sentence “Address the root cause, don’t suppress the error” - this is a sentence that I learned to add after suffering a loss. If you don’t write this sentence, sometimes it will save trouble and directly give you try/except, or add @ts-ignore to eliminate the red line. The error is gone, but the root cause of the problem is still.
**Advanced gameplay: /goal Change the acceptance criteria to “No work will be accepted if the standards are not met”. ** (Requires Claude Code v2.1.139 or higher) The acceptance criteria written in the ordinary question are “run this round”; and /goal is to nail the standard ** into the goal of the entire session ** - after each round, a small model (default Haiku) will review it according to your conditions. If it is not met, it will automatically start the next round without returning the control to you and will not stop until the conditions are met.
/goal test/auth 里所有测试通过,并且 lint 这步是干净的There is a key detail that you should not step into when using /goal: The small evaluation model only looks at what Claude “shows” in the conversation, and it will not run commands or read files by itself. So your conditions must be proven by Claude’s own output - “test/auth tests all passed” is true because Claude will actually run the test, and the results will be printed in the dialog, so that the evaluation model can read it. **If you write “the code quality is very high” which cannot be seen from the output, it cannot judge. **
💡 Summary in one sentence: Give it a pass/fail check (test, screenshot comparison, build exit code), the loop will close by itself; if you want it to “not give up until it reaches the standard”, go to
/goal.
05 Tip 4: For complex tasks, let them be planned before taking action.
The last one, specifically for “big jobs”: **When faced with a task that requires a lot of changes, spans multiple files, or you are unsure of the direction, don’t just start writing it - let it make a plan first, and you can take a look at it before releasing it. **
This matter was foreshadowed in Chapter 06 (Package and Billing), let’s explain why here. The official document’s judgment is very straightforward:
Having Claude jump straight into programming might produce code that solves the wrong problem.
To put it bluntly, explore first, then plan, and finally program - separate “think clearly” and “do it”, so as not to run all the way in the wrong direction and have a lot of changes by the time you find out.
**Analogy: When decorating, make the drawings first and then smash the walls. ** No reliable master would pick up a hammer and smash a load-bearing wall without saying a word. He has to confirm with you “remove this wall, route the wiring here, reroute the water pipe”, and then start work after you nod. The plan is the drawing that Claude handed you before smashing the wall - if something is wrong on the drawing, the cost of making two changes is much lower than having to smash the wall and then rework it.
How to make it come out with drawings first? Two ways:
**Method one is to say clearly “don’t change it yet”. ** Just add a qualification to ordinary dialogue:
我想给设置页加个深色模式开关。先告诉我要动哪些文件、改动思路是什么,
这一步先别改任何代码。
**Method 2, switch to Plan Mode. ** This is Claude Code’s special “read-only plan” file - it can read files and propose plans, but it won’t write a word until you approve it. How to enter: Press Shift + Tab in the session (press once or twice to cycle to Plan Mode), the mode will rotate between default → acceptEdits → plan. If you only want a certain prompt to run in Plan Mode without switching the entire session, just add the /plan prefix before that message.
However, the official also gave a very practical reminder: Don’t go to the extreme and plan for everything:
For tasks with a clear scope and small fixes (such as fixing typos, adding log lines, or renaming variables), ask Claude to perform it directly. Planning is most useful when you are unsure of the approach, the change modifies multiple files, or you are unfamiliar with the code being modified. **If you can describe diff in one sentence, skip the plan. **
The most practical way is this last half sentence: ** “Can you explain in one sentence what it will look like after this modification?” If you can, just do it; if you are stuck, it means that the work is complicated enough, so let it be planned first. ** Changing a typo and using Plan Mode is just to add drama to yourself.
💡 Summary in one sentence: Not sure/across multiple files/unfamiliar code → Let it be planned first (sentence “Don’t change it yet” or
Shift+Tabto enter Plan Mode); If you can explain the small job of diff in one sentence, just do it.
06 Hands-on: Same requirement, two interpretations
Just hearing the truth won’t quench your thirst. Let’s do a small experiment that can see the difference with our own eyes. Just prepare a three-line toy file, it doesn’t depend on any of your ready-made projects.
Step 1: Create a toy file with “holes” (Mac/Linux)
mkdir prompt-demo
cd prompt-demo
echo 'def average(nums):
    return sum(nums) / len(nums)' > stats.py
Windows users: mkdir prompt-demo, cd prompt-demo and type in stats.py using Notepad and paste the two lines.
This function has a pitfall: when an empty list [] is passed in, len(nums) is 0, which will trigger a “divide by zero” crash. Let’s use it as a testing ground.
Step 2: Start Claude in the project directory
claudeExpected: A welcome screen appears with an input box at the bottom.
Step Three: Use “Bad Questions” first to feel how it works
@stats.py 帮我改改这个函数Expectation: Claude will most likely “guess” what you want to do - maybe add a type annotation, maybe add a docstring, but it doesn’t know that what you really care about is the empty list crash, the direction depends on luck. That’s the price of asking vague questions: it’s making the decision for you. **
Step 4: Change to “Good Questions” - Specific + Context + Acceptance Criteria Three-piece Set
@stats.py 里的 average 函数有个 bug:传入空列表时会因为除以零而崩溃。
期望行为是空列表返回 0。
帮我修复,并补一个测试:average([]) 应该返回 0、average([2, 4]) 应该返回 3。
写完把测试跑一遍,确认通过。Expectation: This time Claude’s action chain is clear - locate the empty list branch → add the empty list and return 0 → write the two test cases you named → actually run the test → show you the passing results. **It no longer guesses what you want, because you have said everything about “what to fix, how to change it, and how to calculate success.” **
Step 5: Exit and see if the changes are implemented
cat stats.py(Windows PowerShell uses type stats.py)
Expected: The judgment of empty list appears in stats.py (similar to if not nums: return 0). **It matches what you asked for in step 4 = you have already felt the need to “speak clearly”. **
Putting the two questions side by side, the difference is clear at a glance:
| Step Three ❌ Bad Question | Step Four ✅ Good Question | |
|---|---|---|
| What to change | I didn’t say it, it’s full of guesses in the file | Name the average function |
| What to change | No words, just let it work | Empty list returns 0, hard-coded |
| How to calculate success | There is no standard, it will stop when it “feels” finished | Two test cases + run once to verify |
| Your experience | Staring at the diff and wondering “This is not what I want” | It plays according to your script, over and over again |
💡 Summary in one sentence: The same file, the same bug, bad questions let Claude make the decision for you, good questions are all about “what to change, how to change, and how to calculate success” - Run these two steps by yourself, the difference is more intuitive than reading the truth ten times.
07 Summary
This article talks about one thing: How to make a sentence of demand so that Claude can accurately catch it. **
If you can’t memorize the four mental methods, just remember this list:
| Mental approach | One sentence | How to implement |
|---|---|---|
| Specific > Fuzzy | Scope + constraints + references must be clearly stated | ”Change to average, don’t introduce new libraries, follow the pattern of xxx” |
| Give context | Never say anything you can post | @file, post the entire paragraph to report an error, paste screenshots |
| Give acceptance criteria | Let it check “success or failure” by itself | Give test cases and ask it to run it again; hit /goal |
| Make a plan first | For big jobs, read the drawings first before smashing the wall | Say “Don’t change it yet” or Shift+Tab to enter Plan Mode |
You should now be able to: Translate a vague “Help me change it” into a need that Claude can really understand - encircle the scope, provide enough context, give verifiable success criteria, and if it is complicated, let him plan it first. This set of speaking rules is the “internal strength” for all operations you will use Claude Code in the future - No matter how fancy the function is, if the questions you feed it are bad, the work that comes out will not be good.
On the other hand, let me think of a question for you: Since it is so important to “speak clearly”, do you have to say it again every time if there are some rules (such as “Never introduce new libraries to this project” and “All tests should be placed in the
tests/directory”)? Is there a way to make Claude “remember” it so he doesn’t have to reread it every day?
The next article 16 “Common Workflows” - This article teaches the general rules of “how to explain a sentence clearly”. The next article will focus on the four most frequent specific tasks: exploring unfamiliar code bases, fixing bugs, refactoring, and writing tests. Each category gives you a set of standard methods that you can copy. Now that the rules are in place, it’s time to look at the moves.
16 · The four most commonly used tasks: exploring the code base, fixing bugs, refactoring, and writing tests
Brothers, let’s talk about the most practical thing today.
Think about it, what are you doing with the code every day? To put it bluntly, there are four things to do over and over again: take over a project that you don’t understand, fix an inexplicable bug, refactor a piece of bad code, and add a test to a certain function. Of course there are other needs, but these four categories together account for a large part of our daily time.
The previous article talked about general “speaking skills”, but this article will focus on specific scenarios - These four types of tasks each have their own standard methods of playing, and the routines are fixed. After using Claude Code for a long time, what finally settled down are four templates, which are stored in the memo. When encountering the corresponding scene, you can directly call them up to fill in the blanks.
Let’s put it this way: The general technique is internal strength, and these four templates are moves. You have already practiced your internal strength, and I will give you the moves today.
After reading this article, you will get:
- Each of the four types of high-frequency tasks (exploration/bug fixing/refactoring/test writing) has an instruction template that can be copied directly
- The key principles of each type of “Why fight like this” are not rote memorization of templates
- A quick reference card for four types of tasks, save it and use it at any time
- A complete practice that can be followed and gives the expected output (take a real bug and go through the repair process)
01 First recognize: four jobs, four tools
Before you start, first clearly distinguish the “characters” of these four types of work. They have completely different requirements for Claude. If they use the wrong routine, the effect will be far different.
Analogy: The four tools in the toolbox must be used for their respective purposes. ** A screwdriver is used to tighten screws, and a wrench is used to tighten nuts. Of course it is awkward for you to use a wrench to tighten screws. Exploring, fixing bugs, refactoring, and writing tests are four different tools - the key is not “whether you can use Claude”, but “which tool should be used for this job”.
The core difference between them lies in one dimension: **Can this activity touch your code? **
| Work | Do you move the code | What is Claude mainly doing | What should you keep an eye on |
|---|---|---|---|
| Explore the code base | Not moving (read-only) | Read the file and tell it to you | Is it correct |
| Fix bug | Move | Locate the root cause + modify | Is the root cause found correctly and is there regression testing |
| Refactor | Move (but the behavior remains unchanged) | Equivalent rewrite | Is there any change in behavior after changing |
| Write tests | Add files | Generate tests + coverage boundaries | Edge case coverage is not complete |
Did you see it? Exploration is risk-free (it only reads and does not write), so you can feel free to ask questions; bug fixing and refactoring are operations, and you have to let it be explained clearly before starting; Writing tests are somewhere in between, it creates new files and does not touch your original code, but you have to keep an eye on it to see if it is lazy and only tests “normal conditions”.
Remember the judgment logic of this table. The following four sections will take apart each tool and teach you how to hold it.
💡 Summary in one sentence: For the four types of work, first distinguish the personality according to “code at every turn” - explore zero risk and ask questions at will. For work involving surgery, let it be explained first and then changed.
02 Explore an unfamiliar code base: from big to small, ask questions at three levels
Let’s talk about the most frequent scenario first: You take on a completely unfamiliar project, and the first thing you need to do is to understand it.
How did you do this before? I opened the folder and was confused by the dozens of directories. I clicked in and looked at them one by one. After two hours of looking at them, I was still confused. No more now - Claude Code treats the current directory as a workspace and it can read through the entire project by itself, you just ask.
**Analogy: When you are new to a company, you will not dive into the source code of a certain module as soon as you get up. Instead, you will first ask the old employees for the third layer. ** The first layer is “What does our company do and what is the big structure like?”; the second layer is “Where is the code responsible for payment?”; the third layer is “How does the code go from placing the order to deducting the payment for an order?” From big to small, from surface to line, this is the standard rhythm of exploration.
According to the demonstration in the official document, these three layers correspond to three types of problems:
给我一个这个代码库的整体概览,说说它的主要架构模式负责用户认证的代码在哪些文件里?这几个文件是怎么协同工作的?追踪一下登录流程,从前端一直到数据库是怎么走的A safe habit is that the first two levels must be asked in Plan Mode - that is, press Shift+Tab twice to switch to the planning mode before getting started (the first time you enter acceptEdits, the second time you go to plan). Why? Because in the exploration phase, we just want it to read and speak, and we don’t want it to start changing files when it gets excited. In Plan Mode, it will not touch your source code, and it will not change a line of your code no matter how much you ask.
For example, if you take over an old Go project with 30,000 lines, you can do this on the first day: first give an “overall overview” to find out how many services are divided into, then “where is the code responsible for X” and locate them one by one, and finally select the core link to “track how this request goes.” It takes only half a day to touch the doorway, whereas before I couldn’t get in for two or three days.
Here is the exploration template for you directly. You can use it by filling in the keywords for the three-level questions:
我刚接手这个项目,帮我快速上手。分三步:
1. 给我整体架构概览,说清主要模块和它们的职责
2. 负责 [你关心的功能,如「订单支付」] 的代码在哪些文件里
3. 追踪 [某条核心流程,如「一笔订单的创建到支付」] 的完整执行路径
用新手能懂的方式讲,先别改任何代码。
💡 Summary in one sentence: Exploration follows the same rhythm - from large architecture to specific files to execution links, from large to small three layers, the first two layers are the most stable in Plan Mode.
03 Bug fix: Post an error report → Find the root cause → Modify → Add regression testing
Bug fixing is another type of high-frequency work, and it is also the type that is most likely to overturn.
Why is it easy to roll over? Because the most common mistake that novices make is: When posting an error report, just say “Help me fix it”, and then Claude will give you a fix that “makes the error report disappear”. Note that “the error disappears” does not mean “the problem is solved” - many times it just covers up the symptoms, and the root cause is still buried there, and it will explode again next time in a different position.
**Analogy: Go to the doctor if your body hurts. **You wouldn’t just come in and say, “Prescribe me some painkillers.” You would clearly explain “where it hurts, when it started to hurt, and what movements will make it more painful.” Let the doctor diagnose the cause first, and then prescribe. Fixing bugs is exactly the same - let it find the root cause first, don’t let it rush to “relieve the pain”.
The official best practices repeatedly emphasize an iron rule, which is worth posting on your wall:
Fix it and verify the build was successful. **Resolve the root cause, do not suppress the error. **
Therefore, the correct bug fixing process is four steps, each of which is indispensable:
- Post error report + steps to reproduce: Complete error message, stack, plus “What did I do to trigger this?”
- Let it locate the root cause: Don’t let it change yet, let it explain clearly “why it is wrong”
- Repair: If the root cause is correct, let it be corrected again
- Add regression testing: Add a test that can reproduce the bug and make sure you don’t make the same mistake again
The fourth step is most likely to be missed by novices, but it is precisely the most valuable step. The official idea is very clever: ask Claude to “write a failed test to reproduce the problem, and then fix it” - in this way, the test will automatically turn green after repairing, which is equivalent to locking the bug. If anyone accidentally changes it back in the future, the test will immediately alarm.
Many people have suffered this loss. For example, when fixing a date parsing bug, Claude corrected it three times, five times, five times, and two times, and then submitted it after seeing that the error was gone. As a result, another colleague changed that line back when refactoring two weeks later, and the same bug reappeared in the same place - because there was no test left at the beginning, no one knew that line of code was untouchable. Therefore, step four should be taken when fixing any bug.
Give you directly bug fix template:
我遇到一个 bug。
报错信息:[完整粘贴报错和堆栈]
复现步骤:[我做了什么才触发,是偶发还是必现]
请你:
1. 先定位根本原因,解释为什么会出错,先别改代码
2. 给我修复方案,解决根因,不要只是把报错盖住
3. 改完补一个能复现这个 bug 的回归测试,跑一遍确认通过
💡 Summary in one sentence: There are four steps to fixing bugs - post the error report and reproduction steps, first find the root cause, then make changes, and finally add regression testing; without the lock of regression testing, the same bug will be resurrected sooner or later.
04 Refactoring: first talk about the current situation → set goals → make changes in small steps → test before and after changes
Refactoring is the most risky job, because it touches “good code”**.
After all, there is a clear “fixed” standard for fixing bugs - the errors are gone and the test is green. There is no refactoring. The goal of refactoring is “the code is cleaner, but the behavior cannot be changed a word”. Once the behavior changes, you are secretly introducing bugs in the name of refactoring, which is the worst kind of bug because no one will test a piece of code that is “just tidied up”.
**Analogy: Renovate a house that is occupied by people, but do not allow the residents to move out. ** You have to ensure that water and electricity are maintained as usual and that people are taken care of. You just need to refresh the walls and straighten out the wiring. Reconstruction means “decorating with residents” - functions (residents’ lives) must not be affected throughout.
Therefore, the safe approach to refactoring is four steps, the core of which is “Lock the behavior with testing”:
- Let it explain the current situation first: Find out what this code is doing now and what hidden behaviors it has
- State the refactoring goals: Do you want to “remove functions”, “change to modern writing methods” or “remove duplication”? Be specific
- Small steps: The official recommendation is to “refactor in small, testable increments”, don’t let it be overturned and rewritten at once
- All tests passed before and after modification: Before refactoring, run the test first to save a baseline, and then run it again after modification. The two results must be consistent
The fourth step is the lifeblood of reconstruction. If this code is not tested now, the first step in refactoring is not to change it, but to make up for the test - first use the test to take a snapshot of the “current behavior”, and then refactor it and check it against the snapshot. Success will only be considered if the behavior has not changed. This is completely consistent with the official best practice: give Claude a way to verify his work, otherwise “it looks right” is the only signal, and refactoring that looks right is the easiest to hide.
There’s a hard rule worth following here: Don’t let Claude refactor code without test coverage. Imagine the scenario of Tukuai and let it refactor an untested tool function. It “optimizes” a boundary branch - that branch looks like waste code, but actually handles a rare input. I found out after the online explosion. Always make up for testing first and then refactor. It may be a little slower, but it will never overturn.
Give you refactoring template directly:
我想重构 [文件 / 函数名]。
重构目标:[具体说,如「拆成更小的函数」「换成现代写法」「消除重复」]
要求:
1. 先解释这段代码现在的行为,包括容易忽略的边界情况
2. 如果它还没有测试,先补上覆盖现有行为的测试
3. 小步重构,保持对外行为完全不变
4. 重构前后都跑一遍测试,确认结果一致
💡 Summary in one sentence: The lifeblood of refactoring is “Behavior cannot be changed” - first talk about the current situation, then set goals, make small steps to change, Lock the behavior with tests that have passed before and after changes; if there is no test, add tests before starting.
05 Writing tests: The key is to force it to cover edge cases
The last category: Add tests to the code.
When it comes to writing tests, Claude is actually very easy to do - it will look through your existing test files and write them according to the framework and assertion style you are already using. The style will be automatically aligned without you having to teach it. But there is a pitfall that you must know: If you don’t tell me specifically, it will only measure “normal conditions” by default.
What does it mean to only test normal conditions? For example, a division function tests for you “6 divided by 2 is equal to 3” - yes, it is correct, but what about **divided by 0? What about passing in negative numbers? What about passing null? ** These “edge cases” are where bugs really occur and are where testing should cover the most.
**Analogy: When recruiting someone to do quality inspection on a product, you can’t just ask him to try “normal operation”. ** The really valuable quality inspection is to test those “monster” inputs-empty, over-long, negative, and garbled characters. The problem is always the boundary, not the normal path. The core of writing tests is to force Claude to test these boundaries.
So the key to writing a test template is just one sentence: explicitly require it to cover boundary cases. A good tip from official best practices looks like this - clearly state “which function to test, what scenario to test, and whether to mock”:
Write tests for foo.py that cover the edge case where the user has logged out. Avoid mocks.
Comparing the two questions, the difference is clear at a glance:
| ❌ Fuzzy question | ✅ Precise question |
|---|---|
| ”Write a test for this function" | "Write a test for the divide function, focusing on covering the boundary cases of divisor of 0, negative numbers, and non-numeric input**“ |
| It only measures normal paths, and the coverage rate is artificially high | It measures all the places that are really going to explode |
There is also a little trick: use @ to point the target file directly to it (write @src/utils/math.py), and it will read the entire file before taking action, which is much more accurate than your text description of “the divide function in that math file”**. The use of @ quotes has been discussed in the previous chapter, and it comes in handy here.
Write test template directly for you:
给 @[文件路径] 里的 [函数名] 写测试。
要求:
1. 沿用项目现有的测试框架和断言风格
2. 重点覆盖边界情况:[列出你能想到的,如「空输入、零、负数、超大值、类型不对」]
3. 也帮我想想还有哪些我没列到的边界情况,一并测上
4. 写完跑一遍,有失败的修到通过
Point 3 is an additional trick - Take the initiative to let it help you fix the leaks. The official documentation also mentions that Claude can analyze code paths and find boundaries that you may have missed. You should basically include this sentence when writing tests. It can often uncover input combinations that you didn’t even expect, which is much better than just having to list them all by yourself.
💡 One sentence summary: When writing a test, don’t just say “write a test” - Explicitly force it to cover boundary cases (null values, zeros, negative numbers, type errors), and then let it help you fill in the boundaries you didn’t expect. The normal path is the least important.
06 Hands-on: Take a real bug and go through the repair process
Just looking at the template doesn’t count as you have to run it again. Let’s use the “bug fixing” category for practical purposes—it’s the most complete four-step process. If you pass it, you’ll naturally master the other three categories. A real bug is specially buried here for you to fix.
Step 1: Build a buggy toy project (Mac/Linux)
mkdir bug-demo
cd bug-demo
echo 'def average(numbers):
    return sum(numbers) / len(numbers)' > calc.py
Windows users: Type mkdir and cd, create calc.py using Notepad, and paste the above two lines of Python.
The average function calculates the average, which looks fine - but when passed an empty list, it divides by 0 and crashes. This is the bug we want to fix.
Expected: There is calc.py in the bug-demo folder, and the content is the two lines of the average function.
Step 2: Start Claude Code
claudeExpected: A welcome screen appears with an input box at the bottom.
Step 3: Apply the bug repair template, post the error and let it be fixed
Type in the input box (this is what the section 03 template will look like):
我遇到一个 bug。
报错信息:调用 average([]) 时报 ZeroDivisionError: division by zero
复现步骤:给 calc.py 里的 average 函数传一个空列表就必现
请你:
1. 先定位根本原因,解释为什么会出错,先别改代码
2. 给我修复方案,解决根因,不要只是把报错盖住
3. 改完补一个能复现这个 bug 的回归测试,跑一遍确认通过Expectation: Claude will first tell you the root cause - when the list is empty, len(numbers) is 0, and it will crash when divided by 0; then give a diff (for example, when the list is empty, return 0 or throw a clearer exception), stop and wait for your approval; after approval, it will also create a new test file (like test_calc.py), which contains a use case specifically for testing empty lists.
Step 4: Approve the changes and watch it run for testing
After understanding the diff, select “Agree/Yes”. Claude will then run the test he just wrote.
Expectation: The test results can be seen in the terminal, similar to:
test_calc.py::test_average_empty_list PASSED
test_calc.py::test_average_normal PASSED
Seeing that the test is all green = this bug has been fixed and locked - If anyone changes this line back in the future, the test will immediately turn red and alarm.
Step 5: Exit and confirm that the file has really been changed
Exit Claude (type exit or press Ctrl+D) and return to the terminal to see:
cat calc.py(Windows PowerShell uses type calc.py)
Expected: The average function in calc.py has been added with processing logic for empty lists, and there is an additional test file in the directory. ** Matches the diff you approved = the entire bug fixing process has been completed, congratulations! **
**⚠️ Note: ** If Claude does not take the initiative to write tests in the third step, it is most likely that your template has deleted point 3. Don’t skip that sentence - The lock of regression testing is the watershed between novices and veterans.
💡 Summary in one sentence: Go through the entire bug fixing process yourself - bury a real bug, use a template to find the root cause first and then fix it, and watch it run green through supplementary tests. If you pass this category, you can follow the same pattern as the other three categories.
07 Summary
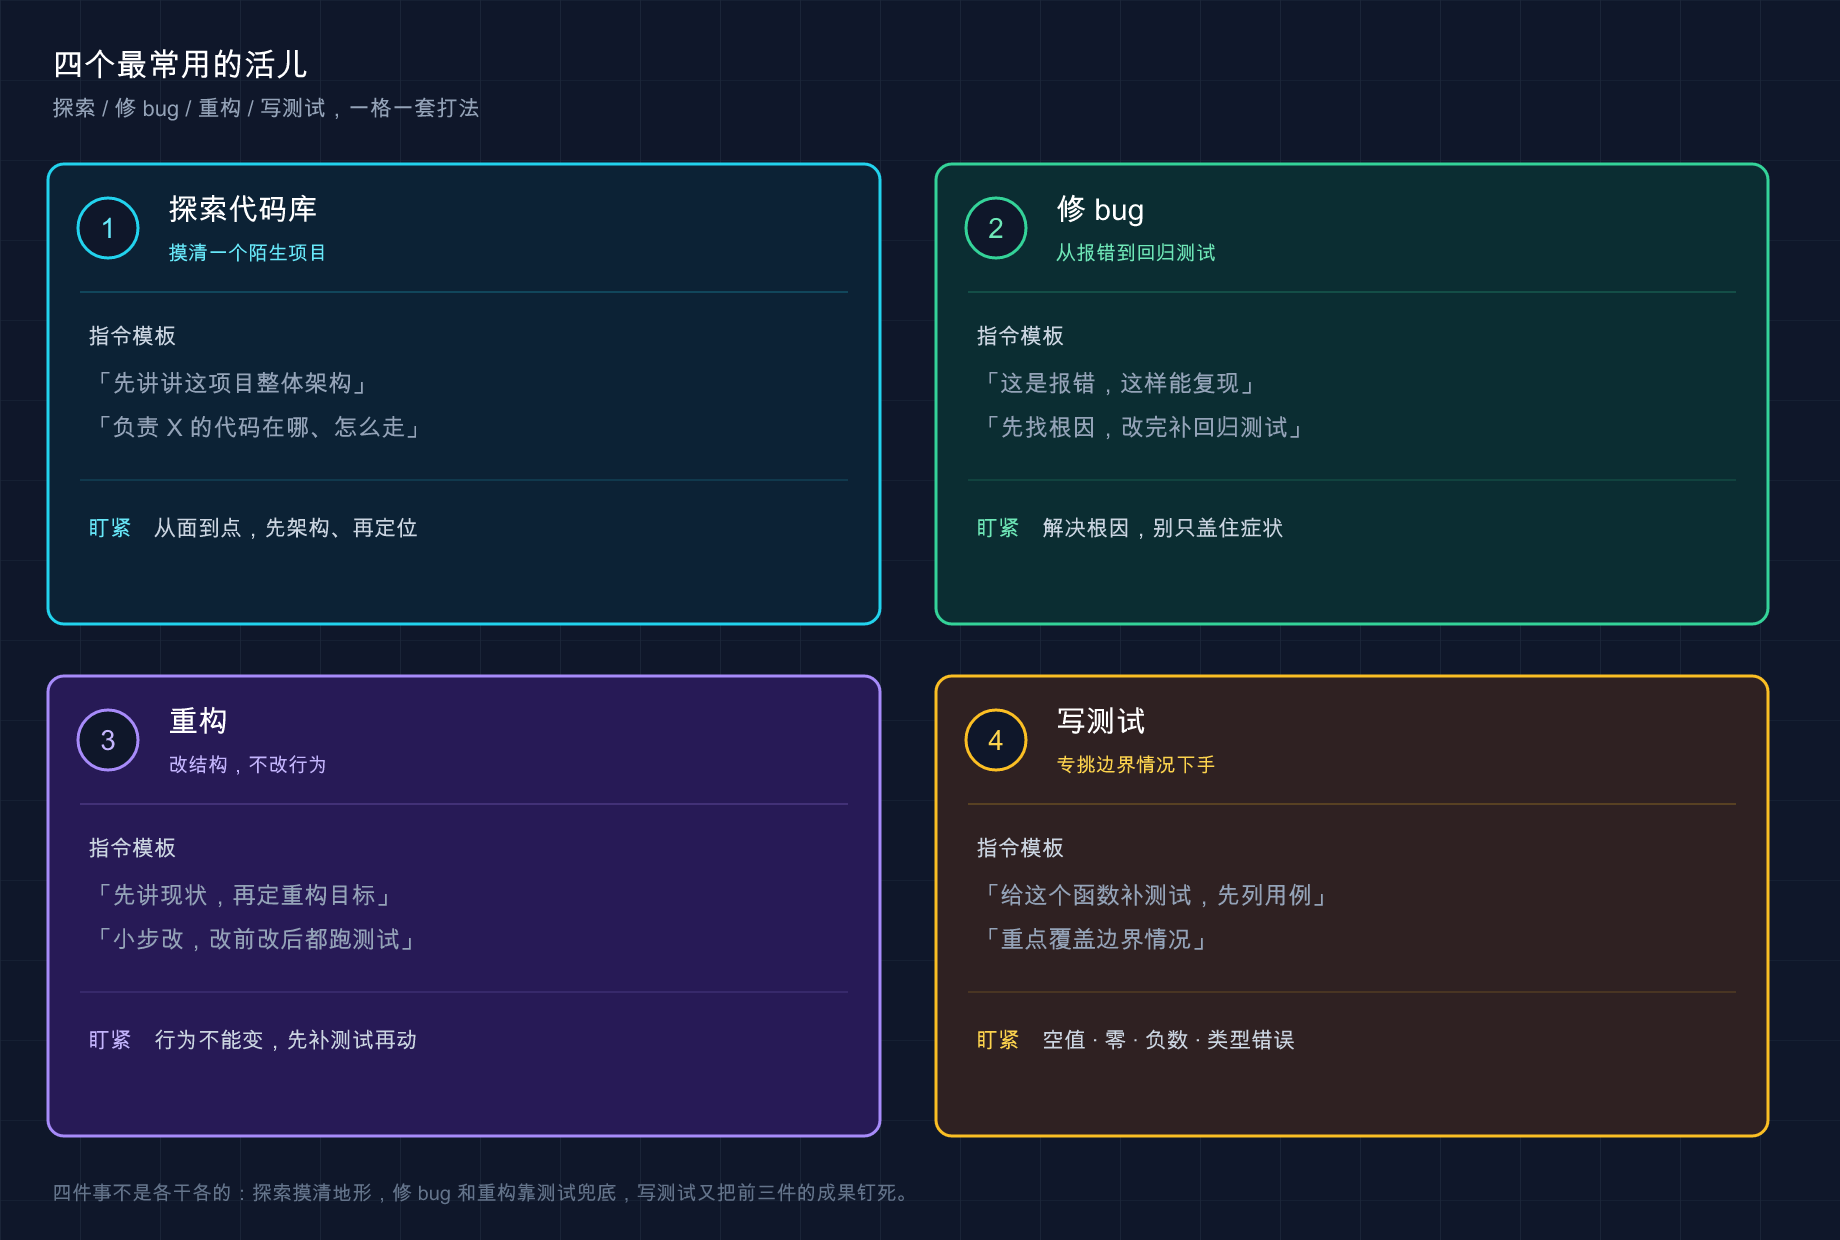
This article divides 80% of your daily tasks into four categories. Each category gives a set of fixed methods and a template that can be copied:
| Work | One-sentence template core | The most important points to pay attention to |
|---|---|---|
| Explore the code base | ”Overall architecture → Where is the code responsible for X → Track a certain process” | There are three layers from large to small, the first two layers are in Plan Mode |
| Fix bug | ”Post error reports and recurrences → Find the root cause first → Modify → Supplement regression testing” | Solve the root cause, don’t cover the symptoms, don’t worry about regression testing |
| Refactoring | ”Talk about the current situation → Set goals → Make changes in small steps → Test before and after changes” | Behavior cannot be changed, if there is no test, make up for it |
| Write tests | ”Write tests, focusing on covering null values/zeros/negative numbers/type errors” | Explicitly force it to test the boundary, and then let it fix the leaks |
You should now be able to: Get any type of high-frequency task, no longer confused by the cursor - directly call up the corresponding template to fill in the blanks, knowing what Claude should do first and what you should focus on at each step. These four templates are the scaffolding for most of your future work; after you become familiar with them, you will find that no matter how complex the task is, it is nothing more than a combination and series of these four categories.
These four templates can withstand the test of being called every day - no matter how fancy the task is, in the end they still fall back on these four sets of play styles. **
Next article 17 “Pictures and Multimodality” - The front is all about “typing instructions”, but there are some things that cannot be explained clearly in words: an error screenshot, a design draft, and a database structure diagram. The next article will teach you how to feed the picture directly to Claude and let him work while looking at the picture. Think about it: If you could just dump that troublesome error screenshot in your hand to it, wouldn’t it be a lot easier?