14 | Claude Code in 16 Hours: Plugin Reference, Chrome, Parallel Tasks, and Environment Variables
Use plugins, Chrome, parallel work, and environment variables through isolation and least privilege.
38 · Plug-in Reference Manual: Pack your own configuration into a package that can be sent out
Run claude plugin details for a plugin. There is often a line of numbers in the output worth noting: This plugin permanently occupies ~180 tokens per session, and the two skills in it consume ~2400 and ~1800 tokens respectively when triggered.
It’s such a small plug-in that looks harmless to humans and animals. It just “hangs there and does nothing” and takes up a section of the workbench. At this time, you can realize: the plug-in is not a black box - it is made up of several clear types of components. How much each type occupies, where to put it, and how to trigger it are all well-documented. Only when you understand this structure thoroughly can you say “build one yourself and make it clean.”
In Part 24, we have already solved the problem of “using other people’s plug-ins”: add the market, install the plug-in, make /reload-plugins take effect, and check the trust before installation. This article does not repeat those, but focuses on a harder piece - the internal structure and development and release of plug-ins. To put it bluntly, the 24th article is about “being able to drive a car”, and this article is about “being able to dismantle an engine and build one myself”.
This article is more of a “reference manual” and the information density will be higher than the previous one. You don’t need to memorize it all at once. First create a plug-in that can run and send it out. The remaining field table can be used as a dictionary and you can check it at any time.
After reading this article, you will get:
- The appearance of the standard directory of plug-ins, and the complete structure behind the iron rule “Put only
plugin.jsonin.claude-plugin/” - Field panorama of
plugin.jsonlist: required, metadata, component path, user configuration, dependencies, check it all in one table - Where to put all the components that the plug-in can package (skill/command/agent/hook/MCP/LSP/monitor) and what are the restrictions?
${CLAUDE_PLUGIN_ROOT}Why must these path variables be used and what will happen if they are not used?- Build a plug-in from scratch, test it locally, build a market, send a complete link to the team, and provide commands and expected output throughout the process
- Version management and dependencies are two pitfalls that cannot be avoided when publishing. How to fill them?
01 First, straighten the “skeleton” of the plug-in: what the standard directory looks like
Chapter 24 You have seen the simplest form of a plug-in - a plugin.json plus a few component folders. But if you want to build a decent plug-in yourself, you must first see the complete skeleton clearly, otherwise it will become messy when you add it halfway.
Let me give the conclusion first: **A plug-in is a folder with a “manifest file” in it to identify it, and the rest are classified according to component types and placed in the root directory. **
**Analogy: A set of Lego bricks. ** There are two things in a box of Lego - an assembly instruction book that tells you what the set is called and what parts it contains; several compartmented parts boxes to assemble the building blocks according to type (one compartment for wheels and one compartment for windows). The plug-in has this structure: plugin.json is the manual, and skills/, agents/, and hooks/ are the divided parts boxes. The instruction manual has its own place, and the parts box is all spread out - this is the origin of the following iron rule.
The official complete plug-in directory looks like this (I deleted the less commonly used ones and kept the core):
my-plugin/
├── .claude-plugin/           # 元数据目录
│   └── plugin.json           # 清单(说明书)——只有它放这儿
├── skills/                   # Skills,每个一个 <名字>/SKILL.md
│   └── code-reviewer/
│       └── SKILL.md
├── commands/                 # Skills 的扁平 .md 写法(老形式)
│   └── status.md
├── agents/                   # Subagent 定义
│   └── security-reviewer.md
├── hooks/                    # Hook 配置
│   └── hooks.json
├── .mcp.json                 # MCP server 定义
├── .lsp.json                 # LSP server 配置
├── bin/                      # 加进 PATH 的可执行文件
├── scripts/                  # Hook 和工具脚本
└── settings.json             # 插件的默认设置
Here is an iron rule that is officially enclosed with a warning box and must be followed by novices. I will nail it for you:
The
.claude-plugin/directory contains theplugin.jsonfile. All other directories (commands/, agents/, skills/, output-styles/, themes/, monitors/, hooks/) must be in the plugin root, not within.claude-plugin/.
To put it bluntly: **.claude-plugin/ can only contain plugin.json in this folder, and skills/, agents/, and hooks/ are all placed outside it and at the same level as it. This pitfall was mentioned in the 24th article - it is easy to stuff skills/ into .claude-plugin/ for the first time when packaging. As a result, the plug-in can be loaded, but the skill does not appear. It took a long time to check and find out that the location is wrong. **Remember that picture of Lego: the instructions belong in the instruction box, and the parts box is all outside. **
There is another point that is easily overlooked. The official statement is very clear: **CLAUDE.mdin the plug-in root directory will not be loaded as the project context**. If the plug-in wants to give instructions to Claude, it must use components such as skill, agent, and hook. It cannot rely on inserting aCLAUDE.mdinto the plug-in. This is different from the project-levelCLAUDE.md` discussed in Part 18, so don’t confuse it.
💡 In one sentence summary: Plug-in = a manual (
.claude-plugin/plugin.json) + divided parts box (each component folder) in the root directory; There is only one iron rule - onlyplugin.jsonshould be placed in.claude-plugin/, and all other folders should be placed in the root directory.
02 plugin.json: What does each field of this “list” control?
Now that the skeleton is in place, let’s unpack the instruction manual - plugin.json. It declares the identity and configuration of the plug-in and is the core of the entire plug-in.
**A counter-intuitive but sobering fact to remember: Checklists are optional. **Official original words - If you omit plugin.json, Claude Code will automatically go to the default location (skills/, agents/ and so on) to find components, and even the plug-in name will be derived from the folder name. **This list is only needed if you need to write metadata, or customize component paths. ** If you want to publish it seriously, you must write it, so let’s talk about it as written.
**Analogy: Customs declaration form. ** When a batch of goods leaves customs, a customs declaration form must be attached - it must clearly state the name of the goods, who sent it, the version batch, and what is contained. Customs (Claude Code) checks, registers and puts it on the shelf according to this list. plugin.json is the customs declaration form of the plug-in: the name, author, version, and installed components are all stated clearly on this piece of paper. **
The only required field
If you write a checklist, only one field is required:
| Field | Type | Description |
|---|---|---|
name | string | Unique identifier, kebab-case (lowercase plus hyphen), no spaces |
Why is name so important? Because it is the namespace prefix of the component. There is an agent in a plug-in called plugin-dev called agent-creator, which will be displayed as plugin-dev:agent-creator in the interface; the skill call is /plugin-dev:xxx. Namespace is the fundamental mechanism for plug-in anti-collision names - if you install ten plug-ins, each skill will have its own prefix, so there will be no fighting.
Metadata field (describes “what” the plug-in is)
These do not affect the function, but they should be filled in when publishing so that users can understand:
| Field | What to do |
|---|---|
displayName | The human-readable name displayed in the interface, which can contain spaces and uppercase and lowercase letters; fall back to name if it is omitted |
version | Semantic versioning. Set it, users will only receive updates when you mention the version number (This is a big pitfall, details in Section 08) |
description | Explain in one sentence what the plug-in does, and it will be displayed when browsing/installing |
author | Author information (name / email / url) |
homepage / repository / license | Document address / Source code address / License |
keywords | Discover tags and help people find you |
Component path field (specify “where” the component is)
By default, components are placed in standard locations such as skills/ and agents/. You don’t need to write these fields at all. Use only if you want to put the component in a non-standard path:
| field | what it points to |
|---|---|
skills | Additional skill directories (appended to the default skills/) |
commands / agents / outputStyles | Custom path (replaces the default directory) |
hooks / mcpServers / lspServers | Configuration file path, or write it directly inline here |
dependencies | Other plugins that this plugin depends on (Section 08) |
There is a particularly easy-to-fail detail hidden here. The official list of “Path Behavior Rules” is: Some fields are “Replace Default”, and some are “Append to Default”.
- Replace default:
commands,agents,outputStyles. Once you writecommands, the defaultcommands/directory is no longer scanned. If you want to keep the default and add others, you have to explicitly list it:"commands": ["./commands/", "./extras/"]. - Append to default:
skills. By defaultskills/is always scanned, and the directories you list in theskillsfield are loaded along with it.
This pitfall is easy to step into: you add "agents": ["./extra-agents/reviewer.md"] to a plug-in, thinking “add another agent”, but it turns out that the two agents in the agents/ directory are all gone - because agents is a replacement not an addition. It would be better to list all three in an array. **Check this rule if you can’t remember it, don’t rely on your feelings. **
A complete list with metadata might look like this:
{
  "name": "deployment-tools",
  "displayName": "Deployment Tools",
  "version": "1.2.0",
  "description": "Deployment automation tools",
  "author": { "name": "Dev Team", "email": "dev@company.com" },
  "license": "MIT",
  "keywords": ["deployment", "ci-cd"]
}
💡 To summarize in one sentence:
plugin.jsonis the customs declaration form of the plug-in. The only required field isname(which defines the namespace). In the component path field, you must distinguish between “replace default” (commands/agents) and “append default” (skills). If you do it wrong, the component will disappear out of thin air.
03 What components can be packaged by the plug-in: identification of seven types of parts
This is the most important section of this article to remember - Which seven types of parts can the plug-in box hold? Article 24 briefly talked about several categories. Here we list all the officially supported ones, indicating where they are placed and what unique restrictions they have.
**Analogy: There are several grids of Lego parts boxes, and each grid contains only one kind of piece. **Wheel grids, window grids, and minifigure grids—you can fight faster by classifying them into categories. The components of the plug-in are also divided into categories:
| Component | Where to put | One sentence function | Trigger method |
|---|---|---|---|
| Skills | skills/<name>/SKILL.md | Callable special abilities (Part 26) | You /plugin name: skill name, or Claude automatically calls |
| Commands | commands/*.md | The flat old way of writing skill, new plug-ins use skills | Same as above |
| Agents | agents/*.md | Specialized subagent (Part 23) | Appears in /agents, Claude faction or you click |
| Hooks | hooks/hooks.json | Automatic actions triggered by events (Part 33) | Automatic triggering of life cycle events |
| MCP servers | .mcp.json | Connecting to external services (Part 22) | It will start automatically when enabled, and the tool will be mixed into the toolbox |
| LSP servers | .lsp.json | Real-time code intelligence (jump definition, check references) | Automatically used when processing code, you need to install a separate language server |
| Monitors | monitors/monitors.json | Background monitoring log/status, notification of movement Claude | Automatically started when the plug-in is activated (experimental) |
Several categories require a few separate sentences. They are all restrictions that are stated in official documents but are easily missed:
**Agents have been “deprived” of power in the plug-in. ** This is critical. Official clarification: **For security reasons, the agent provided by the plug-in does not support the three frontmatter fields hooks, mcpServers and permissionMode. ** In other words, the subagent in the plug-in cannot secretly hook up, start MCP, or change the permission mode - this is to prevent you from installing a plug-in and its agent will change permissions for you behind the scenes. The fields it supports include name, description, model, effort, maxTurns, tools, disallowedTools, skills, memory, background, isolation (the only legal value of isolation is "worktree").
**Hooks can monitor many events. ** Plug-in hooks listen to the same batch of life cycle events as the hooks you write (Part 33) - from SessionStart (start of session), PreToolUse (can be stopped before the tool is called), PostToolUse (after the call is successful), to Stop (end of answer), SessionEnd (session termination), there are thirty officially listed. Novices don’t need to memorize everything. Just remember that “you can perform an action at almost any time”. The details will be left to Chapter 33.
**Hook types are more than just “running scripts”. ** In addition to the most common command (run shell command), there are also http (send events to a URL), mcp_tool (call MCP tool), prompt (use model to evaluate a prompt), agent (run an agentic validator).
**Monitors are experimental. ** It allows the plug-in to keep an eye on the log or status in the background, and feed Claude a notification when there is a new line, without you having to ask it to monitor it. Experimental, architecture may change, and only runs in interactive sessions, requires Claude Code v2.1.105 or above. Newbies just need to understand that there is such a thing.
There are two types of “semi-components” worth knowing: The executable files in the bin/ directory will be added to the PATH of the Bash tool when the plugin is enabled, and can be directly adjusted as bare commands; settings.json is the default setting of the plugin, but currently only supports agent and subagentStatusLine - setting agent allows a custom agent to be directly added when the plugin is enabled Setting it as the main thread is equivalent to “installing this plug-in and changing the character set.”
💡 In one sentence summary: The plug-in can install seven types of parts - skill / command / agent / hook / MCP / LSP / monitor, each with a fixed position; It is important to note two restrictions: the agent in the plug-in is not allowed to have hook/MCP/permission mode (safety reduction), and the monitor is experimental.
04 ${CLAUDE_PLUGIN_ROOT}: Why the path must use variables and cannot be hard-coded
This section is singled out because it is the most frequent source of error reports when building plug-ins yourself, and the truth can be explained clearly in one sentence.
Let’s look at the scenario first: there is a hook in your plug-in that needs to run scripts/format.sh, or the MCP server needs node server.js. You take it for granted and write the absolute path /Users/you/my-plugin/scripts/format.sh - Oh no, this path does not exist on other people’s machines, and even on your machine, the cache directory will change every time the plug-in updates**.
The official solution is to give you three path variables, which will be automatically replaced in the hook command, MCP/LSP configuration, and skill/agent content:
| variable | points to | used for |
|---|---|---|
${CLAUDE_PLUGIN_ROOT} | The absolute path to the plug-in installation directory | Reference the scripts, binaries, and configurations that come with the plug-in |
${CLAUDE_PLUGIN_DATA} | Plug-in’s persistent data directory (retained after update) | Put node_modules, cache, and state to be retained across versions |
${CLAUDE_PROJECT_DIR} | Project root directory | Reference scripts/configurations in the project |
**Analogy: Write “this folder location” in a binder instead of copying the page number. **Imagine a binder that is being rebinded over and over again, and in it you write “Go to the appendix page.” If you write down “Page 87”, the page numbers will be messed up once you rebind it; a smart approach is to write “Appendix to this folder” as a placeholder relative to this folder. ${CLAUDE_PLUGIN_ROOT} is this “our store address” placeholder - No matter where the plug-in is installed or which version it is updated to, it will always point to the root directory of the current version.
Therefore, when quoting the built-in script in the plug-in, the standard writing method looks like this (note the double quotes to prevent spaces in the path):
{
  "hooks": {
    "PostToolUse": [
      {
        "matcher": "Write|Edit",
        "hooks": [
          {
            "type": "command",
            "command": "\"${CLAUDE_PLUGIN_ROOT}\"/scripts/format-code.sh"
          }
        ]
      }
    ]
  }
}
Here is a hard and fast rule that has been emphasized repeatedly by the government, which is worth sticking on your forehead:
This path will change when the plugin is updated. The previous version of the directory remains on disk for approximately seven days after the update for cleanup, but it should be considered temporary and no status is written here.
Translate: ${CLAUDE_PLUGIN_ROOT} is temporary, don’t write things that need to be retained for a long time (such as installed dependencies, cache) - those should be written into ${CLAUDE_PLUGIN_DATA}, because the data directory is retained across versions. A common mistake is to put the node_modules installed by the plug-in into ROOT. As a result, when the plug-in is updated, all dependencies are gone and you have to reinstall it. The built-in script uses ROOT, and the state to be retained uses DATA. If you make this distinction, nothing will happen.
There is another related pitfall. The official section specifically talks about it in the “Plug-in Caching” section: Installed plug-ins cannot reference files outside their own directory. If you write a relative path like ../shared-utils to jump out, it will become invalid after installation - because the entire plug-in is copied into the cache (~/.claude/plugins/cache) when it is installed, and the external files are not copied at all. To share files across plug-ins, you must use symbolic links. This is an advanced topic. Newbies should first remember “don’t reference outside the plug-in.”
💡 In one sentence: the reference path in the plug-in must use variables such as
${CLAUDE_PLUGIN_ROOT}, and the absolute path cannot be hard-coded** (changed every time it is updated); useROOTfor the built-in script, useDATAfor the state to be retained, and never reference files outside the plug-in directory.
05 Hands-on: Build a running plug-in from scratch, and then test it locally
After talking about the structure for four sections, it’s time to really get started. Below I will show you how to create a minimal but complete plug-in, load it locally, and run it through the skill** - the whole process does not rely on any complex environment, just copy it. We create a my-greeter plug-in with a greeting skill.
Step one: Use the official scaffolding command to create a plug-in skeleton
The easiest thing is not to create the directory manually, but to use the official plugin init command, which will set up the skeleton:
claude plugin init my-greeter --with skills--with skills means to create a sample skill folder by the way. This command will create .claude-plugin/plugin.json and a startup SKILL.md under ~/.claude/skills/my-greeter/.
Expected: The terminal prompts that the plug-in skeleton has been created, telling you that it is built in ~/.claude/skills/my-greeter/.
Here is an official design convenience: Put it in a folder with a
plugin.jsonlist under~/.claude/skills/, and it will be automatically loaded asmy-greeter@skills-dirin the next session. There is no need to build a market or install it. This is called a “skills directory plug-in” and is the easiest way to develop your own plug-ins.
Step 2: See what the scaffolding generates
List the directories directly (note the absolute path):
ls -R ~/.claude/skills/my-greeterExpectation: You will see .claude-plugin/plugin.json and skills/ (or a SKILL.md). Make sure plugin.json is in .claude-plugin/ and skill is outside - This is the ironclad rule of Section 01.
Step 3: Write a skill of your own
Open (or create) ~/.claude/skills/my-greeter/skills/hello/SKILL.md and write the content as:
---
description: 用热情的语气跟用户打招呼
---

# Hello Skill

热情地跟名叫 "$ARGUMENTS" 的用户打招呼,问问今天能帮上什么忙。语气友好、鼓励一点。
$ARGUMENTS is a placeholder - it will capture whatever text you type after the skill name. This is the standard way to pass parameters to a skill (skills are discussed in articles 26 and 27, and are reused here).
Step 4: Load this plug-in locally
There is no need to build a market during the development period. Use --plugin-dir to directly load the local plug-in directory. This is an official sign only for development and testing:
claude --plugin-dir ~/.claude/skills/my-greeterExpected: Claude Code starts normally. Type /help and you can see your skills listed under the plug-in namespace.
Step 5: Call out your skill and watch it run
Plug-in skills always have namespaces, so adjust them like this (followed by a name as a parameter):
/my-greeter:hello WalterExpectation: Claude responds to you with a passionate speech that includes the name “Walter”. **Seeing that it says hello according to the description and text you wrote, it means that not only is this plug-in built correctly, but the skills it comes with are really usable. **
Step 6: Change the skill and hot reload to see the effect
Change the text of SKILL.md to two sentences (for example, make it use Chinese and add emoji), then without restarting, type in Claude Code:
/reload-pluginsExpected: Run /my-greeter:hello Walter again and you can see that the changes have taken effect.
⚠️ An official difference: Changes to
SKILL.mdwill take effect immediately in the current session; changes to hooks,.mcp.json, andagents/will not take effect until/reload-pluginsor restart. Don’t change the hook. If you find that there is no response, you will think that you wrote it wrong. Reload it first.
After running through these six steps, you will have personally gone through the complete inner loop of plug-in development: “Build the skeleton → Write the component → Load locally → Call → Hot reload”. **Any plug-in created in the future will essentially follow this process, but with more components. **
💡 To summarize in one sentence:
claude plugin initstarts the skeleton,--plugin-dirloads locally,/reload-pluginshot reloads - These three commands are the inner loop of plug-in development; those placed in~/.claude/skills/can also be automatically loaded without market installation.
06 Distribute the plug-in: build a market
For self-use plug-ins, just put ~/.claude/skills/ or --plugin-dir. But to send it to the team and the community, you have to go to the “marketplace” level** - Chapter 24 You are the “consumer” of the market, and in this section you are the “shopkeeper” of the market.
First, let’s clarify the two concepts that look alike and are easily confused. The official has specially used a Note box to distinguish them:
| Concept | What is | Where is it defined |
|---|---|---|
| Marketplace source | Where to get the “product catalog” (marketplace.json) | When the user /plugin marketplace add, or in the settings |
| plugin source | Where to get the ontology of each plugin in the directory | The source field of each plugin entry in marketplace.json |
**Analogy: Shopping mall vs. the place where each item in the mall is supplied. ** “Market source” refers to where the mall is located and where the catalog is obtained; “Plug-in source” refers to the factory from which each product in the catalog is actually shipped. The two don’t have to be in the same place - a shopping mall catalog can be hung in warehouse A, and a certain item in it can be shipped directly from factory B.
The core of the market is a file: .claude-plugin/marketplace.json** in the root directory of the warehouse. It declares the market name, owner, and plugin list. The smallest one looks like this:
{
  "name": "my-plugins",
  "owner": { "name": "Your Name" },
  "plugins": [
    {
      "name": "my-greeter",
      "source": "./plugins/my-greeter",
      "description": "A friendly greeting plugin"
    }
  ]
}
Each plugin entry must have at least a name and a source (where to get this plugin from). source supports several sources, which is the most useful part of the market:
| Plug-in source type | How to write | Suitable |
|---|---|---|
| Relative path | "./plugins/my-greeter" | The plug-in is in the same warehouse as the market (most common) |
| github | { "source": "github", "repo": "owner/repo" } | The plug-in is in another GitHub repository |
| git-subdir | Give url + path | the subdirectory of the plug-in in a large warehouse (monorepo, multi-project-in-one warehouse), sparse cloning to save bandwidth |
| npm | { "source": "npm", "package": "@org/plugin" } | Plugins published as npm packages |
**Hands on: Install the plug-in in Section 05 into a local market and try it. ** Assume that you have built my-marketplace/ according to the above structure (inside .claude-plugin/marketplace.json + plugins/my-greeter/), in Claude Code:
/plugin marketplace add ./my-marketplace
/plugin install my-greeter@my-pluginsExpectation: The first message indicates that the market has been added successfully; the second message indicates that the plug-in is installed. Then /my-greeter:hello can be adjusted - This link is exactly the same as when you installed other people’s plug-ins in Chapter 24, except this time the product is your own.
Be sure to verify before publishing. The official has given a special order:
claude plugin validate ./my-marketplaceExpected: Check the schema of marketplace.json, whether there are duplicate plug-in names, whether there are illegal .. in the source path, and whether the version is correct. When pointing to the market directory, it only checks marketplace.json; to check the frontmatter of skill/agent together, you must point to the specific plug-in directory (claude plugin validate ./my-marketplace/plugins/my-greeter).
If you really want to send it to the team, push this market warehouse to GitHub, and your colleagues can add it with just /plugin marketplace add owner/repo. If you want to automatically let the team install, you can write extraKnownMarketplaces in the .claude/settings.json of the project. Colleagues will be prompted to install it when they trust the project directory - this part belongs to the team configuration, and novices only need to know this way first.
💡 Summary in one sentence: Publish to the market - create
.claude-plugin/marketplace.jsonin the root directory, list plugins and theirsource(relative path/github/npm, etc.); distinguish between “market source” (where the directory comes from) and “plug-in source” (where each plugin comes from);claude plugin validatebefore publishing.
07 A set of comparisons: personal use, local testing, and official release. Don’t go wrong in these three ways.
The most common mistake made by plug-in makers is not writing the wrong code, but using the wrong “distribution method” - obviously they are just trying it on their own, but they go to build the market; or they are going to publish to the team, but they are still using --plugin-dir which is only effective for themselves. In this section, a table clarifies the three paths.
| Your situation | What to use | Commands | Features |
|---|---|---|---|
| Purely for personal use, if you want to change it, you can use it at will | skills directory plug-in | Put it in ~/.claude/skills/<name>/ (with plugin.json) | Automatically load, no need for market installation, change SKILL.md to take effect immediately |
| During development, repeatedly test a local package | --plugin-dir | claude --plugin-dir ./my-plugin | Direct loading, not into the library; you can specify multiple loads multiple times; .zip is also OK |
| Send to team/community | Market | marketplace.json + /plugin install | Ability to manage versions, automatically update, and share |
A few details that you only know after using them:
**--plugin-dir is a development tool, but only for the current session. ** If you start it this time and load it, it will disappear if you turn it off and on again - it does not write any configuration. The advantage is clean: After testing the plug-in, close the session and it will be clean, leaving no traces. A convenient method during development is to always hang a --plugin-dir session and change /reload-plugins, which is much faster than reinstalling the market every time. The official also has a thoughtful design: the local copy of --plugin-dir will temporarily override the installed market plug-in of the same name - so you can directly overwrite and test an online plug-in with local changes without uninstalling it first.
The skills directory plugin has a scope trap. ** If you put ~/.claude/skills/ (personal level), it can be used in every project; but if you put .claude/skills/ (project level), the official warning is clear: It will only be loaded from the directory where you start Claude Code, and will not be searched in the warehouse root directory like ordinary skills. Therefore, starting from a subdirectory will miss the plug-ins in the root directory - either start from the root of the repository, or /reload-plugins.
**Don’t build a market right off the bat. ** This is typical of over-engineering. The official advice is very practical: Use .claude/ in bulk or --plugin-dir to quickly iterate, and then convert it into a plug-in and build a market when you are ready to share it. A plug-in usually needs to be modified for more than ten rounds under --plugin-dir before it is stable. During this period, building a market is just causing trouble for yourself - you have to submit and refresh the market every time you change it.
💡 In one sentence: don’t go wrong in three ways - self-use plug
~/.claude/skills/, development use--plugin-dir, build market only after release;--plugin-dironly lives one session (clean), iterate the plug-in stably on the first two paths before releasing.
08 Two pitfalls that cannot be avoided in publishing: version management and dependencies
Just because a plug-in can run and be installed does not mean it can be “deployed”. Version management and dependencies are the two areas that are most prone to overturning during release. Officials have circled them with warning boxes, and this section is specially filled in.
Pitfall 1: Set version, push new submission but no one updates it
This is the most counter-intuitive and deceptive one. How does Claude Code determine “whether the plug-in has a new version”? It takes version numbers in this order:
versioninplugin.jsonversionin market entries- If not, use the SHA submitted by git
Here’s the key. The official warning is serious:
Setting
versionwill fix the plugin. Ifplugin.jsondeclares"version": "1.0.0", pushing a new commit without changing that string has no effect on existing users, since Claude Code sees the same version and keeps a cached copy.
Translated into vernacular: **Once you have written "version": "1.0.0", it is useless to just push new code to the warehouse - the version number on the user side has not changed, /plugin update will reply to you “already the latest”, and the cache will not be refreshed at all. ** You must manually increase the version number every time you release a version (1.0.1, 1.1.0…).
So the official gives two strategies, choose one of the two, don’t mix:
| Strategy | How | Update Behavior | Fit |
|---|---|---|---|
| Explicit version | Set version in plugin.json and manually mention it every time a version is released | Users will only receive updates when you mention the version number | A formal plug-in with a stable release rhythm |
| Submit SHA version | Do not write version, git hosting | Every time a new submission is pushed, it is a new version, and users automatically get it | Internal, team, and rapid iteration plug-ins |
**There is a double pitfall: don’t write version in both plugin.json and the market entry. ** Official clarification - the value of plugin.json will silently override the market entry. If you change the version in marketplace.json, it may not take effect at all because it is suppressed by the old plugin.json version number.
It’s easy to fall into the pitfall of explicit versions: a team’s internal plug-in set "version": "1.0.0", changed the code several times and pushed it up, but colleagues kept reporting “Why haven’t they been updated?” It is easy for you to think that the market has not been refreshed, and it takes a long time to realize that the version number has not changed, and Claude Code certainly thinks there is no change**. Internal plug-ins will never write version, let them use SHA, push colleagues to update once, and it will be clean. **Conclusion: Do not set version for internal plug-ins that iterate quickly, only set version for official plug-ins that are stably released, and remember to mention it every time. **
Pitfall 2: How to declare dependencies
If your plugin A requires plugin B to work, declare it using the dependencies field:
{
  "name": "my-plugin",
  "dependencies": [
    "helper-lib",
    { "name": "secrets-vault", "version": "~2.1.0" }
  ]
}
After the declaration, when installing/enabling your plug-in, Claude Code will automatically install/start the dependencies. The version can be constrained using semver (semantic version range) (like ~2.1.0) to avoid relying on a large version to crash your plug-in. When uninstalling, claude plugin uninstall --prune can easily clear out those plugins that are “automatically installed only to satisfy dependencies and no one wants them now”; Plugins you install directly manually will never be touched by prune.
**Analogy: The ingredient list is marked with “Accessories to be purchased separately”. ** At the end of a furniture manual, it says “This model requires an additional M4 screw package (2.1 specification)” - you need to prepare all the accessories according to the order before the furniture can be installed. dependencies is the list of accessories for the plug-in: It states “who I need and which version I need”, and Claude Code automatically prepares them according to the order.
💡 To summarize in one sentence: there are two pitfalls in publishing - If you set
version, you must manually mention it every time you release a version, otherwise users will not receive updates (for rapid iteration, just don’t set it and use SHA); dependencies are declared withdependencies, and semver constraints can be added. When installing your plug-in, the dependencies will be automatically installed together.
09 Summary
This article advances the plug-in from “being able to use” to “being able to make and distribute” - It is essentially a box of Lego: an instruction manual (plugin.json) determines the identity, several parts boxes (component folders) can be packed, and the whole box can be packaged and sent to anyone.
Let’s review the core points together:
| Things you need to find out | Key points |
|---|---|
| Directory skeleton | Only plugin.json** is placed in .claude-plugin/, and all other components are placed in the root directory |
| Manifest field | The only required field is name (definite namespace); the component path is divided into “replacement” (agents/commands) and “append” (skills) |
| What components can be installed | Seven categories of skill/command/agent/hook/MCP/LSP/monitor; The agent in the plug-in has been deprived of rights (no hook/MCP/permission mode) |
| How to write the path | Must use variables such as ${CLAUDE_PLUGIN_ROOT}, do not hard-code, do not reference files outside the directory; put DATA in the status, not ROOT |
| Development inner loop | plugin init skeleton → --plugin-dir loading → /reload-plugins hot reloading |
| Publish | Build marketplace.json, distinguish market source/plugin source, claude plugin validate to verify |
| Two pitfalls | version must be mentioned every time; dependencies are declared with dependencies |
You should now be able to: Understand the purpose of any plug-in directory, build a running plug-in skeleton from scratch, use --plugin-dir to test it locally, build a market and send it to the team; also understand why ${CLAUDE_PLUGIN_ROOT} cannot be hard-coded, and how to avoid the pitfall of “version will not be updated unless mentioned”. **In Chapter 24, you learned to consume other people’s plug-ins. In this article, you become a person who can produce plug-ins - you package your own configuration that you have saved for a long time and send it out. From now on, you can no longer just copy other people’s plug-ins. **
At this point, Claude Code’s “extension + configuration + packaging and distribution” line is complete. From CLAUDE.md in Part 18, MCP in Part 22, subagent in Part 23, to the plug-ins in Parts 24 and 38 - you will not only use these tools, but also assemble, package and deliver them to others.
Next article 39 “Introduction to Practical Combat” - The previous thirty or so articles are all “disassembly of functions one by one”, and the parts in your hand are already piled up. The next article will no longer talk about new features, but string these parts together into a complete practical path for the first time: take a real small demand and walk it from start to delivery, so that you can see with your own eyes “how to twist what you have learned into a rope to work.” Think about it - every move you know now is easy to use alone, but when it comes to a real fight, which move should you draw first and which move should you take next? **
39 · Practical introduction: Take a real demand and go through it from start to delivery
To be honest, most people think that writing AI code is just “one sentence and then wait for the results” - state the requirements clearly, Claude will run it himself, and you will take over and use it. This road sounds smooth, but once you step on a pit, you will know where it breaks:
The direction went astray, three more files were changed, the bugs that were promised crashed after being fixed… In the end, more time was spent cleaning up than doing it myself.
**It’s not that the tools aren’t smart enough, it’s that there are a few key handover batons missing from this process. **
**To put it bluntly, this is the gap between “learning every movement” and “being able to connect the movements together.” ** You have practiced steering, looking in the rearview mirror, and braking, but when you hit the road alone for the first time, you have to connect these actions in the correct order to be able to drive. This article does not teach any new functions, it only does one thing - Take you to connect the parts you already know into a practical path that can be run for the first time.
The task we picked couldn’t be smaller, but it has all the essentials: Add a function to a small script that counts word frequency, and fix a bug. Although Sparrow is small, there is no missing step in the complete road from the start of construction to delivery.
After reading this article, you will get:
- A standard practical path of “start → explore → plan → hands-on → verify → deliver”, what to type and see at each step
- A real small task that can be copied (add
--top Nto the script for counting words, fix the crash with empty parameters), full command + expected output - Why is this iron rule of “let it explore first, then let it act” the most important muscle memory for novices to develop?
- How to use plan mode (see Part 20 for details) to make it come up with a plan before breaking the code, and how to review the diff it gives you
- A comparison table of “How do veterans do it vs. How do novices do it”, marking the most common pitfalls in the order.
01 Let’s take a look at the panorama first: a practical trip, just these six steps
Before taking action, go through the entire journey in your mind. The skeleton of a real task from receipt to delivery, no matter how big or small, is these six steps:
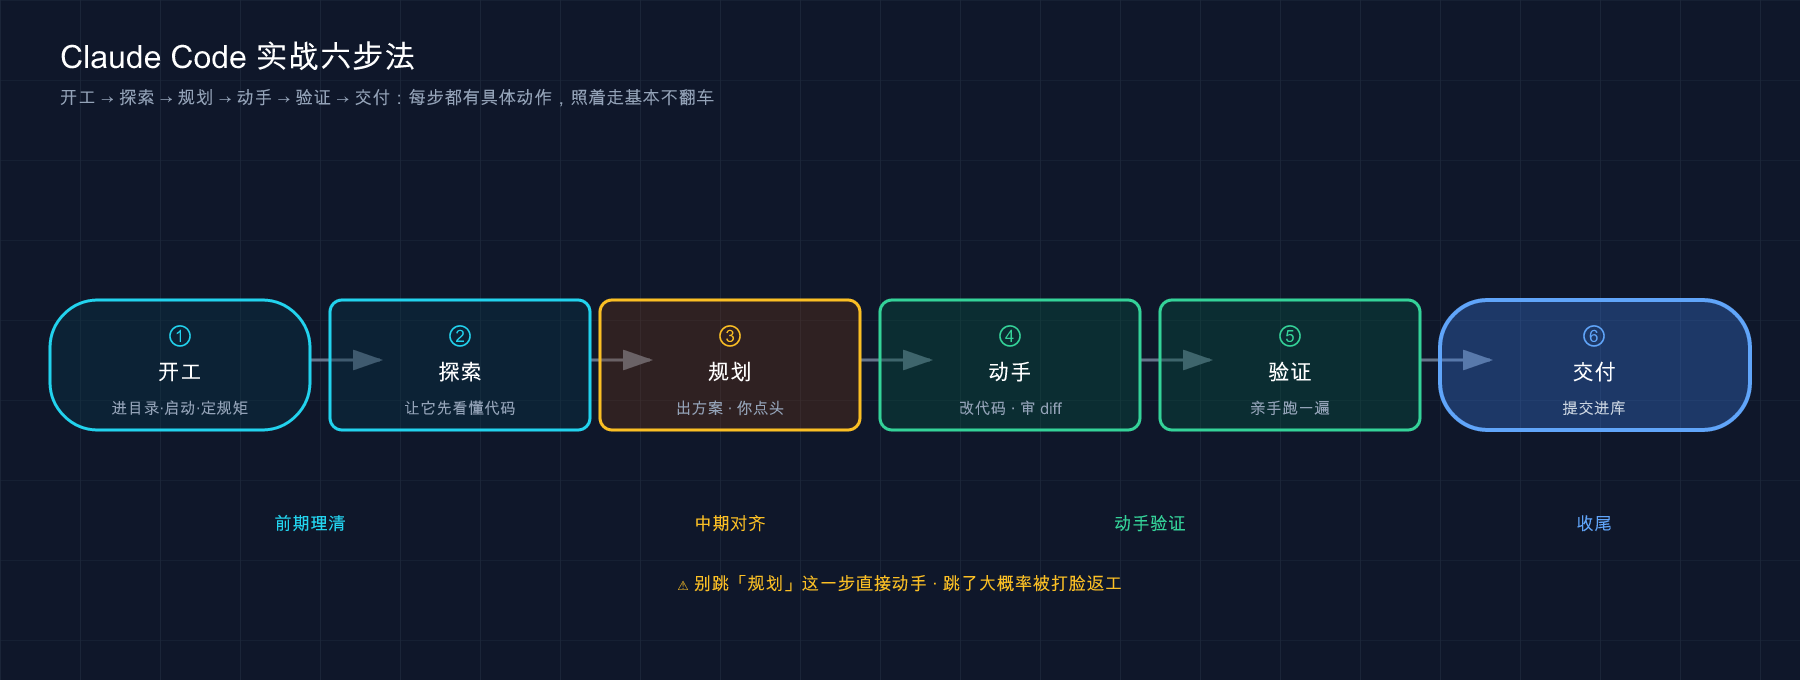
**Analogy: Passing the baton in a relay race. ** These six steps are six people who pass the baton: exploration and “what I understand” are handed over to planning, planning and “how to change it” are handed over to hands-on work, and “what has been changed” is handed over to verification. If any stick is dropped, the whole trip will have to be reworked - 90% of the time a novice crashes the car, it is because a certain handover was not done. The most typical one is “just let it start without exploring”, and the stick will start running before the stick is firmly grasped.
I did not make up these six steps. They are the practical sequence put together by the official quickstart and common workflows documents. The official sentence is very accurate:
Let Claude understand your code before making changes.
These six steps can still be compressed, but cannot be skipped. ** Experienced people will combine “exploration + planning” into one sentence and “verification + delivery” into one action. It looks like three steps - but each step is still there, but the rhythm is faster. The most common mistake for novices is not “walking slowly”, but directly deleting all the four steps in the middle, leaving only “state the need → get the result”, which is equivalent to throwing the stick directly from the first person’s hand to the finish line, with no one picking up in the middle. The rest of this article is to take you through these six steps on a real task, and deliver each step personally. I will mark at the beginning of each step “Which of the things learned in the previous article does this step correspond to?” so that you can number the parts as you go.
💡 To sum up in one sentence: The skeleton of an actual operation is always the six steps of “start → explore → plan → do → verify → deliver”, like a relay race sticks must be delivered in place; the stick that novices most often miss is “starting without letting it explore”.
02 Preparation: Create a small project for practicing
In order to allow you to run as it is, we will not touch any real big projects, but first spend two minutes to build a minimal practice field. It only has a Python script and a text file. It does not rely on any third-party libraries and can be run with python3 (included with Mac/Linux; just install Python on Windows).
Step one: Create a directory, go in, and put two files
Execute in the terminal (this step is purely manual preparation, Claude Code has not been used yet):
mkdir wordcount-demo && cd wordcount-demoCreate a new wordcount.py with the following content (this is the “ancestral code” we want to change, and it is deliberately written to be rough):
import sys
from collections import Counter

def count_words(path):
    with open(path) as f:
        text = f.read()
    words = text.lower().split()
    return Counter(words)

def main():
    path = sys.argv[1]
    counts = count_words(path)
    for word, n in counts.items():
        print(f"{word}: {n}")

if __name__ == "__main__":
    main()
Create another sample.txt as test data:
the quick brown fox the lazy dog the foxStep 2: Run it manually to confirm it works
python3 wordcount.py sample.txtExpected output (the order may be slightly different, the numbers must be the same):
the: 3
quick: 1
brown: 1
fox: 2
lazy: 1
dog: 1
Seeing these counts = the script is working properly and the training ground is set up. This script has two problems, which is exactly what we need:
- Missing function: I want to only see the “top N most frequent words”, but now it types them all.
- Hidden bug: If you try running
python3 wordcount.pydirectly without a file name, it will crash with anIndexErrorin your face instead of prompting you that “it’s time to upload a file”.
Step 3: Incorporate it into git (this step is critical, don’t skip it)
git init && git add . && git commit -m "init: 一个简陋的数词脚本"Expected: A commit confirmation line similar to 2 files changed appears at the end (wordcount.py and sample.txt each record one entry). See it = You already have a clean “origin”. No matter what Claude changes the code to later, you can return here with one click.
Why must you git commit before starting work? Because it is your hardest regret medicine. Article 37 mentioned that checkpoints can rewind Claude’s editing, but checkpoints and git are two sets of tools, each with its own section (Part 37 specifically discussed this). A clean git commit before starting work is the foundation for you to “get back to the starting point with one click no matter how much trouble you make later” - It is a very common mistake to make major changes before submitting, and then regret it after making the changes, but there is no clean baseline to compare with, so you can’t do anything but submit it before starting work.
💡 To sum up in one sentence: the training field is just a rough script + a text file, you can run it with
python3; it deliberately leaves out the two tasks of “missing functions” and “hiding bugs”; dogit commitonce before starting work, leaving yourself the hardest regret medicine.
03 Start: Start in the project directory, first write the smallest CLAUDE.md
The environment is ready, and the first step is officially started - start of work. This step corresponds to Chapter 02 (Startup), Chapter 07 (First Run-through), and Chapter 12 / 18 (CLAUDE.md).
Step one: Start Claude Code in the project root directory
You have to type claude in the wordcount-demo directory, not elsewhere. By default, Claude Code uses “the directory where you started it” as the workspace - in the wrong place, it reads files from other projects.
claudeExpected: When you see the welcome screen of Claude Code, the bottom shows that the current directory is wordcount-demo. This is the starting point that Chapter 07 takes you through.
Step 2: First give it a copy of the “minimum available” CLAUDE.md
Article 18 repeatedly emphasizes a sentence: The most useless CLAUDE.md is the one that wrote three hundred lines of Claude without listening to a single one. Therefore, don’t be greedy for too many training items. It is enough to explain the most important rules in three or five elements. Our little script actually has two rules: what to use to run it, and how to verify after modification. Let it be generated directly in the session (you can also write it by hand, but it is easier to let it be written):
帮我在项目根目录建一个 CLAUDE.md,写清两条:
1. 这是个纯标准库的 Python 命令行小工具,不要引入任何第三方依赖
2. 每次改完代码,用 python3 wordcount.py sample.txt 跑一遍验证不报错Expectation: Claude will show you the content to be written first, and then ask for permission to write the file (the permission mechanism discussed in Part 20 - it must ask you before moving the file). After approval, there will be an additional CLAUDE.md in the project root directory, the content of which roughly looks like this:
# wordcount-demo

一个数文本里单词频率的命令行小工具。

## 技术约束
- 纯 Python 标准库,**不要引入任何第三方依赖**。

## 验证
- 每次改完代码,跑一遍确认不报错:`python3 wordcount.py sample.txt`
Short, but the two most important rules are nailed down. **Don’t think it’s crude - you don’t need to write thirty lines if you can manage it in three or five lines. **
Here you may think of
/initin Chapter 12. The difference is:/initallows Claude to scan the code base by himself and automatically generate a more complete manual, suitable for real projects of a certain scale; our script only has two files, manually specifying the two core rules is more accurate and shorter. Both paths are right, it depends on the size of the project.
Why spend this step writing CLAUDE.md at the beginning of the project? Because it is the “general rule” for all subsequent handovers. When you ask it to add functions later, it will automatically remember “Don’t refer to third-party libraries”; after the modification, it will automatically remember “Run the verification again” - You only say it once, and it will take effect for the entire game, there is no need to repeat every command. This is the most real value of CLAUDE.md: solidifying “what you have to say every time” into the background that it automatically loads every session.
💡 Summary in one sentence: Start work = Station type
claudein the directory + Write a minimum CLAUDE.md of three to five lines to fix the core rules; manually specify two rules for small practice projects, which is more accurate and shorter than scanning the entire library with/init.
04 Exploration: Let it “understand” first, don’t rush to “do it”
This is the most important part of the entire journey to develop muscle memory and the most easily skipped by novices - exploration. Corresponds to the first category in “The Four Most Commonly Used Jobs” in Chapter 16.
**Let me talk about the conclusion first: the first sentence when you get the task is not “change it for me”, but “understand it first”. **
That was the mistake I made in the stunned scene at the beginning - I wanted to type “add a --top parameter to the script” as soon as I started. **What’s wrong? ** Claude knows nothing about your code. It will guess and change it as it goes. If it guesses wrong, it will make a bunch of different changes for you. The correct way is to send it first to find out the current situation:
先别改任何代码。给我讲讲 @wordcount.py 现在是怎么工作的,
入口在哪、有没有什么明显的问题或者容易崩的地方?
Pay attention to two details:
- The sentence at the beginning “Don’t change any code yet” is to draw a line for it - this stick is only allowed to be looked at, not moved. As mentioned in Chapter 15, if the boundary is clearly stated, it will not cross the boundary.
- That
@wordcount.pyuses@to directly insert the file content into the conversation (the@reference mentioned in articles 16 and 17), saving it from having to go through another page.
Expectation: Claude will read the file and give you an explanation - roughly speaking: this is a script that uses Counter to count word frequencies. The entry is main(), which takes the file path from sys.argv[1], and then most likely will proactively point out the hidden danger: if the file name is not passed, sys.argv[1] will cross the boundary and crash.
Did you see - You haven’t mentioned the bug yet, it discovered it by itself while exploring. This is the benefit of “exploring first”: it not only understands the current situation, but also helps you figure out the problem. If this task is done well, the next task (planning) will be successful.
**This script only has a dozen lines, and one sentence of exploration is enough; but in real projects, exploration often requires several levels of “from broad to narrow”. ** The exploration routine given in the official common workflow is this rhythm: first ask about the overall situation, and then delve into the local part——
先给我这个代码库的整体结构和它是干嘛的(先别改任何代码)处理用户登录的逻辑在哪几个文件?它们怎么配合的?In the first sentence, you get the “global map”, and in the second sentence, follow the map and drill into the area you want to change. **Why not ask for details right from the start? ** Because the less familiar it is with the project, the easier it is to regard files that “seem to be relevant” as “really relevant” - give it a global map first, and then position it more accurately. When entering a medium-sized project that I have never touched before, I would rather spend an extra two minutes exploring it than correct it with a wrong overall impression.
**Analogy: Before you hit the road alone for the first time, walk around the car. ** Before getting in the car, experienced drivers will subconsciously take a look - whether the tires are flat, whether there are any obstacles behind, and whether the mirror angle is correct. This lap takes less than ten seconds, but it can avoid “directly shifting into gear and hitting an unseen pillar.” Let Claude explore first, that is, this lap before hitting the road - Ten seconds of “taking a look”, saving the next half hour of “correcting mistakes and starting over again”.
Reading files in the exploration phase will eat up the context (Article 19 mentioned that the workbench will become stupid if it is full). When the task is large and you need to flip through a bunch of files, you can ask it to send a subagent to explore (Part 23) - the subagent flips through its own window and only delivers the conclusion back, so that your main dialogue is not filled with the content of a bunch of files. If you don’t need it for small tasks, just know that there is a way.
💡 One-sentence summary: The first sentence when you get a task is always “Don’t change it first, understand it first”**; letting it explore not only saves you guessing and making random changes, but also often makes you a “problem it proactively finds for you” - this is the best skill for novices.
05 Planning: Let it come up with a plan first, you nod your head and then mess with the code
After exploring, it understands the current situation and what you want to do. But there is still one step left - let it show you “how it plans to change” first, and then take action after you agree. This stick corresponds to the plan mode in Chapter 20.
Why not just let it be changed? Because “the solution it understands” may not be “the solution you want”. Letting him tell you his plan first is the cheapest insurance to spend a minute to avoid “the direction has gone astray and you have to change it all the way to the end”.
Method 1: Just let him talk about the plan first and don’t do anything
The simplest way is to constrain it in one sentence:
我想给这个脚本加一个 --top N 参数,只显示最高频的前 N 个词;
顺手把不传文件名就崩溃的问题也修了。
先告诉我你打算怎么改、动哪几个地方,等我说「开始」你再动手。Expected: It will return you a plan, similar to - use argparse to replace the handwritten sys.argv, add a --top option, use Counter.most_common(N) to get the top N, and when the file name is not passed, argparse will automatically report a friendly prompt instead of crashing. **It stops here waiting for your decision and will not modify the file without authorization. **
Method 2: Seriously use plan mode
If it is a larger task, it is safer to switch to the official planning mode - it will force Claude not to edit the source code, only produce the plan, and not change a line unless approved (but it can still run shell commands for exploration). Two ways to proceed (discussed in Chapter 20):
claude --permission-mode planOr press Shift+Tab in a session to cycle through plan mode. The official positioning of it is very clear:
Claude reads the file and proposes a plan, but makes no edits until you approve it.
The difference between these two methods can be seen clearly in a table:
| Practice | How to constrain it | Degree of enforcement | Suitability |
|---|---|---|---|
| Tell it to talk about the plan first | It depends on you to write “Don’t do it yet” in the prompt | Soft constraints (it will usually listen, but it won’t stop it) | Small changes, when you stare |
| plan mode | At the mode level, source code editing is prohibited (shell commands can still be run) | Hard constraints (a single line of source code cannot be changed before approval) | Big changes, uneasy, want to carefully review the plan |
A practical habit: For a small change like this --top, one sentence is enough; for any change that involves multiple files or you are unsure about, always use Shift+Tab to switch to plan mode - let the mode hold the “no move without nodding” gate for you, which is more worry-free than staring. When making major changes to an unfamiliar project, if you don’t switch to plan mode soon, it will probably change four files at once, and the direction is different from what you expected. The time it takes to go back is enough to look at the plan three times. **So if you are not sure, just plan. **
💡 To sum up in one sentence: before taking action, let it ** come up with a plan first, you nod and then change it **; for small changes, just say “don’t do it yet”, for big changes / bottomless changes, use
Shift+Tabto plan mode and hard lock “don’t change the line before approval”.
06 Hands-on + Review: Leave it to change, but take a look at every diff
The plan is nodded, and the sixth tip (actually a combination of hands-on and review) is to let it be changed while you keep an eye on every change**. Confirmation of authority corresponding to Article 20.
Step 1: Give it the green light
方案可以,开始改吧。Expected: Claude starts editing wordcount.py. Here comes the key - every time it makes a change, it will put the diff (change comparison: which lines were deleted and which lines were added) in front of you to ask for approval (unless you turn on the “Accept All” mode, novices are strongly advised not to open it). Article 20 talked about this permission mechanism, and this step is the moment when it really comes into effect.
Step 2: Look at the diff carefully and press Enter
This is the place where novices are most likely to slack off - diff is crossed without looking and just y all the way. My iron rule is: At least glance at every change to see if it moves where I asked it to move. The changes you should see in this mission are roughly:
- import sys
+ import argparse

- def main():
-     path = sys.argv[1]
-     counts = count_words(path)
-     for word, n in counts.items():
+ def main():
+     parser = argparse.ArgumentParser(...)
+     parser.add_argument("path", ...)
+     parser.add_argument("--top", type=int, default=None, ...)
+     args = parser.parse_args()
+     counts = count_words(args.path)
+     items = counts.most_common(args.top) if args.top else counts.most_common()
+     for word, n in items:
Take a quick glance to confirm three things: **① It is indeed adding --top and changing parameters (in line with the plan); ② It does not mess with the count_words function that is already good; ③ It does not secretly introduce a third-party library (the rules established by CLAUDE.md). ** If it is correct, approve it.
**How to quickly scan a diff? ** You don’t need to read it word for word, just pay attention to the three types of signals: The red lines (-, what was deleted) do not include things you are reluctant to delete; the green lines (+, what were added) do not include dependencies you did not want or functions you did not want to add; the scope of changes should not exceed the few places you mentioned. In this task, the red line deletes the handwritten sys.argv, and the green line adds argparse and --top, and the scope is only in main() - all within expectations, feel free to approve.
** Regarding the “accept all” mode, a piece of advice for novices: don’t open it during the training stage. ** It is mentioned in the quickstart that you can “enable all accept modes for the session” (that is, acceptEdits in Chapter 20). If you enable it, you will no longer be asked step by step and you will have to change it all by yourself. **It saves trouble, but the price is that you completely hand over the “interception during the event” window. ** A more stable approach is to only open it in two situations: first, the changes have been reviewed line by line in plan mode and have an idea; second, a bunch of mechanical repeated changes (such as changing variable names in batches). **In the first one or two months, look at everything carefully and develop your ability to “read diff” before talking about it. **
**Why can’t we skip this step of review? **Because AI code modification is not a “right or wrong” diode, it is often “generally correct, but the details are biased” - it may have changed more places that you did not ask to change, or it may have used writing methods that you did not want. That sentence from article 20 is worth posting again:
Claude Code always asks for permission before modifying a file.
This permission is not just a formality, it is your only window to “intercept in progress” - once it is approved and modified, you have to rely on the checkpoint in Part 37 or git to “rewind afterwards”, which is much more expensive. **It is always more cost-effective to glance at the diff during the process than to roll back afterwards. **
💡 To sum up in one sentence: in the hands-on stage, let it be modified, but take a look at every diff - confirm that “what is moved is what should be moved, the code is not touched randomly, and CLAUDE.md is not violated”; this approval is the only window for you to intercept ** in the process. Entering without thinking is equivalent to leaving the regret medicine afterwards.
07 Verification: Let me show you, don’t believe “I changed it”
After the code has been modified, it will most likely tell you “It has been modified, the --top parameter has been added, and the crash problem has been fixed.” **Don’t believe a word of this sentence until you see it run through with your own eyes. ** This is the second to last pole on the entire trip, and it is also the most economical pole for beginners.
** Let’s talk about the conclusion first: “It said it was corrected” does not count, only “it was correct after running it again” counts. ** This is exactly the hard requirement in the project specification to “actively verify after modifications are made, and don’t just make modifications without verifying them.” In practice, it means - Run the acceptance criteria by yourself.
Step 1: Verify new functionality (--top)
python3 wordcount.py sample.txt --top 3Expected output (from high to low by word frequency, only the top 3 are shown):
the: 3
fox: 2
quick: 1
Seeing that only the top three are left, and they are sorted by frequency = New function has become. (the appears 3 times, fox 2 times, and the third place is any word that appears 1 time.)
Step 2: Verify that the old functionality has not been changed (regressed)
New parameters have been added, old usage cannot be broken - without --top, you have to type them all as before:
python3 wordcount.py sample.txtExpected: Consistent with the original output of Section 02 (all six words present). Consistency = No “fix the new and break the old”.
Step 3: Verify that the bug is really fixed
This step is the most critical - reproduce the original crash and see if it prompts properly now instead of dumping the traceback:
python3 wordcount.pyExpected: No longer the string of IndexError crashes, but a clean line of usage prompts, similar to:
usage: wordcount.py [-h] [--top TOP] path
wordcount.py: error: the following arguments are required: path
From “the program crashed and threw a traceback in your face” to “clearly telling you to pass less path” - this is ironclad evidence that the bug has been fixed. Only when all three steps are passed, the job is truly completed.
**Want to be more stable? Let it “nail the verification into a test”. ** You have to run the above three steps manually, and it will be over after this time; but the same bug may crash again next time someone changes the code. A more stable approach is to ask Claude to write a small test and turn the “not passing the file name but friendly error report” into a repeatable level - the official common workflow specifically includes “when fixing a bug, first write a test that can reproduce it, and then let the test pass” (the “write a test that reproduces the bug and then let the test pass” in the project specification also means the same):
给「不传文件名时不崩溃、而是退出码非 0 并打印用法提示」写一个测试,再确认它通过。Expectation: Claude writes a short test (runs the script using subprocess, asserts the exit code and output), and then runs it to give you a green light. This step upgrades “I ran it this time” to “I can automatically verify it every time in the future” - It is the icing on the cake for one-time practice, and is almost a must for real projects. You can skip small tasks if they are too heavy, but you must have this string in your heart.
Why are you so obsessed with “running with your own hands”? **Because there are more than one or two people who have been tricked by “I changed it”. ** Ask it to fix a boundary condition. It swears that it has been fixed and submits it without running. As a result, the boundary is not covered at all - it changes another place that “seems relevant”. **So let’s face it: the “complete” that AI says is a hypothesis, and the “pass” that you run out of is the fact. ** This has the same meaning as the sentence in the project specification “Everything that claims to have been verified must actually be run again.”
💡 One sentence summary: Verification = Run it three times by hand - whether the new function is correct, whether the old function has been modified, whether the bug has been really fixed; “It said it has been fixed” is an assumption, “you ran it correctly” is the fact, this is not a waste.
08 Delivery: Let it write the submission information and store the results in the library
After passing all three steps of verification, the last step is to deliver and securely store the results in git. Corresponds to the “conversational Git” mentioned at the end of Part 07.
Step one: Take a look at what has been changed
我改了哪些文件?给我一个改动概览。Expectation: Claude runs git status / git diff and tells you that only wordcount.py has been moved this time, the --top parameter has been added, and the input parameter has been changed to argparse. Confirm again before delivery that “the scope of changes is consistent with expectations”, which is a final review.
Step 2: Let it generate submission information and submit
用一句话描述清楚这次改动,提交它。Expectation: Claude will show you its proposed commit message first - similar to “feat: add —top N parameter to wordcount and use argparse to fix missing parameter crash” - ** and then request approval to execute git commit**. This is the permission gate in Chapter 20: before it touches your git history, it still asks you first.
Insert an important boundary here:
git commitwill first confirm the content to be submitted to you; butgit push(push to the remote) is another matter. Before pushing the results to a remote warehouse such as GitHub, you must know it well and check it yourself - this is what Part 43 “Git Workflow” will explain in detail. Here you first remember: You can let it do the local submission and let it do it for you. Pushing the remote step is in your own hands.
Step 3: Confirm submission is successful
显示我最后 1 次提交。Expected: It runs git log -1, and you can see the commit message and changes just now. Seeing it = This job is officially delivered, and the entire process is closed-loop from the start of construction to storage.
When you get here, you look back: from a rough script that crashes and has incomplete functions, to a small tool with --top and friendly prompts for missing parameters, you only typed six or seven sentences of natural language in the whole process-but each sentence is stuck in the correct position of those six steps. **This is what “connecting parts together” looks like. **
💡 One sentence summary: Delivery = Look at the change overview first → let it plan to submit the information and
commit(it will confirm it for you first) →git logto verify the entry into the library; remember the boundaries - You can let go of local commits, and you can control push remotely (leaved to Article 43).
09 What to do if things go wrong: Go back cleanly, don’t make up for the mess
The trip above went smoothly because I deliberately chose a small task here. Real tasks are probably not so good - The verification step is often red: the function is not implemented correctly, or it has changed other places. At this time, the novice’s instinctive reaction is often wrong: Facing the messed up code, let it “fix it on this basis”.
**Don’t do this. ** Repeatedly patching an already deviated state, the more you patch it, the more messy it becomes - it carries the error context of the previous version every time, and it is easy to make the hole bigger and bigger. **The correct approach is: first cleanly retreat to a known correct point, and then start again with “How should I say it more clearly this time?” ** This just puts the checkpoint in Part 37 and the git commit before starting work in Section 02 into use.
There are two levels of return, depending on which step you have changed to:
| Return to gear | What to use | Where to return to | Suitable |
|---|---|---|---|
| Light file: Undo the edit | Checkpoint of Chapter 37, /rewind | Before Claude changed this batch of files | He made one or two changes and wanted to undo them as soon as he discovered them |
| Refile: Return to the starting point | git, git restore . / git reset --hard | The clean commit you made before starting the work | The whole direction is off, and you want to start over from scratch |
Light file is most commonly used: type /rewind in a session, it can rewind Claude’s round of file editing (Article 37 specifically talks about its boundaries - it can return files and conversations, but don’t use it as git). Re-file is a cover-up: If the changes are beyond recognition and the checkpoints are no longer clear, go back to the start-up commit in Section 02 - this is why we insisted on “commit before starting work” in the first place. That clean commit is the starting point you can always escape to.
When you go back, don’t rush to say it again. Think about why you went astray this time - nine times out of ten, the exploration was not done enough, or the instructions were given too vaguely (“Speak clearly” mentioned in Part 15). A piece of experience: The first time it was corrected, 90% of the time it was because key constraints were missing from the instruction, such as not clearly stating “Only change this function, don’t touch anything else”. Return to the original point and make that sentence more specific, and it will usually go smoothly the second time. Retreat is not failure, it is stop loss - it saves a lot of trouble than trying to make up for the mess.
💡 Summary in one sentence: Things have changed The first reaction is to “return cleanly”, not “to fix the mess”; use
/rewindto undo edits for light files, and use git to return to the starting point of the start of work (that’s what the commit before starting work was for); after returning, first fill in the instructions before restarting, don’t repeat the same.
10 A set of comparisons: How do veterans do vs. How do novices do
In the same six steps, there is a world of difference between a veteran and a novice - the worst is all in those “spared handover batons”. I’ve listed the most common pitfalls side by side for you to check on your own:
| Links | ❌ Commonly used by novices | ✅ How to proceed by veterans |
|---|---|---|
| Start work | Type claude in any directory without writing CLAUDE.md | Go to the project directory and first write three or five lines of minimum CLAUDE.md to set the rules |
| Explore | Just “Change it for me” at the beginning, skip understanding it | The first sentence is always “Don’t change it first, understand it first”, let it touch the current situation first |
| Planning | Just let it take action, only to find out when the direction is wrong | Let it come up with a plan first, nod and then change; if there is no bottom line, go to plan mode |
| Hands on | Diff without looking at y all the way | Scan the diff at every place: Is the move correct or has it crossed the line |
| Verification | Just believe “I have changed it” and you are done | Run it three times with your own hands: check new functions, old functions, and bugs each time |
| Delivery | Leave the changes to dry, or submit directly without looking at the scope | First look at the change overview, let it submit the information, and log to confirm the storage |
**The essence of this table is just one sentence: Novices compress six steps into two steps (state needs → get results), and veterans take six steps honestly. ** When I first started, everyone liked to take shortcuts. I suffered a few consecutive losses of “deviating in the direction + submitting without verification”, and then I slowly made these six steps go smoothly. The most important thing to practice first is the first and last two sticks - “explore first” at the beginning and “verify with your own hands” at the end. If you stick to these two sticks, the probability of overturning will be reduced by more than half.
Another question that is often asked is: “Do you mind doing the same six steps every time?” No, because** the smaller the task, the faster each step** - for our training task, it only takes ten minutes to complete all six steps. And after you become familiar with it, exploration and planning can often be combined into one sentence (“Understand @file first and then tell me how you plan to change X, don’t do it”). The process is the skeleton, not the shackles; once the skeleton is memorized, it is up to you how to play Allegro.
💡 To sum up in one sentence: The difference between veterans and novices is all about “not saving the handover baton”; the most important thing to practice is the first and last two sticks - “explore first” at the beginning and “verify with your own hands” at the end; the smaller the task, the faster each step is, and the six steps are the skeleton, not the shackles.
11 Summary
This article does not teach any new functions, it only does one thing - Take you the parts learned in the previous 38 articles and connect them into a complete practical path on a real small task for the first time.
First, play back the entire sentence that you typed together. You will find that these six or seven sentences are stuck on a handover baton:
# 开工后(先定规矩)
帮我建个 CLAUDE.md:纯标准库别引第三方依赖;改完跑 python3 wordcount.py sample.txt 验证

# 探索(先看懂、别动手)
先别改任何代码。讲讲 @wordcount.py 怎么工作的、有没有容易崩的地方?

# 规划(出方案、等点头)
我想加 --top N 只看高频前 N 个词,顺手修不传文件名就崩溃的问题。先说方案,等我说开始再动手。

# 动手(点头放行,然后逐处审 diff)
方案可以,开始改吧。

# 验证(亲手跑,不信它说的)
(回终端跑:--top 3 / 不带 top / 不带文件名,三条各验一遍)

# 交付(看范围 → 提交 → 确认)
我改了哪些文件? → 用一句话描述这次改动,提交它。 → 显示我最后 1 次提交。
**Do you see it clearly? The real “actual combat” is these few sentences of natural language. The difficulty is never the skill of speaking, but putting each sentence in the right place. ** Let’s review the six steps of this journey together:
| Steps | What to do in this step | Previous article used | Key points in one sentence |
|---|---|---|---|
| Start work | Start the site to the directory + write the minimum CLAUDE.md | 02 / 07 / 12 / 18 | Say the core rules once and they will take effect |
| Explore | Let it understand the code first, don’t do anything | 16 | The first sentence is always “Don’t change it, understand it first” |
| Planning | Let it come up with a plan and you nod | 20 (plan mode) | If you don’t have a plan, just Shift+Tab and hard lock “No changes until approved” |
| Hands-on | Let it change and take a look at each diff | 20 (permission confirmation) | Intercepting during the process is more cost-effective than rolling back afterwards |
| Verification | Run it by yourself, don’t believe “I changed it” | 16 / 37 | The “passed” is the truth |
| Delivery | Look at the scope → Information to be submitted → Into the database | 07 | You can let go of local commits, and you can control the push yourself |
You should now be able to: Get any real small request “Help me add a function to something/fix a bug”, and no longer be confused at the terminal not knowing which sentence to type first - silently recite the six steps (start work, explore, plan, do it, verify, deliver), one stick at a time. In particular, stick to the first and last two sticks of “explore first, then verify”, so that Claude will not guess and make changes, but it will actually work after the changes are made. **When this process runs smoothly, all the parts learned earlier will truly come to life and can be twisted into a rope to work for you. **
This article is a watershed - From here on, we assume that you will “connect the parts together in one trip”, and the next few articles will continue to add new techniques on this practical path.
Next article 40 “Chrome: Let it operate the browser” - In this actual battle, Claude did all the work of “local files + command line”. But in real work, many things have to be done in the browser: fill in a form, click on the page a few times, grab a piece of data on the web page, and adjust the style of the real rendered interface. The next article will connect it with the “hand” of the browser, so that it can move from “only changing code” to “can click the mouse for you”. Think about it - **When Claude can not only change your code, but also open the browser to do it for you, the work it can do for you will be much wider. **
40 · Chrome: Let it operate the browser
⚠️ **Experimental feature, may change with version. ** The Chrome integration discussed in this article is currently in beta. The commands, pre-versions, and supported browsers are subject to official documents, and may be adjusted in subsequent versions.
Brothers, today we are going to talk about a feature that allows Claude Code to “grow hands” - Operation Browser.
In the previous thirty-nine articles, Claude’s work was basically in the “file + command line” area: reading your code, changing your files, and running your scripts. But there are a lot of things in real development that are inseparable from the browser - after changing the login form, you have to open the page and click to try it, to report a bug, you have to look at the red error message in the browser console (console), and to restore the design draft, you have to face the browser with a pixel-for-pixel ratio. In the past, you could only switch to Chrome to do these things manually, and then copy what you saw back and feed it to Claude.
**No more now. ** Connected to Chrome integration, you say in the terminal “Open localhost:3000, submit the form with error data, and see if the error message is correct.” Claude will open the browser, fill in the form, read the error message, and tell you the result later. For the first time, “modify code” and “verify code in the browser” can be done from beginning to end in the same conversation, without having to switch windows back and forth.
The day I first connected it, I stared at my Chrome automatically popping up a new tab page, clicking on the search box, and typing in word by word. I stared at it for a while - the feeling of “it is really clicking for me” was completely different from running commands in the sandbox before.
Let’s put it this way: the previous MCP (see Part 22 for details) connects it to data sources such as databases and Jira; Chrome integration connects it to the browser itself that you use every day—connecting all your login states. This article will explain clearly what it can do, how to connect it, what pitfalls it has, and what the security boundaries are when operating your “real browser”.
After reading this article, you will get:
- Explain in one sentence what Chrome integration is and what it and MCP/computer use are responsible for.
- Complete steps to follow it (installing extensions, starting
--chrome, pre-version and plan requirements), and which browsers/environments are not supported - Six types of high-frequency use cases (real-time debugging, design verification, form filling, data extraction…, selected from the official typical workflow), with a sentence for each type of how you would actually use it
- What are the risks of operating a “real browser” versus a sandbox, what official guardrails have been given, and what rules should you abide by yourself?
- A minimal implementation that can be followed and gives the expected results: connect Chrome and let it read the page once
01 First understand: what it is and what it can do
Let me give you the conclusion first: Chrome integration = let Claude Code borrow the Chrome you have logged in to open web pages, click buttons, fill out forms, and read pages for you.
The key word is “The one you have logged in to”. The official said it very directly:
Claude opens new tabs for browser tasks and shares your browser’s login status so it can access any website you’re logged into. Browser operations run in a Chrome window visible in real time.
Breaking this sentence apart, there are three points that are particularly important to Xiaobai:
- Open a new tab, not a new unfamiliar browser - it works in the Chrome in front of you.
- Share your login status - You are logged in to Gmail, Notion, and the company backend, and it can be accessed directly without you having to configure any APIs or post any tokens.
- The window is visible in real time - you can see everything it clicks and fills in, not sneaking in the background.
**Analogy: Calling a driver. ** You drank some wine tonight, call a driver to take you home. The driver is not driving his own car, it is your car - your ETC is inserted in the car, your parking card is stored in the storage compartment, and your home address is stored in the navigation. He can use these directly without you having to apply for a new card for him. But you can get the steering wheel back at any time: when you encounter a community access control that requires facial recognition (which cannot be done by a driver), he will stop and let you come. Claude operates the browser as a “surrogate driver” - the browser he opens is your browser that has logged in and everything is done. It does what it is supposed to do. When it encounters login pages and verification codes (CAPTCHA) that it can’t pass, it stops and calls you to **.
So what exactly can it do? The official list is a list. I picked out the categories that Xiaobai has the most experience with and added “How do you really use them”:
- Real-time debugging: Directly read the error report and page DOM status of the browser console, and then turn back and change the code that caused the error - this is the most different from MCP, you can “see” what is happening in the browser.
- Design Verification: After writing the UI according to the Figma draft, open the browser to see if it matches (connecting to the restoration of the design draft in Part 17).
- Web Application Test: Test form validation, check whether the visual deformation is present, and check whether the user process is working properly.
- Operate logged-in applications: write and change things directly in Gmail, Notion, and Google Docs, without using an API connector.
- Extract data: Extract the list (name, price, inventory) on the page into structured data and save it as a local CSV.
- Record GIF: Record a browser operation as a GIF to record or share “how this happened”.
Let’s take a scene that impressed me the most: there was a weird bug in the front-end callback, and the console reported an undefined when the page was loaded. I looked at the code for almost half an hour and couldn’t find anything wrong. After connecting to Chrome, I said “Open the dashboard page, read to me the error message in the console when loading, and then locate which piece of code” - it read the error message and followed the call stack to find a place where null value judgment was not performed. It took less than two minutes. Before the change, I had to open F12, copy the error report, and then paste it back into the terminal to describe it. It took longer than this just to go back and forth.
💡 Summary in one sentence: Chrome integration allows Claude to borrow the browser you log in to do everything to open web pages, read the console, fill out forms, and extract data - “modify code” and “verify in the browser” can be completely run through in the same conversation for the first time.
02 Which one does it manage with MCP and computer use?
Before answering, let’s clarify something that is easy to confuse: Claude has several ways to operate the “outside world”, and Chrome integration is only one of them. Don’t confuse the three methods, otherwise you will be confused about “which one should be used for this matter.”
The official computer use page talks about a priority order - when Claude does external work, he will try from the most accurate tools to the most cumbersome tools:
If you have an MCP server for this service, Claude will use it. If the task is a shell command, Claude uses Bash. If the task is a browser job and you have set up Claude in Chrome, Claude will use it. If none of the above applies, Claude uses computer use.
**Analogy: Don’t make a special trip if you can do something over the phone. ** For the same thing, if you can explain it clearly in a message, send a message (the fastest); if you can’t explain it clearly in a message, make a phone call (slower); if you can’t answer the question on the phone, just go to your door in person (the slowest and most troublesome). Claude also sorted things this way - try the easiest thing first, and only upgrade to heavier means when the easiest thing is out of reach.
Comparing the three roads, you will know their respective home courts:
| Means | What to do | When will it be its turn | Is this article about it |
|---|---|---|---|
| MCP (see Chapter 22 for details) | Connect to services with interfaces such as database, Jira, and Slack | The service has a ready-made MCP server, which is the most accurate and should be used first | No |
| Chrome Integration | Operate webpages in the browser: click, fill in, read the console, and extract data | The job is to operate web pages, and Chrome integration is installed | Yes |
| computer use | Control native app: click on the macOS app, view the screen, take a screenshot | None of the above are accessible (native apps, simulators, tools without API) | No, see below |
computer use (let Claude use your computer) is a brother article, and I will mention it here to give you an idea. It is “wider” and “slower” than Chrome integration - Chrome integration can only touch the browser, computer use can control the entire macOS desktop: open the native app, click any button, and capture your screen. Official words:
Screen controls are reserved for things that other tools can’t reach: native apps, emulators, and tools without APIs.
Just remember a few key differences (all are subject to official documents):
- computer use is currently a research preview and is only available in the CLI on macOS (for the desktop app line on Windows, see Part 10), it requires the Pro/Max package, and does not support
-pnon-interactive mode. - It appears as a built-in server called
computer-usein the/mcpmenu. It is off by default and must be enabled manually. - It runs on your real desktop and will request macOS “Accessibility” and “Screen Recording” permissions.
In one sentence, division of labor: For interfaces, use MCP, for web pages, use Chrome, and even the native desktop must be accessed through computer use. This article focuses on the middle one - Chrome.
💡 One sentence summary: Claude touches the outside world in three ways from precision to cumbersomeness - MCP (service with interface) → Chrome (browser webpage) → computer use (the entire macOS desktop); this article focuses on Chrome, and its home field is operations in the browser.
03 How to connect: install extension, start --chrome
Connecting to Chrome integration is simpler than connecting to an ordinary MCP server - the core is just two steps: install a Chrome extension and start it with the --chrome flag**. However, there are several prerequisites that cannot be connected if they are not met. The threshold must be set clearly first.
First, check the four preconditions
The official has listed four hard requirements, but even one of them cannot be met. Please check them one by one:
| Prerequisites | Specific requirements | How to check |
|---|---|---|
| Browser | Google Chrome or Microsoft Edge | Other browsers will not work, see the “unsupported list” below |
| Chrome extension | ”Claude in Chrome” extension v1.0.36 or higher | chrome://extensions inside |
| Claude Code version | v2.0.73 or higher | Terminal run claude --version |
| Packages | Straightforward Anthropic plans (Pro/Max/Team/Enterprise) | /status View Subscriptions |
The last item Package is the easiest to fall into, so I’ll emphasize it separately. Officially stated:
Chrome integration is not available through third-party providers such as Amazon Bedrock, Google Cloud Vertex AI, or Microsoft Foundry. If you only access Claude through a third-party provider, you will need a separate claude.ai account to use this feature.
To put it in adult words: If you use third-party access such as Bedrock/Vertex/Foundry (discussed in Chapter 05), or just use API key, this function will not work - it only recognizes direct Anthropic subscriptions. This is the same as desktop app and computer use, just remember it.
Which browsers/environments are not supported?
I specially picked out this “unsupported list” because I would be confused if I stepped on it:
- Browser: Currently only supports Chrome and Edge. Brave, Arc, and other Chromium-based browsers are not supported - don’t take it for granted that they are also Chromium kernels.
- Environment: WSL not supported (Windows Subsystem for Linux). If you are running Claude Code in WSL and want to connect to Chrome on Windows, this road is currently blocked.
I have stepped through this pitfall of Arc myself. My daily main browser is Arc (same as Chromium core). I took it for granted that I would be able to use it if I installed the extension. As a result, I couldn’t connect to /chrome, even though I had the extension installed and the version was correct, it just didn’t work. After struggling for more than 20 minutes, I finally found the small line in the document “Brave, Arc or other Chromium-based browsers are not yet supported” - wasted work. Later, I honestly installed a separate Chrome just for it, and it was connected in seconds.
Install extension + start
The prerequisites are all in place, let’s officially follow:
**Step one: Install the “Claude in Chrome” extension. ** Go to the Chrome App Store, search for “Claude” and install it (Edge also installs the same one in the Chrome App Store).
Installing extensions and accessing the Chrome App Store generally requires “Magic Internet Access” in China; the extension itself needs to be connected to Anthropic, and it cannot be connected even if the network is unavailable.
**Step 2: Start Claude Code with --chrome. ** In terminal:
claude --chromeOr if you are already in a session, just type /chrome to enable it without exiting and restarting.
**Just these two steps. ** After connecting, you can type /chrome at any time to: check the connection status, manage permissions, reconnect extensions, and choose which connected browser to use. If multiple browsers are connected at the same time, Claude will ask you which one to use at the beginning of the browser operation.
Don’t want to hit --chrome every time?
If you find it annoying to add --chrome in every session, you can set it as the default: Run /chrome and select “Enable by default”.
However, the official reminds you of the price, which is worth thinking carefully before driving:
Enabling Chrome by default in the CLI increases contextual usage because the browser tools are always loaded. If you notice increased context consumption, disable this setting and only use
--chromewhen needed.
To put it bluntly: enabled by default = the set of tools in the browser will be resident in every session, which will eat up a portion of the context window (Article 19 mentioned that the workbench will become stupid if it is full). Generally speaking, the more stable approach is not to set a default, and only temporarily --chrome** when operating a browser session - most pure code modifications do not use the browser at all, and there is no need to let it occupy space all the time.
By the way: If you mainly work in the VS Code extension (Part 08), as long as you install the Chrome extension, browser automation will be available directly without adding any flags - this is less troublesome than CLI.
Where to manage website permissions?
There is another detail: Which websites Claude can browse, click, and enter are inherited from Chrome extensions. Official:
Site-level permissions are inherited from Chrome extensions. Manage permissions in Chrome extension settings to control which sites Claude can browse, click, and type.
In other words, to control which sites it can touch, go to the settings of the Chrome extension to adjust it, not on the Claude Code side. This is its first gate, which will be discussed in the next section about safety.
💡 To summarize in one sentence: There are only two steps to connect Chrome - **Install the “Claude in Chrome” extension + start it with
--chrome(or/chromein the session); but first align the four prefixes (browser, extension version, CC version, Anthropic subscription), and Brave / Arc / other Chromium and WSL are not supported.
04 Typical use cases: six types of work, copy them
Picking up is just the beginning, it’s only valuable if you can use it. The official has given a series of sample workflows. I have selected the most practical ones from the six categories in the order of “you are likely to encounter them”, and each category is given an instruction that can be directly followed and modified. These instructions are all spoken in natural language, and you can just follow your own scenario.
Use Case 1: Test local web application
After you change a function during development, let it help you check it directly in the browser:
我刚改了登录表单的校验逻辑。打开 localhost:3000,
用一组无效数据提交表单,看看错误提示有没有正确出现。
It will navigate to your local server, interact with the form, and report back to you the observed results. This is probably the most commonly used type - after changing the front end, you don’t need to touch the browser yourself, it will run the verification process for you.
Use Case 2: Debugging with Console Log
Let it read the browser console to help you locate the problem. Here is an official tip: Don’t let it “give me all the console output”. If the log is too long, the screen will be refreshed - Tell it the mode you are looking for:
打开 dashboard 页面,检查页面加载时控制台里有没有报错。It will read console messages, filter according to the pattern or error type you mentioned, and will not dump a lot of irrelevant logs to you.
Use Case 3: Fill out forms in batches
Duplicate data entry is best thrown at it:
我有一个客户联系人表格在 contacts.csv 里。对每一行,
打开 crm.example.com 的 CRM,点「添加联系人」,
把姓名、邮箱、电话填进去。
It reads your local files, operates the web interface, and enters them one by one. To be honest, this kind of “mechanical repetitive” work is its most popular place - you just need to prepare the data, and it will fill in the rest.
Use Case 4: Write directly in the logged-in application
This type of coolness best embodies the “shared login state”:
根据最近的几个 commit 起草一份项目进展更新,
加到我那份 Google Doc(docs.google.com/document/d/abc123)里。
It opens the document, clicks into the editor, and types in the content. **Gmail, Notion, Sheets—all web applications you have logged in to can use this set, without any API. **
Use Case 5: Extract structured data from web pages
Extract the information scattered on the page into regular data:
打开商品列表页,把每件商品的名称、价格、库存状态抽出来,
存成一个 CSV 文件。
It navigates to the page, reads the content, compiles it into a structured format and saves it locally.
Use Case 6: Record an operation GIF
I want to show my colleagues “how to use this function” and let them record:
录一个 GIF,展示怎么走完整个结账流程,
从把商品加进购物车一直到确认页。
It records this interactive sequence and saves it as a GIF file. **Writing a document and submitting an issue with an animation is much clearer than typing a bunch of words. **
If you compare these six categories with “what you did before”, you will know where the savings are:
| Scenario | ❌ No Chrome integration | ✅ With Chrome integration |
|---|---|---|
| Verify front-end changes | Switch to the browser yourself, see the effect, and come back with a description | Just one sentence to let it open the page, run it and report the results |
| Adjust the console to report errors | F12 to open the console, copy the error report, and paste it back to the terminal | Let it read the console directly and filter out the error report |
| Record data in batches | Manually copy and paste each line into the web page | Feed a CSV and it will fill in line by line |
| Write in Notion / Docs | Organize it yourself and then paste it in | Let it be written directly into the document (shared login state) |
Reminder: /mcp Select claude-in-chrome to see the complete list of these browser tools. If you want to know what “hand actions” it has, go there. The official also lists use cases such as “multi-site workflow”, which are skipped here. If you are interested, you can explore it yourself in /mcp → claude-in-chrome.
💡 Summary in one sentence: Six types of high-frequency use cases - testing local applications, reading consoles to debug bugs, filling out forms in batches, writing in logged-in applications, extracting page data, and recording demo GIFs. Each type of natural language command can be used to make it work. The core is “saving you from manually switching the browser”.
05 Security: What are the risks of operating a “real browser”?
This section should not be skipped - because it operates your real browser where everything is logged in, not a sandbox that burns after use. This is a completely different trust boundary than when Claude ran commands in the sandbox (Part 21).
Where is the risk?
Going back to the “chauffeur” analogy: the chauffeur drives your car with the ETC plugged in and the parking card on it. The convenience is real, but the risk is also real - He’s in your car, using all your cards. The same goes for Chrome integration: it shares your login status, which means that it can access all the websites you are logged in to - your email, your company backend, and your bank page (as long as you are logged in).
There are two specific types of risks that you need to know:
- Login status is equal to the keychain: It does not require re-authentication to access the website. What you log in is what it can get. When asking it to operate on a certain page, you must know in your mind what sensitive accounts are logged in to this browser.
- Prompt injection: This is specifically discussed in Chapter 21 - Malicious instructions “written for AI to read” may be hidden in the content of the webpage. When it reads a page, a certain piece of text on the page may secretly direct it to do something else. This risk is particularly real when operating a browser, because all it reads is external web content that you have no control over.
What guardrails are provided by the official?
Fortunately, Chrome integration is not “open to let it mess around”. It has several built-in gates:
- It will stop and call you when it encounters login/verification code: When it encounters the login page or CAPTCHA, it will pause and ask you to handle it manually, and will not fill in or click blindly for you.
- Operations are visible in real time: It works in a Chrome window that you can see**. You can keep an eye on what you click and fill in, and you can pin it down at any time if something goes wrong.
- Controllable website permissions: As mentioned in the previous section, limit which websites it can touch in the Chrome extension settings - this is the gate you should use most to narrow the range it can move.
A few things you should abide by yourself
In addition to the official guardrails, there are a few rules for operating real browsers worth remembering:
| Scenario | What to do |
|---|---|
| Before letting it operate the browser | First think about what sensitive accounts are logged in on this Chrome |
| Involving money / irreversible operations (orders, transfers, deleting data) | ⚠️ Do it yourself, don’t leave it to it, or keep an eye on every step of the process |
| Give it the range of websites to operate | ✅ In the extension settings, make a small circle and only put the sites it really needs |
| Let it access unfamiliar/untrustworthy web pages | ⚠️ Be wary of prompt injection, and don’t let it accept all the “instructions” in the content |
The general principle is just one: every click on it in the browser is “real” - unlike in the sandbox if you run it by mistake and delete a container and start over again, clicking “Confirm Payment” in the browser means you have really paid. Therefore, the more irreversible the transaction is and the more it involves money operations, the more you have to hold the steering wheel yourself and let it do the work that “it’s easy to clean up if you make a mistake.”
This is the same as the main thread of safety in all previous chapters: Convenience and risk are directly proportional. Chrome integration is full of convenience - you can log in directly - so you have to keep a close eye on “what it can touch”.
💡 To sum up in one sentence: Chrome integration operates the real browser where you log in to everything, not a sandbox - the risk lies in “the login state is the key” and “prompt injection in the webpage”; the official guardrails are “stop when encountering login/verification code, visible operations, and controllable website permissions”. You yourself have to circulate the scope of small websites and keep irreversible and money-related operations in your own hands.
06 Hands-on: Connect Chrome and let it read the page once
Just watch and practice fake moves. Let me take you through a minimum practical operation: connect Chrome, let it open a web page, read something and come back. Your sensitive account will not be touched during the whole process. It is specially used to verify “whether it is connected or not”**.
Prerequisite: You must have a direct subscription to Pro/Max/Team/Enterprise (not Bedrock/Vertex/API key) and install Chrome or Edge. Installing extensions and accessing web pages may require “Magic Internet Access”.
Step one: Install the “Claude in Chrome” extension
Search “Claude” in the Chrome App Store and install the official extension. After installation, go to chrome://extensions to confirm that it is enabled and version ≥ 1.0.36**.
✅ Self-test: “Claude” can be seen in the extension list and is turned on.
Step 2: Confirm that the Claude Code version is new enough
claude --versionExpected: Printed version number ≥ 2.0.73. If it is lower, upgrade first (npm update -g @anthropic-ai/claude-code or update according to the method in Chapter 02), otherwise it will not be connected.
Step 3: Start with --chrome
claude --chromeAfter entering, type /chrome to see the status:
/chromeExpected: It shows that Chrome is connected and the extension status is normal. If it prompts that the extension is not detected, follow the official troubleshooting: Confirm that the extension is installed and enabled → Confirm that CC is the latest → Confirm that Chrome is running → /chrome Select “Reconnect Extension”. When enabled for the first time, it will install a native messaging configuration, and Chrome will have to be restarted to read it - If you can’t connect the first time, restart Chrome and try again.
Step 4: Let it open the page and read something
After connecting, give it a “read only, do not touch sensitive accounts” command (the official documentation site is just for practice):
打开 code.claude.com/docs,点一下搜索框,
输入「hooks」,把出现的结果告诉我。Expectation: You will see your Chrome pop-up new tab, automatically navigate there, click on the search box, and type - the entire process is visible to the naked eye (this is the “real-time visibility of operations” mentioned in Section 05). It then lists the results back to the terminal. **Seeing the browser really moving and the results coming back = the connection was successful. **
If the browser becomes unresponsive during the operation, the official prompts to first check whether there is a pop-up dialog box (alert/confirm) blocking the page** - the JavaScript dialog box will block the browser event; manually close it and let it continue. If the connection is disconnected after a long period of inactivity, select “Reconnect extension” in
/chrome(the extension’s background service worker will enter an idle state).
After completing these four steps, you will have gone through the complete link of “install extension → start → verify connection → let it operate the page”. **Let it do any browser work in the future, the essence is the same, just replace the fourth step with your real task. **
💡 To summarize in one sentence: There are only four steps to start - install the extension, start
claude --chrome, verify the connection with/chrome, and give a read-only command to see the browser really move; the first time you can’t connect, it’s probably because the extension is not installed or Chrome has not been restarted. Check it according to the official list.
07 Summary
This article connects Claude Code to the browser you use every day - from “only touching files and command lines” to being able to open web pages, read consoles, fill out forms, and extract data. “Change code” and “verify in the browser” can finally be completed from beginning to end in one conversation.
Putting the core together to review:
| What you have to do | Key points |
|---|---|
| Understand what it is | Use your real Chrome to log in to everything, open a new tab, and see it in real time |
| Distinguish it from other tools | **MCP (with interface) → Chrome (web page) → computer use (entire desktop) ** Three paths, from precise to cumbersome |
| Connect it | Install the “Claude in Chrome” extension + --chrome to start; align the extension/CC version, and subscribe to Anthropic directly |
| Know which one is not supported | Brave / Arc / other Chromium and WSL will not work, only support Chrome / Edge |
| Able to use | Test local applications, read consoles, fill out forms in batches, write in logged-in applications, extract data, and record GIFs |
| Stay safe | Operating a real browser (not a sandbox): encircling small website permissions, doing irreversible and money-related operations yourself, and being wary of injection prompts |
You should now be able to: Explain clearly what Chrome integration is, what it and MCP / computer use are responsible for, connect it independently (install extension + --chrome), use natural language commands to let it do six common browser tasks, and clearly understand the risks of operating a real browser and what gates to follow. **With this connection, Claude Code takes another step forward from the “local code assistant” - it can directly operate the window you deal with most often for you. **
Next article 41 “Parallel Tasks” - This article allows a Claude to operate the browser, but when there are more tasks, you will find that a session is still slow to operate in series: it opens the browser to test function A, and you can only wait for requirements B and C. Next article, let’s change the idea: How to make multiple tasks truly spread out in parallel, each doing his or her own thing without disturbing each other. Think about it: If changing the front end, running tests, and extracting data can be done at the same time, instead of waiting in line for Claude to switch back and forth, can it save a lot of time?
41 · Parallel tasks: Let several Claudes start working at the same time instead of queuing
It’s a bit embarrassing to say it, but the first time I wanted to “work in parallel”, I did such a stupid thing: I opened two terminals and cd to the same project directory. One asked Claude to change the front-end login page, and the other asked him to fix a back-end bug.
I was still thinking happily: “Isn’t this double the efficiency?”
The result - both sides are modifying package.json, and the dependencies just written in on one side are directly overwritten and rolled back by the changes on the other side; at first glance in git status, the workspace is in a mess, and it is impossible to tell who changed which line. I spent much more time than “doing it one by one” that day, before I manually smoothed out the changes on both sides, and the more I did, the more angry I became. **It was that time that I realized: parallelism is not as simple as “opening more windows”, the core is “don’t let them step on the same ground”. **
In fact, Claude Code has already prepared serious parallel tools - --worktree gives each session an isolated copy of the code, --bg dumps tasks to the background for batch running, and claude agents gives you a master console to keep an eye on them. In this article, we will fill in the pit above, and then take you through these methods yourself.
After reading this article, you will get:
- Explain in one sentence “Why parallelism” and the two prerequisites for parallelism: tasks are independent of each other and do not compete for the same file
- The four official parallel methods (sub-agent/agent view/agent team/dynamic workflow) are clearly distinguished in one table, so you know which one to choose.
- Use
--worktreeto give each session an isolated copy without overwriting each other - attach.worktreeincludeto clean up these pitfalls - Use
claude agentsand--bgto push tasks to the background, monitor the progress on a screen, and only intervene when needed - Use
claude -p(headless mode, headless) to write tasks into scripts and run them in batches, and configure--bareto start faster - The most important line of judgment: when is it worthwhile to parallelize, and when is it just detouring yourself?
01 Think clearly first: what problem does parallelism solve and what are the prerequisites?
Let me give the conclusion first: What is solved in parallel is “several unrelated tasks, and I don’t want to wait in line for each one”; but it can be established based on one premise - don’t grab the same file for these tasks.
Looking back on the previous forty articles, we basically worked in “one session” - open a Claude, give instructions, and it does it step by step. This model is enough for 90% of the work. But there are two times when you will find it slow.
**First, tasks can naturally be separated and independent of each other. ** For example, “change the front-end style”, “fix a bug in the back-end” and “make up a batch of unit tests”. Three things cannot be done at the same time, but they can only be queued up: after changing the front-end, it is the back-end’s turn. **Obviously they can do it at the same time, but they are forced to do it in series. **
**The second is that the task is too big to be carried out in one session. ** For example, “replacing an old API in the entire code base with a new one” involves dozens or hundreds of files, and a session is changed from beginning to end. The context (context, which can be understood as its “working memory”, see Part 19 for details) is already full, and the further you go, the more you “forget things”.
**Analogy: supermarket checkout. ** In a checkout aisle, ten people are queuing up with shopping carts, and the tenth person has to wait for the first nine to finish checking out - this is seriality. Smart supermarkets will open more checkout slots and divide ten people into three or four lines to check in at the same time. The total time will be immediately cut down. Working in parallel means “opening more cash registers”: ** Several independent tasks are assigned to several Claudes to check out at the same time, instead of being squeezed into one queue. **
However, there is an implicit premise for opening more cash registers: Each team is independent and does not interfere with each other. If three cashiers share the same cash box and put money into it at the same time to give change, everything will go wrong immediately - this is the pitfall at the beginning. So there is only one iron law of parallelism:
**Do the tasks touch the same files? Use worktrees to isolate work. **
If you fall into a real scenario that you will encounter, the tasks that can be done in parallel look like this:
- “These three unrelated modules need to fix their own bugs each” - fixed in three sessions at the same time without disturbing each other.
- “Sweep out the dead code that no one uses in the entire
utils/directory” - Send a sub-agent to search, so that the main dialogue is not filled with a bunch of files (see Part 23 for details) - “The same script, run the same changes on each of the 30 files” - written as a headless batch task, the machine will run it by itself
💡 To sum up in one sentence: Parallelism is to prevent independent tasks from queuing (like opening more cash registers in supermarkets), but there is only one iron rule for its establishment - Don’t let them grab the same file, otherwise the more parallel it is, the more chaotic it will be.
02 Official four parallel methods: recognize the door first, don’t be spoiled for choice at first glance
Claude Code has more than one trick to parallelism. The official page “Parallel Running Agents” compares them together. The core difference is just one question: Who will coordinate these tasks? ** Is it Claude who distributes and collects work in a conversation, is it you who throws it away and looks back, or is it Claude who is the foreman and coordinates a team.
First, let’s understand the four methods in a table. This section is a map, and the following sections are to dig deeper one by one:
| How | What is it | Who coordinates | When to use |
|---|---|---|---|
| Subagent | A worker dispatched within a session will return a summary after completing the work in its own context | Claude assigns work and collects work in the conversation | The auxiliary task will fill the main conversation with a bunch of search results/logs, and you will not go through these processes again |
| Agent view | One screen, schedule and monitor multiple background sessions, claude agents open (study preview) | You throw out tasks and check back | You have several independent tasks that you want to hand over, glance at the status, and only intervene when needed |
| Agent teams | Multiple sessions coordinate work, share task lists, send messages to each other, and have a leader to coordinate (experimental, default off) | Claude acts as a foreman to coordinate a team | Do you want Claude to split the project into several pieces, assign them, and keep workers in sync (see Part 29 for details) |
| Dynamic Workflows | A script that runs a large number of sub-agents and cross-verifies the results (research preview) | Script instead of Claude’s round-by-round judgment | The job is too large to be coordinated by several sub-agents, or the results need to be verified by each other: full database audit, 500 file migration |
⚠️ Experimental Note: The above table** agent view and dynamic workflows (workflows) are research previews, and agent teams (agent teams) are experimental and closed by default** - the interface, shortcut keys, and behaviors may change later. Before doing so, check the version with
claude --version. Subagents are a stable feature.
You don’t need to memorize this table, just remember one sentence: “Who coordinates” is the watershed——Claude is conveniently assigned → sub-agent in the conversation; you leave the background → agent view; Claude leads the team as the foreman → agent team; the script is run rigidly in batches → dynamic workflow.
There are two other things** They are not “parallel methods” per se, but tools to coordinate parallelism**. This article focuses on the former one:
- Worktrees: Give each session a separate copy of git, so that parallel sessions never change to the same file. This is the correct solution to the pit at the beginning, which is discussed in Section 03.
/batch: A skill that allows Claude to split a large change into 5 to 30 worktree-isolated subagents, each of which opens a PR. It is a packaged usage of “subagent + worktree”, not a single coordination style.
Sub-agents (Part 23) and agent teams (Part 29) have been discussed thoroughly before. This article will not be repeated - this article focuses on the areas that have not been touched yet: worktree isolation, background multi-session, and headless batch.
💡 To summarize in one sentence: There are four serious methods of parallelism, “who coordinates” is the key to distinguish; worktree and
/batchare tools for coordinating parallelism, and are not considered separate methods; this article specializes in the three things that have not been mentioned before: worktree, background session, and headless.
03 Isolation with worktree: Give each session its own copy
This section is the correct answer to the pitfall at the beginning, and it is also the most important part of the entire article to understand.
Let’s first talk about where the pit lies: two sessions cd into the same directory, which means two people are making corrections on the same drawing at the same time. The last written one will overwrite the first written one, which will naturally lead to chaos. git worktree (work tree, a native capability of git) is here to cure this.
**Analogy: Make several copies of the same drawing, and several people will modify their own copies. ** There is only one original design drawing, and three people have to mark it at the same time. If they are squeezed onto one piece of paper, they will inevitably make messy things. The correct way is to make three copies - each person takes one copy and makes any changes they want, then merges them after making changes. This is what git worktree does: It pulls out several independent working directories for you from the same warehouse history, each with its own files and branches, but sharing the same set of commit history and remote. No matter how a session is modified in its copy, it will not touch the copy of another session.
The official made this valuable point very clear:
Running each Claude Code session in its own worktree means that edits in one session never touch files in another session, so you can have Claude building features in one terminal while fixing bugs in a second terminal.
Open an isolation session with one line of command
The easiest way to use it is to add --worktree (or abbreviated -w) when starting, followed by a name. Claude will automatically create an isolated worktree and start work in it. By default, this worktree is placed in .claude/worktrees/<name>/ in the root directory of your warehouse, and the branch name is worktree-<name>:
claude --worktree feature-authWant to start a second independent session? Another terminal, change the name, run the same command:
claude --worktree bugfix-123Now the two sessions are each in their own copy, one for building features and one for fixing bugs. No one can touch anyone else’s files - the tragedy of “mutual overwriting” at the beginning is gone. Can’t think of a name? Omit it and Claude automatically generates one like bright-running-fox:
claude --worktreeYou can also temporarily put it into a worktree in a session - just say “work in worktree” and it will create one for you using the EnterWorktree tool.
Before using
--worktreein a directory for the first time, you must first run a normalclaudein the directory and accept the workspace trust dialog. If you have not accepted trust,--worktreewill directly report an error and ask you to runclaudefirst - even the-pmode is the same.
Three pitfalls that novices must step into
** Pitfall 1: .claude/worktrees/ needs to be entered into .gitignore. ** Otherwise, the contents of these worktrees will be displayed as a bunch of “untracked files” in your home directory, which will look scary. The official reminded this specifically.
** Pitfall 2: The worktree is a clean new copy, and your .env is not in it. ** worktree is a new checkout, and files in the main repository that are not tracked by git (such as .env, .env.local) will not be followed by default - as a result, the new session will lack environment variables as soon as it is run. The solution is to put a .worktreeinclude file in the project root, list the local files to be automatically copied into each worktree, the syntax is the same as .gitignore:
.env
.env.local
config/secrets.json
I personally fell into this trap: I excitedly opened a session with -w and prepared to change the backend. As a result, Claude kept reporting that it could not connect to the database when I ran it. I spent a long time troubleshooting the error report and even suspected that the database was down - and finally realized that .env was not copied into the worktree at all, and the connection string could not be read at all. Later, I put .worktreeinclude in the root of every project, and I never made this mistake again.
** Pitfall 3: Remember “Keep or Delete” when exiting. ** The official cleaning rules are very practical:
- Nothing has been changed (no uncommitted changes, no untracked files, no new submissions): the worktree and its branches will be automatically deleted; but if the session is named in advance (
--name), Claude will prompt you to decide whether to keep or delete it. - Changed something: Claude will ask you “Keep or delete” - if you keep, you will keep the directory and branches so that you can come back and work on them later; if you delete, you will throw away the uncommitted changes together.
- The worktree run out of non-interactive (
-p) is not automatically cleaned, because there is no exit prompt, you have to delete it yourself withgit worktree remove.
If you don’t want Claude to build it automatically, you can also do it manually.
To fully control where the worktree is placed and which branch to use, you can just use git to build it yourself (the git workflow will be discussed in Part 43):
# 在新分支上建一个 worktree
git worktree add ../project-feature-a -b feature-a

# 进去启动 Claude
cd ../project-feature-a && claude

# 列出所有 worktree
git worktree list

# 干完删掉
git worktree remove ../project-feature-a
The official reminder is easy to forget: each new worktree is checked out independently, remember to reinstall the dependencies and configure the virtual environment in it - don’t expect it to inherit the node_modules installed in the main directory.
💡 To summarize in one sentence: worktree gives each session an independent copy of the code (like copying drawings and changing them separately),
claude --worktree <name>opens an isolated session per line; remember the three pitfalls -.claude/worktrees/, enter.gitignore,.env, copy with.worktreeinclude, and select “Keep/Delete” when exiting.
04 Multi-session parallelism: background task dumping + a master console to watch
Worktree solves the problem of “no files fighting”, but there is still a problem: if you have three or five sessions open, do you have to open three or five terminals to switch back and forth and monitor each one? ** So tired. This is where the “agent view” comes into play.
Analogy: The flight status board at the airport control tower. ** The tower will not send a person to keep an eye on a plane - on a large screen, the status of all flights is clear at a glance: which one is taxiing, which one is waiting for instructions, and which one has landed. The dispatcher usually glances at the overview and only takes over the intercom** when a certain aircraft requires him to make a decision. What claude agents gives you is this tower screen: **All background conversations are lined up, the status is clear at a glance, and you can intervene only if anyone needs you. **
⚠️ Research Preview: Agent view is an officially labeled research preview function. It requires a newer version of Claude Code. The interface and shortcut keys may change in the future. First use
claude --versionto check the version.
Put the task to the background
The essence of a background session is that it is not tied to your terminal - you turn off the screen, close the shell, or even open another interactive session, and it is still running. There are several ways to dump.
The first method is to dump directly from the shell and add --bg:
claude --bg "调查一下 SettingsChangeDetector 这个不稳定的测试为啥老挂"After throwing it out, Claude will print the short ID of the session and the command to manage it, which looks like this:
backgrounded · 7c5dcf5d
  claude agents             list sessions
  claude attach 7c5dcf5d    open in this terminal
  claude logs 7c5dcf5d      show recent output
  claude stop 7c5dcf5d      stop this session
Second method, get rid of the current conversation: Type /bg (short for /background) to move the current conversation to the background.
Use the claude agents tower screen to manage them
Open the main console:
claude agentsIt will occupy the entire terminal and list all background sessions in groups by status - “needs input”, “working in progress” and “completed”. There is an icon at the beginning of each line, and the color and animation tell you the status of this session:
| Status | Icon | Meaning |
|---|---|---|
| Working | Flashing animation | Running tools or generating replies |
| Requires input | Yellow | Waiting for your answer or permission |
| Completed | Green | Task completed successfully |
| Failed | Red | Ended with error |
There are only three core operations on the tower screen. It is enough for novices to remember these three:
Space: Select a line and press Space to pop up a small panel to see its recent output or which question it is stuck on - Most of the time you don’t need to enter the complete dialogue, just glance at it.- Reply: Type it back directly in the Peep panel and press
Enterto send it, without leaving the main console. Enter/→(Attach): If you want to get into a conversation and have a good chat, press Enter to “attach” it, and it will become a complete interactive session; press←in the empty input box to return to the main console.
There is a deeply hidden but extremely critical detail here, which just ties together the worktree in the previous section: before changing a file in each background session, Claude will automatically move it into an isolated worktree under .claude/worktrees/. In other words - You use the proxy view to dump tasks in parallel, and file isolation is automatically done for you. There is no need to manually use -w like in Section 03. Official documentation confirms: When the agent view dispatches each session, it will automatically create a separate worktree for it.
Take a common parallel combination: launch three background sessions at the same time - one to repair flaky tests, one to review a PR, and one to update the documentation. You do what you should do, claude agents will scan it every once in a while - whoever turns green will be checked for acceptance, whoever is marked yellow will be decided. It saves a lot of trouble than opening three terminals to switch back and forth.
⚠️ A fact that will consume your credit: background sessions consume your subscription usage just like interactive sessions. Run ten in parallel, and the credit consumption rate is about ten times that of running one. Don’t just start a bunch of things without thinking just because you’re having fun backstage.
💡 One sentence summary:
--bgputs the task into the background,/bgputs the current session into the background,claude agentsgives you a tower screen (like an airport flight board) -Spacepeeks, direct replies,Enterappends; the file isolation of the background session is done automatically using worktree**, but the more parallelism, the higher the quota.
05 Headless batch: write it into the script and let it run unattended
The first two sets are “you sit in front of the terminal and stare.” But there is a type of work that you don’t want to focus on at all - running the same routine on a batch of things; or plugging Claude into CI and scripts, let it be automatically called like a command line tool. This is the headless mode (headless, that is, a running method that does not open the interactive interface and exits after running).
**Analogy: Write the instructions on a piece of paper and throw it into the self-service machine, and spit out the results after running. ** You won’t watch the vending machine to see it deliver the goods - you don’t need to keep an eye on the coin insertion, button pressing, and things falling out. Headless is this kind of “unattended”: You write out the prompts and parameters at once and give them to claude -p, and it will spit out the results after running them. You can just use them.
The core is just one flag: -p (or --print). With this added, claude will run once and then exit non-interactively:
claude -p "找出 auth.py 里的 bug 并修掉" --allowedTools "Read,Edit,Bash"Here --allowedTools is pre-approved which tools it can use - because no one clicks “Agree” next to it, you have to tell it in advance “use these tools as you like, don’t stop and ask” (see articles 20 and 35 for details on permission mode).
Three packages that make it really useful
**Package 1: Pipe feeding data. ** headless reads standard input (stdin), so you can pipe data into it just like any command line tool. For example, let it interpret the build error and write the result to the file:
cat build-error.txt | claude -p "简明扼要说清这个构建错误的根因" > output.txtWhen troubleshooting a failed build, just throw this line over - much faster than copying the error and pasting it into the session.
**Package 2: --bare makes startup faster. ** By default, claude -p will load the same set of context as the interactive session (read all hooks, skills, plugins, MCP, CLAUDE.md). Running in the script will be too slow and may be interfered by the configuration in teammates ~/.claude. Add --bare Skip these automatic discoveries, the startup is fast, and the results are consistent on each machine:
claude --bare -p "总结这个文件" --allowedTools "Read"The official said clearly:
--bareis the recommended mode for script and SDK calls and will become the default for-pin a future release.
Package 3: --output-format json gets structured results. ** The script needs to parse Claude’s output, and plain text is difficult to process. Add --output-format json, which will return structured JSON with metadata (results, session ID, and total_cost_usd how much it cost this time), which can be used as soon as it is extracted with jq:
claude -p "总结这个项目" --output-format json | jq -r '.result'Spell headless into “batch”
A single -p does not count as a batch. The real batch is to wrap it up with a shell loop - run the same job on each batch of files. For example, generate a sentence description for each .py file in a certain directory:
for f in src/*.py; do
  claude --bare -p "用一句话说明 $f 是干什么的" --allowedTools "Read"
done
This is the prototype of “unattended batch”: loop, -p, --bare, three-piece set. Of course, if this batch of work is as large as dozens or hundreds of files, and you still want to verify the results with each other, then it is time to use the dynamic workflow or /batch mentioned in Section 02 - their essence is to seriously engineer this kind of batch.
⚠️ A billing change to note: The official document states that starting from June 15, 2026, the usage of Agent SDK and
claude -punder the subscription package will be deducted from an independent monthly Agent SDK quota and calculated separately from your interaction usage. Before running scripts in batches, have an idea in mind (see Chapter 06 for billing details).
💡 To summarize in one sentence: headless uses
claude -pNon-interactively run once and exit (like investing in a self-service machine without having to watch it), equipped with--allowedToolspre-batch tool,--bareacceleration,--output-format jsonto get structured results; use shellforloop to form the prototype of “batch”.
06 The most critical section: When not to parallelize
I talked about three sets of parallel methods, but this section is more important than the previous ones - because too many people get obsessed with parallelism as soon as they learn it, and want to dismantle everything. As a result, the more parallelism, the more chaotic, and the more parallelism, the more expensive it is.
First establish the line of judgment. **To be worthy of parallelization, two things must be met at the same time: tasks ** are independent of each other ** (A does not depend on the results of B), and ** do not grab the same file ** (or are separated by worktree). Without one, parallelism is digging a hole for yourself.
Take a side-by-side look at what should be done in parallel and what should be done serially:
| Scenario | Should it be parallelized | Why |
|---|---|---|
| Fixed bugs in three unrelated modules | ✅ Parallelism | Independent, no grabbing of files, typical parallelism |
| Run 30 files in batches with the same set of changes | ✅ Parallel (headless / /batch) | Independent of each other, machine running is the most trouble-free |
| ”Refactor A first, then change B based on the new A**” | ❌ Serial | B depends on the result of A, and parallel will only get the old A |
Both sessions must change package.json | ❌ Serial (or must be isolated by worktree) | Grab the same file, which is the pitfall at the beginning |
| A small change can be completed in five minutes | ❌ Serial | The coordination cost of disassembly is more than the time saved |
| Tasks must frequently communicate intermediate results | ⚠️ It depends on the situation | The cost of communication is high, so it is better to follow a conversation |
The following three local rules are given to you based on my experience.
First, if there are jobs that are dependent on one another, they should not run in parallel. ** “After refactoring the core module, and then let other modules adapt to the new interface”, the next step has to wait for the previous step** - hard parallelism. The latter one will be modified according to the old version, and after running it, it will be completely reworked. If you do this once, you will waste two session credits.
**Second, don’t tear down small jobs. ** What can be changed in five minutes, it takes more than five minutes just to “figure out how to dismantle it, open a few sessions, and how to merge it later.” The dismantling work itself has costs, and the dismantling of small jobs is a pure loss.
**Third, the more parallelism, the more quota will be burned. ** The point in Section 04 needs to be emphasized again: Ten sessions in parallel, the credit will be burned at about ten times the speed. A safe habit is - Manual parallel control should be within three or five. If you really need large batches (tens or hundreds), leave it to /batch or dynamic workflow engineering instead of manually opening a one-screen session.
To put it bluntly, parallelism is a double-edged sword: in the right scenario, the efficiency is doubled; in the wrong scenario, it is slower, more expensive and messy than serial**. Judging “should parallelization” is always more valuable than “how to parallelize”.
💡 To sum up in one sentence: The iron rule for parallelism is “independence + don’t grab files”. If there is one missing file, don’t split it; don’t parallelize tasks that are dependent on each other and small five-minute tasks; the more parallelism, the more quota will be burned. Control it within three or five, and hand it over to
/batchin large quantities.
07 Hands-on: Run worktree isolation + background task dumping by yourself
Just watch and practice fake moves. The whole process below is based on a git warehouse. If you don’t have a warehouse, just build one first to practice. The commands are real and runnable, and each step is given the expected output. If you follow it again, these methods will have muscle memory.
Use git repository; the background session part requires a newer version of Claude Code (agent view is the research preview), take a look first with
claude --version. The following commands do not rely on magic to access the Internet.
Step one: Enter a git project and accept the trust dialog box
cd 你的某个git项目
claude
After entering, just ask a casual question (such as “What is this project for?”) before exiting. This step is to accept the workspace trust - If you have not accepted it, the next step --worktree will report an error directly.
Step 2: Use --worktree to open an isolation session
claude --worktree test-parallelExpected: Claude has built an isolated worktree under .claude/worktrees/test-parallel/ and started it in it. If you change any file in this session, only this copy will be changed, and the main directory will not be touched at all. If you have changed something when exiting, it will ask you “Keep or delete” - choose delete if you practice.
Step 3: Confirm that the worktree is really built (Open another terminal and return to the main project directory)
git worktree listExpected: In addition to the main checkout, there is one more line in the list pointing to .../.claude/worktrees/test-parallel, with its own branch. See this line = The isolation replica is indeed built.
Step 4: Dump a task to the background
claude --bg "列出这个项目所有 markdown 文件的标题"Expected: The terminal prints a line backgrounded · <short ID>, followed by claude attach / claude logs / claude stop several management commands. See this string = the task has been thrown into the background and is running, your terminal can do other things immediately.
Step 5: Open the tower screen and stare at it
claude agentsExpected: The entire terminal is occupied by the agent view, and the session that was just dumped appears as a line with the status (Working/Completed) next to it. Select it and press Space to peek at the output, press Esc to close the panel, and press Esc again to exit the agent view. Seeing this grouped list = you can already use one screen to manage multiple background sessions.
Step Six: Cleanup
# 停掉刚才那个后台会话(短ID 换成第四步打印的)
claude stop <短ID>

# 删掉练手的 worktree(在主项目目录)
git worktree remove .claude/worktrees/test-parallelExpected: claude stop prints stop confirmation; run git worktree list again after git worktree remove, and the line test-parallel is gone. Clean = A complete link is open.
After completing these six steps, you will have personally gone through the parallel main chain of “open isolation session → confirm copy → remove background → tower watch → clean up”. **In the future, if we really want to work in parallel, the essence will be the same, just changing tasks and adding a few sessions. **
💡 To summarize in one sentence: There are only six steps to start the link -
claude(accept trust) →--worktreeOpen an isolation session →git worktree listConfirm →--bgLeave the background →claude agentsWatch →stop+git worktree removeClean up; going through it once is more effective than memorizing ten commands.
08 Summary
This article talks about “let several Claudes start working at the same time”, from “why to run in parallel” to “when not to run in parallel”, with three sets of methods to get started in the middle.
Let’s review the core points together:
| What you want to do | What to use | Key points |
|---|---|---|
| Find out what parallel solutions are for | The two prerequisites of “independence + no grabbing of files” | Like a supermarket opening more cash registers, but each team must be independent |
| Understand the types of parallelism | Four methods and one table | ”Who coordinates” is a watershed; agent view / workflows is a research preview, teams are experimental |
| Let sessions not overwrite each other’s files | --worktree / git worktree | Give each session an independent copy, remember .gitignore, .worktreeinclude, and clean up the three pitfalls |
| Dump tasks in the background and monitor progress on one screen | --bg + claude agents | The background session is not tied to a terminal, and worktree is automatically used for file isolation; Space peeks, Enter appends |
| Write tasks into scripts and run them in batches | claude -p (headless) | Equipped with --allowedTools for pre-batch, --bare for acceleration, --output-format json to get structured results |
| Determine whether it should be parallelized | The iron rule of “independence + don’t grab files” | If there are dependencies, don’t split small tasks; the more parallelism, the more quota will be burned, control it within three or five |
You should now be able to: Understand what parallelism actually solves, and the iron rule is “independence and no grabbing of files”; distinguish which of the four official parallel methods to choose; use --worktree to open an isolated copy of the session, so as not to repeat the “mutual coverage” mistake at the beginning; use --bg and claude agents to put the task in the background and stare at it on one screen; use claude -p Write jobs into scripts and run them in batches; the most important thing is - when you get a task, you should calmly judge “whether this thing is worth parallelizing” instead of tearing it down as soon as you get started.
Looking back at the stupid thing at the beginning about “changing the same directory on two terminals at the same time”, the root cause is that I don’t understand isolation and I haven’t figured out the dependencies. Now that you have the isolation key of worktree and the line of judgment in your hand, you can avoid a lot of detours than those who dive in head first. **
Next article 42 “Environment Variables” - You have encountered several environment variables in this article: the CLAUDE_CODE_SIMPLE behind --bare, the CLAUDE_CODE_DISABLE_BACKGROUND_TASKS that turns off background tasks, and the one that changes the configuration directory CLAUDE_CONFIG_DIR… They are like a row of “toggle switches” hidden behind. They are inconspicuous, but they can quietly change the behavior of Claude Code. In the next article, I will look through this row of switches one by one and tell you which one controls what and which one is worth moving. Think about it: **The same command may behave differently on your machine and when run in CI - the difference is often hidden in these environment variables. **
42 · Environment variables: the row of “master switches” hidden behind the back
It is said that environmental variables are “things only touched by advanced players”. To be honest -** this statement has harmed many people. **
Too many people rely on manually clicking /model and making manual changes every time they open a session to connect to models, configure agents, and adjust timeouts. After making the changes, they have to start over again the next time they open a new session. When asked why it is not worthy of death at once, the answer is mostly “environment variables sound hard-core, and I am afraid of breaking them.”
But if you look back at the previous forty-one chapters - Chapter 04 is about API key, Chapter 05 is about connecting domestic models, Chapter 19 is about context, Chapter 21 is about telemetry…** The bottom layer of these things is almost all the same set of mechanisms: environment variables. ** You have been using them for a long time, but no one has spread them out and talked about them together.
Let’s put it this way: environment variables are not “touched only by advanced people”, but the row of master switches that “turn it once and benefit for life”. You are afraid of it simply because no one tells you which switches are commonly used and what the consequences will be if you dial them wrongly. I will pierce the window paper today.
After reading this article, you will get:
- In one sentence, explain what environment variables do in Claude Code and why it is worth spending ten minutes to understand.
- When to use the three setting methods (shell temporary / shell configuration file persistent /
envfield ofsettings.json), a table explains clearly settings.jsonEach of the four types of files controls the scope, which one goes into git and which one does not - directly connected to Part 31- A list of “the most important environment variables to know”: connection, timeout, privacy, configuration directory, with default values and pitfall tips
- When the same thing can be done using both environment variables and setting fields, who has the final say** (priority rules)
- A practical example that can be followed and gives the expected output: set a variable by yourself and verify that it really takes effect
01 First understand: What do environment variables control in Claude Code?
Let me give the conclusion first: **Environment variables are a set of “key-value switches” that are read when Claude Code is started. They are used to determine how it connects to the model, how to authenticate, how long the timeout is, and whether to report data and other underlying behaviors. **
The functions you used earlier - /model to change models, claude mcp add to connect to services, /config to adjust settings - are mostly “temporarily dialed in the session”. But there are some behaviors that you want to follow every time you start it, without having to manually set it every time: for example, “I will always use the address of the self-built proxy”, “All my request timeouts will be relaxed to 20 minutes”, “My machine will never report any telemetry.” These underlying rules that “don’t change once they are set” are governed by environment variables.
An official sentence defines it:
Environment variables can control the behavior of Claude Code, such as model selection, authentication, request routing, and feature switching.
**Analogy: Preset buttons on a coffee machine. ** With a coffee machine with presets, you can adjust the amount of water, concentration, and whether to add milk every time by pressing a cup. ** You can also save the cup you often drink as “My Preset” and make a cup with one click in the future. The machine will remember the parameters by itself. ** Environment variables are the latter: they solidify those settings that you “want to do every time” and Claude Code will read them as soon as it is started, saving you the trouble of going back and dialing them manually.
If you fall into a real scene, you will most likely think of it at these times:
- “I connected DeepSeek, and I don’t want to manually point to the model every time” - Write the model and address into the environment variables (the set in Part 05, the bottom layer is it)
- “The company network is slow, the default timeout of 10 minutes is not enough” - a variable to relax the timeout
- “This is a company machine, and compliance requirements will not report telemetry” - A variable is turned off directly (mentioned in Chapter 21)
- “I have two accounts, work and personal, and I want to separate them without interfering with each other” - a variable to switch the configuration directory
Did you see it? **These are all “set once and take effect long-term” requirements. ** Environment variables are born for this kind of needs.
💡 To summarize in one sentence: Environment variables are a set of “key-value pair master switches” that are read when Claude Code starts up. They manage underlying behaviors such as connection, authentication, timeout, and privacy; its value lies in solidifying the “I want to do this every time” settings once, without having to go back and dial them manually.
02 Where to set: three methods, from “just this time” to “forever”
Now that we know what it manages, the next most practical question is—where is the ** located? **The answer is three places, the difference is just one line: **This time it is set, how long it will affect and who it will affect. **
The official stated this line very simply:
Variables set in the shell are valid only for the duration of that terminal session, whereas variables in a settings file apply each time
claudeis run.
I have arranged the three methods according to “effective range from narrow to wide”, you choose:
Method 1: Temporarily set up in the shell (just take care of this terminal)
Before starting claude, run export in the terminal. Only valid for the current terminal window, it will disappear if you close it.
macOS / Linux / WSL:
export API_TIMEOUT_MS="1200000"
claude
Windows PowerShell:
$env:API_TIMEOUT_MS = "1200000"
claude
This is suitable for “I just want to try it this time” - temporarily relax the timeout, temporarily change the address, and close the terminal after running, leaving nothing behind.
Method 2: Write into the shell configuration file (this machine takes effect every time)
If you want to automatically bring it up every time you open a terminal, add the export line to your shell configuration file. The default on Mac is ~/.zshrc, and on many Linux it is ~/.bashrc:
# 加到 ~/.zshrc 末尾
export API_TIMEOUT_MS="1200000"
After saving, open a new terminal (or source ~/.zshrc) and it will take effect. **This is the approach of “all projects and all terminals on my machine come like this”. **
To persist on Windows, use
setx API_TIMEOUT_MS "1200000"(CMD) or[Environment]::SetEnvironmentVariable("API_TIMEOUT_MS", "1200000", "User")(PowerShell), and then open a new terminal to take effect.
Method 3: Write into the env field of settings.json (follow the configuration, it has nothing to do with the startup method)
The third and most commonly used method is to write the env key in settings.json. The official stated its benefits very clearly:
Claude Code reads them directly from the file on startup, so they will take effect no matter how you start
claude.
{
  "env": {
    "API_TIMEOUT_MS": "1200000",
    "BASH_DEFAULT_TIMEOUT_MS": "300000"
  }
}
This file path and writing method have already been laid out in Chapter 31 when I talked about
settings.json. Here you just need to remember:envis the opening reserved for environment variables. Writing variables here has nothing to do with how you typeclaude, it can read them all.
A look at the three methods side by side will make it clear which one to choose:
| Setting method | Valid range | Is the terminal still there after turning off the terminal | Most suitable |
|---|---|---|---|
shell temporary export | Current terminal only | ❌ gone | ”I just want to try it this time” |
Write into ~/.zshrc etc. | All terminals of this machine | ✅ In | ”This is how my personal machine looks like” |
Write into env of settings.json | Follow the scope of the configuration file | ✅ In | ”Binded to the project/team, it will take effect whoever starts it” |
A handy habit: **To temporarily verify whether a variable works, use shell export to try it; if you confirm that it will be used for a long time, move it into env of settings.json. ** Why prefer settings.json over ~/.zshrc? Because the “file classification” table in the next section - settings.json allows you to precisely control “whether this variable is only for me, the whole team, or only this project”, ~/.zshrc cannot make this distinction.
💡 To summarize in one sentence: The three setting methods are arranged according to the effective scope - shell temporary
export(just this time), writing into~/.zshrc(global to the local machine), writing intoenvofsettings.json(it has nothing to do with configuration or startup method); use the first one for temporary testing, and the third one is recommended for long-term effectiveness.
03 Four types of files in settings.json: Who can control which one goes into git
The previous section said that env of settings.json is my most recommended method, but here is a pitfall that novices must step into: settings.json has more than one file, it has four categories, and is written into different files. The “people” managed by this variable are completely different. **
This matter has been specifically dismantled in the 31st article, and I will reiterate it here from the perspective of environment variables - because the consequences of misplacing files are very real: you thought you only set the proxy address for yourself, but accidentally submitted it to git, and the whole team was led astray by you.
**Analogy: The company’s reimbursement standards are posted on the bulletin board vs. you write them down on a sticky note. ** The finance department prints out the “50 cap for taxi rides” and puts it on the bulletin board, and the whole company must follow it. This is a public rule; if you find it troublesome, write “Don’t pay for the coffee I paid for at my own expense this month” on a note at your workstation. This is a only your own private note. Which file the environment variables are written to depends on whether you choose “post on the bulletin board” or “note notes”.
This official table directly tells you who is responsible for each type of document:
| Files | Applies to |
|---|---|
~/.claude/settings.json | You, in each project |
.claude/settings.json | Everyone working on the project, Check into source control |
.claude/settings.local.json | You, in this project only, are not checked in |
| Managed Settings | Everyone in your organization, deployed by administrator |
Translated into vernacular, remember these four sentences:
~/.claude/settings.json——In your home directory, “Myself, all projects are like this.” Put your personal preference here..claude/settings.json(project root) - “Everyone in this project does this”, and it goes into git, and teammates pull it and bring it with them. The unified rules of the team are placed here..claude/settings.local.json(project root) - “Only me, only in this project”, and it does not enter git (.localsuffix is ignored by default). Temporary settings with private credentials that belong only to you go here.- Hosted Settings - These are issued by the administrator to the entire organization. You generally cannot change them, and it is not your turn to set them.
There is a big or small fall here that is easy to fall into. When connecting to a self-built gateway, it is easier to write ANTHROPIC_BASE_URL together with an address with a personal token into the .claude/settings.json of the project root, and then git commit - if you don’t scan the diff before pushing, you will be in trouble: Once that thing is pushed, it is equivalent to exposing the private address (and possibly credentials) to everyone who can see the warehouse. ** So there is an iron rule to remember: ** All variables with “personal exclusive” properties (private addresses, personal configuration directories, etc.) should be put into .local files that are not uploaded to git; only those that “should be the same for the whole team” should be put into .claude/settings.json.
| The nature of this variable | Which file should be written to |
|---|---|
| My personal preference, common to all projects | ~/.claude/settings.json (main directory) |
| The whole team is unified and must be shared with the project | .claude/settings.json (into git) |
| My private, with credentials, only this project | .claude/settings.local.json (❌ without entering git) |
💡 To summarize in one sentence:
settings.jsonis divided into four types of files. Which one is written determines “who” the variable controls - the home directory controls the whole world, and the project rootsettings.jsoncontrols the whole team when entering git, and.localonly controls itself if it is not entered into git; **variables with personal credentials, do not put them in files entered into git. **
04 The most important variables to know: connection, timeout, privacy, directory
To be honest, the official environment variable table is scary—hundreds of them, from AWS Bedrock to OpenTelemetry exporter, most of which you will never use in your life. So I won’t make a list in this section. I’ll just pick out the dozen or so things that novices will actually encounter. I’ll divide them into four groups according to their uses. Each one will explain to you “what it does, how much it defaults to, and when to use it.”
One group: connection and authentication (how to connect to the model)
This group is the bottom layer of the previous chapters 04 and 05. Three cores:
ANTHROPIC_API_KEY      # 你的 API 密钥
ANTHROPIC_BASE_URL     # 把请求改道到代理或网关
ANTHROPIC_MODEL # 默认用哪个模型-
ANTHROPIC_API_KEY- Your API key. There is a particularly easy to step on here**, the official written clearly: Once this key is set, even if you have logged in to the subscription (Pro/Max/Team/Enterprise), this key will be used. If you want to switch back to the subscription, you have tounset ANTHROPIC_API_KEYto clear it. **Note: In interactive mode, Claude Code will pop up a confirmation prompt, allowing you to approve or deny the use of this key, and choose to remember it for subsequent automatic use; in non-interactive mode (-p), use it directly without popping up the confirmation prompt. ** This pitfall is easy to step on - you have obviously opened a Max subscription, but the bill goes to API billing. After checking for a long time, you found that there is a line ofexport ANTHROPIC_API_KEYleft in~/.zshrc(Article 04 discusses in detail how to choose subscription vs API key). -
ANTHROPIC_BASE_URL- Reroute API requests to your proxy or gateway. Connecting to domestic models and using self-built transfers, the core is it (the configuration in Chapter 05, the protagonist is this variable). -
ANTHROPIC_MODEL- Specifies the default model. Note its priority: the--modelflag and the/modelcommand in the session will override it** (more on this in the next section).
Group 2: Timeout (if you think it gives up too quickly, adjust this)
When the network is slow or the proxy takes a long way, the most common adjustment is the timeout. The two most commonly used:
| Variables | What to do | Default value |
|---|---|---|
API_TIMEOUT_MS | Timeout for a single API request | 600000 (10 minutes) |
BASH_DEFAULT_TIMEOUT_MS | Default timeout for long-running bash commands | 120000 (2 minutes) |
-
API_TIMEOUT_MS- How long does it take for an API request to time out. Official tip: Turn it up when the network is slow or when using a proxy. But don’t fill it in blindly - it has an upper limit of2147483647. Exceeding this number will cause the underlying timer to overflow, and the request will fail in seconds (it is a common situation when the hand shakes and the number of 0s is entered. As a result, an error is reported instantly every time the request is made, and it takes a long time to find out that it is an overflow). -
BASH_DEFAULT_TIMEOUT_MS——The default time for Claude to run long commands (such as installing dependencies and running builds). The default is 2 minutes, adjust it when running large builds is not enough.
Group Three: Privacy and Telemetry (Compliance/Strong Privacy Scenario)
In the 21st article, I talked about a few things I clicked on when talking about security. This group of management “does not send data to the outside world”:
DISABLE_TELEMETRY=1      # 关掉遥测上报
DO_NOT_TRACK=1 # 同上,跨工具通用的约定DISABLE_TELEMETRY- Set to1to exit telemetry. The official statement clearly states that telemetry data does not contain your code, file paths or bash commands; but in environments with strict compliance requirements, it is best to set it up to keep it clean.DO_NOT_TRACK- Set to1, equivalent toDISABLE_TELEMETRY. This is a cross-tool convention that is followed by many developer CLIs. If you set it once, many tools will recognize it.
There is also a one-click all-off option -
CLAUDE_CODE_DISABLE_NONESSENTIAL_TRAFFIC=1. Officially, it is equivalent to settingDISABLE_AUTOUPDATER,DISABLE_FEEDBACK_COMMAND,DISABLE_ERROR_REPORTINGandDISABLE_TELEMETRYat the same time. Strong privacy/isolation environment: All variables can be turned off to save trouble.
Four groups: multiple accounts and context (advanced but easy to use)
Two high-frequency ones that I highly recommend you get to know:
CLAUDE_CONFIG_DIR- Override the configuration directory (default~/.claude). All settings, credentials, session history, and plugins are saved here. Its biggest use is to run multiple accounts in parallel - the official example is very practical:
# 给工作账号开个独立配置目录,互不干扰
alias claude-work='CLAUDE_CONFIG_DIR=~/.claude-work claude'
The work account and the personal account can be divided like this: usually claude will go to the personal configuration, and typing claude-work will go to another set of completely isolated settings and login status, so that the history, credentials, and MCP configuration of both sides are consistent.**
DISABLE_AUTO_COMPACT- Set to1to turn off “automatic compression when approaching the context limit” (the auto-compact mechanism is discussed in Part 19). Manual/compactstill works. Set this if you want complete control over when to compress - most people just leave it at the default.
⚠️ An important reminder: The official statement is very strict - Claude Code only reads environment variables “at startup”. So after you change any variable (whether you change the shell or
settings.json), you have to exitclaudeand reopen it for the new value to take effect**. If there is no response after the modification, it is most likely because it has not been restarted.
💡 To summarize in one sentence: There are four groups that are really commonly encountered - Connection authentication (
ANTHROPIC_API_KEY/BASE_URL/MODEL), timeout (API_TIMEOUT_MSdefault 10 minutes), privacy (DISABLE_TELEMETRY/DO_NOT_TRACK), multiple accounts (CLAUDE_CONFIG_DIR); be sure to restart after changingclaudeonly takes effect.
05 Priority: The same thing can be set up in several places, who has the final say?
After learning this, you will have a natural question: **The model can be set using ANTHROPIC_MODEL, selected using the /model command, and the model field can be written in settings.json - all three are set, who listens? **
This is what “precedence” answers. **If you don’t figure it out, you will encounter the supernatural phenomenon of “I obviously set it up, but it doesn’t work.” **
First remember the first general outline given by the official - Environment variables > Setting fields:
When the same behavior has both environment variables and settings fields, the environment variables take precedence. For example,
ANTHROPIC_MODELoverrides themodelsetting. The settings field applies when the environment variable is not set.
**Analogy: What the boss says to his face trumps the employee handbook. ** The employee handbook (field of settings.json) says in black and white “The reimbursement for taxi rides is capped at NT$50”; but today your boss tells you in person that “this trip is far, so you will be reimbursed for the taxi ride” (environment variable) - Of course you will listen to what your boss said to your face for this trip. Environment variables are the phrase “explained face to face” and have priority over hard-coded fields in the manual. When the boss doesn’t give special instructions (environment variables are not set), then go back and follow the manual (setting fields).
But there is a counter-intuitive turning point here, and novices are most likely to fall into trouble: **not all environment variables can be suppressed. ** The official specifically named the model:
--modeland/modeloverrideANTHROPIC_MODEL.
In other words, the model chain is like this:
/model 命令 / --model 标志   ←  最优先(你当场的选择)
        ↓ 盖过
ANTHROPIC_MODEL 环境变量      ←  其次
        ↓ 盖过
settings.json 的 model 字段   ←  兜底
Why is the model reversed here? In fact, it is very reasonable - **You manually cut /model in the session, which is the clear intention of “I want to use this now”. Of course, it should override the environment variable you set before. ** This is the same logic as “the boss’s words in person override the manual”: ** The more “on the spot and clear” the instruction, the higher the priority. **
| Configuration method | Relative priority | One sentence |
|---|---|---|
/model command / --model flag | HIGHEST | Explicit selection on the spot in your session/on startup |
ANTHROPIC_MODEL environment variable | Medium | Your preset default |
The model field of settings.json | Don’t worry about it | Use it when none is set |
Note: This “command/flag overrides environment variables” is a rule for model configuration and is not universally applicable. The official words remind you that different functions interact differently** - for example,
CLAUDE_CODE_EFFORT_LEVELwill override the/effortcommand. So when you are not sure about a specific variable, go back to the official variable table and check the description of its row, and don’t take it for granted.
It’s easy to make this mistake once: I wrote ANTHROPIC_MODEL in settings.json, but in a certain session, I randomly cut a certain one in /model, and forgot about it after cutting it——I have been using the temporarily cut one in the second half, and I am still wondering why it is different from the configured one. In fact, the reason is very straightforward: /model was selected on the spot and should have overridden the preset environment variables. **This is not a bug, it is design. **
💡 One sentence summary: The general outline is environment variables > setting fields (the boss’s face-to-face words trump the employee manual); but there are exceptions for models -
/model/--modelThis “clear instruction on the spot” in turn trumpsANTHROPIC_MODEL; the rule is “the more on-the-spot, the clearer, the higher the priority.” If you are not sure, check the official line of instructions.
06 Hands-on: Set up a variable and verify with your own hands that it really takes effect
Without practice, environmental variables will always be separated. Let me walk you through the minimum closed loop: Set a variable → Enter the session → Confirm that it really takes effect. **The whole process does not rely on any existing complex configurations and can be completed in a few minutes. **
We use BASH_DEFAULT_TIMEOUT_MS (the default timeout of the bash command) for practice - we chose it because it is safe, observable, and does not affect the connection if it is corrected.
Step one: first look at the default state (in the terminal, before starting claude)
Don’t set anything, just open a session:
claudeOnce inside, let it run a sentence asking it for the current bash timeout:
我现在的 bash 命令默认超时是多少毫秒?读一下你环境里的 BASH_DEFAULT_TIMEOUT_MS,没设的话就说默认值Expectation: It will tell you that this variable is not set explicitly and will default to 120000 (2 minutes). Remember this baseline value and compare it later. Then exit the session (hit /exit or Ctrl+C twice).
Step 2: Use shell to temporarily set a value and then open a session
Return to the terminal, temporarily export a different value (set to 5 minutes), and then open a session:
export BASH_DEFAULT_TIMEOUT_MS="300000"
claude
Windows PowerShell with:
$env:BASH_DEFAULT_TIMEOUT_MS = "300000"thenclaude.
After entering, Ask the same question:
我现在的 bash 命令默认超时是多少毫秒?Expectation: This time it should read 300000 (5 minutes) instead of the default 120000. **Seeing the value change from 120000 to 300000 = your temporary settings were actually read. ** This verifies that “Method 1: Shell Temporary Settings” really works.
Step 3: Verify “Turn off the terminal and it will be gone”
Exit the session, close the terminal window completely, reopen a new one, directly claude (export nothing this time), and ask the same question again.
Expected: Back to 120000 (default). Because export is only effective for the terminal that has been closed - This personally confirms the point in Section 02 that “the shell is temporarily set, and it will disappear when the terminal is closed.”
Step 4 (optional): Write to settings.json and make it persistent
If you want this value to be long-term and independent of the startup method, write it into settings.json. The safest thing is to write it into a file that belongs only to you and is not on git:
{
  "env": {
    "BASH_DEFAULT_TIMEOUT_MS": "300000"
  }
}
Write into
.claude/settings.local.json(current project root, not entering git), or~/.claude/settings.json(your home directory, common to all projects), select according to the scope you want - refer to the table in Section 03.
After saving, open a new terminal, directly claude (without export), and ask again - this time it is time to read 300000 stably, and no matter how you start claude in the future, it will still. This is the advantage of “Method 3: Write to settings.json” compared to shell temporary settings: **Write it once, no need to go back to export. **
After running these four steps, you will have gone through the entire link of the environment variable “Setting → Verification Validation → Verification Scope → Persistence” by yourself. **The essence of setting any variables in the future is this: first temporarily test whether it works, and then move it to settings.json to solidify it after confirming it. **
💡 In one sentence: To verify whether a variable is valid, the most stable way is to “ask Claude the value it read”; first use the shell temporary
exportto test (it will disappear after closing the terminal), confirm that it works, and then write it intosettings.jsonfor persistence - go through this link by yourself, and the environment variables will no longer be mysterious.
07 Summary
In this article, we dive below the water’s surface and understand and understand the row of “master switches”—environment variables—that control the underlying behavior of Claude Code.
To sum up, the core of the whole article is about five things: what it manages, where it is set, which file it is written to, what the commonly used ones look like, and whose instructions are set in many places. A table is strung together:
| Things you need to know | Answers | Key points |
|---|---|---|
| What do environment variables control | Low-level behaviors such as connection, authentication, timeout, and privacy | Key-value pair switches read at startup, “set once to take effect long-term” |
| Where to set | Shell temporary / ~/.zshrc / env of settings.json | Select according to the effective range, recommended for long-term use settings.json |
| Which settings file to write to | Home directory / project root (enter git) / .local (do not enter git) | Don’t enter git if you have credentials |
| Which ones are most commonly used | ANTHROPIC_*, API_TIMEOUT_MS, DISABLE_TELEMETRY, CLAUDE_CONFIG_DIR | Each has a default value, and it will take effect after restart after changing it |
| Listening to whom is set in many places | Environment variables > Setting fields; but /model overrides ANTHROPIC_MODEL | The clearer the situation, the higher the priority |
You should now be able to: Understand what environment variables control in Claude Code, know the effective scope of each of the three setting methods, understand who enters git and who does not enter the four types of settings.json files, understand the most commonly used variables such as connection/timeout/privacy/multiple accounts, and understand who should listen when the same thing can be set in multiple places. What’s more important - **You set a variable yourself, verified that it really takes effect, and you also saw the difference between “it disappears when you close the terminal” and “it persists when you write it to a file”. ** Once this layer of window paper is pierced, the environmental variables will change from “high-level metaphysics” to switches that you can flip at will.
Going back to the beginning sentence: **Environmental variables are never “touched only by advanced people”, but “set once and benefit for life”. ** The awkwardness of “having to set it manually every time” in your previous forty-one articles can probably be solved once and for all with a variable.
Next article 43 “Git Workflow” - Environment variables help you understand the underlying behavior of Claude Code. Next, it is time to truly integrate it into your daily development rhythm. When it comes to development, Git is unavoidable: let Claude help you write commit messages, sort out diffs, open PRs, and handle conflicts… How can it help you with Git, and what pitfalls should you keep an eye on? Let’s talk about it in the next article. Think about it: **You are willing to let AI git commit for you, but when git push is to the production branch, do you dare to let go? **